AWSの生成AIサービス、Amazon Bedrockを使った最も基本的な機能の最新ハンズオンです。
- Bedrockナレッジベース(RAG構築機能)
- Bedrockエージェント(AIエージェント構築機能)
AgentCoreの登場で出番が少なくなったBedrock Agentsですが、実は最新の
Claudeモデルでもちゃんと動きます!
GUIで構築できるので、「いきなりコード書くのはちょっと…」な非エンジニアの方が、初めてのAIエージェントを作る際には今でも良い選択肢だと思います。
また、RAGもS3 Vectorsの出現で非常に安く構築できるようになったので、令和最新版のフルサーバーレスなAIアプリをAmplifyで作ってみましょう。
すべて東京リージョン対応です!
前提条件
- AWSアカウントを作成する(使い捨てやすいよう、不要メルアドでの作成を推奨)
- GitHubアカウントを作成する(Amplify用。既存アカウントでもOK)
0. 環境準備編
IAMユーザーの作成
- AWSマネジメントコンソールにサインインし、リージョンを東京に変更
- AdministratorAccessポリシーを付与した新規IAMユーザーを作成
- ルートユーザーの場合はサインアウトし、作成したIAMユーザーでサインイン
すべてAWS東京リージョンを利用します。こまめに現在のリージョンを確認してください!
開発環境の作成
- マネコンで「Amazon SageMaker AI」を検索して移動
- シングルユーザー向けの設定
- 6分ほどかかるので、画面左上のAWSアイコンを右クリック > 新しいタブで作業続行
Cloud9は無くなりましたが、この旧SageMakerのコードエディタはローカル起動アプリの画面プレビューもできるため、AWS完結の開発環境として割と便利です。
1. RAG構築編
Claudeの利用申請&プレイグラウンド体験
- マネコンでBedrockを検索して移動
- テキストのプレイグラウンド > モデルを選択
- Anthropic / Claude Sonnet 4.5 / JP Anthropic Claude Sonnet 4.5
- フォームが出現した場合は回答する
-
KAGAI Learning Hubって何?と質問してみる
RAGデータソースの作成
- マネコンでS3を検索して移動
- バケットを作成
- バケット名:
rag-<あなたのニックネーム>-<年月日8ケタ>
- バケット名:
- バケットに社内文書(以下サンプル)をアップロード
ナレッジベースの作成
- マネコンでBedrockを検索して移動
- ナレッジベース > 作成 > ベクトルストアを含むナレッジベース
- ステップ1: そのまま次へ
- ステップ2
- S3のURI: Sを参照 > 先ほどのバケットを選択
- 解析戦略: パーサーとしての基盤モデル
- 解析用の基盤モデルを選択: Anthropic / Claude Sonnet 4.5 / JP Anthropic Claude Sonnet 4.5
- チャンキング戦略: 階層型チャンキング
- ステップ3
- 埋め込みモデル: Amazon / Titan Text Embeddings V2
- ベクトルストア: Amazon S3 Vectors
- 30秒ほどで作成完了後、データソースをチェックして「同期」
- 30秒ほど待機し、正常終了を確認する
- 待ってる間に「ナレッジベースID」をメモしておく(後で使う)
LLMを使ったマルチモーダルパース(図表も画像にして解釈)と、階層型チャンキングが今回の精度向上チューニングです。
2. RAG動作確認編
単体テスト
- 「ナレッジベースをテスト」
- モデルを選択 > Anthropic / Claude Sonnet 4.5 / JP Anthropic Claude Sonnet 4.5
-
KAGAI Learning Hubって何?と質問してみる
開発環境の作成(続き)
- SageMakerのタブに戻る > Open Studio
- 新しいタブが開くが、一旦SageMakerのタブに戻る
- アプリケーション設定 > Code Editor > 編集
- アイドルシャットダウンを有効にする > 60 (分) > 送信
- マネコンで「IAM」を検索して移動
- ロール >
AmazonSageMaker-ExecutionRoleを検索 - 「最後のアクティビティ」が最新のものをクリック
- アクセス許可を追加 > ポリシーをアタッチ
-
AmazonBedrockFullAccessを検索して追加
- ロール >
- SageMaker Studioのタブに戻る
- Skip Tour for now
- Code Editor
- Create Code Editor space
- Name: handson > Create space
- Instance: ml.t3.large > Run space
- 30秒待機 > Open Code Editor
- コードエディタ(開発環境)が開く
- ブラウザの機能で文字サイズ少し拡大しておく
- 左ペイン「Explorer > Open Folder」
-
/home/sagemaker-user/のままOK - 「Do you trust...」ダイアログが出たら承認
- 右上
日アイコンでターミナルを表示 - ポップアップは全部閉じる
- 隠しフォルダを非表示にする(下記コマンド後、ブラウザをリロード)
cat << 'EOF' > ~/sagemaker-code-editor-server-data/data/User/settings.json
{
  "files.exclude": {
    "**/.*": true,
    "**/sagemaker-*": true,
    "**/user-default-*": true
  }
}
EOF
最小スペックのインスタンスだと、後続のNode.jsパッケージをインストールするあたりでメモリ枯渇するので、一つ上のサイズを使っています。
フロントエンドの開発(Streamlit)
- 左サイドバーのエクスプローラー内を右クリック > New File
-
rag.pyを作成 - 内容に以下を貼り付け
-
import streamlit as st
import boto3

# タイトルとサイドバーの表示
st.title("おしえて! Bedrock")
with st.sidebar:
    knowledge_base_id = st.text_input("ナレッジベースID", placeholder="XXXXXXXXXX")

# Bedrock APIクライアントの作成
client = boto3.client("bedrock-agent-runtime")

# メッセージ送信を待機
if prompt := st.chat_input("メッセージを入力してください"):
    # ユーザーメッセージを表示
    with st.chat_message("user"):
        st.markdown(prompt)

    # Knowledge Baseへのストリーミングクエリ
    with st.chat_message("assistant"):
        response = client.retrieve_and_generate_stream(
            input={"text": prompt},
            retrieveAndGenerateConfiguration={
                "type": "KNOWLEDGE_BASE",
                "knowledgeBaseConfiguration": {
                    "knowledgeBaseId": knowledge_base_id,
                    "modelArn": "jp.anthropic.claude-sonnet-4-5-20250929-v1:0",
                },
            },
        )

        # ストリーミングレスポンスの受け皿を準備
        answer = ""
        citations = []
        text_placeholder = st.empty()
        text_placeholder.status("回答を生成中…")

        # レスポンスを見て、テキストもしくは引用を検出
        for event in response["stream"]:
            if "output" in event:
                chunk = event["output"].get("text", "")
                answer += chunk
                text_placeholder.markdown(answer)

            if "citation" in event:
                for ref in event["citation"].get("retrievedReferences", []):
                    location = ref.get("location", {})
                    if "s3Location" in location:
                        uri = location["s3Location"].get("uri", "")
                        if uri and uri not in citations:
                            citations.append(uri)

        # 引用元があれば表示
        if citations:
            with st.expander("引用元", expanded=True):
                for c in citations:
                    st.write(f"- {c}")
Pythonの短いコードでモダンなフロントエンドが書けるのは良いですよね!
もしAWSにデプロイする際は、ECS Express Modeを使うと便利です。
動作確認
- 以下コマンドで起動
pip install streamlit
streamlit run rag.py
- 右下ポップアップの「Open in Browser」
- 先ほどコピーした「ナレッジベースID」を入力して
KAGAI Learning Hubって何?と質問 - 動作確認できたら、ターミナルで
Ctrl + Cで停止
3. AIエージェント構築編
上記のRAGと組み合わせて「パワポ作成してメールでURL送ってくれるエージェント」を作ります。
Bedrockエージェントの作成
- マネコンで「Bedrock」を検索して移動
- エージェント > エージェントを作成 > 作成
- モデルを選択
- 「最適化済み Bedrock エージェント」のチェックを外す
- Anthropic / Claude Sonnet 4.5 / JP Anthropic Claude Sonnet 4.5
- エージェント向けの指示:
ユーザーからの依頼をもとに、Web検索やナレッジベースから情報収集を行い、PowerPointでスライド資料を作成してください。作成した資料のURLは、メールでユーザーへ送付してください。なお現在は2026年です。 - いったん「保存」ボタンを押す
- アクショングループ > 追加
- アクショングループ関数 1
- 名前:
search-web - パラメータ
- 名前:
query/ 説明:検索クエリー
- 名前:
- 名前:
- アクショングループ関数を追加 > アクショングループ関数 2
- 名前:
create-pptx - 説明:
content引数には、空行で区切って複数スライドを指定してください。各ブロックの1行目がスライドタイトル、2行目以降が本文です。箇条書きは各スライド4点以内に収めてください。行頭記号は自動付与されるため、記号を含めないこと。 - パラメータ
- 名前:
title/ 説明:スライドのタイトル - 名前:
content/ 説明:スライドの内容
- 名前:
- 名前:
- アクショングループ関数を追加 > アクショングループ関数 3
- 名前:
send-email - パラメータ
- 名前:
url/ 説明:資料のURL
- 名前:
- 名前:
- 「作成」をクリック
- アクショングループ関数 1
- ナレッジベース > 追加
- プルダウンから先ほどのKBを選択
- エージェント向けのナレッジベースの指示:
KAGAI Learning Hubについての情報が格納されています。 - 「Add」をクリック
- 保存して終了
- 右サイドバーの「準備」をクリック
- 「許可」のIAMロールをクリック
- アクセス許可を追加 > ポリシーをアタッチ
-
AmazonBedrockFullAccessを検索して追加
- モデルを選択
一つのアクショングループ(Lambda関数)に3つのツールを集約しています。これにより、Lambdaの設定手順がシンプルになります。
最後のIAMポリシー追加作業はAgentsのバグ対策です。。
Tavily APIキーの取得
- 以下より、GitHubアカウントでサインアップ
- APIキー取得画面を開いておく
Google検索するためだけにGoogle Cloudのアカウント用意するのはちょっと…という方向けに、LLM特化のTavilyは検索精度が高く無料枠も多いので、AIエージェント検証にぴったりの製品です。
パワポ保存用S3の作成
- マネコンで「S3」 > バケットを作成
- バケット名:
pptx-<あなたのニックネーム>-<年月日8ケタ> - バケット名はメモしておく(後で使います)
- バケット名:
メール通知用SNSの作成
- マネコンで「Simple Notification Service」を検索して移動
- トピック名:
pptx-agent> 次のステップ > トピックの作成 - ARNをメモしておく(後で使います)
- サブスクリプションの作成
- プロトコル: Eメール
- エンドポイント: あなたのEメール(パワポが開けるPCのもの)
- トピック名:
- メールを確認して「Confirm subscription」をクリックしておく
サブスクリプションをアレンジすれば、SMSなどにも通知可能です。
Lambdaレイヤーの作成
- コードエディタに戻り、以下を実行
# 新規フォルダにpython-pptxをインストール
mkdir python
pip install python-pptx -t python

# パッケージをZIPに圧縮
sudo apt-get install -y zip unzip
zip -r layer.zip python
- 左サイドバーのエクスプローラーを更新
-
layer.zipを右クリック > Download - 数秒待ってもダウンロードされない場合は、ブラウザをリロードしてみてください
-
Lambda関数の設定
- マネコンで「Lambda」を検索して移動
- レイヤー > レイヤーを作成
- 名前:
python-pptx - ファイルを選択 > layer.zip
- 互換性のあるアーキテクチャ: x86_64
- 互換性のあるランタイム: Python 3.12
- 名前:
- 左サイドバーを開く > 関数 > action_group_quick_start_XXXXX-XXXXX
- コードソースに以下を貼り付け
import json
import os
import boto3
import urllib.request
from io import BytesIO
from datetime import datetime
from pptx import Presentation


# Lambdaのメイン関数
def lambda_handler(event, context):
    print(f"Received event: {json.dumps(event)}")

    # イベントから必要な情報を取り出す
    action_group = event.get("actionGroup", "")
    function_name = event.get("function", "")
    parameters = {p["name"]: p["value"] for p in event.get("parameters", [])}

    # 呼び出された機能ごとに処理を分岐
    if function_name == "search-web":
        result = search_web(parameters.get("query", ""))
    elif function_name == "create-pptx":
        result = create_pptx(parameters.get("title", "無題"), parameters.get("content", ""))
    elif function_name == "send-email":
        result = send_email(parameters.get("url", ""))
    else:
        result = {"error": f"Unknown function: {function_name}"}

    # Bedrock Agents用のレスポンス形式で返す
    return {
        "messageVersion": "1.0",
        "response": {
            "actionGroup": action_group,
            "function": function_name,
            "functionResponse": {
                "responseBody": {
                    "TEXT": {"body": json.dumps(result, ensure_ascii=False)}
                }
            }
        }
    }


# Web検索する関数
def search_web(query: str) -> dict:
    # リクエストボディを作成
    data = json.dumps({
        "api_key": os.environ["TAVILY_API_KEY"],
        "query": query
    }).encode("utf-8")

    req = urllib.request.Request(
        "https://api.tavily.com/search",
        data=data,
        headers={"Content-Type": "application/json"}
    )

    # Tavily APIを呼び出して結果を整形
    with urllib.request.urlopen(req, timeout=30) as res:
        response = json.loads(res.read().decode("utf-8"))

    results = [
        {"title": r["title"], "url": r["url"], "content": r["content"]}
        for r in response.get("results", [])
    ]
    return {"query": query, "results": results}


# パワポ作成する関数
def create_pptx(title: str, content: str) -> dict:
    prs = Presentation()

    # タイトルスライドを作成
    slide = prs.slides.add_slide(prs.slide_layouts[0])
    slide.shapes.title.text = title
    slide.placeholders[1].text = f"作成日: {datetime.now().strftime('%Y年%m月%d日')}"

    # コンテンツを空行で分割して、各ブロックをスライドにする
    for slide_content in content.strip().split('\n\n'):
        if not slide_content:
            continue
        slide = prs.slides.add_slide(prs.slide_layouts[1])
        lines = slide_content.split('\n')
        # 1行目をスライドタイトル、2行目以降を本文にする
        slide.shapes.title.text = lines[0].lstrip('- #')
        if len(lines) > 1:
            slide.placeholders[1].text = '\n'.join(line.lstrip('- ') for line in lines[1:])

    # メモリ上に保存してS3にアップロード
    pptx_buffer = BytesIO()
    prs.save(pptx_buffer)
    pptx_buffer.seek(0)

    s3 = boto3.client("s3")
    bucket = os.environ["S3_BUCKET"]
    file_key = f"slide_{datetime.now().strftime('%Y%m%d_%H%M%S')}.pptx"
    s3.upload_fileobj(pptx_buffer, bucket, file_key)

    # ダウンロード用の署名付きURLを生成(1時間有効)
    presigned_url = s3.generate_presigned_url(
        "get_object",
        Params={"Bucket": bucket, "Key": file_key},
        ExpiresIn=3600
    )
    return {"message": "PowerPoint created successfully", "download_url": presigned_url}


# メール送信する関数
def send_email(url: str) -> dict:
    response = boto3.client("sns").publish(
        TopicArn=os.environ["SNS_TOPIC_ARN"],
        Subject="Bedrock Agentsがパワポを作成しました",
        Message=f"以下のURLからダウンロードできます:\n{url}"
    )
    return {"message": "Email sent successfully", "message_id": response["MessageId"]}
Tavilyへのリクエストは、公式SDKを使うとLambdaレイヤーに必要なパッケージが増えるため、通常のHTTPリクエストを組んでいます。
- 「Deploy」をクリック
- 画面下「レイヤーの追加」
- カスタムレイヤー > python-pptx > バージョン1 > 追加
- 「設定」タブ
- 一般設定 > 編集 > タイムアウト: 30秒 > 保存
- アクセス権限 > ロール名をクリック
- アクセス許可を追加 > ポリシーをアタッチ
-
AmazonS3FullAccessとAmazonSNSFullAccessを追加
- 環境変数 > 編集
-
TAVILY_API_KEY/ 値: TavilyのAPIキー -
S3_BUCKET/ 値: パワポ用S3バケットの名前 -
SNS_TOPIC_ARN/ 値: SNSトピックのARN
-
4. AIエージェント動作確認編
単体テスト
- Bedrock > エージェント > 先ほど作成したエージェントをクリック
- 右サイドバーからテスト
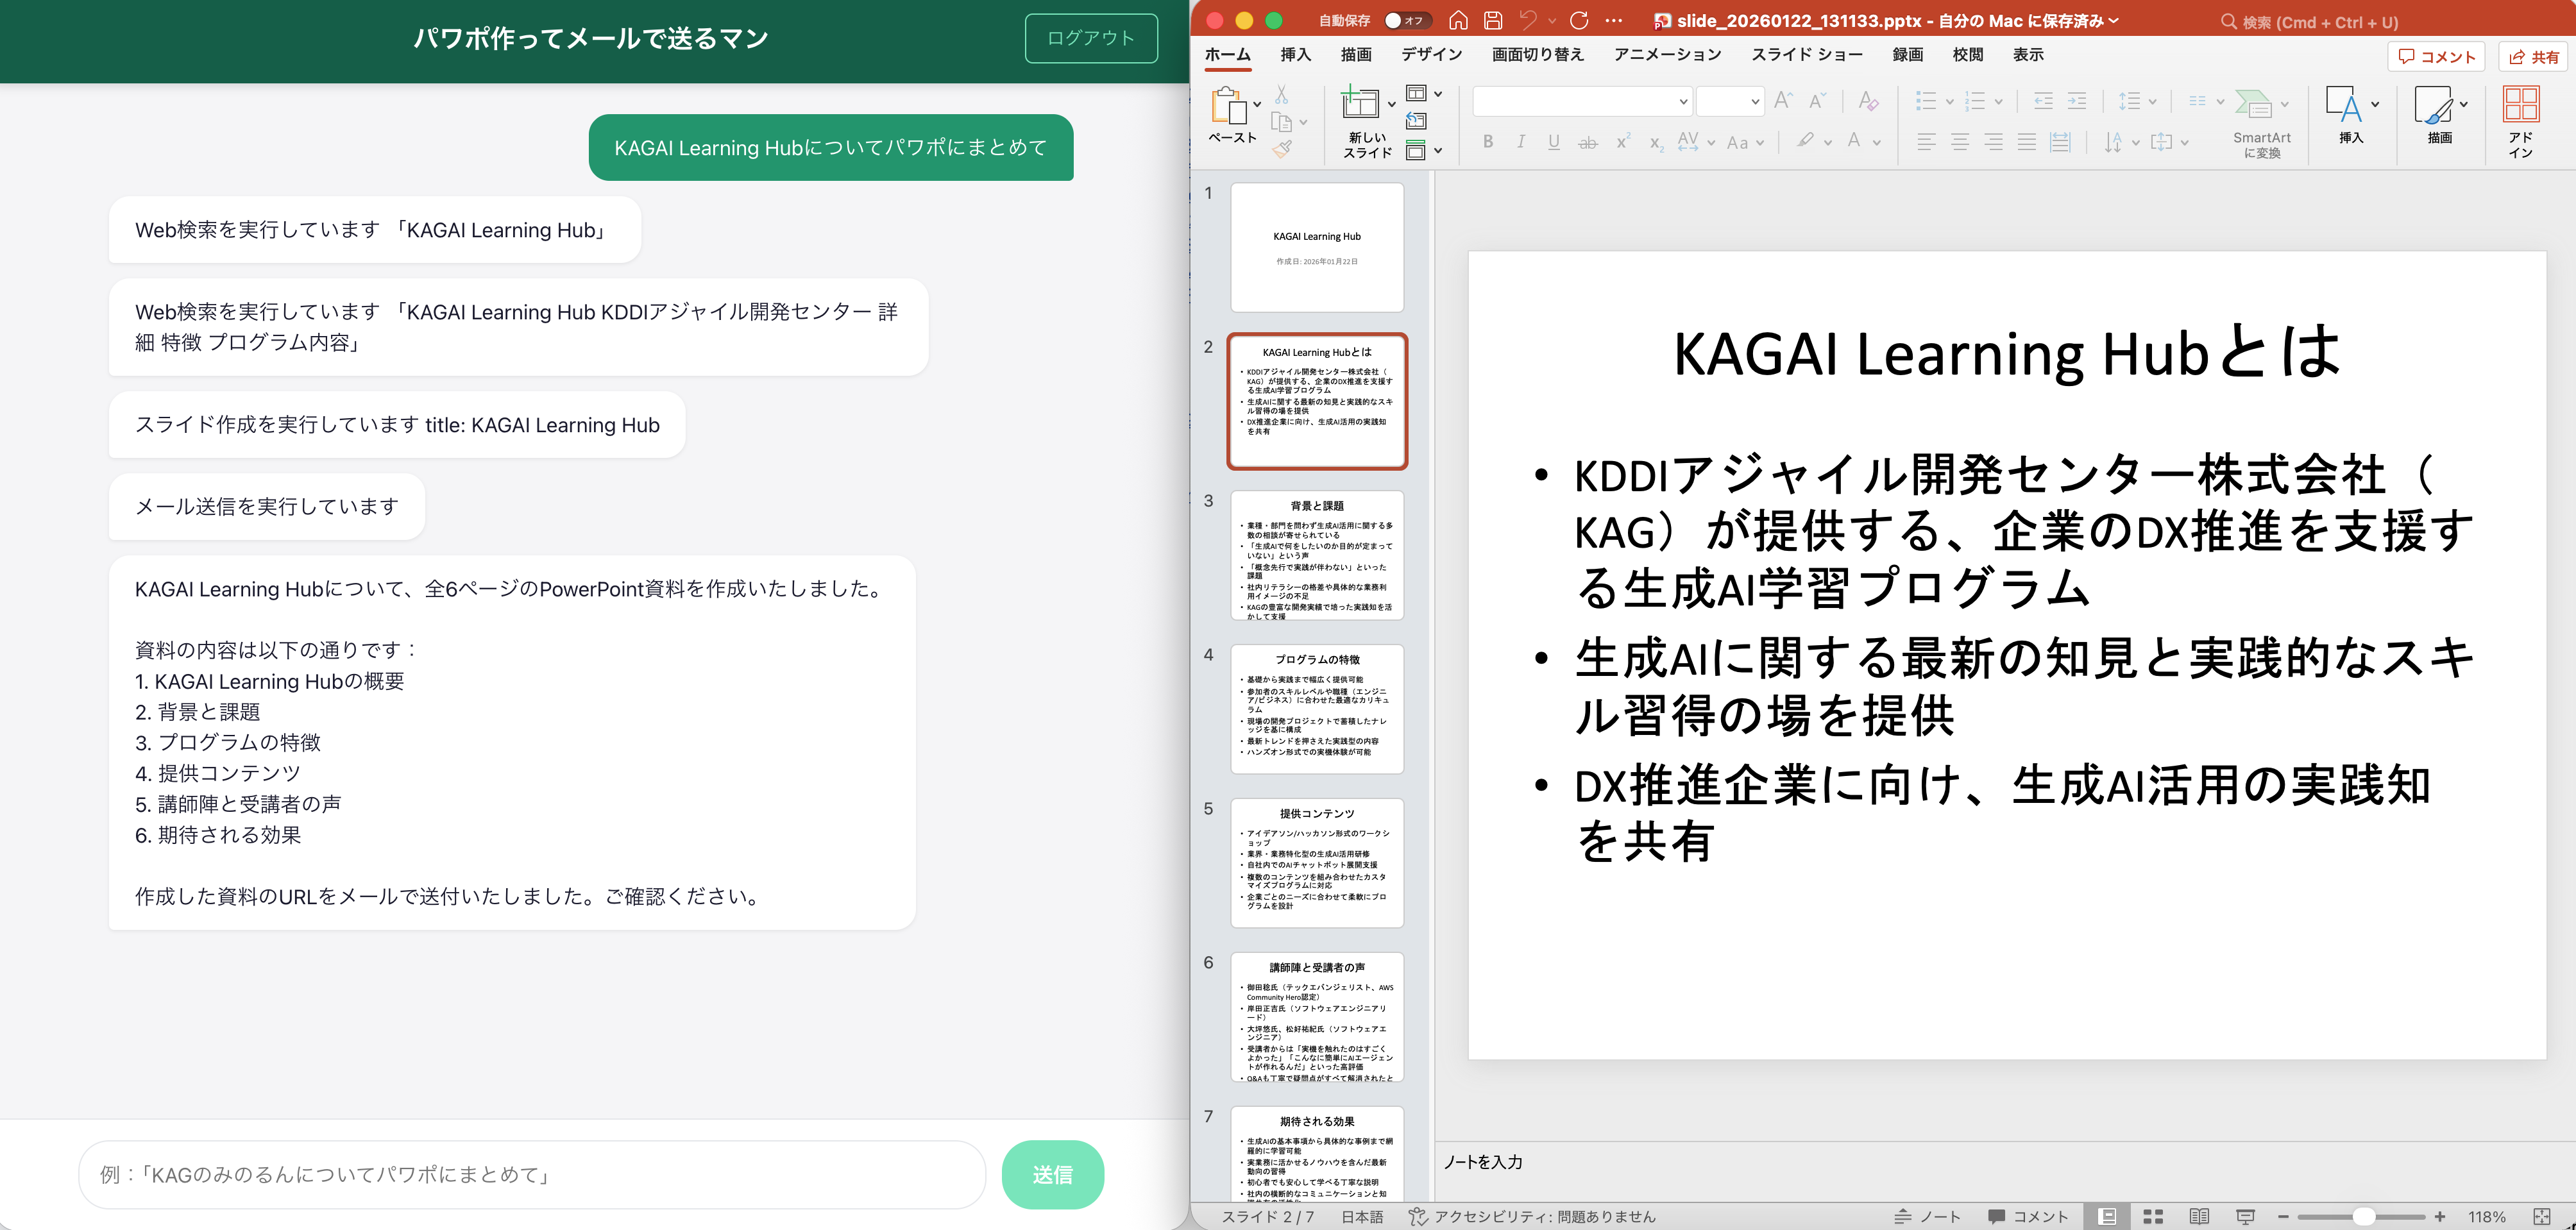
KAGAI Learning Hubについてパワポにまとめて
- エイリアスを作成 > エイリアス名:
v1> エイリアスを作成 - エージェントのIDと、画面下側のエイリアスIDをメモしておく(後で使います)
フロントエンドの開発(React)
- 以下の「Create repository from template」をクリック
-
https://docs.amplify.aws/react/start/quickstart/
- Repository name:
pptx-agent - Choose visibility: Private
- Repository name:
- 作成後「Code > HTTPS」のURLをコピーしておく
-
https://docs.amplify.aws/react/start/quickstart/
- コードエディタで以下コマンドを実行
# Gitの初期設定
git config --global user.name "<GitHubユーザー名>"
git config --global user.email "<GitHub登録メルアド>"

# 上記のリポジトリをクローン
git clone <リポジトリURL.git>
- GitHubの認証ポップアップが出たら、画面に従って進める
- クローンしたディレクトリ内の以下ファイルを更新
import { defineBackend } from '@aws-amplify/backend';
import { auth } from './auth/resource';
import { PolicyStatement, Effect } from 'aws-cdk-lib/aws-iam';

const backend = defineBackend({ auth });

// 認証済みユーザーにBedrock Agentsの呼び出し権限を追加
backend.auth.resources.authenticatedUserIamRole.addToPrincipalPolicy(
  new PolicyStatement({
    effect: Effect.ALLOW,
    actions: ['bedrock:InvokeAgent'],
    resources: ['arn:aws:bedrock:ap-northeast-1:*:agent-alias/*/*'],
  })
);
import { StrictMode } from 'react'
import { createRoot } from 'react-dom/client'
import { Amplify } from 'aws-amplify'
import { I18n } from 'aws-amplify/utils'
import { translations } from '@aws-amplify/ui-react'
import outputs from '../amplify_outputs.json'
import './index.css'
import App from './App.tsx'

Amplify.configure(outputs)

// 認証画面の日本語化
I18n.putVocabularies(translations)
I18n.setLanguage('ja')

createRoot(document.getElementById('root')!).render(
  <StrictMode>
    <App />
  </StrictMode>,
)
:root {
  font-family: system-ui, Avenir, Helvetica, Arial, sans-serif;
  line-height: 1.5;
  font-weight: 400;
  color: #213547;
  background-color: #f5f5f7;
  font-synthesis: none;
  text-rendering: optimizeLegibility;
  -webkit-font-smoothing: antialiased;
  -moz-osx-font-smoothing: grayscale;
}

* {
  box-sizing: border-box;
}

html, body, #root {
  margin: 0;
  padding: 0;
  width: 100%;
  height: 100%;
}

/* Amplify Authenticator を中央配置 */
[data-amplify-authenticator] {
  display: flex;
  justify-content: center;
  align-items: center;
  min-height: 100vh;
  background: #E0F2F1;
}
import { useState, useRef, useEffect, useCallback } from 'react'
import { Authenticator } from '@aws-amplify/ui-react'
import { fetchAuthSession } from 'aws-amplify/auth'
import {
  BedrockAgentRuntimeClient, InvokeAgentCommand
} from '@aws-sdk/client-bedrock-agent-runtime'
import '@aws-amplify/ui-react/styles.css'
import './App.css'
import outputs from '../amplify_outputs.json'

// 環境変数から設定を取得
const AGENT_ID = import.meta.env.VITE_AGENT_ID
const AGENT_ALIAS_ID = import.meta.env.VITE_AGENT_ALIAS_ID
const AWS_REGION = outputs.auth.aws_region

// 型定義
interface Message {
  role: 'user' | 'assistant' | 'trace'
  content: string
}

// Lambda関数名をユーザーフレンドリーな日本語に変換
const getFunctionDisplayName = (functionName: string): string => {
  const functionMap: Record<string, string> = {
    'search-web': 'Web検索',
    'create-pptx': 'スライド作成',
    'send-email': 'メール送信',
  }
  return functionMap[functionName] || functionName
}

// アクションのパラメータから表示用の概要を抽出
const getParameterSummary = (params: Array<{ name: string; value: string }>): string => {
  const query = params?.find(p => p.name === 'query')?.value
  return query ? `「${query}」` : ''
}

// メインコンポーネント
function App() {
  // UIの状態管理
  const [inputText, setInputText] = useState('')
  const [isLoading, setIsLoading] = useState(false)
  const [streamingText, setStreamingText] = useState('')
  const [renderKey, setRenderKey] = useState(0)

  // 再レンダリング間で保持する参照
  const sessionIdRef = useRef(crypto.randomUUID())
  const messagesEndRef = useRef<HTMLDivElement>(null)
  const messagesRef = useRef<Message[]>([])

  // 新しいメッセージが追加されたら自動スクロール
  useEffect(() => {
    messagesEndRef.current?.scrollIntoView({ behavior: 'smooth' })
  }, [renderKey, streamingText])

  // メッセージを追加して再レンダリングをトリガー
  const addMessage = useCallback((message: Message) => {
    messagesRef.current.push(message)
    setRenderKey(prev => prev + 1)
  }, [])

  // Bedrock Agentsのトレース情報をパースしてメッセージとして追加
  const addTraceMessage = (trace: unknown) => {
    if (!trace || typeof trace !== 'object') return
    const t = trace as Record<string, unknown>

    if (!t.orchestrationTrace) return
    const ot = t.orchestrationTrace as Record<string, unknown>

    // エージェントの思考を表示
    if (ot.rationale) {
      const rationale = ot.rationale as Record<string, unknown>
      const text = String(rationale.text || '')
      if (text) {
        addMessage({ role: 'trace', content: text })
      }
    }

    // Lambda実行時の情報を表示
    if (ot.invocationInput) {
      const input = ot.invocationInput as Record<string, unknown>
      const actionGroup = input.actionGroupInvocationInput as Record<string, unknown> | undefined
      const knowledgeBase = input.knowledgeBaseLookupInput as Record<string, unknown> | undefined

      if (actionGroup) {
        const functionName = String(actionGroup.function || '')
        const params = actionGroup.parameters as Array<{ name: string; value: string }> | undefined
        const displayName = getFunctionDisplayName(functionName)

        // send-email, create-pptxはパラメータを表示しない
        const paramSummary = (functionName === 'send-email' || functionName === 'create-pptx')
          ? ''
          : (params ? getParameterSummary(params) : '')

        const content = paramSummary
          ? `${displayName}を実行しています… ${paramSummary}`
          : `${displayName}を実行しています…`

        addMessage({ role: 'trace', content })
      }

      // ナレッジベース検索時の情報を表示
      if (knowledgeBase) {
        const query = String(knowledgeBase.text || '')
        const content = query
          ? `ナレッジベース検索を実行しています… 「${query}」`
          : `ナレッジベース検索を実行しています…`

        addMessage({ role: 'trace', content })
      }
    }
  }

  // Bedrock Agents を呼び出し
  const invokeAgent = async (prompt: string) => {
    setIsLoading(true)
    setStreamingText('')
    addMessage({ role: 'user', content: prompt })

    try {
      // Cognito認証情報を取得
      const { credentials } = await fetchAuthSession()
      if (!credentials) {
        throw new Error('認証情報を取得できませんでした')
      }

      // Bedrock Agent クライアントを作成
      const client = new BedrockAgentRuntimeClient({
        region: AWS_REGION,
        credentials,
      })

      // エージェント呼び出しコマンドを作成
      const command = new InvokeAgentCommand({
        agentId: AGENT_ID,
        agentAliasId: AGENT_ALIAS_ID,
        sessionId: sessionIdRef.current,
        inputText: prompt,
        enableTrace: true,
      })

      const response = await client.send(command)
      if (!response.completion) {
        throw new Error('レスポンスがありません')
      }

      // ストリーミングレスポンスを処理
      let fullResponse = ''
      for await (const event of response.completion) {
        if (event.chunk?.bytes) {
          const text = new TextDecoder('utf-8').decode(event.chunk.bytes)
          fullResponse += text
          setStreamingText(fullResponse)
        }
        if (event.trace?.trace) {
          addTraceMessage(event.trace.trace)
        }
      }

      // 最終応答をメッセージに追加
      addMessage({ role: 'assistant', content: fullResponse })
      setStreamingText('')

    } catch (err) {
      console.error('Agent invocation error:', err)
      const errorMessage = err instanceof Error ? err.message : 'エラーが発生しました'
      addMessage({ role: 'assistant', content: `エラー: ${errorMessage}` })
    } finally {
      setIsLoading(false)
    }
  }

  // フォーム送信ハンドラ
  const handleSubmit = (e: React.FormEvent) => {
    e.preventDefault()
    if (!inputText.trim() || isLoading) return
    invokeAgent(inputText.trim())
    setInputText('')
  }

  // メッセージのCSSクラスを決定
  const getMessageClassName = (msg: Message): string => {
    const baseClass = msg.role === 'trace' ? 'assistant' : msg.role
    return `message ${baseClass}`
  }

  // 「考え中…」表示の条件判定
  const shouldShowThinking = (): boolean => {
    if (!isLoading || streamingText) return false
    if (messagesRef.current.length === 0) return false
    return messagesRef.current[messagesRef.current.length - 1]?.role !== 'trace'
  }

  return (
    <Authenticator>
      {({ signOut }) => (
        <div className="app-container">
          {/* ヘッダー */}
          <header className="header">
            <h1>パワポ作ってメールで送るマン</h1>
            <button onClick={signOut} className="logout-btn">
              ログアウト
            </button>
          </header>

          {/* チャットエリア */}
          <div className="chat-area">
            <div className="messages">
              {/* ウェルカムメッセージ */}
              {messagesRef.current.length === 0 && (
                <div className="welcome-message">
                  <p>Bedrock Agentsに資料作成をまかせよう!</p>
                </div>
              )}

              {/* メッセージ一覧 */}
              {messagesRef.current.map((msg, idx) => (
                <div key={idx} className={getMessageClassName(msg)}>
                  <div className={`message-content${msg.role === 'trace' ? ' shimmer' : ''}`}>
                    {msg.content}
                  </div>
                </div>
              ))}

              {/* ストリーミング中のテキスト */}
              {streamingText && (
                <div className="message assistant">
                  <div className="message-content">{streamingText}</div>
                </div>
              )}

              {/* 考え中の表示 */}
              {shouldShowThinking() && (
                <div className="message assistant">
                  <div className="message-content shimmer">考え中…</div>
                </div>
              )}

              <div ref={messagesEndRef} />
            </div>
          </div>

          {/* 入力フォーム */}
          <form onSubmit={handleSubmit} className="input-form">
            <div className="input-form-inner">
              <input
                type="text"
                value={inputText}
                onChange={(e) => setInputText(e.target.value)}
                placeholder="例:「KAGのみのるんについてパワポにまとめて」"
                disabled={isLoading}
              />
              <button type="submit" disabled={isLoading || !inputText.trim()}>
                送信
              </button>
            </div>
          </form>
        </div>
      )}
    </Authenticator>
  )
}

export default App
今回、エージェントIDなどの環境変数や、AWS SDK実行用の一時的な認証情報をフロントエンドに持つ実装となっています。
ハンズオンの簡略化のため、セキュリティ面は最低限の対策となっていますので、本番実装時はさらに堅牢な構成にすることを検討ください。
/* ==================================
   アプリケーション全体
   ================================== */

.app-container {
  display: flex;
  flex-direction: column;
  height: 100vh;
  background: #f5f5f7;
}

/* ==================================
   ヘッダー
   ================================== */

.header {
  display: flex;
  align-items: center;
  justify-content: center;
  position: relative;
  padding: 1.25rem 1.5rem;
  background: #065F46;
  color: white;
  box-shadow: 0 2px 8px rgba(0, 0, 0, 0.15);
}

.header h1 {
  margin: 0;
  font-size: 1.25rem;
  font-weight: 600;
}

.logout-btn {
  position: absolute;
  right: 1.5rem;
  padding: 0.5rem 1rem;
  background: transparent;
  color: #6EE7B7;
  border: 1px solid #6EE7B7;
  border-radius: 6px;
  font-size: 0.875rem;
  cursor: pointer;
  transition: all 0.2s;
}

.logout-btn:hover {
  background: #6EE7B7;
  color: #065F46;
}

/* ==================================
   チャットエリア
   ================================== */

.chat-area {
  flex: 1;
  display: flex;
  flex-direction: column;
  max-width: 800px;
  width: 100%;
  margin: 0 auto;
  min-width: 0;
}

/* ==================================
   メッセージ一覧
   ================================== */

.messages {
  flex: 1;
  overflow-y: auto;
  padding: 1.5rem;
  display: flex;
  flex-direction: column;
  gap: 0.75rem;
}

.welcome-message {
  flex: 1;
  display: flex;
  align-items: center;
  justify-content: center;
  color: #6b7280;
  font-size: 1.125rem;
}

/* ==================================
   メッセージ吹き出し
   ================================== */

.message {
  display: flex;
  max-width: 85%;
  animation: fadeIn 0.3s ease;
}

.message-content.shimmer {
  background: linear-gradient(
    90deg,
    #e8f5e9 25%,
    #c8e6c9 50%,
    #e8f5e9 75%
  );
  background-size: 200% 100%;
  animation: shimmer 1.5s infinite;
}

@keyframes shimmer {
  0% {
    background-position: 200% 0;
  }
  100% {
    background-position: -200% 0;
  }
}

@keyframes fadeIn {
  from {
    opacity: 0;
    transform: translateY(8px);
  }
  to {
    opacity: 1;
    transform: translateY(0);
  }
}

.message.user {
  align-self: flex-end;
}

.message.assistant {
  align-self: flex-start;
}

.message-content {
  padding: 0.875rem 1.25rem;
  border-radius: 16px;
  line-height: 1.5;
  white-space: pre-wrap;
  word-break: break-word;
}

.message.user .message-content {
  background: #059669;
  color: white;
  border-bottom-right-radius: 4px;
}

.message.assistant .message-content {
  background: white;
  color: #1a1a2e;
  border-bottom-left-radius: 4px;
  box-shadow: 0 1px 3px rgba(0, 0, 0, 0.08);
}

/* ==================================
   入力フォーム
   ================================== */

.input-form {
  background: white;
  border-top: 1px solid #e5e7eb;
  padding: 1rem 1.5rem;
}

.input-form-inner {
  display: flex;
  gap: 0.75rem;
  max-width: 800px;
  margin: 0 auto;
}

.input-form input {
  flex: 1;
  padding: 0.875rem 1rem;
  border: 1px solid #e5e7eb;
  border-radius: 24px;
  font-size: 1rem;
  transition: border-color 0.2s;
}

.input-form input:focus {
  outline: none;
  border-color: #059669;
}

.input-form button {
  padding: 0.875rem 1.5rem;
  background: #059669;
  color: white;
  border: none;
  border-radius: 24px;
  font-size: 1rem;
  font-weight: 600;
  cursor: pointer;
  transition: background 0.2s;
}

.input-form button:hover:not(:disabled) {
  background: #047857;
}

.input-form button:disabled {
  background: #6EE7B7;
  cursor: not-allowed;
}

/* ==================================
   スクロールバー
   ================================== */

.messages::-webkit-scrollbar {
  width: 6px;
}

.messages::-webkit-scrollbar-track {
  background: transparent;
}

.messages::-webkit-scrollbar-thumb {
  background: #d1d5db;
  border-radius: 3px;
}

/* ==================================
   レスポンシブ
   ================================== */

@media (max-width: 768px) {
  .chat-area {
    max-width: 100%;
  }

  .message {
    max-width: 90%;
  }

  .header h1 {
    font-size: 1rem;
  }

  .logout-btn {
    padding: 0.4rem 0.75rem;
    font-size: 0.8rem;
  }
}
- 以下コマンドを実行
# プロジェクトディレクトリに移動
cd pptx-agent

# 利用しないデータベース用バックエンドを削除
rm -rf amplify/data

# 必要なパッケージをインストール(2分ほど待機)
npm install

# 必要なパッケージを追加
npm install @aws-sdk/client-bedrock-agent-runtime
npm install tsx --save-dev
- 左ペイン「Source Control」
- メッセージ:
commit - Commit > Yes > Sync Changes > OK
- メッセージ:
Amplifyにデプロイ
- マネコンで「AWS Amplify」を検索して移動
- アプリケーションをデプロイ > GitHub > 次へ
- GItHubアクセス許可を実施する
- 前述のリポジトリとmainブランチを選択 > 次へ
- 詳細設定に環境変数を追加
-
VITE_AGENT_ID/ 先ほどメモしたエージェントID -
VITE_AGENT_ALIAS_ID/ 先ほどメモしたエイリアスID
-
- 次へ > 保存してデプロイ
- 6分ほど待機
ハンズオン会では待機中に上記コードを解説します。
動作確認
- 「デプロイされたURLにアクセス」をクリック > アカウントを作る
- エージェントに
KAGAI Learning Hubについてパワポにまとめてと依頼
他にも、好きなテーマで資料作成を頼んでみましょう!
おかたづけ&料金について
- 今回すべてサーバーレスサービスのみの利用のため、使っていないときの維持費はほぼ掛かりません。
- エージェントの呼び出し一回あたりのコスト目安は、数円〜かかっても数十円レベルです。
- コードエディタは60分で自動停止にしていますが、起動し続けると1時間あたり10円ぐらいかかるので注意。
- Amplifyは誰でもアカウント作成可能な状態で公開されてしまうので、検証終了後は「アプリケーションの設定 > 全般設定 > アプリの削除」を実施ください。
- 検証後はAWSアカウントを解約してしまいましょう。使い捨て運用がオススメです。
慣れてきたら自分用のAWS Organizationsを作って、用途ごとに都度メンバーアカウントを発行すると、使い捨て運用がさらに楽になります!