だいぶ時間が経ってしまいましたが、こちらで初めて名前を聞き、そこで紹介されたこちらでさらに説明を聞いてきたので、早速試してみました。
GraphPipeとは
Oracleが開発した、学習済みモデルを使って、簡単に推論してくれる仕組みです。
細かい話はここを見ていただくのが一番です。
また、日本語の情報としては、ABeam Consultingの澤田様がここで情報発信しています。
どう簡単なの?
従来までの推論の流れは、それぞれのフレームワークで作成した学習済みモデルごとにサーバ側の仕組みを作成し、さらにクライアント側も合わせた形で作成していました。
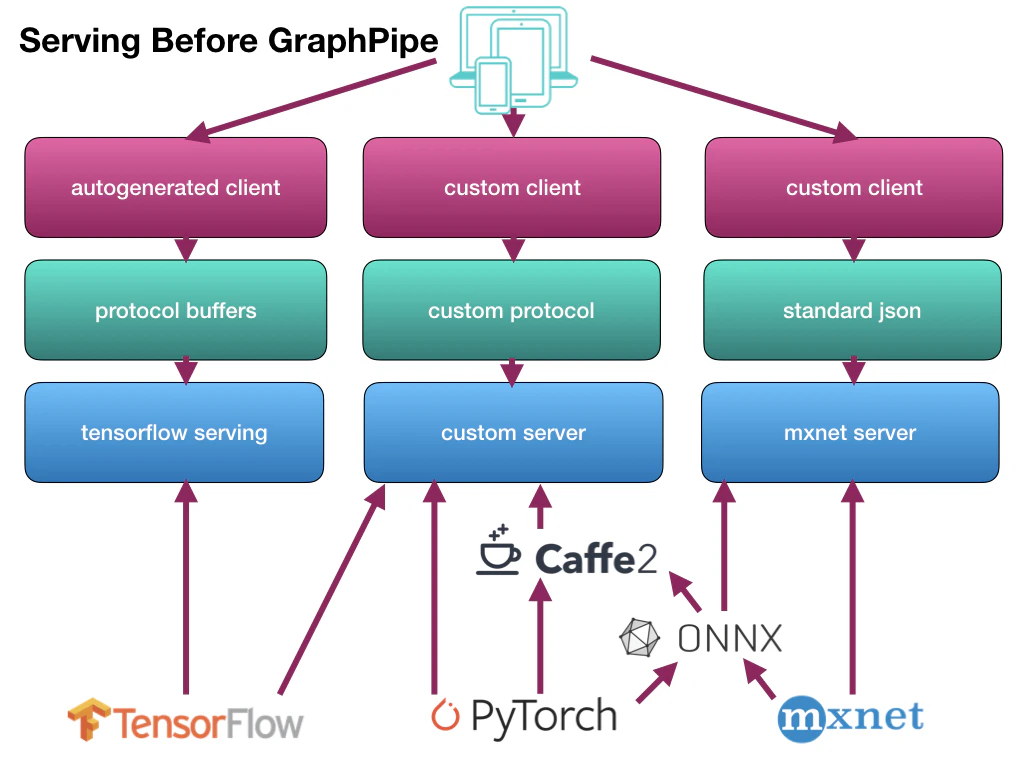
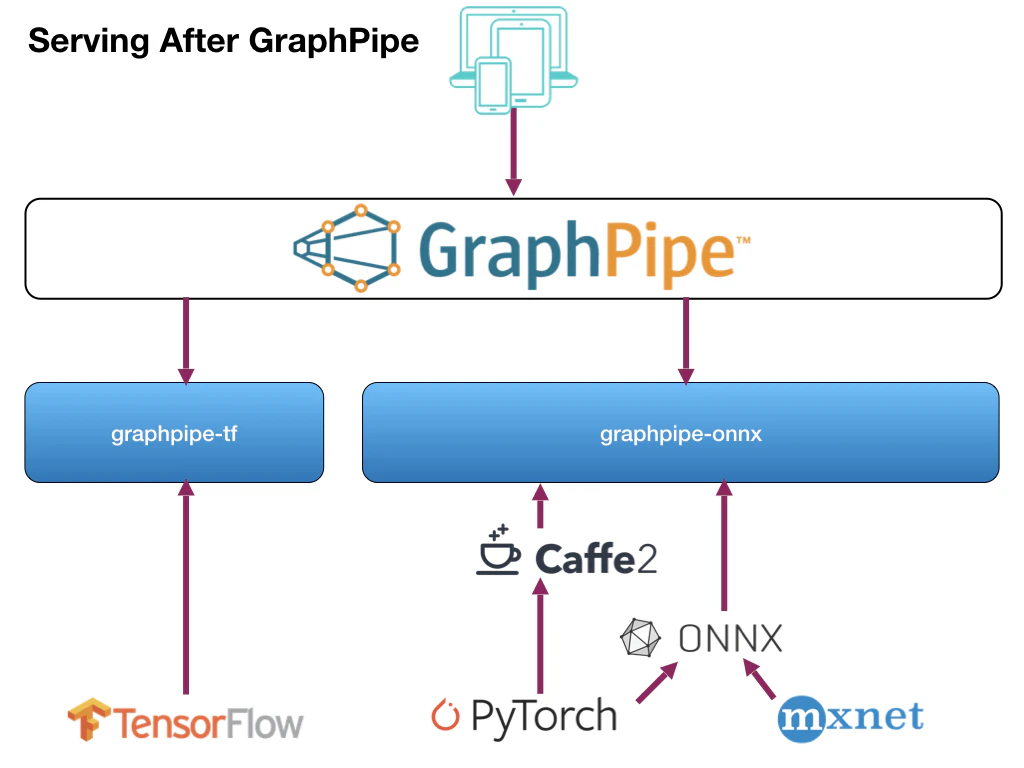
それを、サーバ側/クライアント側とも一本化(サーバ側は2つ)して、らくしましょうという仕組みです。
使い方
サーバ側/クライアント側、それぞれの使い方を見ていきます。
サーバ側
Dockerでサーバアプリを起動します。
> docker run -it --rm \
  -e https_proxy=${https_proxy} \
  -p 9000:9000 \
  sleepsonthefloor/graphpipe-tf:cpu \
  --model=https://oracle.github.io/graphpipe/models/squeezenet.pb \
  --listen=0.0.0.0:9000
実行するイメージは、Docker Hubから取得します。
現在、以下の6種類が用意されています。
- CPU版
- TensorFlow
- sleepsonthefloor/graphpipe-tf:cpu
- ONNX/Caffee2
- sleepsonthefloor/graphpipe-onnx:cpu
- TensorFlow+Oracle Linux
- sleepsonthefloor/graphpipe-tf:oraclelinux-cpu
- ONNX/Caffe2+Oracle Linux
- sleepsonthefloor/graphpipe-onnx:oraclelinux-cpu
- TensorFlow
- GPU版
- TensorFlow
- sleepsonthefloor/graphpipe-tf:gpu
- ONNX/Caffee2
- sleepsonthefloor/graphpipe-onnx:gpu
- TensorFlow
これらを実行するサーバ環境に合わせて選択します。
使用する学習済みモデルは、「--model」で指定します。
「--listen」でポートを指定します。
クライアント側
クライアント側はPython、または、Go言語で開発ができます。
ここではPythonの場合の説明をします。
準備
まずモジュールをインストールします。
> pip install grapepipe
ソースコードの作成
サーバとやり取りするコードを作成します。
ここでは、画像(mug227.png)を渡し、識別結果を受け取るサンプルを作成します。
from io import BytesIO
from PIL import Image, ImageOps
import numpy as np
import requests

from graphpipe import remote

data = np.array(Image.open("mug227.png"))
data = data.reshape([1] + list(data.shape))
data = np.rollaxis(data, 3, 1).astype(np.float32)  # channels first
print(data.shape)

pred = remote.execute("http://127.0.0.1:9000", data)
print(“Expected 504 (Coffee mug), got: %s” % np.argmax(pred, axis=1))
実行
作成したコードを実行します。
> python pred.py
すると、すぐに結果が表示されます。
(1, 3, 227, 227)
Expected 504 (Coffe mug), got: [504]
これは、最初が送った画像のフォーマット、2行目が「正解は504で識別結果も504でした」という意味になります。
なお、実行時にはサーバ側にも実行ログが表示されます。
INFO[0491] Request for / took 195.09784ms
これは、サーバ側での識別にかかった時間が195msですという意味になります。
学習済みモデルの種類
使用できる学習済みモデルは、以下のようになっています。
- TensorFlow
- SavedModel形式
- GraphDef(.pb)形式
- ONNX/Caffe2/PyTorch
- ONNX (.onnx) + value_inputs.json
- Caffe2 NetDef + value_inputs.json
Kerasの出力形式「.h5」からTensorFlowのGraphDef(.pb)への変換は、すでに用意されています。
> curl https://oracle.github.io/graphpipe/models/squeezenet.h5 > squeezenet.h5
> docker run -v $PWD:/tmp/ sleepsonthefloor/graphpipe-h5topb:latest \
  squeezenet.h5 converted_squeezenet.pb
また、Caffe2/PyTorchの場合は、それぞれONNXに変換する必要があります。
参考:GraphDef(.pb)ファイルの保存方法
import tensorflow as tf
from tensorflow.python.framework import graph_util

# グラフを構築する関数
# 学習時とも共通で使える
def build_graph():
    ...
    y = tf.nn.softmax(..., name=‘output’) # 出力層の名前

with tf.Graph().as_default() as graph:
    build_graph()

    with tf.Session() as sess:
        saver = tf.train.Saver()
        saver.restore(sess, ‘checkpoint.ckpt’) # 学習済みのグラフを読み込み

        graph_def = graph_util.convert_variables_to_constants(
            sess, graph.as_graph_def(), [‘output’]) # 出力層の名前を指定

        # プロトコルバッファ出力
        tf.train.write_graph(graph_def, '.', 'graph.pb', as_text=False)
感想
作ったモデルが簡単に検証でき、また、他の人が作ったモデルもすぐに確認できるので、非常に便利です。
データサイエンティストとアプリケーションエンジニアがお互いを意識しないで作業できるのが嬉しいです。