この記事は「いのべこ(富士通システムズウェブテクノロジー)Advent Calendar 2020」の11日目の記事です。
記事の掲載内容は私自身の見解であり、所属する組織を代表するものではありません。
はじめに
Kubernetesのスキルを習得すべく色々機能を試していますが、今回はローリングアップデートの機能を試してみた際の手順などをまとめたいと思います。
ローリングアップデートの機能は、Kubernetesの持つ機能の中でも個人的に一番気になっていて、これによってアプリケーションをダウンタイムなしでアップデートできるとされています。
他のKubernetesが有する機能としては、pod間での負荷分散を行うものなどもあるため、それらが連携することで、どこまで利用者影響なく(既存のTCPコネクションなども考慮してくれるのかなど)アップデートを実行できるのかに興味があり、細かい仕様などを調べる前に実際に試して挙動を見てみることにしました。
確認は、nginxのコンテナイメージとpure-ftpdのコンテナイメージの2つのパターンで行っています。
前提条件
・Kubernetesのクラスタ構築が済んでいる
・試した環境のバージョンは以下
CentOS:7.3
Kubernetes:1.18.2
Calico:3.13.3
Docker:1.13.1-109
参考資料
1.nginxのコンテナイメージのアップデート
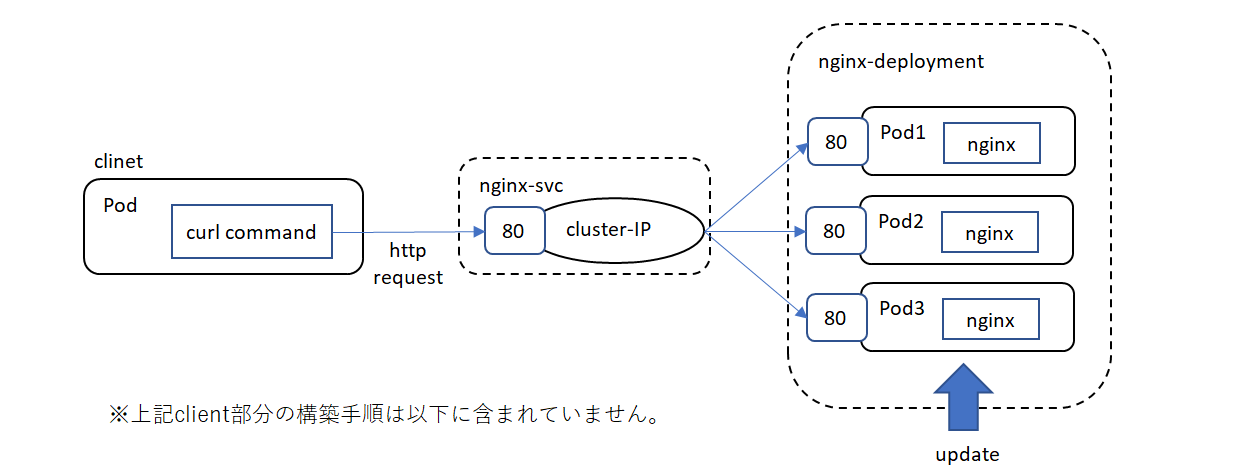
以下の図ような環境でアップデートを実行し、クライアントからのhttpリスエストに対する応答が途切れないか確認しました。

nginxコンテナイメージのデプロイメントとそれにアクセスするサービスの作成
nginxのデプロイメントのyamlファイルを作成します。
apiVersion: apps/v1
kind: Deployment
metadata:
  name: nginx-deployment
  labels:
    app: nginx
spec:
  replicas: 3
  selector:
    matchLabels:
      app: nginx
  template:
    metadata:
      labels:
        app: nginx
    spec:
      containers:
      - name: nginx
        image: nginx:1.14.2
        ports:
        - containerPort: 80
上記ファイルを適用します。
# kubectl apply -f nginx-deployment.yaml
podにアクセスするサービスのyamlファイルを作成します。
kind: Service
metadata:
  name: nginx-svc
spec:
  selector:
    app: nginx
  ports:
  - protocol: TCP
    port: 80
    targetPort: 80
上記ファイルを適用します。
# kubectl apply -f nginx-svc.yaml
ローリングアップデート実行前の準備
サービスに割り当てられたクラスタIP確認します。
# kubectl get service nginx-svc
NAME        TYPE        CLUSTER-IP      EXTERNAL-IP   PORT(S)   AGE
nginx-svc   ClusterIP   10.102.247.25   <none>        80/TCP    46m
今回、図中のclientにあたる、nginxとは別であらかじめ用意しておいたpodから以下のようにクラスタIPに対して連続でHTTPリスエストを発行し、HTTPレスポンスのステータスとサーババージョンを表示します。
※pod上でcurlコマンドが使用できるようにあらかじめyumなどで関連パッケージを導入しておきます。
# while true; do curl -s -i 10.102.247.25 | grep -E 'HTTP|Server'; sleep 1; done
HTTP/1.1 200 OK
Server: nginx/1.14.2
HTTP/1.1 200 OK
Server: nginx/1.14.2
HTTP/1.1 200 OK
Server: nginx/1.14.2
上記を実行している状態で、ローリングアップデート(nginx:1.14.2→1.16)を実行します。
kubectl set image deployment/nginx-deployment nginx=nginx:1.16 --record
上記実行と併せて別terminalで以下を実行し、pod状態の遷移を確認します。
順次、新しいバージョンのnginxのコンテナが作成され、旧バージョンのコンテナが破棄される様子が分かります。
# kubectl get pod -w
NAME                                READY   STATUS              RESTARTS   AGE
nginx-deployment-6b474476c4-fwxgw   1/1     Running             0          28h
nginx-deployment-6b474476c4-m75rr   1/1     Running             0          28h
nginx-deployment-6b474476c4-v2mp4   1/1     Running             0          28h
nginx-deployment-767cbb69b8-bzpg6   0/1     ContainerCreating   0          4s
nginx-deployment-767cbb69b8-bzpg6   1/1     Running             0          11s
nginx-deployment-6b474476c4-v2mp4   1/1     Terminating         0          28h
nginx-deployment-767cbb69b8-8s5lt   0/1     Pending             0          0s
nginx-deployment-767cbb69b8-8s5lt   0/1     Pending             0          0s
nginx-deployment-767cbb69b8-8s5lt   0/1     ContainerCreating   0          0s
nginx-deployment-767cbb69b8-8s5lt   0/1     ContainerCreating   0          1s
nginx-deployment-6b474476c4-v2mp4   0/1     Terminating         0          28h
nginx-deployment-767cbb69b8-8s5lt   1/1     Running             0          1s
nginx-deployment-6b474476c4-fwxgw   1/1     Terminating         0          28h
nginx-deployment-767cbb69b8-hmc9c   0/1     Pending             0          0s
nginx-deployment-767cbb69b8-hmc9c   0/1     Pending             0          0s
nginx-deployment-767cbb69b8-hmc9c   0/1     ContainerCreating   0          0s
nginx-deployment-767cbb69b8-hmc9c   0/1     ContainerCreating   0          1s
nginx-deployment-6b474476c4-fwxgw   0/1     Terminating         0          28h
nginx-deployment-6b474476c4-v2mp4   0/1     Terminating         0          28h
nginx-deployment-6b474476c4-v2mp4   0/1     Terminating         0          28h
nginx-deployment-767cbb69b8-hmc9c   1/1     Running             0          2s
nginx-deployment-6b474476c4-m75rr   1/1     Terminating         0          28h
nginx-deployment-6b474476c4-m75rr   0/1     Terminating         0          28h
nginx-deployment-6b474476c4-fwxgw   0/1     Terminating         0          28h
nginx-deployment-6b474476c4-fwxgw   0/1     Terminating         0          28h
nginx-deployment-6b474476c4-m75rr   0/1     Terminating         0          28h
nginx-deployment-6b474476c4-m75rr   0/1     Terminating         0          28h
アップデート実行中のHTTP応答は以下です。途中でエラーとなることなく新しいバージョンに切り替わりました。
# while true; do curl -s -i 10.102.247.25 | grep -E 'HTTP|Server'; sleep 1; done
HTTP/1.1 200 OK
Server: nginx/1.14.2
HTTP/1.1 200 OK
Server: nginx/1.14.2
HTTP/1.1 200 OK
Server: nginx/1.14.2
HTTP/1.1 200 OK
Server: nginx/1.14.2
HTTP/1.1 200 OK
Server: nginx/1.14.2
HTTP/1.1 200 OK
Server: nginx/1.16.1
HTTP/1.1 200 OK
Server: nginx/1.16.1
HTTP/1.1 200 OK
Server: nginx/1.16.1
2.pure-ftpdのコンテナイメージのアップデート
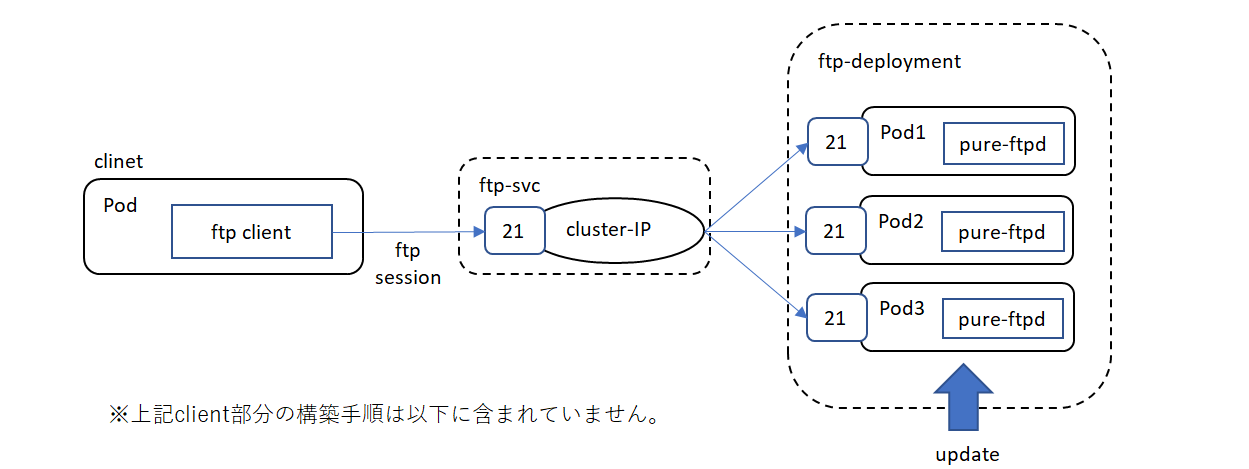
以下の図ような環境でアップデートを実行し、クライアントからのftp接続が切れないか確認しました。

pure-ftpdコンテナイメージのデプロイメントとそれにアクセスするサービスの作成
pure-ftpdのデプロイメントのyamlファイルを作成します。
apiVersion: apps/v1
kind: Deployment
metadata:
  name: ftp-deployment
  labels:
    app: ftp
spec:
  replicas: 3
 selector:
    matchLabels:
      app: ftp
  template:
    metadata:
      labels:
        app: ftp
    spec:
      containers:
      - name: ftp
        image: stilliard/pure-ftpd:latest
        ports:
        - containerPort: 21
上記ファイルを適用します。
# Kubectl apply -f ftp-deployment.yaml
podにアクセスするサービスのyamlファイルを作成します。
apiVersion: v1
kind: Service
metadata:
  name: ftp-svc
spec:
  selector:
    app: ftp
  ports:
  - protocol: TCP
    port: 21
    targetPort: 21
上記ファイルを適用します。
# kubectl apply -f ftp-svc.yaml
ローリングアップデート実行前の準備
ftpアクセスのためのユーザ(test)を登録します。(今回あくまでテストのため、実行中のpodに対して行います※podを再起動するとユーザ情報は消えます)
---------------------------------pod名を確認---------------------------------------
# kubectl get pod
NAME                                READY   STATUS    RESTARTS   AGE
ftp-deployment-6d676859b8-7jcrx     1/1     Running   0          5m13s
ftp-deployment-6d676859b8-8j77h     1/1     Running   0          5m13s
ftp-deployment-6d676859b8-fsm58     1/1     Running   0          5m13s
-----------------------------以下を各podに対し実行----------------------------------
# kubectl exec -it ftp-deployment-6d676859b8-fsm58 -- /bin/sh

# cd /home/ftpusers/
# pure-pw useradd test -f /etc/pure-ftpd/passwd/pureftpd.passwd -m -u ftpuser -d /home/ftpusers/test

Password: ********         (パス)
Enter it again: ********   (パス確認)

# mkdir test
# chown ftpuser:ftpgroup test
# ls -la
サービスに割り当てられたクラスタIPを確認します。
# kubectl get service ftp-svc
NAME      TYPE        CLUSTER-IP     EXTERNAL-IP   PORT(S)   AGE
ftp-svc   ClusterIP   10.98.148.32   <none>        21/TCP    71s
今回、図中のclientにあたる、ftpサーバ用とは別であらかじめ用意しておいたpodから以下のようにftp接続します。
※pod上でftpコマンドが使用できるようにあらかじめyumなどで関連パッケージを導入しておきます。
# ftp 10.98.148.32
Connected to 10.98.148.32.
220---------- Welcome to Pure-FTPd [privsep] [TLS] ----------
220-You are user number 1 of 5 allowed.
220-Local time is now 18:02. Server port: 21.
220-This is a private system - No anonymous login
220-IPv6 connections are also welcome on this server.
220 You will be disconnected after 15 minutes of inactivity.
Name (10.98.148.32:root): test
331 User test OK. Password required
Password:
230 OK. Current directory is /
Remote system type is UNIX.
Using binary mode to transfer files.
ftp> bin
200 TYPE is now 8-bit binary
また、上記ftp接続しているpod上に別terminalで接続し、netstatコマンドでTCPコネクションを確認します。ftp接続しているpodからftpサーバへのコネクション(宛先21番ポート)が確認できます。
※pod上でnetstatコマンドが使用できるようにあらかじめyumなどで関連パッケージ(net-toolsなど)を導入しておきます。
# netstat -an
Active Internet connections (servers and established)
Proto Recv-Q Send-Q Local Address           Foreign Address         State
tcp        0      0 192.168.196.141:60696   10.98.148.32:21         ESTABLISHED
Active UNIX domain sockets (servers and established)
Proto RefCnt Flags       Type       State         I-Node   Path
この状態で、ローリングアップデート(pure-ftpd:latest→wheezy-1.0.36)を実行します。
# kubectl set image deployment/ftp-deployment ftp=stilliard/pure-ftpd:wheezy-1.0.36 --record
deployment.apps/ftp-deployment image updated
上記実行と併せて別terminalで以下を実行し、pod状態の遷移を確認します。
順次、新しいバージョンのftpサーバのコンテナが作成され、旧バージョンのコンテナが破棄される様子が分かります。
# kubectl get pod -w
NAME                                READY   STATUS    RESTARTS   AGE
ftp-deployment-6d676859b8-6qrpn     1/1     Running   0          64s
ftp-deployment-6d676859b8-htnps     1/1     Running   0          68s
ftp-deployment-6d676859b8-pzjfp     1/1     Running   0          60s
ftp-deployment-64f968bc8b-zkl7j     0/1     Pending   0          0s
ftp-deployment-64f968bc8b-zkl7j     0/1     Pending   0          0s
ftp-deployment-64f968bc8b-zkl7j     0/1     ContainerCreating   0          0s
ftp-deployment-64f968bc8b-zkl7j     0/1     ContainerCreating   0          0s
ftp-deployment-64f968bc8b-zkl7j     1/1     Running             0          3s
ftp-deployment-6d676859b8-pzjfp     1/1     Terminating         0          80s
ftp-deployment-64f968bc8b-jmfmp     0/1     Pending             0          0s
ftp-deployment-64f968bc8b-jmfmp     0/1     Pending             0          0s
ftp-deployment-64f968bc8b-jmfmp     0/1     ContainerCreating   0          0s
ftp-deployment-64f968bc8b-jmfmp     0/1     ContainerCreating   0          1s
ftp-deployment-64f968bc8b-jmfmp     1/1     Running             0          4s
ftp-deployment-6d676859b8-6qrpn     1/1     Terminating         0          88s
ftp-deployment-64f968bc8b-t2f6k     0/1     Pending             0          0s
ftp-deployment-64f968bc8b-t2f6k     0/1     Pending             0          0s
ftp-deployment-64f968bc8b-t2f6k     0/1     ContainerCreating   0          0s
ftp-deployment-64f968bc8b-t2f6k     0/1     ContainerCreating   0          1s
ftp-deployment-64f968bc8b-t2f6k     1/1     Running             0          4s
ftp-deployment-6d676859b8-htnps     1/1     Terminating         0          96s
ftp-deployment-6d676859b8-pzjfp     0/1     Terminating         0          112s
ftp-deployment-6d676859b8-pzjfp     0/1     Terminating         0          113s
ftp-deployment-6d676859b8-pzjfp     0/1     Terminating         0          113s
ftp-deployment-6d676859b8-6qrpn     0/1     Terminating         0          2m
ftp-deployment-6d676859b8-6qrpn     0/1     Terminating         0          2m1s
ftp-deployment-6d676859b8-6qrpn     0/1     Terminating         0          2m1s
ftp-deployment-6d676859b8-htnps     0/1     Terminating         0          2m8s
ftp-deployment-6d676859b8-htnps     0/1     Terminating         0          2m9s
ftp-deployment-6d676859b8-htnps     0/1     Terminating         0          2m9s
アップデート処理終了後、アップデート処理前に接続していたftpセッション上でftpコマンドを発行すると、コネクションが切断されていました。(旧バージョンのpodが落ちているので当然といえば当然ですが)
# ftp> bin
421 Service not available, remote server has closed connection
再度netstatコマンドを発行するとセッションが切られている(CLOSE_WAIT)ことが確認できました。
# netstat -an
Active Internet connections (servers and established)
Proto Recv-Q Send-Q Local Address           Foreign Address         State
tcp        1      0 192.168.196.141:60696   10.98.148.32:21         CLOSE_WAIT
Active UNIX domain sockets (servers and established)
Proto RefCnt Flags       Type       State         I-Node   Path
まとめ
今回の確認によって、Kubernetesのローリングアップデート機能により複数のコンテナのアップデートが容易に行えることが分かり、特にpod数が多い場合において非常に有効であると思いました。
しかし、少なくとも今回試した設定では、すでにpodに対して張られているTCPコネクションについては特に考慮されずアップデートが行われるようなので、コネクションが切断されると影響があるアプリは、より上位のレイヤー(アプリ側)での考慮や外部の負荷分散装置でセッションの考慮がされるものとの連携などが必要であることが分かりました。