

コード公開
で紹介した。
スイッチサイエンスのGravity - 液晶ディスプレイモジュール(2インチ,I2C/UART接続)を使ったちゃんプロプログラム公開サイト管理するpico wのコード。
MicroPythony用のコードがなかったので、「Raspberry Pi Pico/RP2040/RP2350」をArduinoIDEに入れて、ArduinoIDE上でpico wを動かした。
表示したときの液晶の画像は記事の下にないこともない。
コード↓
#include <WiFi.h>
#include <WiFiClientSecure.h>
#include <HTTPClient.h>
#include <ArduinoJson.h>
#include <Wire.h>
#include <time.h>
#include "DFRobot_LcdDisplay.h"

// =====================
// WiFi
// =====================
const char* ssid = "**********";//家のwi-fiのSSID
const char* password = "**********";//家のwi-fiのパスワード

// JSON URL
const char* url ="https://minatopi.github.io/LINE-chanpro-Surveillance/output.json";

// LCD
DFRobot_Lcd_IIC lcd(&Wire, 0x2c);

// =====================
// UTF-8安全化
// =====================
String safeText(String s) {
 s.replace("👁", "");
  s.replace("👍", "");
  s.replace("⭐", "");

  return s;
}

// =====================
// タイトル整形
// =====================
String formatTitle(String t) {

  t = safeText(t);

  if (t.length() > 50) {
    t = t.substring(0, 50) + "...";
  }

  return t;
}

// =====================
// 時刻表示
// 今日→HH:MM
// 昨日→昨日
// それ以前→N日前
// =====================
String formatTimeLabel(const String &iso) {

  int y, mo, d, h, mi, s;

  if (sscanf(
        iso.c_str(),
        "%d-%d-%dT%d:%d:%d",
        &y, &mo, &d,
        &h, &mi, &s) != 6) {
    return "??";
  }


  // UTC → JST
  h += 9;

  if (h >= 24) {
    h -= 24;
    d++;
  }


  // 現在時刻取得
  time_t now = time(nullptr);
  struct tm *nowTm = localtime(&now);


  int nowY  = nowTm->tm_year + 1900;
  int nowM  = nowTm->tm_mon + 1;
  int nowD  = nowTm->tm_mday;


  // 日付だけ比較
  int itemDay =
    y * 10000 +
    mo * 100 +
    d;

  int nowDay =
    nowY * 10000 +
    nowM * 100 +
    nowD;


  int diff =
    nowDay - itemDay;


  if (diff <= 0) {

    char buf[6];

    sprintf(
      buf,
      "%02d:%02d",
      h,
      mi);

    return String(buf);

  }


  if (diff == 1) {

    return "昨日";

  }


  return String(diff) + "日前";
}

// =====================
// カード描画
// =====================
void drawCard(
int x,
int y,
int w,
int h,
const char* title,
int views,
int likes,
bool likeChanged,
String timeLabel)
{
// Like変化時は赤、変化なしは青
uint32_t borderColor =
likeChanged ? 0xFF0000 : 0x0000FF;

uint32_t infoColor =
likeChanged ? 0xFF0000 : 0x0000FF;

// 枠線
lcd.drawRect(
x,
y,
w,
h,
2,
borderColor,
1,
WHITE,
1);

// タイトル(常に黒)
String t = formatTitle(String(title));

lcd.drawString(
x + 10,
y + 8,
t.c_str(),
0,
BLACK);

// Views
String viewsText =
"Views: " + String(views);

lcd.drawString(
x + 10,
y + 32,
viewsText.c_str(),
0,
infoColor);

// Likes
String likesText =
"Likes: " + String(likes);

lcd.drawString(
x + 130,
y + 32,
likesText.c_str(),
0,
infoColor);

// 時刻(常に黒)
lcd.drawString(
x + 240,
y + 32,
timeLabel.c_str(),
0,
BLACK);

// デバッグ表示
Serial.print("LikeChanged=");
Serial.println(likeChanged);
}


// =====================
// JSON取得
// =====================
void fetchAndDisplay() {

  WiFiClientSecure client;
  client.setInsecure();

  HTTPClient https;

  Serial.println("JSON取得中...");

  if (!https.begin(client, url)) {
    Serial.println("接続失敗");
    return;
  }

  int httpCode = https.GET();

  if (httpCode <= 0) {

    Serial.println("HTTPエラー");

    https.end();
    return;
  }

  String payload =
    https.getString();

  https.end();

  Serial.println("取得成功");

  JsonDocument doc;

  DeserializationError error =
    deserializeJson(doc, payload);

  if (error) {

    Serial.println("JSONエラー");
    return;
  }

  lcd.cleanScreen();

  if (!doc.is<JsonArray>()) {

    lcd.drawString(
      10,
      10,
      "JSON Error",
      0,
      BLACK);

    return;
  }

  JsonArray arr =
    doc.as<JsonArray>();

  int count = arr.size();

  if (count == 0) {

    lcd.drawString(
      10,
      10,
      "No Data",
      0,
      BLACK);

    return;
  }

  int start =
    (count > 3)
      ? count - 3
      : 0;

  int y = 10;

  // 最新→古い
  for (int i = count - 1;
       i >= start;
       i--) {

    JsonObject item = arr[i];

    const char* title =
      item["title"] | "no title";

    int views =
      item["views_after"] | 0;

    int likes =
      item["like_after"] | 0;

    bool likeChanged =
      (item["like_before"] | 0)
      !=
      (item["like_after"] | 0);

    String date =
      item["updated_at"] | "";

    String timeLabel =
      formatTimeLabel(date);

    drawCard(
      10,
      y,
      300,
      60,
      title,
      views,
      likes,
      likeChanged,
      timeLabel);

    y += 70;
  }
}

// =====================
// setup
// =====================
void setup() {

  Serial.begin(115200);

  Wire.setSDA(0);
  Wire.setSCL(1);
  Wire.begin();

  lcd.begin();
  lcd.cleanScreen();
  lcd.setBackgroundColor(WHITE);

  WiFi.begin(
    ssid,
    password);

  Serial.print("WiFi接続中");

  while (
    WiFi.status()
    != WL_CONNECTED) {

    delay(500);
    Serial.print(".");
  }

  Serial.println();
  Serial.println("接続完了");

  // JST
  configTime(
    9 * 3600,
    0,
    "ntp.nict.jp",
    "pool.ntp.org");

  Serial.println("時刻同期中...");

  while (time(nullptr) < 100000) {
    delay(500);
  }

  Serial.println("時刻同期完了");

  fetchAndDisplay();
}

// =====================
// loop
// =====================
unsigned long lastUpdate = 0;

const unsigned long interval =
  900000; // 15分

void loop() {

  if (
    millis() - lastUpdate
    >= interval) {

    lastUpdate =
      millis();

    fetchAndDisplay();
  }
}
コードの流れ
電源ON⇒Wi-Fi接続⇒NTPで現在時刻取得⇒GitHubからJSON取得⇒
JSON解析⇒最新3件をLCD表示⇒15分待機⇒再びJSON取得
悲しき事態
https://qiita.com/minatopi/items/b9531b92503610bfe94a
に述べた通り、pico wにつけた、液晶を使って変化を感知しよう!と思って変化を感知するプログラムを作りました。
そして、小型化するために力ずくで、配線を押し込んでいたところ、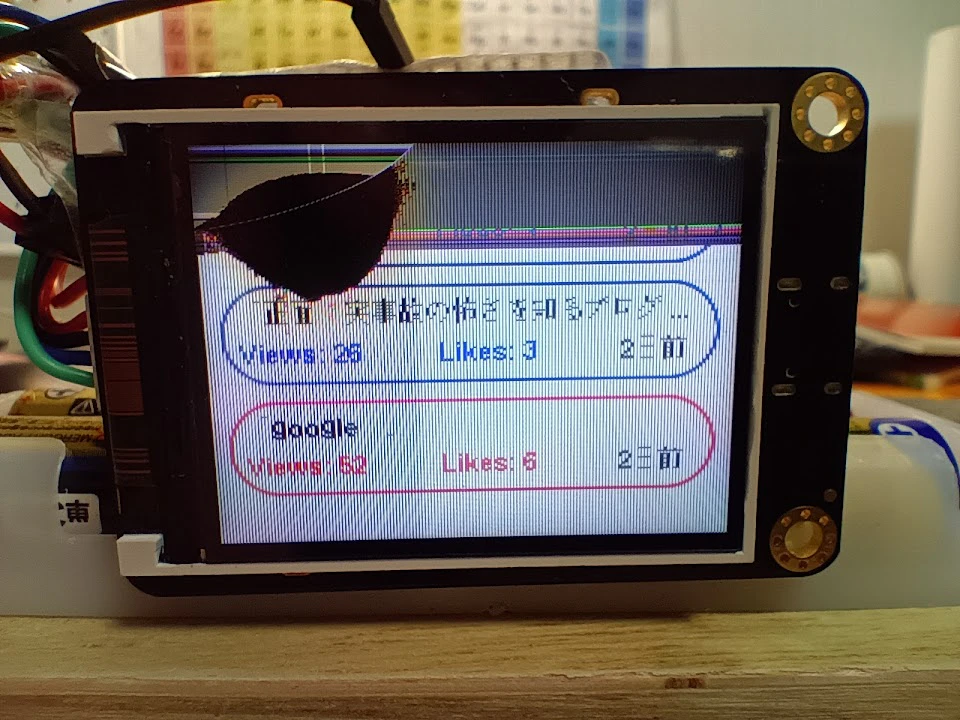
液晶の裏の配線だったため、液晶に力が加わり、破損。
使っていた液晶ディスプレイは、スイッチサイエンスのGravity - 液晶ディスプレイモジュール(2インチ,I2C/UART接続)。価格は、¥2,963(税込)(2026/6月)。中1にしては、結構な出費なので、悲しすぎ。配線4本(I2C)というカラー液晶には珍しい配線の数で、本体にESP32が搭載されているため高い。
どうすればいい?新しく買いなおすしかないのな?