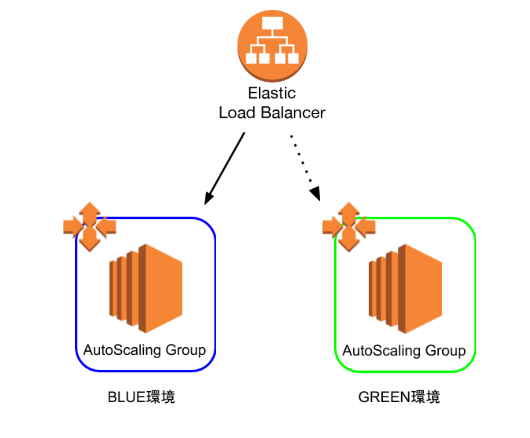
概要
AWS環境で、デプロイメントのフローを自動化する仕事を任されたので、成果物をここにメモしておきます。
Blue/Greenの2環境を用意し、普段は片方のみを使用しています。使用していないほうの環境にデプロイをして、ELBの振り分け先を変更することで、ダウンタイムのないデプロイメントを目指します。また、packerやAnsible, Terraformなどのツールを使うことで、このフローを自動化していきます。
尚、こちらの記事やこちらの記事などを参考にして作成しました。
作業手順
- アプリケーションや必要なミドルウェアなどをインストールした、ゴールデンAMIを作成する
- ゴールデンAMIを参照する起動設定を新規作成し、デプロイ先のAutoScaling Groupにそれを読み込ませる
- Elastic Load BalancerのListenerが転送するTargetGroupを変更し、本番環境をBlueからGreenに(もしくはGreenからBlueに)切り替える
AMIの作成
PackerとAnsibleを使って、ゴールデンAMIを作成します。AMIの基本的な設定はPackerで、ツールのインストール等の構成管理はAnsibleで、それぞれ行います。
まずは、Packerの設定です。
{
    "variables":{
        "version":"" //デプロイのたびに変わる値は、変数としておきます
    },
    "builders":      // AMIを作成するために一時的に立てられるEC2インスタンスについて定義
    [
        {
            "type":"amazon-ebs",
            "ami_name": "test-AMI-v{{user `version`}}",
            "region": "ap-northeast-1",
            "source_ami": "ami-xxxxxxxxxxx",  // 基とするAMI
            "instance_type": "t2.micro",
            "ssh_username": "centos",
            "tags":{
                "version":"{{user `version`}}" // 起動設定を作成するときに、見つけやすいようにタグをつけておく
            },
            "force_deregister": true,
            "force_delete_snapshot": true,
            "security_group_ids":["sg-xxxxxxx","sg-xxxxxxx"],
            "iam_instance_profile": "xxxxxxx",
            "subnet_id":"subnet-xxxxxxxx"
        }
    ],
    "provisioners":   // AMI作成用のインスタンスの中で行いたい処理を定義
    [
        {
            "type":"shell",
            "inline": [  // Ansibleを動かすためのツールをインストール
                "sudo -E yum -y update",
                "sudo -E yum -y install epel-release",
                "sudo -E yum -y install python-pip",
                "sudo -E yum -y install ansible"
            ]
        },
        {
            "type":"ansible-local",   // Ansibleの起動
            "playbook_file":"setup.yml"
        }
    ]
}
上のファイルの中から呼ばれている、Ansibleの設定ファイル(playbook)の設定は、以下の通りです。
尚、以下ではS3上のmavenリポジトリから成果物をとってくるようにしてあります。
- hosts: all
  become: yes
  vars:
    proxy_env: # すべてに共通するプロキシ設定は、変数化しておく
      https_proxy: xxxxxxxxx
      http_PROXY: xxxxxxxxx
      HTTPS_PROXY: xxxxxxxxx
      HTTP_PROXY: xxxxxxxxx
      no_proxy: xxxxxxxxx
  tasks:
    - environment: "{{proxy_env}}"
      name: "install boto3 (required by aws-s3)" # boto3のインストール
      pip:
        name: boto3
    - pip:
        name: lxml
      name: "install lxml" # Ansibleのs3モジュールを動かすのに必要
      environment: "{{proxy_env}}"
    - maven_artifact: # S3上のmavenリポジトリから成果物を取得
        repository_url: 's3://xxxxxxxx'
        group_id: jp.co.xx.xx
        artifact_id: xxxxxx
        version: 1.0.0
        extension: tgz
        dest: /tmp/xxxxxx.tgz
packerコマンドで上記のpackerおよびAnsibleを実行すると、AMIが作成されるはずです
ASGの設定変更
Terraformを用いて、まず上で作成したAMIを読み込む起動設定を作成し、そしてデプロイ先のASG(使用中でない環境のASG)にその起動設定を読み込ませるようにします。
provider "aws" {
  region = "ap-northeast-1"
}

variable "target_version" {} // デプロイのたびに値が変わるものは、変数化しておく

data "aws_ami" "centos" { // packerとAnsibleで作成したAMIを取得
  most_recent = true
  owners      = ["xxx"]
  filter {  // タグで検索
    name = "version"
    values = ["${var.target_version}"]
  }
}

resource "aws_launch_configuration" "test" { // 起動設定を新規作成
  name                 = "config-test-v${var.target_version}"
  image_id             = "${data.aws_ami.centos.id}" // 作成したAMIを指定
  instance_type        = "t2.micro"
  enable_monitoring    = false
  security_groups      = ["sg-xxxxxxx", "sg-xxxxxxxxx","sg-xxxxxxx"]
  key_name             = "xxxxxxxxx"
  iam_instance_profile = "xxxxxxxxx"
  root_block_device {
    delete_on_termination = true
    iops = 100
    volume_size = 30
    volume_type = "gp2"
  }
}

resource "aws_autoscaling_group" "test_resource" {  // デプロイ先のASGが上の起動設定を読みこむよう、設定変更
  name = "asg-test"
  launch_configuration = "${aws_launch_configuration.test.name}"  // 上で作成した起動設定を指定
  min_size = 2
  max_size = 2
  desired_capacity = 2
  target_group_arns = ["xxxxx","xxxxxx"]
  vpc_zone_identifier = ["xxxxxxx","xxxxxxxx"]
  lifecycle {
    create_before_destroy = true
  }
}
terraformコマンドで上の設定を反映させると、使用中でない環境のASGに設定が反映されます。
Blue/Greenの切り替え
最後に、ELBの振り分けの設定を変えます。適当なスクリプト言語でシェルを書くのですが、今回はCentOSにデフォルトで入っているPythonの2系で書きます(今時Python2かよ、って感じですが)。
処理の手順は、以下の通りです
- ASGに紐づくEC2のインスタンスのリストを取得
- EC2がすべて立ち上がって、テストをパスしたか確認する
- EC2がすべて立ち上がっていれば、ELBのListenerのリクエストの転送先のTargetGroupを変更し、Blue/Greenを切り替える
以下がコードです。
# ! /bin/python
# -*- coding: utf-8 -*-

from time import sleep
import json
import subprocess

# ASGに紐づくEC2インスタンスのリストの取得
GET_INSTANCE_LIST = """aws ec2 describe-instances --filters "Name=tag:version,Values=%s"""
# EC2インスタンスがヘルシーな状態であるか確認
GET_INSTANCE_STATUS = "aws ec2 describe-instance-status --instance-id %s"
# ELBの切り替え
SWITCH_ELB_LISTENER = "aws elbv2 modify-rule --rule-arn %s --actions Type=forward,TargetGroupArn=%s"

# EC2のリストを取得し、ヘルスチェック
def get_ec2_health(version):
    instance_ids = []
    # インスタンスのリスト取得
    instance_list = subprocess.check_output(GET_INSTANCE_LIST % version,shell=True)
    instance_dict = json.loads(instance_list)
    for instance in instance_dict["Reservations"]:
        # 停止中のインスタンスは除く
        if instance["Instances"][0]["State"]["Code"] != 48:
            instance_ids.append(instance["Instances"][0]["InstanceId"])
    for i in range(30):
        # 一つずつインスタンスをヘルスチェックし、一つでもダメであれば、15秒後に再チェック
        result = check_ec2_status(instance_ids)
        if result == True:
            return True
        else:
            sleep(15)
    return False

# EC2のヘルスチェック
def check_ec2_status(instance_ids):
    for instance_id in instance_ids:
        result = commands.getoutput(GET_INSTANCE_STATUS % instance_id)
        status_dict = json.loads(result)
        # 一つでもヘルスチェックに失敗すれば、Falseを返す
        if status_dict["InstanceStatuses"][0]["SystemStatus"]["Details"][0]["Status"] != "passed" or status_dict["InstanceStatuses"][0]["InstanceStatus"]["Details"][0]["Status"] != "passed":
            return False
    return True

# ELBの切り替え
def switch_elb():
    ELB_rules = {}
    try:
        # ELBのListenerのRuleのarnをjson形式で羅列しておくファイル
        file = open("../../ELB_rules_arns.json","r")
        ELB_rules = json.load(file)
    except:
        print("ELBのルールの情報が読み込めませんでした")
        return
    target_group_arns = {}
    try:
        # デプロイ先の環境の、TargetGroupのarnをjson形式で羅列しておくファイル
        file = open("./target_group_arns.json","r")
        target_group_arns = json.load(file)
    except:
        print("ターゲットグループの情報が読み込めませんでした")
        return
    for key in ELB_rules:
        result = subprocess.call(SWITCH_ELB_LISTENER % (ELB_rules[key],target_group_arns[key]),shell=True)
        if result == 0:
            print("切り替え成功")
    return 0

# メインの関数
def main():
    version = input("デプロイのバージョンを指定してください")
    ec2_health = get_ec2_health(version)
    if ec2_health == True:
        switch_elb_status = switch_elb()
        if switch_elb_status != 0:
            print("ELBの切り替えがうまくいきませんでした")
        else:
            print("ELBの切り替えに成功しました")
    else:
        print("EC2のヘルスチェックが失敗したため、切り替えを行いません")

if __name__ == "__main__":
    main()
