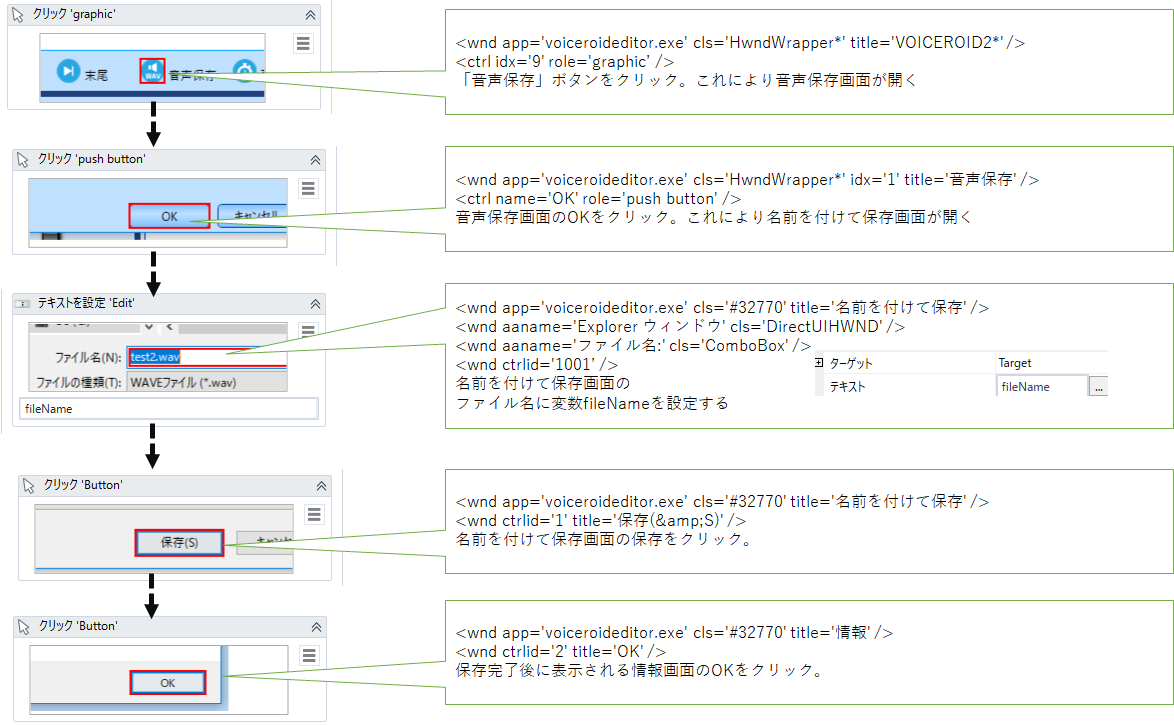
レギュレーション
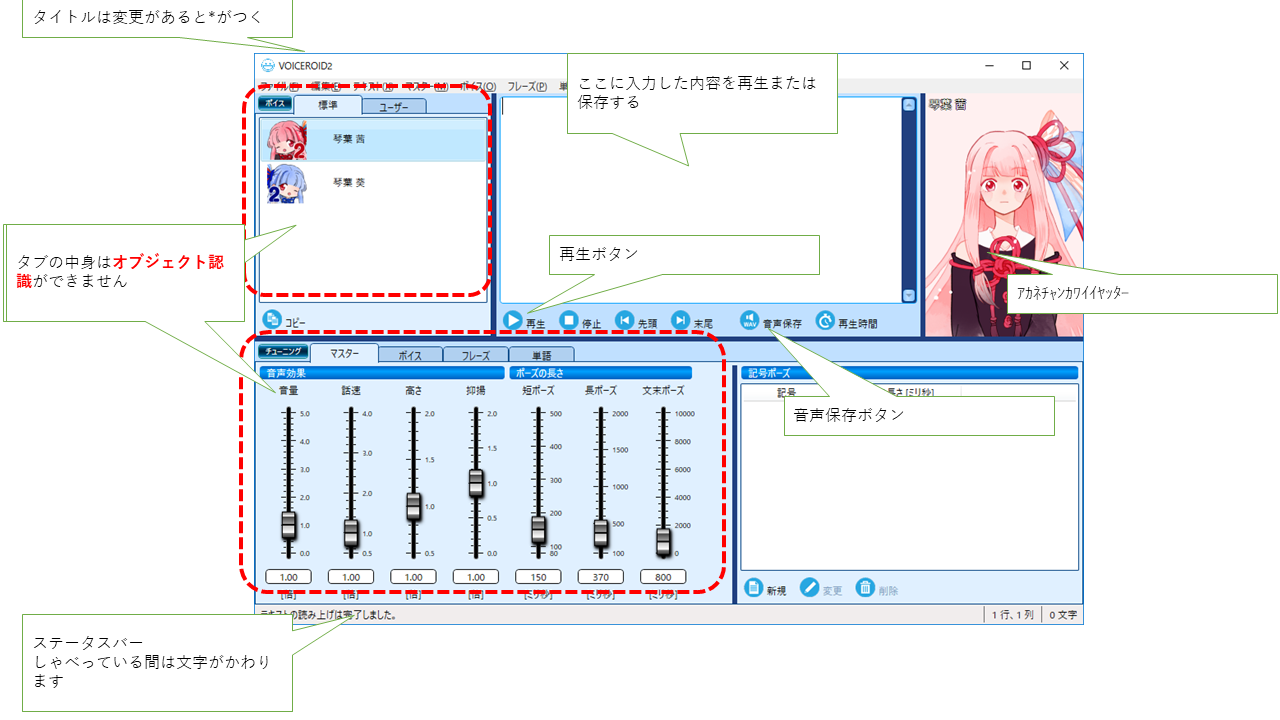
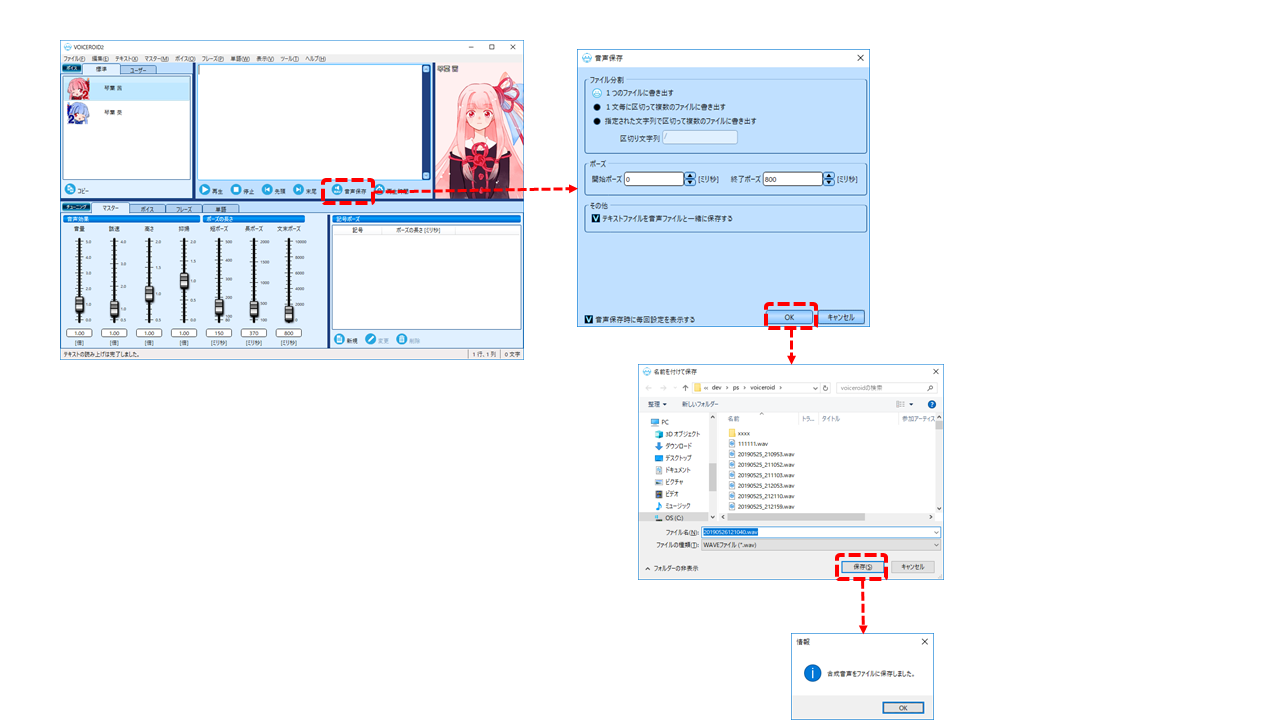
各RPAツールでVOICEROID2の茜ちゃんに「アカネチャンカワイイヤッタ」と言わせた後にファイルを保存します。
画像認識できる場合は葵ちゃんにもしゃべってもらいます。
環境:
Windows10 64bit
VoiceRoide2
タブの中の子要素が取れない問題について:
https://teratail.com/questions/53276
参加ツール
| ツール名 | 簡単な説明 |
|---|---|
| VBA + UIAutomation | UIAutomationをCOM経由でVBAで実行して画面操作します。ツールに頼らない裸の強さを見せてくれます。 |
| PowerShell + UIAutomation | UIAutomationを.NET経由でPowerShellを使って実行します。Windows7以降ならOfficeすら不要という強さがあります。 |
| WinAppDriver | Microsoftが開発したSeleniumライクの自動操作を実現するツール。Seleniumを使うなら俺も使えという熱い気持ちが伝わってきます。 |
| Friendly | 本来はテストツール。操作対象のアプリにテスト用のDLLをインジェクションするという荒業をみせて、参加選手のなか唯一タブの中の要素を画像認識を使わずに操作した豪の物です。 |
| PyAutoGUI | Pythonでの自動操作を実現します。基本的に画像認識で操作を行いますが、旨く作ればMacでもLinuxでも動作します。最近のPythonブームによって躍進が期待されます。 |
| UWSC | 古のツールの中で唯一UIAutomationが認識できる要素を解析できたつわものです。バランスの取れたいい選手ですが、このたび公式サイトが閉鎖されるというアクシデントがあり引退がささやかれています。 |
| sikulix | 画像認識に特化したツール。IDEが使いやすくデザインされています。またJavaで動作してどこでも動くうえ、スクリプト自体はPythonやRuby,JavaScriptで記載できる欲張りセットになっております。 |
| RocketMouse | 昔からある自動操作ツール。画像認識はできるが、オブジェクトの認識はWin32で作ったものしかできません。今回は試用版による参加 |
| UIPath | 2018年のforresterの調査でRPAのリーダーと言わしめた製品。高価格帯からは唯一の参戦だが、Community版なら個人や小規模事業では使用できるというサプライズ。 |
なお、AutoIt選手とAutoHotKey選手につきましてはUIAutomationのCOMを触るためのIFを用意する必要があり、それ以外だと、画像認識しかできないので今回は欠場となっております。
アカネチャンカワイイヤッターの実行
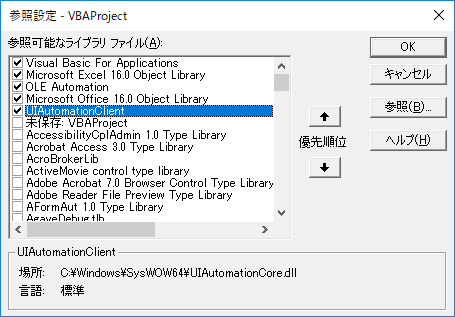
VBA + UIAutomationでアカネチャンカワイイヤッター
Officeさえ入っていればWindowsの自動操作が行えます。
RPAツールなんていらんかったんや
画面上の要素を正確に捕捉できるため、違うPCでも動かしやすいという利点があります。
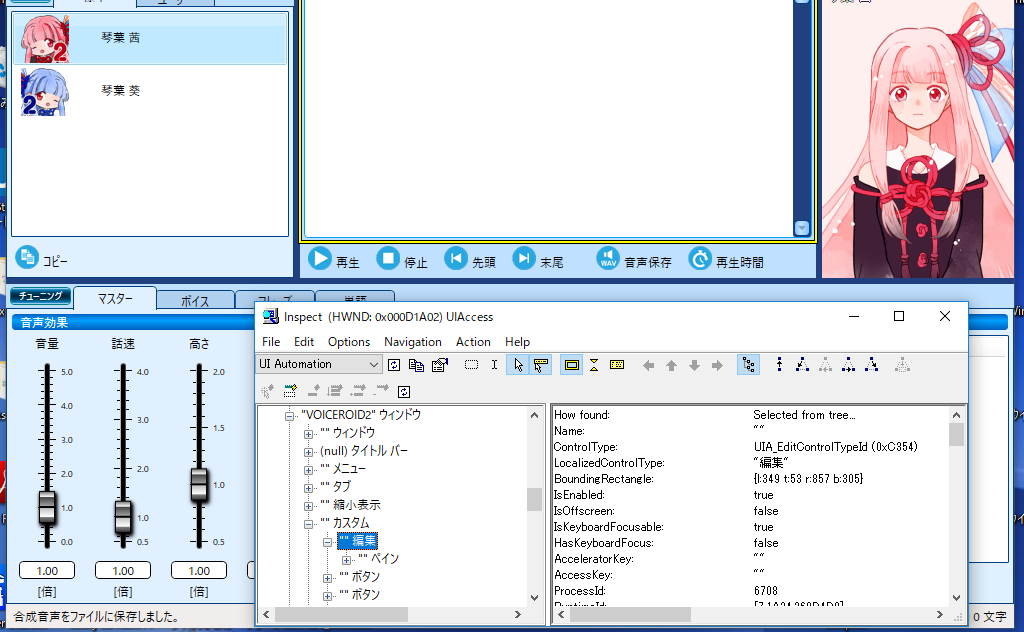
操作対象のオブジェクトの調査はInspectを用いて行うとよいでしょう。
VBAによる実装
Option Explicit


Public Sub Kawaii()
    Dim vr As New VoiceRoid
    Dim mainForm As IUIAutomationElement
    Set mainForm = vr.GetMainWindowByTitle(vr.GetRoot(), "VOICEROID2")
    If (mainForm Is Nothing) Then
        Set mainForm = vr.GetMainWindowByTitle(vr.GetRoot(), "VOICEROID2*")
        If (mainForm Is Nothing) Then
            MsgBox "VOICEROIDE2が起動していない"
            Exit Sub
        End If
    End If

    ' 茜ちゃんしゃべる
    Call vr.SetText(mainForm, 0, "アカネチャンカワイイヤッタ")
    Call vr.pushButton(mainForm, 0)

    ' しゃべり終わるまで待機
    Dim sts As String
    Do While sts <> "テキストの読み上げは完了しました。"
        sts = vr.GetStatusBarItemText(mainForm, 0)
        Call vr.SleepMilli(500)
    Loop

    ' 音声保存
    Call vr.pushButton(mainForm, 4)

    ' 5秒以内に音声保存画面が表示されたら保存ボタンを押す
    Dim saveWvForm As IUIAutomationElement
    Set saveWvForm = vr.WaitMainWindowByTitle(mainForm, "音声保存", 5)
    Call vr.pushButton(saveWvForm, 0)

    ' 名前を付けて保存に日付のファイル名を作る
    Dim saveFileForm As IUIAutomationElement
    Set saveFileForm = vr.WaitMainWindowByTitle(saveWvForm, "名前を付けて保存", 5)
    Call vr.SetTextById(saveFileForm, "1001", Format(Now(), "yyyymmddhhnnss.wav"))
    SendKeys "{ENTER}"

    ' 情報ポップアップのOKを押下
    Dim infoForm As IUIAutomationElement
    Set infoForm = vr.WaitMainWindowByTitle(saveWvForm, "情報", 60)
    Call vr.pushButton(infoForm, 0)
End Sub
Option Explicit
Private uia As UIAutomationClient.CUIAutomation
Private Declare Sub Sleep Lib "kernel32" (ByVal dwMilliseconds As Long)

Private Sub Class_Initialize()
    Set uia = New UIAutomationClient.CUIAutomation
End Sub
Private Sub Class_Terminate()
    Set uia = Nothing
End Sub
Public Sub SleepMilli(ByVal millisec As Long)
    Call Sleep(millisec)
End Sub
' ルートのディスクトップ要素を取得
Public Function GetRoot() As IUIAutomationElement
    Dim ret As IUIAutomationElement
    Set ret = uia.GetRootElement
    Set GetRoot = ret
End Function

' 指定の子ウィンドウをタイトルから取得する
Public Function GetMainWindowByTitle(ByRef form As IUIAutomationElement, ByVal name As String) As IUIAutomationElement
    Dim cnd As IUIAutomationCondition
    Dim ret As IUIAutomationElement
    Set cnd = uia.CreatePropertyCondition(UIA_PropertyIds.UIA_NamePropertyId, name)

    Set ret = form.FindFirst(TreeScope_Element Or TreeScope_Children, cnd)

    Set GetMainWindowByTitle = ret
End Function

' 指定の子ウィンドウをタイトルから取得できまで待機
Public Function WaitMainWindowByTitle(ByRef form As IUIAutomationElement, ByVal name As String, ByVal timeOutSec As Double) As IUIAutomationElement
    Dim start As Variant
    start = timer()
    Dim ret As IUIAutomationElement

    Set ret = GetMainWindowByTitle(form, name)
    Do While ret Is Nothing
        If timer() - start > timeOutSec Then
            Exit Function
        End If
        Set ret = GetMainWindowByTitle(form, name)
        Call SleepMilli(100)
    Loop
    Set WaitMainWindowByTitle = ret
End Function

' ボタンを指定Indexを押下する
Public Sub pushButton(ByRef form As IUIAutomationElement, ByVal ix As Long)
    Dim cnd As IUIAutomationCondition
    Set cnd = uia.CreatePropertyCondition(UIA_PropertyIds.UIA_ClassNamePropertyId, "Button")

    Dim list As IUIAutomationElementArray
    Set list = form.FindAll(TreeScope_Element Or TreeScope_Descendants, cnd)

    Dim ptn As IUIAutomationInvokePattern
    Set ptn = list.GetElement(ix).GetCurrentPattern(UIA_PatternIds.UIA_InvokePatternId)
    Call ptn.Invoke

End Sub


' 指定のClassNameがTextBoxに値を設定する
Public Sub SetText(ByRef form As IUIAutomationElement, ByVal ix As Long, ByVal text As String)
    Dim cnd As IUIAutomationCondition
    Set cnd = uia.CreatePropertyCondition(UIA_PropertyIds.UIA_ClassNamePropertyId, "TextBox")

    Dim list As IUIAutomationElementArray
    Set list = form.FindAll(TreeScope_Element Or TreeScope_Descendants, cnd)


    Dim editValue As IUIAutomationValuePattern
    Set editValue = list.GetElement(ix).GetCurrentPattern(UIA_PatternIds.UIA_ValuePatternId)
    Call editValue.SetValue(text)

End Sub

' 指定のAutomationIdでTextBoxに値を設定する
Public Sub SetTextById(ByRef form As IUIAutomationElement, ByVal id As String, ByVal text As String)
    Dim cnd As IUIAutomationCondition
    Set cnd = uia.CreatePropertyCondition(UIA_PropertyIds.UIA_AutomationIdPropertyId, id)

    Dim list As IUIAutomationElementArray
    Set list = form.FindAll(TreeScope_Element Or TreeScope_Descendants, cnd)


    Dim editValue As IUIAutomationValuePattern
    Set editValue = list.GetElement(0).GetCurrentPattern(UIA_PatternIds.UIA_ValuePatternId)
    Call editValue.SetValue(text)

End Sub

' 指定のClassNameがTextBoxの値を取得する
Public Function GetStatusBarItemText(ByRef form As IUIAutomationElement, ByVal ix As Long) As String
    Dim cnd As IUIAutomationCondition
    Set cnd = uia.CreatePropertyCondition(UIA_PropertyIds.UIA_ClassNamePropertyId, "StatusBarItem")

    Dim list As IUIAutomationElementArray
    Set list = form.FindAll(TreeScope_Element Or TreeScope_Descendants, cnd)

    GetStatusBarItemText = list.GetElement(ix).CurrentName

End Function
備考
・画像認識はUIAutomationの範囲からはずれるために実施していません。
・タブの子要素が取得できません。茜ちゃんから葵ちゃんに切り替えたり、感情を変更することができないことになります。
・UIAutomationで要素を検索して値の取得や操作をしているだけです。
ただし、ディスクトップを検索する場合、直下の子供だけを検索するようにしないと時間がかかるので注意してください。
・名前を付けて保存時にファイル名入力後にENTERを押下しています。これはロストフォーカス時に入力前の文字にもどってしまう事象の対策です。他のツールにおいても同様の実装をおこなっています。
PowerShell+UIAutomationでアカネチャンカワイイヤッター
PowerShellさえ入っているWin7以降ならOfficeすら不要で自動操作ができます。
また、VBAに対するアドバンテージとしては、.NETの機能が簡単に利用できるようになったことです。
管理者権限がなければps1ファイルが実行できないという勘違いをしていましたが、実際はそんなことはないので、学習コストさえ払えるならPowerShellに移行したほうがよいでしょう。
PowerShellでの実装
Add-Type -AssemblyName UIAutomationClient
Add-Type -AssemblyName UIAutomationTypes
Add-type -AssemblyName System.Windows.Forms

$source = @"
using System;
using System.Windows.Automation;
public class AutomationHelper
{
    public static AutomationElement RootElement
    {
        get
        {
            return AutomationElement.RootElement;
        }
    }
    public static AutomationElement GetMainWindowByTitle(string title) {
        PropertyCondition cond = new PropertyCondition(AutomationElement.NameProperty, title);
        return RootElement.FindFirst(TreeScope.Children, cond);
    }

    public static AutomationElement ChildWindowByTitle(AutomationElement parent , string title) {
        try {
            PropertyCondition cond = new PropertyCondition(AutomationElement.NameProperty, title);
            return parent.FindFirst(TreeScope.Children, cond);
        } catch {
            return null;
        }
    }
    public static AutomationElement WaitChildWindowByTitle(AutomationElement parent, string title, int timeout = 10) {
        DateTime start = DateTime.Now;
        while (true) {
            AutomationElement ret = ChildWindowByTitle(parent, title);
            if (ret != null) {
                return ret;
            }
            TimeSpan ts = DateTime.Now - start;
            if (ts.TotalSeconds > timeout) {
               return null;
            }
            System.Threading.Thread.Sleep(100);
        }
    }
}
"@
Add-Type -TypeDefinition $source -ReferencedAssemblies("UIAutomationClient", "UIAutomationTypes")

# 5.0以降ならusingで記載した方が楽。
$autoElem = [System.Windows.Automation.AutomationElement]

# ウィンドウ以下で指定の条件に当てはまるコントロールを全て列挙
function findAllElements($form, $condProp, $condValue) {
    $cond = New-Object -TypeName System.Windows.Automation.PropertyCondition($condProp, $condValue)
	return $form.FindAll([System.Windows.Automation.TreeScope]::Element -bor [System.Windows.Automation.TreeScope]::Descendants, $cond)
}

# ウィンドウ以下で指定の条件に当てはまるコントロールを1つ取得
function findFirstElement($form, $condProp, $condValue) {
    $cond = New-Object -TypeName System.Windows.Automation.PropertyCondition($condProp, $condValue)
	return $form.FindFirst([System.Windows.Automation.TreeScope]::Element -bor [System.Windows.Automation.TreeScope]::Descendants, $cond)
}

# 要素をValuePatternに変換
function convertValuePattern($elem) {
	return $elem.GetCurrentPattern([System.Windows.Automation.ValuePattern]::Pattern) -as [System.Windows.Automation.ValuePattern]
}

# 指定の要素をボタンとみなして押下する
function pushButton($form, $index) {
    $buttonElemes = findAllElements $form $autoElem::ClassNameProperty "Button"
    $invElm = $buttonElemes[$index].GetCurrentPattern([System.Windows.Automation.InvokePattern]::Pattern) -as [System.Windows.Automation.InvokePattern]
    $invElm.Invoke()
}

# 指定のAutomationIDのボタンを押下
function pushButtonById($form, $id) {
    $buttonElem = findFirstElement $form $autoElem::AutomationIdProperty $id
    $invElm = $buttonElem.GetCurrentPattern([System.Windows.Automation.InvokePattern]::Pattern) -as [System.Windows.Automation.InvokePattern]
    $invElm.Invoke()
}

# 指定の内容をしゃべらせる
function speakText($mainForm, $message) {
	try {
		# テキストの検索
		$textboxElems = findAllElements $mainForm $autoElem::ClassNameProperty "TextBox"
		$messageValuePtn = convertValuePattern $textboxElems[0]
		$messageValuePtn.SetValue($message);

		# 音声保存ボタン押下
		pushButton $mainForm 0

		# 読み上げ中は待機
		$cond = New-Object -TypeName System.Windows.Automation.PropertyCondition([System.Windows.Automation.AutomationElement]::NameProperty, "テキストの読み上げは完了しました。")
		do
		{
		  Start-Sleep -m 500
		  $elems = $mainForm.FindAll([System.Windows.Automation.TreeScope]::Element -bor [System.Windows.Automation.TreeScope]::Descendants, $cond)
		}
		while ($elems.Count -eq 0)

		return $True
	} catch {
	    Write-Error "ファイルの保存に失敗しました"
	    $_
		return $False
	}
}

# しゃべる内容を設定後指定のファイルに保存
function saveText($mainForm , $message, $outPath) {
	try {
		# テキストの検索
		$textboxElems = findAllElements $mainForm $autoElem::ClassNameProperty "TextBox"
		$messageValuePtn = convertValuePattern $textboxElems[0]
		$messageValuePtn.SetValue($message);

		# 音声保存ボタン押下
		pushButton $mainForm 4

		#音声保存ウィンドウが表示される可能性
		$saveWvForm = [AutomationHelper]::WaitChildWindowByTitle($mainForm, "音声保存", 2)
		pushButton $saveWvForm 0

		#名前を付けて保存
		$saveFileForm = [AutomationHelper]::WaitChildWindowByTitle($saveWvForm, "名前を付けて保存", 5)
		if ($saveFileForm -eq $null) {
			return $False;
		}
		$txtFilePathElem = findFirstElement $saveFileForm $autoElem::AutomationIdProperty "1001"
		$txtFilePathValuePtn = convertValuePattern $txtFilePathElem
		$txtFilePathValuePtn.SetValue($outPath);
		[System.Windows.Forms.SendKeys]::SendWait("{ENTER}")
		#エンターでないとコンボボックスが効いて、元に戻る。
		#pushButtonById $saveFileForm "1"

		# ここでファイルの上書きがtxtとwav分でる可能性があるが、ファイル名を一意にすることで回避すること

		# 情報ポップアップがでるまで待機
		$infoWin = [AutomationHelper]::WaitChildWindowByTitle($saveWvForm, "情報", 60)
		if ($infoWin -eq $null) {
			return $False;
		}
		pushButton $infoWin 0
		return $True
	}
	catch {
	    Write-Error "ファイルの保存に失敗しました"
	    $_
		return $False
	}

}

# メイン処理
$mainForm = [AutomationHelper]::GetMainWindowByTitle("VOICEROID2")
if ($mainForm -eq $null) {
    $mainForm = [AutomationHelper]::GetMainWindowByTitle("VOICEROID2*")
}
if ($mainForm -eq $null) {
    Write-Error "VOICEROID2を起動してください"
    exit 1
}

# しゃべる
$ret = speakText $mainForm 'アカネチャンカワイイヤッタ'
if ($ret -eq $False ) {
	exit
}

# 保存する
$fileName =  Get-Date -Format "yyyyMMddHHmmss.wav"
saveText $mainForm 'アカネチャンカワイイヤッタ' $fileName
備考
・タブにたいする制限はVBAのUIAutomationと同じです。
・PowerShell中にC#のコードを埋め込んでいる理由は「名前を付けて保存」ダイアログを操作するためです。
下記を参照してください。
>PowerShellのUIAutomationは複雑怪奇なり
・using等の新しい機能は使わないようにしているのでPowershell2.0あたりでも動くと思います(未検証)
・PowerShellで画像認識をやりたい場合は以下を参照してください。
C#やPowerShellで画面上の特定の画像の位置をクリックする方法
https://qiita.com/mima_ita/items/f7d2c38767bda8b35cbd
WinAppDriverでアカネチャンカワイイヤッター
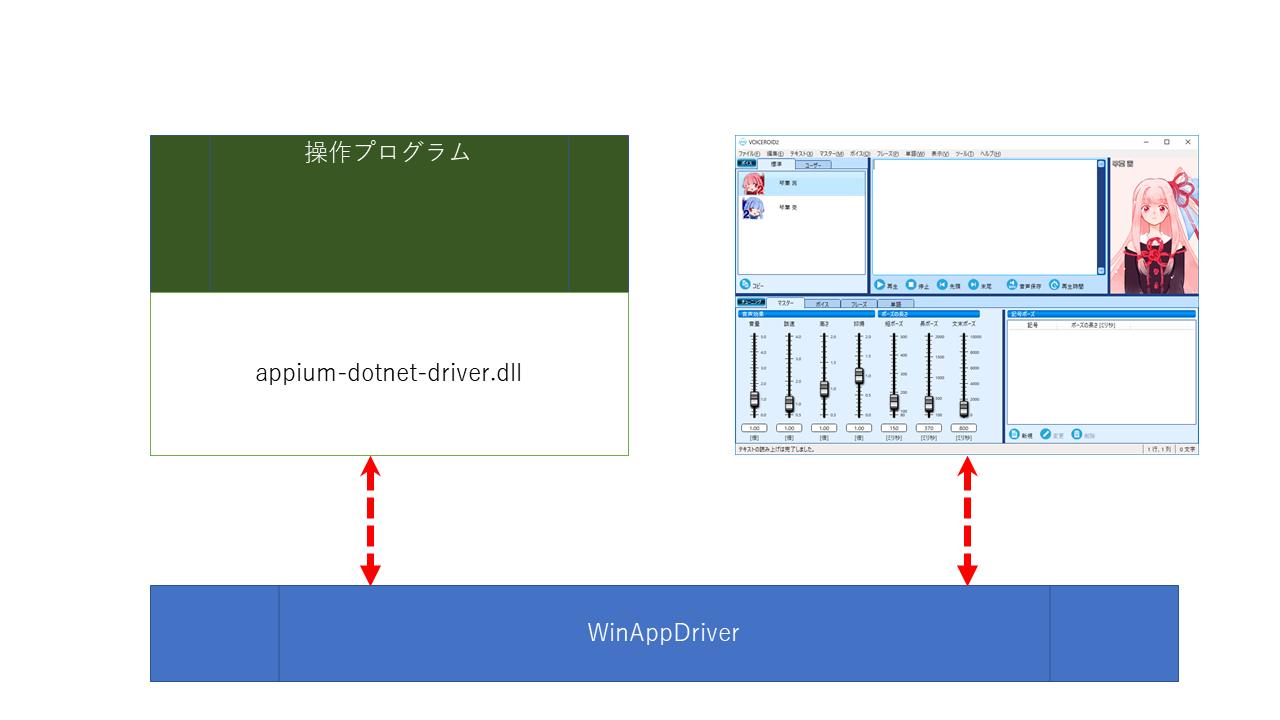
Seleniumライクな操作でWindowsアプリを操作するためにマイクロソフトが開発したツールです。Seleniumの操作とほぼ同じなので、学習コストは低くなることが期待できます。
その構成は以下のようになります。
操作プログラムは操作対象のプログラムを直接操作するのでなくWebAppDriver経由で操作をおこないます。
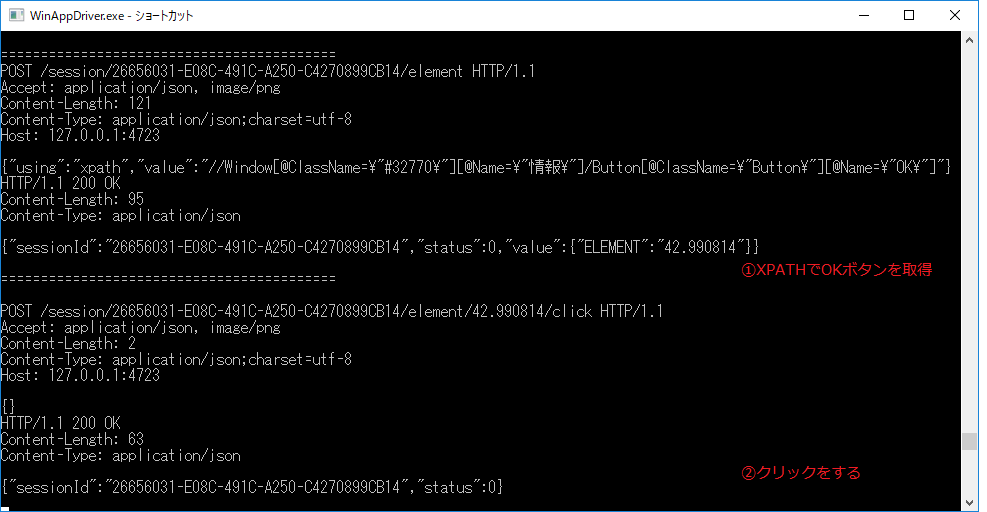
操作プログラムとWebAppDriverの間は下記のようなJSONデータでやりとりが行われています。
WebAppDriverはダウンロードページ から入手してください。
WinAppDriverUiRecorderについて
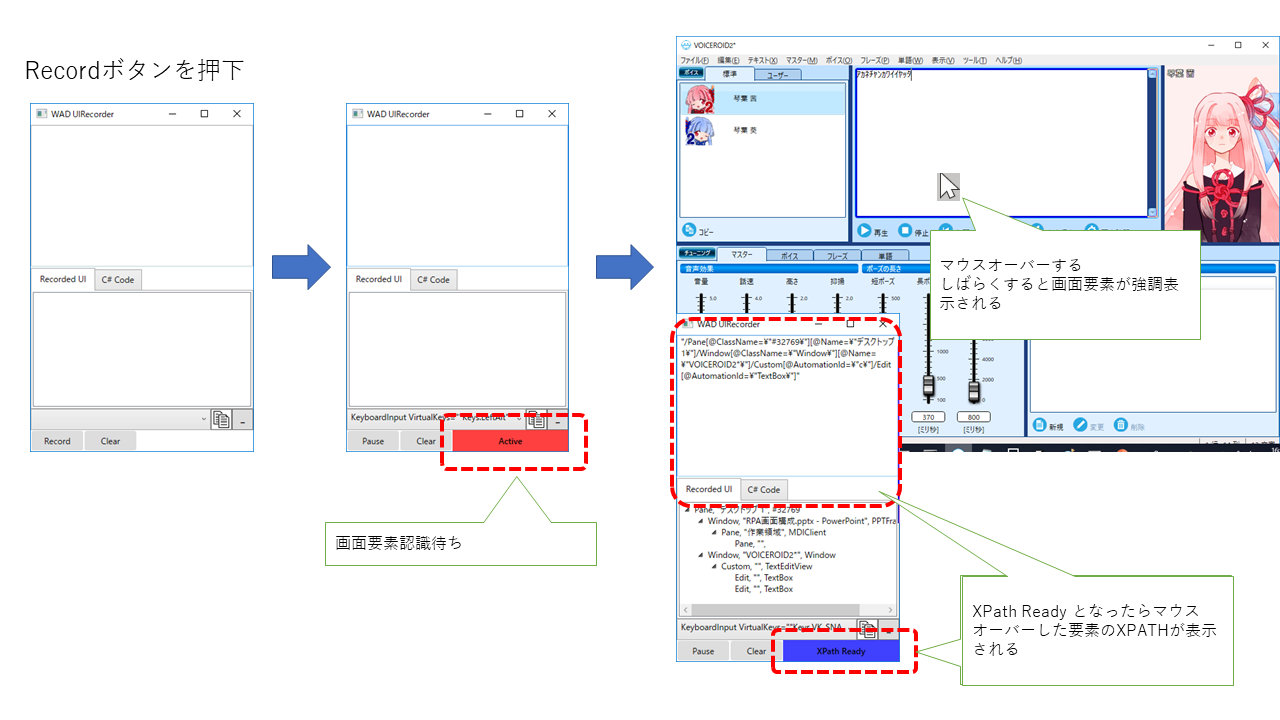
XPathを用いてWindowの要素を操作するのですが、そのXPathの検査にはWinAppDriverUiRecorderを使用します。
C# Codeのタブを選択すると行った操作の内容の実装例が表示されます。
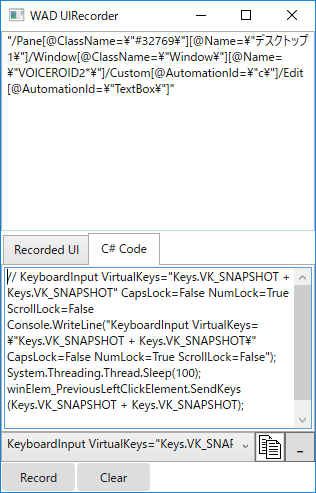
ただし、基本的にあてにはならないのでXPathの参考程度にするといいでしょう。
またマルチディスプレイで作業している場合、1つめのディスプレイしか認識しないので注意してください。
WinAppDriverを使用した実装
NuGetで取得した資材。
・Appium.WebDriver v3.0.0.2
using System;
using System.Collections.Generic;
using System.Linq;
using System.Text;
using System.Threading.Tasks;
using OpenQA.Selenium.Appium.Windows;
using OpenQA.Selenium.Remote;
using OpenQA.Selenium;
using System.Globalization;

namespace WinAppDriverSemple
{

    class Program
    {
        static WindowsDriver<WindowsElement> desktopSession;
        private const string WindowsApplicationDriverUrl = "http://127.0.0.1:4723/";

        // 指定の要素が検索できるまで待機する
        public static WindowsElement WaitElementByAbsoluteXPath(WindowsDriver<WindowsElement> root, string xPath, int nTryCount = 15)
        {
            WindowsElement uiTarget = null;

            while (nTryCount-- > 0)
            {
                try
                {
                    uiTarget = root.FindElementByXPath(xPath);
                }
                catch
                {
                }

                if (uiTarget != null)
                {
                    break;
                }
                else
                {
                    System.Threading.Thread.Sleep(500);
                }
            }

            return uiTarget;
        }


        static void Main(string[] args)
        {
            // DesktopからVOCAROID2を検索
            DesiredCapabilities desktopCapabilities = new DesiredCapabilities();
            desktopCapabilities.SetCapability("app", "Root");
            desktopCapabilities.SetCapability("deviceName", "WindowsPC");
            desktopSession = new WindowsDriver<WindowsElement>(new Uri(WindowsApplicationDriverUrl), desktopCapabilities);
            String hwnd;
            WindowsElement appElem;
            appElem = desktopSession.FindElementByName("VOICEROID2");
            hwnd = appElem.GetAttribute("NativeWindowHandle");
            if (hwnd.Equals("0"))
            {
                appElem = desktopSession.FindElementByName("VOICEROID2*");
                hwnd = appElem.GetAttribute("NativeWindowHandle");
            }
            DesiredCapabilities appCapabilities = new DesiredCapabilities();
            hwnd = int.Parse(hwnd).ToString("x");
            appCapabilities.SetCapability("appTopLevelWindow", hwnd);
            WindowsDriver<WindowsElement> appSession = new WindowsDriver<WindowsElement>(new Uri(WindowsApplicationDriverUrl), appCapabilities);

            // しゃべらせる
            var txtMsg = appSession.FindElementByXPath("//Edit[@AutomationId=\"TextBox\"]");
            txtMsg.Click();
            // 英語キーボードじゃないと記号が旨く送信できない(Seleniumの仕様っぽい)
            txtMsg.SendKeys(Keys.LeftControl + "a");
            txtMsg.SendKeys(Keys.Delete);
            txtMsg.SendKeys("アカネチャンカワイイヤッタ");

            var btnPlay = appSession.FindElementByXPath("//Button[@ClassName=\"Button\"]/Text[@ClassName=\"TextBlock\"][@Name=\"再生\"]");
            btnPlay.Click();

            // 保存開始
            var statusBar = WaitElementByAbsoluteXPath(appSession, "//StatusBar[@ClassName =\"StatusBar\"]/Text[@ClassName=\"StatusBarItem\"][@Name=\"テキストの読み上げは完了しました。\"]/Text[@ClassName=\"TextBlock\"][@Name=\"テキストの読み上げは完了しました。\"]");
            if (statusBar == null)
            {
                Console.Error.WriteLine("読み上げ失敗");
                return;
            }

            var btnSave = appSession.FindElementByXPath("//Button[@ClassName=\"Button\"]/Text[@ClassName=\"TextBlock\"][@Name=\"音声保存\"]");
            btnSave.Click();


            // 音声保存画面でOK押下
            var btnSaveOk = appSession.FindElementByXPath("//Window[@ClassName =\"Window\"][@Name=\"音声保存\"]/Button[@ClassName=\"Button\"][@Name=\"OK\"]");
            btnSaveOk.Click();

            // 名前を付けて保存
            var txtFileName = appSession.FindElementByXPath("//Window[@ClassName=\"#32770\"][@Name=\"名前を付けて保存\"]/Pane[@ClassName=\"DUIViewWndClassName\"]/ComboBox[@Name=\"ファイル名:\"][@AutomationId=\"FileNameControlHost\"]/Edit[@ClassName=\"Edit\"][@Name=\"ファイル名:\"]");
            String hankakuKey = Convert.ToString(Convert.ToChar(0xE0 + 244, CultureInfo.InvariantCulture), CultureInfo.InvariantCulture);
            // 英字キーボードだと以下のキーで半角全角切り替えになる
            txtFileName.SendKeys("`"); // 0xFF40

            txtFileName.SendKeys(Keys.LeftControl + "a");
            txtFileName.SendKeys(Keys.Delete);
            //
            txtFileName.SendKeys(System.DateTime.Now.ToString("yyyymMMddhhmmss") + ".wav");
            txtFileName.SendKeys(Keys.Enter);


            //
            var infoOk = WaitElementByAbsoluteXPath(appSession, "//Window[@ClassName=\"#32770\"][@Name=\"情報\"]/Button[@ClassName=\"Button\"][@Name=\"OK\"]");
            infoOk.Click();

        }
    }
}
備考
・Windows10でしか動作しません。
・WinAppDriverで公開されているものはテストコードとUIRecorderのみです。WinAppDriver自体のコードは公開されていません。
・UIAutomation同様、タブの子要素が取得できません。
・日本語キーボードの場合、記号が正常に表示されません。
例:editBox.SendKeys("a/b\c"); // →a/b]c
https://github.com/Microsoft/WinAppDriver/issues/194
・XPathで要素の指定は容易に行えます。しかしながらパフォーマンスがUIAutomationに比べてかなり落ちます。
今回はすこしでも早くなることを期待して、ディスクトップのルートからでなく、アプリケーションから検索するようにしています。
・名前を付けて保存をする際のファイル名がどうしても全角になってしまい、そこを「`」を送信することでごまかしています。
Friendlyでアカネチャンカワイイヤッター
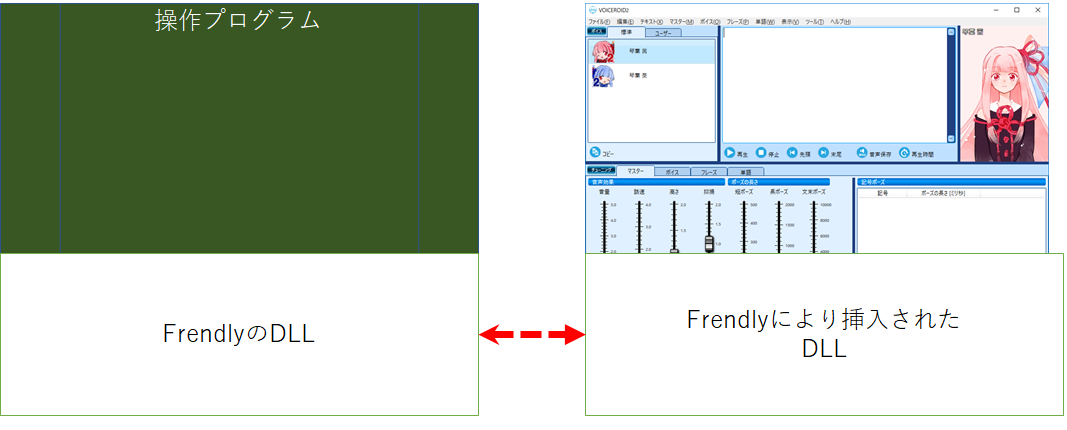
操作プログラムが使用しているFrendlyが操作対象の茜ちゃんにDLLインジェクションをします。
それにより、そこでプロセス間通信を行い画面の要素の情報を取得しています。
この仕組みのため、マイクロソフト製のUIAutomationとWinAppDriverでも、やれないことを平然とやってのけます。そこにしびれるあこがれる~!!!
ただし、操作対象のアプリケーションにテスト用のDLLを差し込んだものをテストや運用で使っていいのかという問題がありますので導入時にはよく検討すべきです。一方、単体テストや、再起動可能な画面の自動操作では非常に強力なライブラリです。
日本の会社が作った仕組みなので、公式サイトのドキュメントをみるのが一番いいでしょう。
また、GitHubにコードが公開されています。
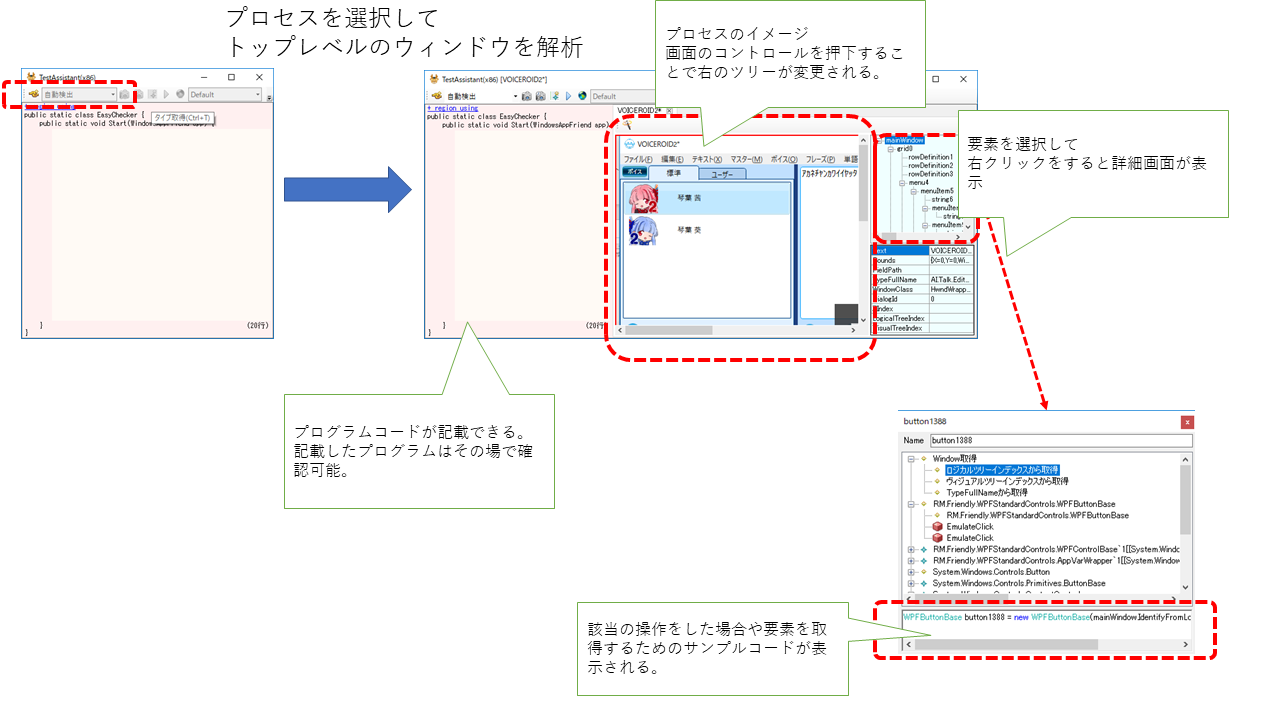
Friendlyでの実装例を教えてくれるTestAssistantツール
TestAssistantというツールが提供されており、画面の要素の調査がおこなえます。
要素を選択してコードのサンプルを作成したり、実際作成したサンプルをツール上で実行できたりと、かなり強力なツールになっています。
同一アプリに対する操作について
同一アプリに複数のプロセスがFriendlyを使用して操作すると以下のエラーを出力してエラーになります。
型 'Codeer.Friendly.FriendlyOperationException' のハンドルされていない例外が Codeer.Friendly.Windows.dll で発生しました

追加情報:アプリケーションとの通信に失敗しました。

対象アプリケーションが通信不能な状態になったか、

シリアライズ不可能な型のデータを転送しようとした可能性があります。
たとえば、TestAssistantで要素を調べならがら、コードを書いている場合によく遭遇します。
この場合は、操作対象のアプリケーションを起動しなおす必要があります。
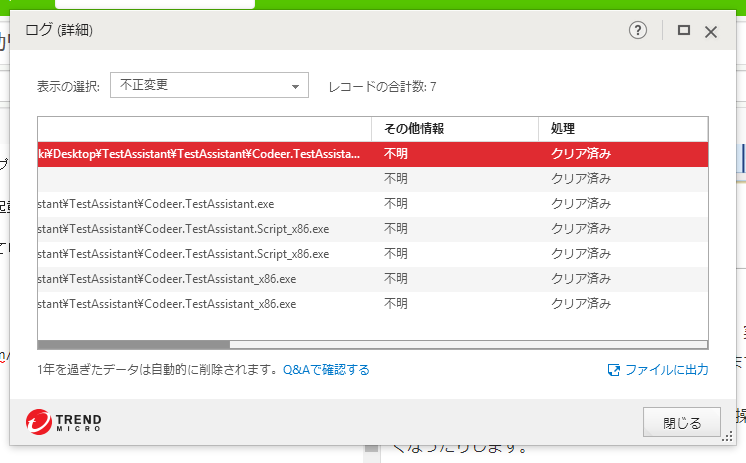
ウィルスバスターの検知
設定によってはウィルスバスターによって誤検知されるので注意してください。
Friendlyによる実装
Nugetで取得したもの
・Codeer.Friendly
・Codeer.Friendly.Windows
・Codeer.Friendly.Windows.Grasp
・Codeer.Friendly.Windows.NativeStandardControls
・Codeer.TestAssistant.GeneratorToolKit
・RM.Friendly.WPFStandardControls
using Codeer.Friendly;
using Codeer.Friendly.Windows;
using Codeer.Friendly.Windows.Grasp;
using RM.Friendly.WPFStandardControls;
using System;
using System.Collections.Generic;
using System.Diagnostics;
using System.Linq;
using System.Text;
using System.Threading.Tasks;
using Codeer.Friendly.Windows.NativeStandardControls;
using Codeer.Friendly.Dynamic;

namespace AkanechanKawaii
{
    class Program
    {
        static void Main(string[] args)
        {
            // プロセスの取得
            Process[] ps = Process.GetProcessesByName("VoiceroidEditor");
            if (ps.Length == 0)
            {
                Console.Error.WriteLine("VOICEROID2を起動してください");
                return;
            }

            // WindowsAppFriendをプロセスから作成する
            // 接続できない旨のエラーの場合、別のプロセスでテスト対象のプロセスを操作している場合がある。
            // TestAssistant使いながら動作できないようなので、注意。
            var app = new WindowsAppFriend(ps[0]);

            var mainWindow = WindowControl.FromZTop(app);

            // 茜ちゃんしゃべる
            WPFTextBox txtMessage = new WPFTextBox(mainWindow.IdentifyFromLogicalTreeIndex(0, 4, 3, 5, 3, 0, 2));
            txtMessage.EmulateChangeText("アカネチャンカワイイヤッタ");

            WPFButtonBase btnPlay = new WPFButtonBase(mainWindow.IdentifyFromLogicalTreeIndex(0, 4, 3, 5, 3, 0, 3, 0));
            btnPlay.EmulateClick();

            // ステータスバーを監視してしゃべり終わるまでまつ
            String sts;
            do
            {
                System.Threading.Thread.Sleep(500);
                var txtStatusItem = mainWindow.IdentifyFromVisualTreeIndex(0, 0, 0, 0, 2, 0, 0, 0, 4, 0, 0, 0).Dynamic(); ;
                sts = txtStatusItem.Text.ToString();
            } while (!sts.Equals("テキストの読み上げは完了しました。"));

            // 保存ボタン押下
            // ダイアログが表示されると引数なしのEmulateClickだと止まるのでAsyncオブジェクトを渡しておく
            var async = new Async();
            WPFButtonBase btnSave = new WPFButtonBase(mainWindow.IdentifyFromLogicalTreeIndex(0, 4, 3, 5, 3, 0, 3, 5));
            btnSave.EmulateClick(async);

            // 音声保存ダイアログ操作
            var dlgSaveWav = mainWindow.WaitForNextModal();
            var asyncSaveWin = new Async();
            WPFButtonBase buttonOK = new WPFButtonBase(dlgSaveWav.IdentifyFromLogicalTreeIndex(0, 1, 0));
            buttonOK.EmulateClick(asyncSaveWin);

            // ファイル名指定後の保存
            var asyncSaveFile = new Async();
            var dlgFileSave = dlgSaveWav.WaitForNextModal();
            NativeEdit editFileName = new NativeEdit(dlgFileSave.IdentifyFromZIndex(11, 0, 4, 0, 0));
            editFileName.EmulateChangeText(System.DateTime.Now.ToString("yyyymMMddhhmmss") + ".wav");

            NativeButton btnSaveOk = new NativeButton(dlgFileSave.IdentifyFromDialogId(1));
            btnSaveOk.EmulateClick(asyncSaveFile);

            // 情報ダイアログが表示されるまで待機してOKを押下
            var dlgInfo = WindowControl.WaitForIdentifyFromWindowText(app, "情報");
            NativeButton btn = new NativeButton(dlgInfo.IdentifyFromWindowText("OK"));
            btn.EmulateClick();


            //非同期で実行した保存ボタン押下の処理が完全に終了するのを待つ
            asyncSaveFile.WaitForCompletion();
            asyncSaveWin.WaitForCompletion();
            async.WaitForCompletion();


            // 葵ちゃんに切り替えてしゃべる
            // UIAutomationだと葵ちゃん切り替えが行えない。
            WPFListView ListView = new WPFListView(mainWindow.IdentifyFromLogicalTreeIndex(0, 4, 3, 3, 0, 1, 0, 2));
            ListView.EmulateChangeSelectedIndex(1);
            txtMessage.EmulateChangeText("オネエチャンカワイイヤッタ");
            btnPlay.EmulateClick();
            ListView.EmulateChangeSelectedIndex(0);

        }
    }
}
備考
・基本的にIdentifyFromLogicalTreeIdxで取得している要素はTestAssistantで取得しています。
・引数なしのEmulateClickで制御がおわるまでかえってこないボタンについてはAsyncをわたして、最後でWaitForCompletion()を実行して終了を待っています。
・UIAutomationでもWinAppDriverでも取れないタブの中身を取得できるため、葵ちゃんに切り替えてしゃべってもらっています。
PyAutoGUIでアカネチャンカワイイヤッター
Pythonで自動操作を行えます。
いままでのツールやライブラリと違い、PyAutoGuiはMacやUnixでも動作するので複数のOSで同じ操作をする場合に有効になると想定されます。
PyAutoGUIによる実装
import time
import pyautogui
import pyperclip
import datetime

# クリップボードを経由する場合
# http://sagantaf.hatenablog.com/entry/2017/10/18/231750
def copipe(string):
    pyperclip.copy(string)
    pyautogui.hotkey('ctrl', 'v')

# 指定の画像が表示されるまで待つ
def waitPicture(f):
    print(f)
    ret = None
    while ret is None:
        ret = pyautogui.locateOnScreen(f, grayscale=False, confidence=.8)
        print (ret)
        if ret is not None:
            return ret
        time.sleep(1)

mainButtons = pyautogui.locateOnScreen('mainbutton.bmp', grayscale=False, confidence=.8)
if mainButtons is None:
    print (u'VOICEROID2の再生ボタンが見つかりません')
    exit()

# テキスト選択
pyautogui.click(mainButtons[0] + 30, mainButtons[1] )

# テキストのクリア
pyautogui.hotkey('ctrl', 'a')
pyautogui.press('del')

# テキストの設定
copipe(u'アカネチャンカワイイヤッタ')

# 再生
pyautogui.click(mainButtons[0], mainButtons[1] + mainButtons[3] / 2 )

# 読み上げまで待機
time.sleep(0.5)
waitPicture('status.bmp')

# 音声の保存
pyautogui.click(mainButtons[0] +  mainButtons[2], mainButtons[1] + mainButtons[3] / 2 )

wavSave = waitPicture('wavSave.bmp')
pyautogui.click(wavSave[0] + 5, wavSave[1] + wavSave[3] / 2 )

# ファイルの保存
fileSave = waitPicture('fileSave.bmp')
pyautogui.click(fileSave[0], fileSave[1])
copipe(datetime.datetime.now().strftime("%Y%m%d%H%M%S.wav"))
pyautogui.press('enter')

# 情報ダイアログ
info = waitPicture('info.bmp')
pyautogui.click(info[0] + info[2], info[1] + info[3])

# 葵ちゃんしゃべる
time.sleep(0.5)
aoi = pyautogui.locateOnScreen('aoi.bmp', grayscale=False, confidence=.8)
pyautogui.click(aoi[0], aoi[1])

# テキスト設定
pyautogui.click(mainButtons[0] + 30, mainButtons[1] )
pyautogui.hotkey('ctrl', 'a')
pyautogui.press('del')
copipe(u'オネエチャンカワイイヤッタ')
pyautogui.click(mainButtons[0], mainButtons[1] + mainButtons[3] / 2 )

# 茜ちゃんに戻す
akane = pyautogui.locateOnScreen('akane.bmp', grayscale=False, confidence=.8)
pyautogui.click(akane[0], akane[1])
解説
・キーボード操作処理で日本語入力に対応していないため、pyperclipを使用してクリップボード経由で文字を設定しています。クリップボードの内容が重大な場合のシナリオについて留意してください。
・locateOnScreenで画像認識をしており、その精度はconfidenceパラメータにより制御しています。画像が認識しずらい場合、この値を下げてみてください。
・あくまで画像認識なので、実行前に対象のコントロールが隠れていたりしないことを確認してから実行してください。他にも解像度の変更やウィンドウサイズや位置の違いで簡単に動かなくなります。
・マルチディスプレイの場合、1つめのディスプレイに操作対象のウィンドウがないと動作しないです。
UWSCでアカネチャンカワイイヤッター
10年以上前から存在するツールです。
レコード機能が強力でAutoHotKeyやAutoItでは認識しないような画面の要素を検出できます。
また、画像認識などの機能そろっており、おそらく、もっとも使いやすいツールの一つでした。
残念なことに、2018年ころよりサイトが閉鎖されてしまい、今後使用することはできないでしょう。
UWSCによる実装
id = GETID("VOICEROID2", "HwndWrapper[VoiceroidEdito", -1)
If id=NULL Then
    id = GETID("VOICEROID2*", "HwndWrapper[VoiceroidEdito", -1)
EndIf

// 再生を行う
SLEEP(1)
SENDSTR(id, "アカネチャンカワイイヤッタ", 1, True, True)

CLKITEM(id, "", CLK_BTN , True, 0)

// ステータスバーをみて再生完了を待つ
sts = ""
While sts <> "テキストの読み上げは完了しました。"
    Sleep(0.1)
    GETITEM(id, ITM_STATUSBAR)
    sts = ALL_ITEM_LIST[6]
Wend

// 保存ボタン
CLKITEM(id, "", CLK_BTN , True, 5)

// 音声保存画面
idSaveWv = GETID("音声保存", "HwndWrapper[VoiceroidEdito", -1)
CLKITEM(idSaveWv, "OK", CLK_BTN , True, 0)

// 名前を付けて保存画面
idFileSave = GETID("名前を付けて保存", "#32770", -1)
SENDSTR(idFileSave, PARAM_STR[0], 0, True, True)
KBD(VK_ENTER)
//CLKITEM(idFileSave, "保存", CLK_ACC)

// OK押下
idInfo = GETID("情報", "#32770", -1)
CLKITEM(idInfo, "OK", CLK_BTN)

// 葵ちゃんに切り替え
SLEEP(1)
ret = CHKIMG("aoi.bmp")
BTN(LEFT, CLICK, G_IMG_X, G_IMG_Y)
SLEEP(0.5)
SENDSTR(id, "オネエチャンカワイイヤッタ", 1, True, True)
CLKITEM(id, "", CLK_BTN , True, 0)

SLEEP(0.5)
CHKIMG("akane.bmp")
BTN(LEFT, CLICK, G_IMG_X, G_IMG_Y)
備考
・Tabの要素は取得できませんが、画像認識により代替できます。
・レコーダ―では記録されない要素がありますが、スクリプトを書くと要素を取得できます。
・CHKIMGはBMP形式のみが対象です。
・サイト閉鎖の問題もあり今後利用するのは厳しいでしょう。
sikulixでアカネチャンカワイイヤッター
画像認識に特化したツールです。
Ruby,Python,JavaScriptで記載されたスクリプトをJavaで解析して動作します。
基本がJavaなのでMacやLinuxでも動作します。ただし1.1.4よりJavaの64ビットが要求されています。
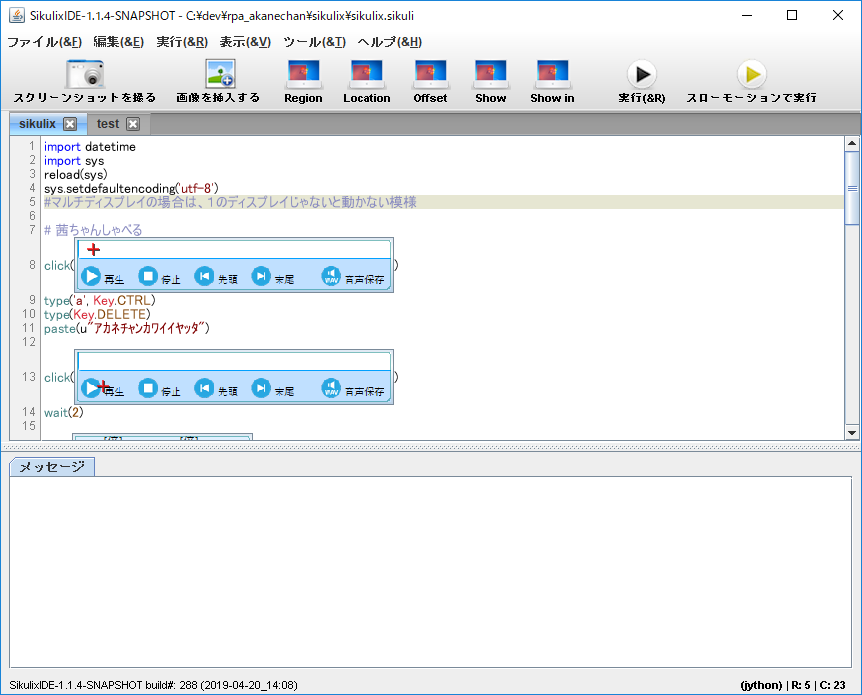
UWSC,pyAutoGuiともに画像認識は行えますが、使用する画像はあらかじめ用意する必要がありました。しかしsikulixでは、必要な際にディスクトップ全体から切り取って使用できます。
また画像のどこをクリックするかという指定もGUI上で行えます。
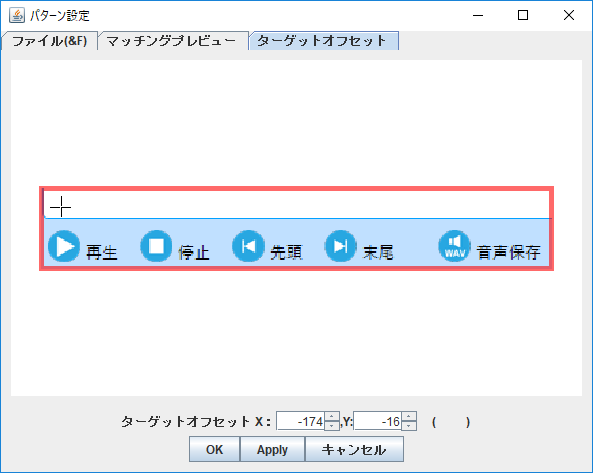
操作記録の機能こそないものの、直観的に作成できる貴重なツールです。
sikulixの実装
import datetime
import sys
reload(sys)
sys.setdefaultencoding('utf-8')
# マルチディスプレイの場合は、1のディスプレイじゃないと動かない模様

# 茜ちゃんしゃべる
click(Pattern("1558790034069.png").targetOffset(-174,-16))
type('a', Key.CTRL)
type(Key.DELETE)
paste(u"アカネチャンカワイイヤッタ")

click(Pattern("1558790034069.png").targetOffset(-162,14))
wait(2)

wait("1558790542060.png")
click(Pattern("1558790034069.png").targetOffset(121,16))

# 音声保存画面
click(Pattern("1558790796902.png").targetOffset(-39,2))

# 名前を付けて保存
click(Pattern("1558790905402.png").targetOffset(-45,-35))
type('a', Key.CTRL)
type(Key.DELETE)
paste(datetime.datetime.now().strftime("%Y%m%d%H%M%S.wav"))
type(Key.ENTER)
click(Pattern("1558790905402.png").targetOffset(-41,38))

# 情報のOKボタンクリック
click(Pattern("1558791076872.png").targetOffset(87,50))

# 消えるまでまつ
# 時間が読めない場合はregionとってexistsで消えるまで見る
wait(1)

# 葵ちゃん
click("1558791449664.png")
click(Pattern("1558790034069.png").targetOffset(-174,-16))
type('a', Key.CTRL)
type(Key.DELETE)
paste(u"オネエチャンカワイイヤッタ")

click(Pattern("1558790034069.png").targetOffset(-162,14))
wait(2)

click("1558791495218.png")
備考
・画像ファイル名になっている箇所はIDE上は画像が表示されます。またtargetOffsetについては赤い十字で表現されます。
・今回ためしたsikuliのバージョンは1.1.4で、使用しているPythonはJythonで2.7になります。また、Javaに組み込んでいるため、通常のPythonより使い勝手がわるい可能性があります。
先に紹介したpyAutoGuiとの使い分けとしてはPythonでどの程度やらせるかが、一つの基準になるでしょう。
・マルチディスプレイの場合、1つめのディスプレイにないと動作しません。
補足:回避できそうですが、少なくとも↑のコードと当方の環境では動かなかったです。
https://sikulix-2014.readthedocs.io/en/latest/screen.html#multi-monitor-environments
・画像認識を使用しているのでウィンドウが隠れたりすると正常に動作しません。
・下記のコードは日本語を表示するためのものです。
import sys
reload(sys)
sys.setdefaultencoding('utf-8')
・その他詳細はココにまとめました
Rocket Mouose Proでアカネチャンカワイイヤッター
古くからあるツールで、1万円前後で入手できます。今回は14日使える試用版で作成しました。
いままで紹介したツールと違い、スクリプトなどは記載しません。
このため、単純な処理は容易に作成できますが、複雑な分岐がある場合は対応できません。
Rocket Mouose Proによる実装と解説
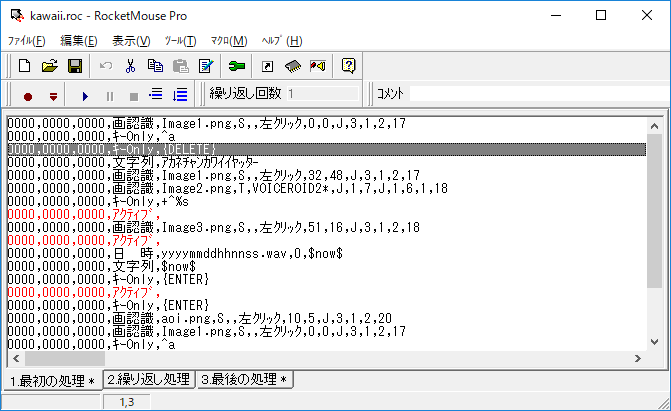
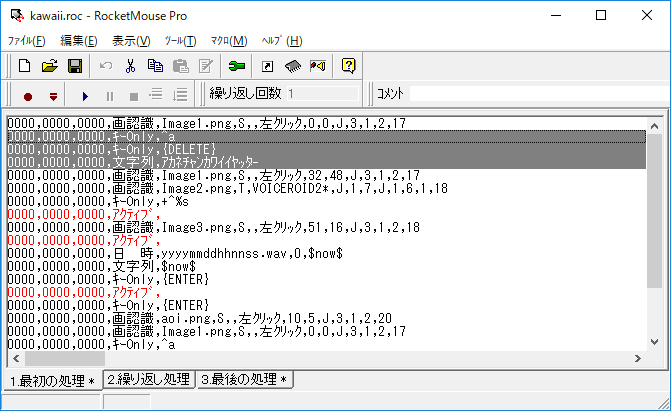
Rocket Mouseでは「最初の処理」、「繰り返しの処理」、「最後の処理」の3つありますが、今回は「最初の処理」と「最後の処理」のみ使用します。
また、最後の処理につては完了メッセージを表示するだけになります。
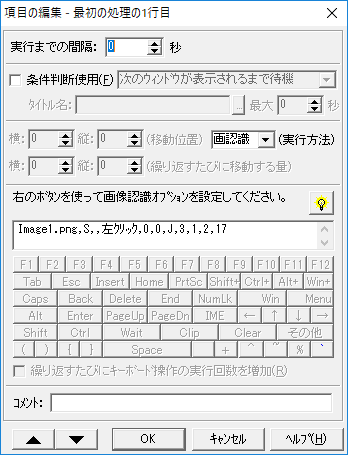
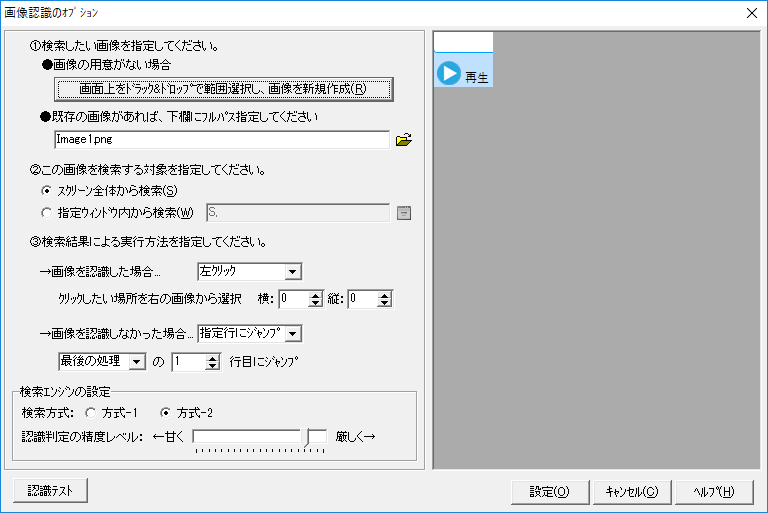
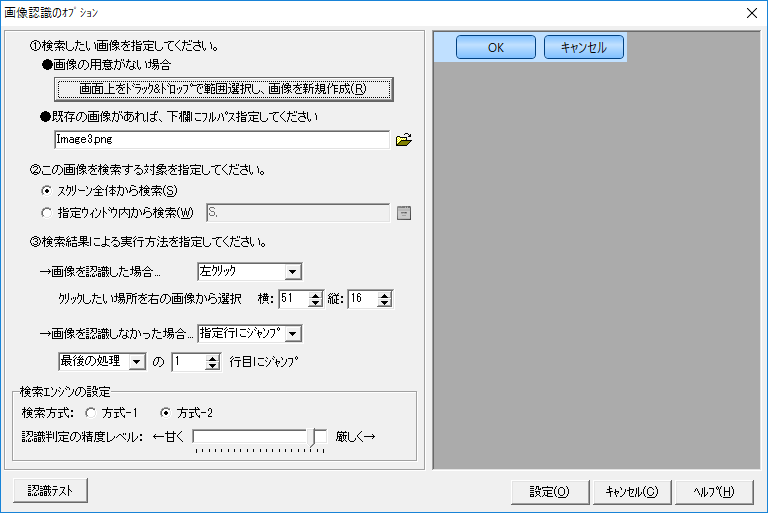
テキストと再生ボタンの画像認識を行い、認識できた場合はテキストをクリックします。
認識できなければ「最期の処理の1行目」にジャンプし処理を終了します。
この処理はキーボード操作でテキストをクリアしたのち、入力したい文字を入れています。
最初の処理5行目
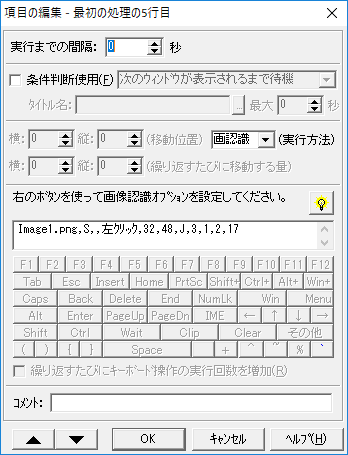
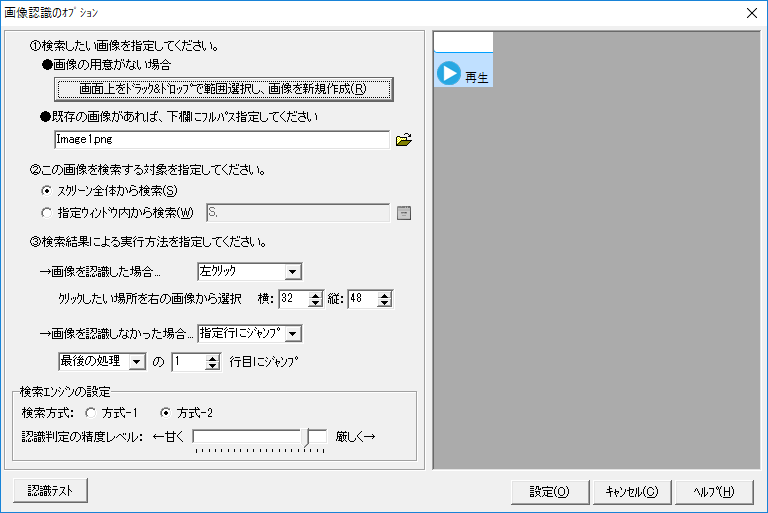
これは最初の処理1行目とほぼ同じで押下している箇所が違うだけです。
今回は再生ボタンをおしています。
最初の処理6行目
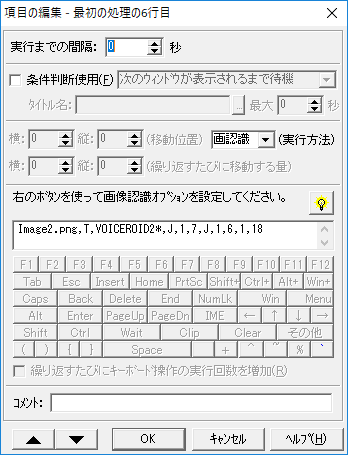
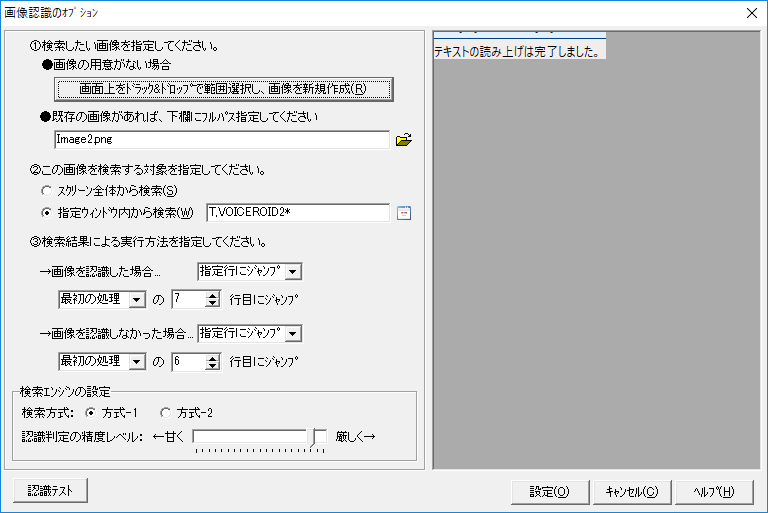
この処理は「テキストを読み上げました」と表示されるまで無限ループをしています。
最初の処理7行目
ショートカットキーで音声保存をしています。
最初の処理8行目
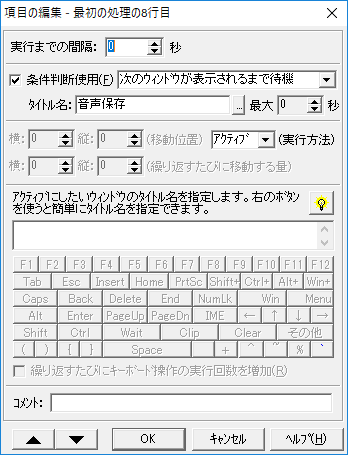
「音声保存」というタイトルのウィンドウが表示されるまで待機します。
OKボタンが表示されたらクリックする、されなければ終了としています。
最初の処理10行目
最初の処理8行目と同様に「名前を付けて保存」画面がでるまで待ちます。
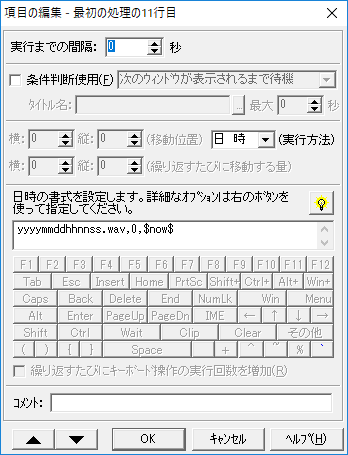
時刻を取得して書式を整えたあと、変数$now$に格納します。
最初の処理12~13
ファイル名に格納した変数$now$を設定後Enterを押します。
これにより名前を付けて保存ダイアログが終了します。
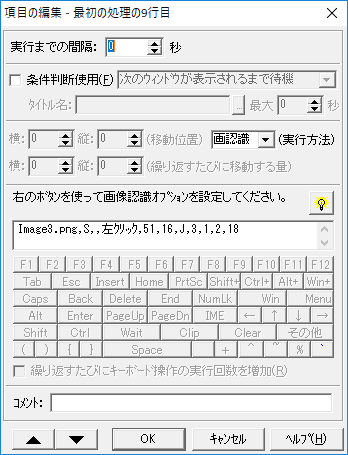
最初の処理14~15
「情報」というウィンドウが表示されるまでまち、表示されたらEnterを押して終了します。
最初の処理16~
あとは今まで出た内容と同じように、葵ちゃんを画像認識で選択後、しゃべらせています。
備考
・マルチディスプレイの場合、1つめのディスプレイにないと動作しません。
・また、条件分岐の制約上エラー処理に弱いです。たとえば、画像が見つからない場合に無限ループになったりします。
UiPathでアカネチャンカワイイヤッター
2018年のforresterの調査でRPAのリーダーと言わしめた製品になっています。
https://samfundsdesign.dk/siteassets/media/downloads/pdf/the_forrester_wave_rpa_2018_uipath_rpa_leader.pdf
今回の走者のなかで、唯一、数十、数百万のツールですが、実はいくつかの条件をみたすことで UiPath Community Editionを使用することができます。
https://www.uipath.com/ja/freetrial-or-community
今まで見てきたオブジェクト識別機能、画像による識別機能、操作記録は当然そろっており、フローチャートによるわかりやすいインターフェイスを提供しています。これは.NETのWFを使用しており、流れ図の部品にあたるアクティビティをカスタムアクティビティとして作成できます。
https://qiita.com/UmegayaRollcake/items/c9ff9a01b101ba9193fc
また、さらには国内製品唯一のアドバンテージだった日本語のローカライズも対応されています。
さすが、リーダーを自称し、他称されるだけの機能です。
UiStudioの起動
ライセンス認証をしたあとのUiPath.Studioの場所は以下になりました。
C:\Users\名前\AppData\Local\UiPath\
プロジェクト
今回作成したプロジェクトのファイルは下記の通りです。
https://github.com/mima3/rpa_akanechan/tree/master/UiPathSample
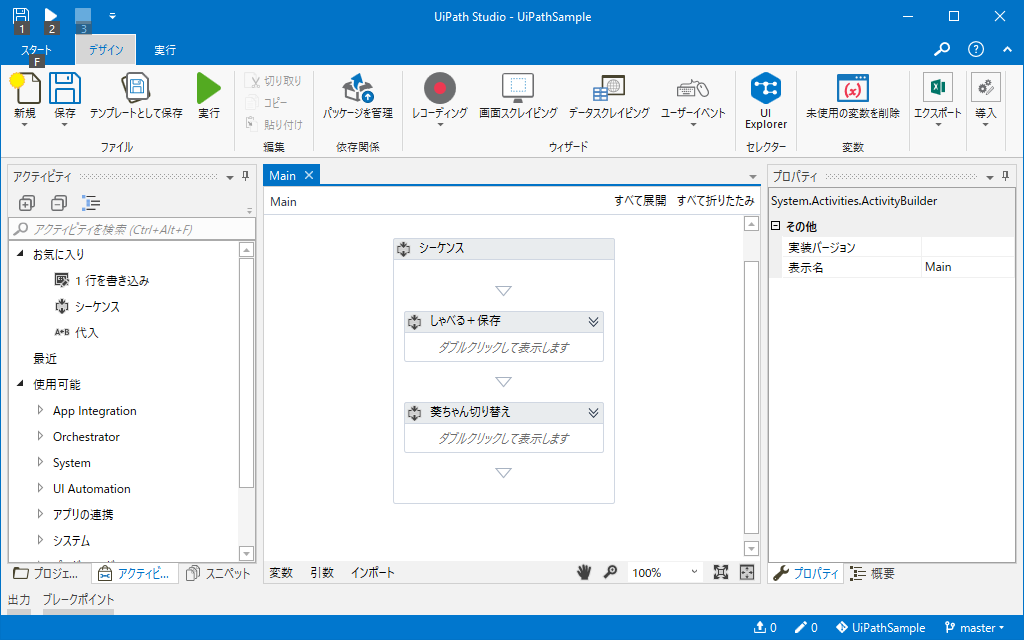
シーケンスの中に「しゃべる+保存」アクティビティと「葵ちゃんに切り替え」アクティビティがあります。
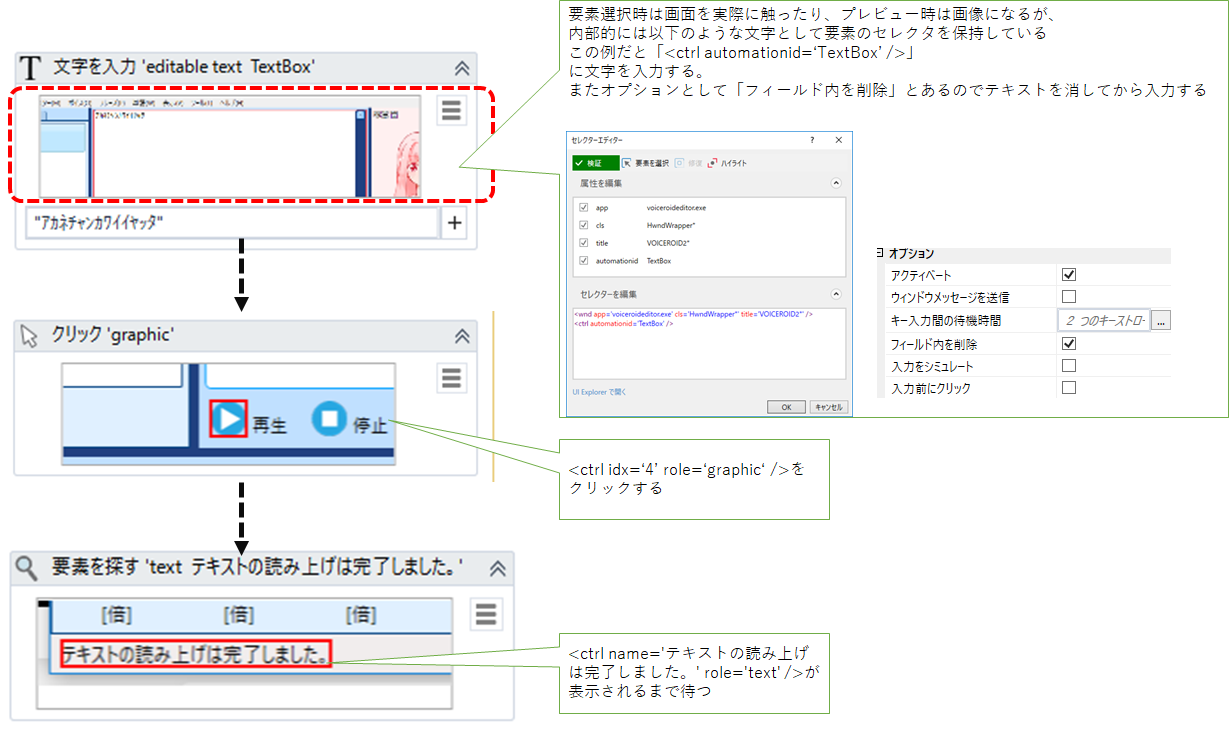
しゃべる~保存アクティビティ
各UIの操作をひとつづ追加していくこともできますし、画面の操作をレコードしてあとで細かいところを修正することもできます。
変数の設定
シーケンス内で有効、アクティビティ内で有効といったスコープを極めて変数を定義できます。

設定値ではVB.NETの式が使用でき、今回は現在時刻のファイル名を構築してます。
処理の流れ
あかねちゃんに切り替えアクティビティ
UIPathでもタブの子要素になっている要素を検知することはできないので画像識別を利用します。
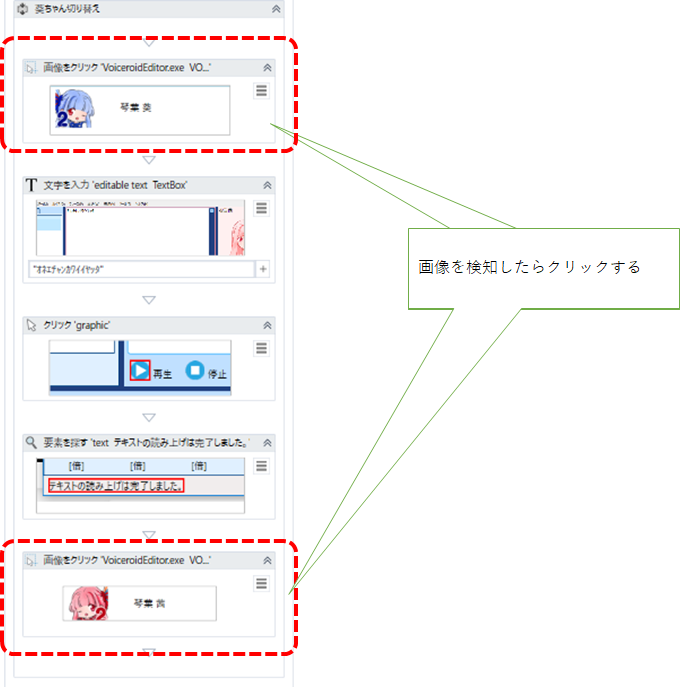
完走した感想
完走した感想ですが、色々と昔のツールが脱落して新規ツールが増えていきました。
まず、昔ながらのツールであるAutoHotKey,AutoIt,RocketMoude、UWSCのうち、UIAutomationでとれる内容を解析することができたのはUWSCだけでした。そしてそのUWSCもすでに命数が尽きています。
(もちろんCOMをサポートしているツールは頑張れば対応できますが、それをやるなら別の手段をとると思います。)
もはやWin32の時代でないと思うと諸行無常を感じます。
また、テスト工程で使うなら、Friendlyが魅力的です。テスト対象をかえずに、テスト用に魔改造が色々できそうです。
複数OS対応ならば、画像の範囲を工夫してSikulixか、pyAutoGuiを検討することになると思います。ただし、画像認識なのでいずれにしても、確実に動作させるのは難しいでしょう。
IT活用しない縛りのレギュレーションの会社ではVBAかPowerShellでUIAutomationをたたくしかないです。
UIPathについては他の高価格帯と比較しないと意味がなさそうなので、ここでは言及しないでおきますが、たぶん触っておいて損はないと思います。
…とここまでやっておいて書くのもアレですが、VBAやPowerShellで動かすのをRPAといっていいのか、そもそもRPAって一体全体なんですか、どなたに伺えばいいんですかという話になりそうなので、そろそろ終わりとうございます。
(補足)
RTAごっこするんじゃなくて、茜ちゃんを、ちゃんと動かすなら先駆者兄貴のライブラリを使うといいっすよ。
https://github.com/mikoto2000/TTSController
