はじめに
まず、ExpoのManaged WorkflowでFirebaseの電話番号認証を行う方法は以前からあって、下記の記事で紹介しています。
Expo + Firebase Auth で電話番号認証
https://qiita.com/mildsummer/items/1940f430d4191b5c5fd9
今のところExpoではFirebaseのネイティブモジュールを使用できない(※)関係で、reCAPTCHA認証の部分はWebViewを使用する必要があります。
上記の記事ではFirebaseでホスティングされたWebページを用意するという一手間があり、公式に推奨されていたものではありませんが、ここにきてSDK37からreCAPTCHAを実装するためのパッケージ(expo-firebase-recaptcha)が追加されました。
ただ、このexpo-firebase-recaptchaの実装自体は非常に簡易なものであって、独自のネイティブモジュールは使用していない、いわばWebView使用パターンの一実装例にすぎません。
そういう意味ではちょっと残念ですが、下記のソースを見るとWebViewに指定するsourceにbaseUrlを入れている(これにより、実際にホスティングする必要が無い)点やFirebase JS SDKとの連携などの部分が、より洗練されているように思えるので、
これを使ってみて、実用観点で使用するならこんな感じかなというパターンを紹介します。
※ Google Analytics for Firebaseのみできるようになったようです(検証中)
https://docs.expo.io/versions/latest/sdk/firebase-analytics/
準備
下記の設定方法については詳しく述べるまでもないと思うので割愛し、これを前提としてすすめます。
- FirebaseプロジェクトのAuthentication設定で電話番号認証を有効化
- Firebase JS SDKをインストール(
$ expo install firebase)し、設定情報を使ってinitializeAppする。
expo-firebase-recaptchaを使ってみる
APIの内容を把握
expo-firebase-recaptchaには以下のようなReactコンポーネントやクラス等が含まれます。
-
FirebaseRecaptchaVerifierModal(Reactコンポーネント)
- reCAPTCHAのWebViewをモーダル内に表示するコンポーネント
- FirebaseAuthApplicationVerifierインターフェースの実装
-
FirebaseRecaptcha(Reactコンポーネント)
- reCAPTCHAを表示するWebView単体のコンポーネント
- 内部的には
react-native-webviewを使用し、このpropsがそのまま渡せる
-
FirebaseAuthApplicationVerifier(TypeScriptインターフェース)
- Firebase JS SDKのfirebase.auth.ApplicationVerifierに相当
-
FirebaseRecaptchaVerifier(クラス)
- FirebaseAuthApplicationVerifierインターフェースの実装
- 擬似的だがfirebase.auth.RecaptchaVerifierクラスに相当
名前が似ていたり継承の概念が入りそれぞれの役割がややこしいので、詳しく説明します。
まず、含まれるDOM要素に応じたサイズでWebViewをアプリ画面内に表示するということが難しい点、
reCAPTCHAは「私はロボットではありません」のチェックボックスのみではなく画像認識の画面を表示する場合がある、つまりUIのサイズが決まっていないという点、
以上の理由から、アプリ画面の中に直接インラインで表示させるということは難しくなっています。
そのため必然的に画面(電話番号を入力する)とは独立したモーダル内に表示することになります。
FirebaseRecaptchaVerifierModalというのが基本のコンポーネントで、ReactNativeのデフォルトのモーダル内にreCAPTCHAを表示する実装になっています。
特にこだわりがない場合はこれを使用します。
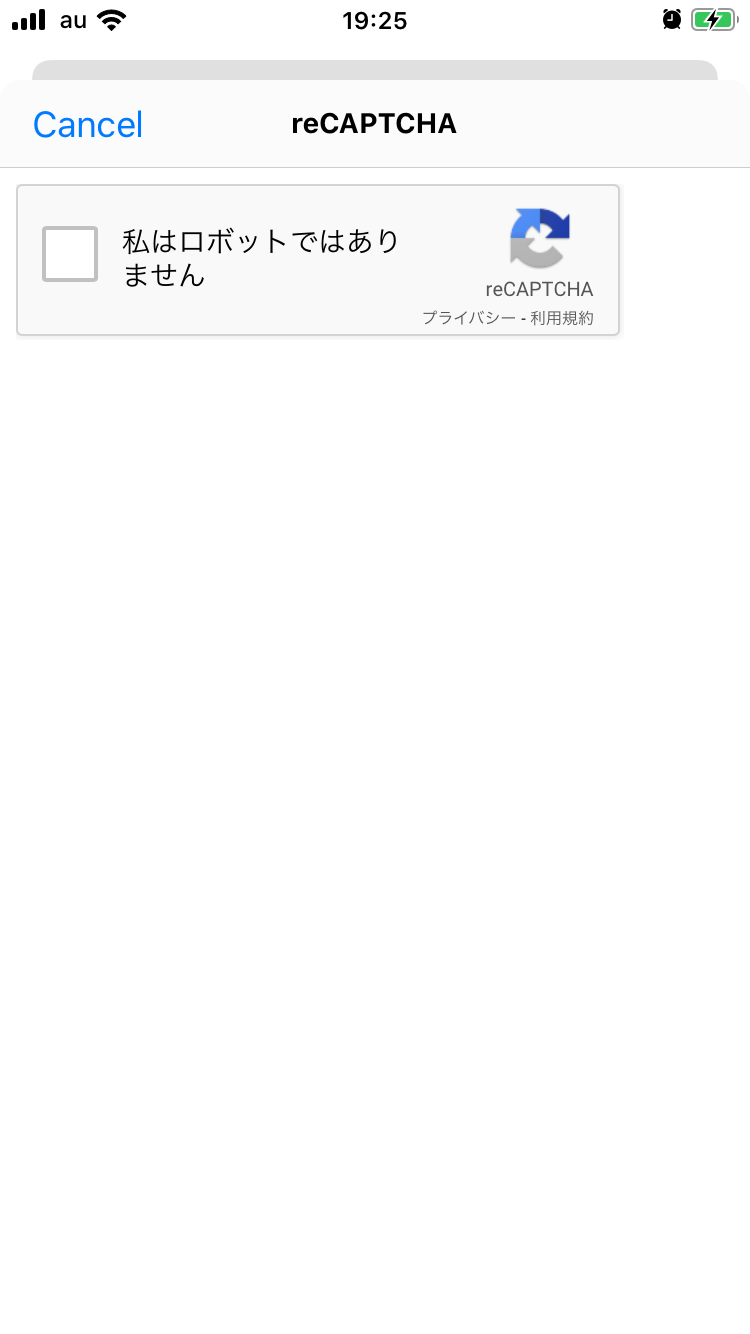
モーダル画面は以下のように空のHTMLにreCAPTCHAをそのまま設置したというようなものになります。変更できるのはタイトルとキャンセルボタンの文言のみ。
使い方をちょっと抽象的に書くと、こんな感じです。
const recaptchaVerifierRef = React.createRef();

<FirebaseRecaptchaVerifierModal
  ref={recaptchaVerifierRef}
  firebaseConfig={firebase.app().options} // Firebase設定
/>

const phoneProvider = new firebase.auth.PhoneAuthProvider();
const verificationId = await phoneProvider.verifyPhoneNumber(phoneNumber, recaptchaVerifierRef.current);
// reCAPTCHAが完了したらSMSが送られる

const credential = firebase.auth.PhoneAuthProvider.credential(
  verificationId,
  verificationCode // SMSで送られてきた認証番号
);
const result = await firebase.auth().signInWithCredential(credential);
電話番号認証にはFirebase AuthenticationsのPhoneAuthProviderクラスインスタンスを使用しますが、そのメソッドverifyPhoneNumberの第二引数にFirebaseAuthApplicationVerifierを継承したクラスのインスタンスを渡します。この場合FirebaseAuthApplicationVerifierを継承していて、かつReactコンポーネントでもあるFirebaseRecaptchaVerifierModalのインスタンス(Reactエレメント)がこの役割を担います。
実際にFirebaseAuthApplicationVerifierインターフェースをみてみると、このような簡単な内容です。
(自分で書いて記事に使っているソースは全てJSですが、ここではJSだったりTSだったりですみません。)
export interface FirebaseAuthApplicationVerifier {
  readonly type: string;
  verify(): Promise<string>;
}
要はreCAPTCHAによって生成されたトークンを非同期で返すverifyメソッドを実装すればよいということです。
FirebaseRecaptchaVerifierModalがどういう機能を担い、どういうコンテキストで実装されたものなのかこれで大体わかるでしょうか。
Reactとの組み合わせ方として、なかなかエレガントではないかと思います。
独自UIの作成
FirebaseRecaptchaVerifierModalの他にFirebaseRecaptchaというWebView単体のコンポーネントが提供されているというのは上述しました。
独自のモーダルデザインでFirebaseRecaptchaVerifierModalのようなコンポーネントを作りたい場合、こちらを使用することになります。
上記の画像のようなデフォルトのモーダルの左上にいかにも安っぽい感じでチェックボタンが表示されるのも嫌なので、これを試してみます。
必要なパッケージはこちら。
$ expo install expo-firebase-recaptcha formik react-native-modal
入力画面を作成
電話番号とSMSで送られてきた認証番号を入力する画面を用意し、コンポーネントを設置します。このコンポーネントは外部からみてFirebaseRecaptchaVerifierModalと同じような振る舞いをすればOKなので、import部分を入れ替えればそのまま使えるように開発を進めます。
import React, { Component, createRef } from "react";
import firebase from "firebase";
import {
  StyleSheet,
  View,
  Keyboard,
  TouchableWithoutFeedback,
  Button,
  TextInput
} from "react-native";
import { Formik } from "formik";

// ここを切り替えればいいように作っておく
import { FirebaseRecaptchaVerifierModal as RecaptchaVerifierModal } from "expo-firebase-recaptcha";
// import RecaptchaVerifierModal from "./app/components/RecaptchaVerifierModal";

// firebase.initializeApp をしておく

const styles = StyleSheet.create({
  container: {
    flex: 1,
    height: "100%",
    width: "100%"
  },
  form: {
    flex: 1,
    width: "100%",
    padding: 40,
    justifyContent: "center"
  },
  input: {
    width: "100%",
    height: 50,
    fontSize: 16,
    paddingHorizontal: 15,
    marginBottom: 15,
    backgroundColor: "#EEE"
  }
});

export default class app extends Component {
  state = {
    verificationId: null
  };
  _recaptchaVerifier = createRef();

  /**
   * reCAPTCHA画面を起動し、RecaptchaVerifierを取得
   * @param {object} values
   */
  verifyRecaptcha = values => {
    if (this._recaptchaVerifier.current) {
      console.log(this._recaptchaVerifier.current.type);
      const { phoneNumber } = values;
      const phoneProvider = new firebase.auth.PhoneAuthProvider();
      phoneProvider.verifyPhoneNumber(phoneNumber, this._recaptchaVerifier.current).then((verificationId) => {
        this.setState({ verificationId });
      }).catch(e => {
        console.log(e);
      });
    }
  };

  /**
   * 認証番号を照らし合わせ、認証を完了
   * @param {object} values フォームの値
   */
  verifyPhoneNumberToken = values => {
    const { verificationId } = this.state;
    const { verificationCode } = values;
    const credential = firebase.auth.PhoneAuthProvider.credential(
      verificationId,
      verificationCode
    );
    firebase.auth().signInWithCredential(credential).then((result) => {
      // 成功
      console.log("result", result);
    }).catch(e => {
      // 失敗
      console.log(e);
    }).finally(() => {
      this.setState({
        verificationId: null,
        verificationPhoneNumber: null
      });
    });
  };

  render() {
    const { verificationId } = this.state;
    return (
      <TouchableWithoutFeedback onPress={Keyboard.dismiss}>
        <View style={styles.container}>
          <RecaptchaVerifierModal
            ref={this._recaptchaVerifier}
            firebaseConfig={firebase.app().options}
          />
          <Formik
            initialValues={{
              phoneNumber: "+819012345678",
              verificationCode: ""
            }}
            onSubmit={
              verificationId
                ? this.verifyPhoneNumberToken
                : this.verifyRecaptcha
            }
          >
            {({ handleSubmit, handleChange, values }) => (
              <View style={styles.form}>
                {verificationId ? (
                  <TextInput
                    style={styles.input}
                    placeholder="認証コード"
                    keyboardType="number-pad"
                    onChangeText={handleChange("verificationCode")}
                    value={values.verificationCode}
                  />
                ) : null}
                <TextInput
                  style={styles.input}
                  placeholder="電話番号"
                  keyboardType="phone-pad"
                  onChangeText={handleChange("phoneNumber")}
                  value={values.phoneNumber}
                />
                <Button
                  title="OK"
                  onPress={handleSubmit}
                />
              </View>
            )}
          </Formik>
        </View>
      </TouchableWithoutFeedback>
    );
  }
}
入力画面はこんな感じで、実際は他の情報入力との組み合わせになるので、サンプルです。

コンポーネントを作成
コンポーネントのソースはこんな感じで。
[2020/06/16]現在のバージョンでエラーが出ていたので、ソースを修正しました
import React, { PureComponent } from "react";
import { View, Animated, ActivityIndicator, TouchableOpacity, Text, StyleSheet } from "react-native";
import Modal from "react-native-modal";
import { FirebaseRecaptcha, FirebaseAuthApplicationVerifier } from "expo-firebase-recaptcha";

const AnimatedActivityIndicator = Animated.createAnimatedComponent(ActivityIndicator);
const animationIn = { 0: { transform: [{ translateY: 20 }] }, 1: { transform: [{ translateY: 0 }] } };
const animationOut = { 0: { transform: [{ translateY: 0 }], opacity: 1 }, 1: { transform: [{ translateY: 20 }], opacity: 0 } };
const injectedStyleSheet = `
  html, body {
    width: 100%;
    height: 100%;
    margin: 0;
    padding: 20px;
    display: flex;
    align-items: center;
    justify-content: center;
    box-sizing: border-box;
  }
  body > div, body > div > div {
    box-shadow: none !important;
    border: none !important;
  }
`;
const injectedJavascript = `
  var styleSheet = document.createElement("style");
  styleSheet.innerHTML = "${injectedStyleSheet.replace(/\n/g, "")}";
  document.head.appendChild(styleSheet);
  var initialized = false;
  var observer = new MutationObserver(function() {
    if (!initialized) {
      initialized = true;
      observer.disconnect();
      window.ReactNativeWebView.postMessage("");
    }
  });
  observer.observe(document.body, {
    childList: true
  });
`;
const styles = StyleSheet.create({
  container: {
    flex: 1,
    margin: 0,
    alignItems: "center",
    padding: 15
  },
  inner: {
    width: "100%",
    height: "90%",
    backgroundColor: "#fff"
  },
  title: {
    width: "100%",
    padding: 15,
    color: "#333",
    lineHeight: 15,
    backgroundColor: "#EEE",
    zIndex: 2
  },
  closeButton: {
    position: "absolute",
    width: 45,
    height: 45,
    top: 0,
    right: 0,
    zIndex: 3
  },
  closeButtonLine1: {
    position: "absolute",
    width: 20,
    height: 1,
    top: "50%",
    left: "50%",
    marginTop: -0.5,
    marginLeft: -10,
    backgroundColor: "#333",
    transform: [{ rotate: "-45deg" }]
  },
  closeButtonLine2: {
    position: "absolute",
    width: 20,
    height: 1,
    top: "50%",
    left: "50%",
    marginTop: -0.5,
    marginLeft: -10,
    backgroundColor: "#333",
    transform: [{ rotate: "45deg" }]
  },
  screen: {
    flex: 1,
    position: "absolute",
    width: "100%",
    height: "100%",
    zIndex: 1,
    backgroundColor: "#fff"
  },
  activityIndicator: {
    flex: 1,
    position: "absolute",
    width: "100%",
    height: "100%",
    zIndex: 2
  },
  webViewWrapper: {
    flex: 1,
    width: "100%",
    padding: 15
  }
});


/**
 * モーダルでreCAPTCHAを実行するためのコンポーネント
 * @implements FirebaseAuthApplicationVerifier
 * @extends PureComponent
 */
class RecaptchaVerifierModal extends PureComponent {
  state = {
    isVisible: false
  };
  _webViewVisibility = new Animated.Value(0);

  /**
   * @readonly
   * @type {string}
   */
  type = 'recaptcha';

  /**
   * reCAPTCHAを開始
   * @public
   * @returns {Promise<string>}
   */
  verify = () => {
    const { isVisible } = this.state;
    if (!isVisible && !this._resolve) {
      this._webViewVisibility.setValue(0);
      this.setState({ isVisible: true });
      return new Promise((resolve, reject) => {
        this._resolve = resolve;
        this._reject = reject;
      });
    } else {
      return new Promise((resolve, reject) => {
        reject(new Error("Verification already in progress."));
      });
    }
  };

  /**
   * 検証が成功
   * @param recaptchaToken
   * @private
   */
  _onVerify = recaptchaToken => {
    if (this._resolve) {
      this._resolve(recaptchaToken);
      delete this._resolve;
      delete this._reject;
      this.setState({ isVisible: false });
    }
  };

  /**
   * ユーザーインタラクションによってモーダルを閉じる処理
   * @private
   */
  _onClose = () => {
    const reject = this._reject;
    if (reject) {
      reject(new Error("Verification has been canceled."));
    }
    delete this._resolve;
    delete this._reject;
    Animated.timing(this._webViewVisibility, {
      toValue: 0,
      duration: 150
    }).start(() => {
      this.setState({ isVisible: false });
    });
  };

  _onMessageFromWebView = (event) => {
    const message =
      event.nativeEvent.data && JSON.parse(event.nativeEvent.data);
    if (message) {
      if (message.type === "verify") {
        this._onVerify(message.token);
      } else if (message.type === "load") {
        this._onInitialized();
      } else if (message.type === "error") {
        console.log("error");
      }
    }
  };

  _onInitialized = () => {
    setTimeout(() => {
      Animated.timing(this._webViewVisibility, {
        toValue: 1,
        duration: 300
      }).start();
    }, 400);
  };

  render() {
    const { isVisible } = this.state;
    const { firebaseConfig, firebaseVersion, title } = this.props;
    return (
      <Modal
        style={styles.container}
        isVisible={isVisible}
        animationIn={animationIn}
        animationOut={animationOut}
        animationInTiming={500}
        animationOutTiming={500}
        onBackButtonPress={this._onClose}
        onBackdropPress={this._onClose}
        onDissmiss={this._onClose}
        backdropTransitionOutTiming={0}
      >
        <View style={styles.inner}>
          <Text
            style={styles.title}
          >{title}</Text>
          <TouchableOpacity style={styles.closeButton} onPress={this._onClose}>
            <View
              style={styles.closeButtonLine1}
            />
            <View
              style={styles.closeButtonLine2}
            />
          </TouchableOpacity>
          <Animated.View
            style={[styles.screen, {
              opacity: this._webViewVisibility.interpolate({
                inputRange: [0, 1],
                outputRange: [1, 0]
              })
            }]}
            pointerEvents="none"
          >
            <AnimatedActivityIndicator
              style={styles.activityIndicator}
            />
          </Animated.View>
          <Animated.View
            style={[styles.webViewWrapper, {
              opacity: this._webViewVisibility
            }]}
            pointerEvents="auto"
          >
            {isVisible && (
              <FirebaseRecaptcha
                bounces={false}
                injectedJavaScript={injectedJavascript}
                firebaseConfig={firebaseConfig}
                firebaseVersion={firebaseVersion}
                onMessage={this._onMessageFromWebView}
              />
            )}
          </Animated.View>
        </View>
      </Modal>
    );
  }
}

RecaptchaVerifierModal.defaultProps = {
  firebaseVersion: null,
  title: "認証を開始します"
};

export default RecaptchaVerifierModal;
親コンポーネント(画面)内ではPhoneAuthProviderによりverifyメソッドが呼ばれます。モーダルの表示非表示やPromiseのやりくりをするのに加えて、FirebaseRecaptcha(WebView)にJSをinjectすることでスタイル調整やreCAPTCHAが表示完了したタイミングでActivityIndicatorを消す処理などを行っています。
画面を確認
先ほどのApp.jsのimportを切り替えて画面を確認すると、

独自デザインのモーダルでreCAPTCHAが表示できました。
Androidでもほぼ変わりありません。


怪しいコンバージョンと判断されるとこのように画像認識が求められます。
reCAPTCHAが完了すると、わりとすぐに認証番号がSMSで届きます。
この後入力してOKを押すとデバッグコンソールに認証結果が表示されます。

終わり
ちなみにFirebaseでの電話番号認証は以前からSMSが届かない不具合があり、下記のような記事でAuthyを調べたりもしていました。
Firebaseの電話番号認証の代わりにAuthyを使う
https://qiita.com/mildsummer/items/5a3892435debd76529ef
今回改めて使ってみると問題なく届いてしまったのですが、以前の検証に使ったソースでもやはり届いたので、このパッケージの実装だけがうまくいくということでもなさそうです。
電話番号認証に関してはローカルなプロバイダの影響が大きいためか、予期できない不具合と突然それが解決するというようなことがあるようです。。。