はじめに
これまでの記事の続きです。
Expo + Firebase Auth覚え書き
Expo + Firebase Authでパスワード再設定・メール確認覚え書き
Expo + Firebaseで電話番号認証を利用してみます。
主要な部分はこちらの実装をほとんど参考にしています。
また、SMS送信に不安定な部分があり、まだ動作確認が不十分ですので(引き続き調査しようと思います)、悪しからずご了承下さい。
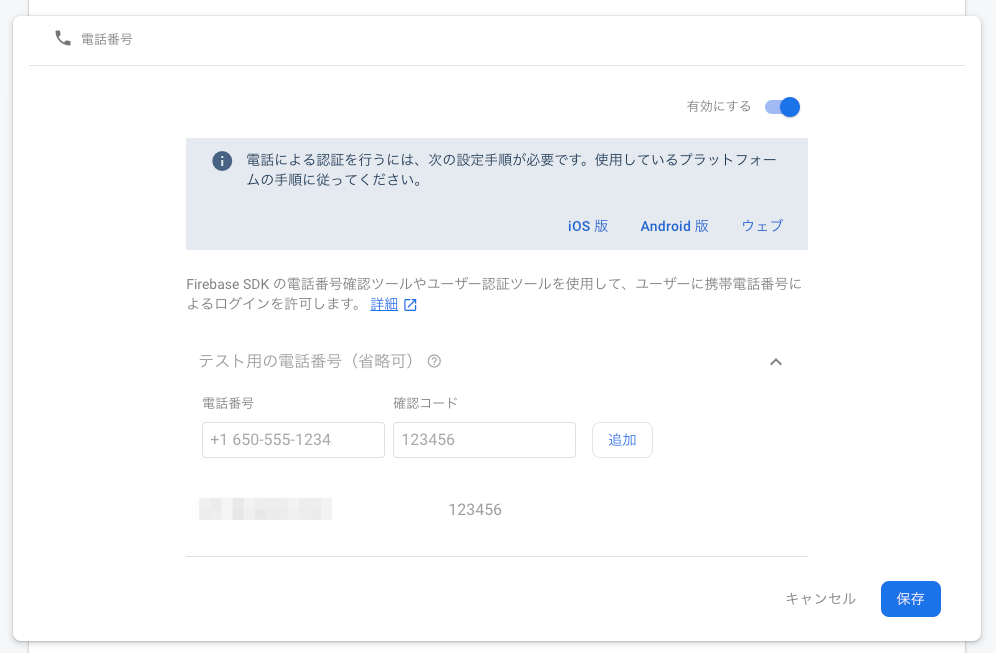
Firebaseコンソールでの設定
「Authentication」→「ログイン方法」から電話番号を有効にします。テスト用の電話番号を入力しておくと便利です。
電話番号入力画面を用意
ここでは、Firebase.UserインスタンスにphoneNumberが無い場合に画面内に入力フォームを表示するようにしてみます。
表示条件にphoneNumberConfirmationがありますが、これは後の処理でstoreに持たせるようにしますので、今は無視してください。
{user.phoneNumber || phoneNumberConfirmation ? null : (
  <View>
    <Input
      label='Your phone number'
      value={phoneNumber}
      onChangeText={this.onChangePhoneNumber}
    />
    <Button
      title='OK'
      onPress={this.verifyPhoneNumber}
      disabled={!phoneNumber}
    />
  </View>
)}
reCAPTCHA認証してメールを送信する処理を実装
import { Linking } from 'expo'
import * as WebBrowser from 'expo-web-browser';

export const verifyPhoneNumber = (phoneNumber) => (dispatch) => {
  const captchaUrl = `${CAPTCHA_URL_BASE}?appurl=${Linking.makeUrl('')}`;
  const listener = ({ url }) => {
    WebBrowser.dismissBrowser();
    const tokenEncoded = Linking.parse(url).queryParams['token'];
    if (tokenEncoded) {
      const token = decodeURIComponent(tokenEncoded);
      // 偽のfirebase.auth.ApplicationVerifierを作成
      const captchaVerifier = {
        type: 'recaptcha',
        verify: () => Promise.resolve(token)
      };
      auth.signInWithPhoneNumber(phoneNumber, captchaVerifier).then((confirmationResult) => {
        dispatch({
          type: 'CONFIRM_PHONE_NUMBER',
          phoneNumberConfirmation: confirmationResult
        });
      }).catch(function({ message }) {
        Alert.alert(message);
      });
    }
  };
  Linking.addEventListener('url', listener);
  WebBrowser.openBrowserAsync(captchaUrl).then(() => {
    Linking.removeEventListener('url', listener);
  });
};
LinkingとWebBrowserを使用します。
電話番号認証のためにはreCAPTCHA認証(firebase.auth.RecaptchaVerifier)が必要なのですが、現状、FirebaseのJS版SDKではこの機能がDOM上でしか使用できないため、ブラウザを立ち上げてその中で認証させるという方法をとります。
ブラウザ内のreCAPTCHA認証からトークンを渡してもらい、authインスタンスのfirebase.auth.RecaptchaVerifierクラスインスタンスとして振る舞うオブジェクトを用意して電話番号認証を実行します。
実行結果のconfirmationResult(ConfirmationResultインスタンス)は後ほど使うので、storeに保持しておきます。
reCAPTCHAを実行するWebページを用意する
Firebaseの静的サイトホスティングでreCAPTCHAを行うWebページを用意します。
静的サイトホスティングについてはこちらの記事を参考にしました。
<!DOCTYPE html>
<html>
<head>
  <meta charset="utf-8">
  <meta name="viewport" content="width=device-width, initial-scale=1">
  <title>Entering captcha</title>

  <!-- update the version number as needed -->
  <script defer src="/__/firebase/7.2.1/firebase-app.js"></script>
  <!-- include only the Firebase features as you need -->
  <script defer src="/__/firebase/7.2.1/firebase-auth.js"></script>
  <script defer src="/__/firebase/7.2.1/firebase-database.js"></script>
  <script defer src="/__/firebase/7.2.1/firebase-messaging.js"></script>
  <script defer src="/__/firebase/7.2.1/firebase-storage.js"></script>
  <!-- initialize the SDK after all desired features are loaded -->
  <script defer src="/__/firebase/init.js"></script>

  <style media="screen">
    body { background: #ECEFF1; color: rgba(0,0,0,0.87); font-family: Roboto, Helvetica, Arial, sans-serif; margin: 0; padding: 0; }
  </style>
</head>
<body>
<p>Please, enter captcha for continue<p/>
<button id="continue-btn" style="display:none">Continue to app</button>
<script>
  function getToken(callback) {
    const containerId = 'captcha';
    const container = document.createElement('div');
    container.id = containerId;
    document.body.appendChild(container);
    var captcha = new firebase.auth.RecaptchaVerifier(containerId, {
      'size': 'normal',
      'callback': function(token) {
        callback(token);
      },
      'expired-callback': function() {
        callback('');
      }
    });
    captcha.render().then(function() {
      captcha.verify();
    });
  }

  function sendTokenToApp(token) {
    const baseUri = decodeURIComponent(location.search.replace(/^\?appurl\=/, ''));
    const finalUrl = location.href = baseUri + '/?token=' + encodeURIComponent(token);
    const continueBtn = document.querySelector('#continue-btn');
    continueBtn.onclick = function() {
      window.open(finalUrl, '_blank');
    };
    continueBtn.style.display = 'block';
  }

  document.addEventListener('DOMContentLoaded', function() {
    getToken(sendTokenToApp);
  });
</script>
</body>
</html>
reCAPTCHAを実行し、成功したら取得したトークンをクエリパラメーターにしてアプリに遷移させます。
確認番号入力画面を用意
ではアプリ側で、確認番号の送信が完了したら入力フォームを表示するようにします。
{phoneNumberConfirmation ? (
  <View>
    <Input
      label='Enter the verification code'
      value={phoneNumberVerificationCode}
      onChangeText={this.onChangePhoneNumberVerificationCode}
    />
    <Button
      title='OK'
      onPress={this.confirmPhoneNumberVerification}
      disabled={!phoneNumberVerificationCode}
    />
  </View>
) : null}
ユーザーに電話番号を紐付ける
この処理はWebと変わらず、確認番号を使用して電話番号認証を完了し、作成したクレデンシャルをユーザー(Firebase.User)に紐付けて完了です。
export const confirmPhoneNumberVerification = (verificationCode) => (dispatch) => {
  const state = store.getState().user;
  const phoneNumberConfirmation = state.phoneNumberConfirmation;
  const user = state.data;
  const credential = firebase.auth.PhoneAuthProvider.credential(phoneNumberConfirmation.verificationId, verificationCode);
  user.linkWithCredential(credential).then((userCredential) => {
    dispatch({
      type: 'SUCCESS_CONFIRM_PHONE_NUMBER',
      user: userCredential.user
    });
  }).catch(function({ message }) {
    Alert.alert(message);
  });
};
Github
サンプルソースを置いています。
- Expoアプリ側 https://github.com/mildsummer/expo-auth-practice
- Firebase側ソースはこちら https://github.com/mildsummer/expo-auth-practice-firebase