はじめに
直近の記事でWebViewを使用することによってExpoアプリをEjectせずにStripeを導入する方法を確認しました。
ここではもう一つの選択肢として、iOSにおいてEjectが必須であるPayments APIの方をまとめてみます。
Compatibilityを整理
なかなかややこしいので、まずはWebViewでの実装を含めて、各OS、機能で何ができて何ができないのかを整理しておきます。
checkout.js in WebView
Expoでの動作 → iOS/Android共に❌
サーバー側実装 → 不要
動的な金額設定 → 可
PSD2 → 不明(未準拠?)
Stripeのcheckout.jsは、カード入力フォームをWebページ上にモーダルで表示させて決済を導入できるライブラリです。
現在はレガシー扱いになっていて、下記のドキュメントのようにStripeがホスティングするページへリダイレクトさせる実装へと変更することが推奨されています。
Checkout migration guide
https://stripe.com/docs/payments/checkout/migration
今から導入する際には当然選択肢には入らないと思いますが、StripeをExpoで使用する際のライブラリとしてexpo-stripe-checkoutという一実装があり、こちらはこのcheckout.jsをWebViewで使用しています。
ちょっと試してみたところ、現在このcheckout.jsはブラウザがWebViewやスマホであると認識された場合に別タブでチェックアウト画面を開くような処理になっていて、うまく動作しませんでした。
Elements + Payment Intents in WebView
Expoでの動作 → iOS/Android共に⭕️
サーバー側実装 → 必要
動的な金額設定 → 可
PSD2 → 準拠可
Stripe Elementsはカード情報などの入力フォームを独自に作成するためのWeb向けAPIです。
ユーザーが入力したカード情報などに開発者がタッチできないよう設計されており、欧州の決済サービス指令(PSD2)に準拠したセキュアな決済フローを柔軟に実装できるようになっています。
Elementsの場合はPayment Intentという決済機能を使うのですが、これはサーバー側の実装が併せて必要になります。
Expoで使用する際はこちらの記事に簡単な例を載せたので、参照してください。
ejectなしのExpoアプリにStripe決済をWebViewを使って埋め込む
https://qiita.com/mildsummer/items/f95fd53864be6f14e3b0
Checkout + Sessions in WebView
Expoでの動作 → iOS/Android共に⭕️
サーバー側実装 → 必要(+静的HTMLホスティング)
動的な金額設定 → 可
PSD2 → 準拠可
現在のCheckoutは、redirectToCheckoutメソッドによってStripeがホスティングする決済フォームへリダイレクトする機能になっています。
通常はSessionをサーバー側で作成してからsessionIdを指定することでリダイレクトする感じになります。
そのほか、WebViewで使用する場合もコールバック先のHTMLはWeb上のどこかに用意する必要があります。
詳しくはこちらの記事の1.2.を参照してください。
ejectなしのExpoアプリにStripe決済をWebViewを使って埋め込む(Checkout編)
https://qiita.com/mildsummer/items/616677286e79cb8f8f75
Checkout クライアント専用組み込み in WebView
Expoでの動作 → iOS/Android共に⭕️
サーバー側実装 → 不要(静的HTMLホスティングは必要)
動的な金額設定 → 不可(SKU・個数を指定)
PSD2 → 準拠可
現状、Expoアプリに導入できるStripeの機能のなかで唯一サーバー側の実装が不要なパターンです。
ただし、SKUを指定する形になるため動的に金額を設定することはできません。これはセキュリティ上の制限ということだと思います。
Expoでの実装例はこちらを参照してください。
Expo Payments + Charge
| Expoでの動作 | iOS | Android |
|---|---|---|
| Managed / Expo Client | ❌ | ⭕️(英語のみ) |
| Bare / Expo Client | ❌ | ⭕️(英語のみ) |
| Bare / Standalone | ⭕️ | ⭕️ |
サーバー側実装 → 必要
動的な金額設定 → 可
PSD2 → 未準拠
WebViewを使わず、Stripeのネイティブアプリ用ライブラリを使用したパターンです。
ExpoからはPayments API(expo-payments-stripe)を使用します。
Stripeの各OSライブラリをReact Nativeで使用できるようにしたものがtipsi-stripeで、これをExpoで使用できるようにしたものがexpo-payments-stripeと二重の依存関係になっているため、最新のバージョンが反映されるまでになかなか時間がかかりそうだなという懸念がありますが、一応使用できます。
ただし2020年1月現在のところPSD2に準拠したPaymentIntentsを使用できないため、欧州での使用が想定される場合は注意が必要です。
PSD2に準拠する必要がある場合は、Expoのフォーラムでも話題に上がっているので随時チェックしてみてください。
Tipsi-stripe SCA compliant Payment
https://forums.expo.io/t/tipsi-stripe-sca-compliant-payment/27422
表に書いた通り、iOSではBare Workflowでスタンドアロンビルドした状態のみで使用できます。
AndroidではEjectせずExpo Clientで使用できるのですが、今のところUI文言の設定にはリソースファイル(XML)の修正が必要で、故にカード入力UIを日本語に対応したい場合はeject/Bare Workflow化が必須です。
では、このPaymentsを導入する流れを説明していきます。
まずPaymentsを使ってみる
サーバー側の実装
ExpoのPaymentsではユーザーの入力したカード情報をトークン化する機能のみ使用できます。
このトークンはStripe Chargeの作成時にsourceオプションとして指定するものです。
このCharge作成の処理はサーバー側で行います。
上述したWebViewの記事と同じようにFirebase Cloud Functionsにデプロイするとしたら例えば以下のような感じになります。
const functions = require('firebase-functions');

const app = require('express')();
const stripe = require('stripe')('sk_test_...'); // 秘密鍵
const cors = require('cors');
const bodyParser = require('body-parser');

app.use(require('body-parser').text());
app.use(cors());
app.use(bodyParser.urlencoded({ extended: true }));
app.use(bodyParser.json());

app.post('/createCharge', async (req, res) => {
  const { token } = req.body;
  const result = await stripe.charges.create({
    amount: 2000, // 金額
    currency: 'jpy', // 通貨単位
    source: token, // トークンを渡す
    description: 'test charge', // 説明
  });
  res.json(result);
});

exports.api = functions.https.onRequest(app);
WebViewの記事と合わせて簡単にhttps.onRequestでexpressを使用していますが、勿論ちゃんとhttpsCallableやFirestoreとの連携などすることも可能です。
また、Firebase Cloud Functionsを使用する際に注意が必要な点があります。
Payment Intentsを使用した
- サーバー側で決済情報を作成 → 2. クライアント側でカード情報と紐付けて決済完了
のパターンと違ってChargeの場合は - クライアント側でカード情報を作成(トークン化) → 2. サーバー側で決済
という流れになるので、サーバー側で冪等性を保証しないと同じカード情報を使って二重に決済されるということが容易に起こってしまいます。
詳しくはこちらのk-boyさんの記事が参考になります。
stripeをfirebaseで使うときidempotency_keyをつけよう
https://qiita.com/k-boy/items/6d8ce83084a0f49ab0d2
アプリ側を作成
ボタンをタップしたらカード入力フォームを表示するような画面を作ります。

expo-payments-stripeをインストールします。
$ npm install --save expo-payments-stripe
JS側はシンプルにApp.jsのみでこんな感じに。
import React, { Component } from 'react';
import { StyleSheet, Text, ActivityIndicator, TouchableOpacity, View } from 'react-native';
import { PaymentsStripe as Stripe } from 'expo-payments-stripe';
export default class App extends Component {
state = {
loading: false,
succeeded: false
};
/**
* カード入力画面を表示しCharge作成
*/
charge = async() => {
this.setState({ loading: true });
try {
await Stripe.setOptionsAsync({
publishableKey: 'pk_test_...' // 公開鍵
});
const params = {
// Only iOS support this options
smsAutofillDisabled: true,
requiredBillingAddressFields: 'full',
prefilledInformation: {
billingAddress: {
name: 'Hanako Yamada',
line1: 'line1',
line2: 'line2',
city: 'Yokohama',
state: 'Kanagawa',
country: 'JP',
postalCode: '2440000',
email: 'test@test.com',
}
}
};
const source = await Stripe.paymentRequestWithCardFormAsync(params);
const result = await fetch('https://[リージョン名]-[プロジェクト名].cloudfunctions.net/api/createCharge', { // 先ほどのAPIを叩く
method: 'POST',
headers: {
'Content-type': 'application/json'
},
body: JSON.stringify({ token: source.tokenId })
});
this.setState({ loading: false, succeeded: result.status === 200 });
} catch (e) {
console.log(e);
this.setState({ loading: false });
}
};
/**
* Chargeをキャンセル
*/
cancel = () => {
this.setState({ isCharge: false });
};
render() {
const { loading, succeeded } = this.state;
return (
<View style={styles.container}>
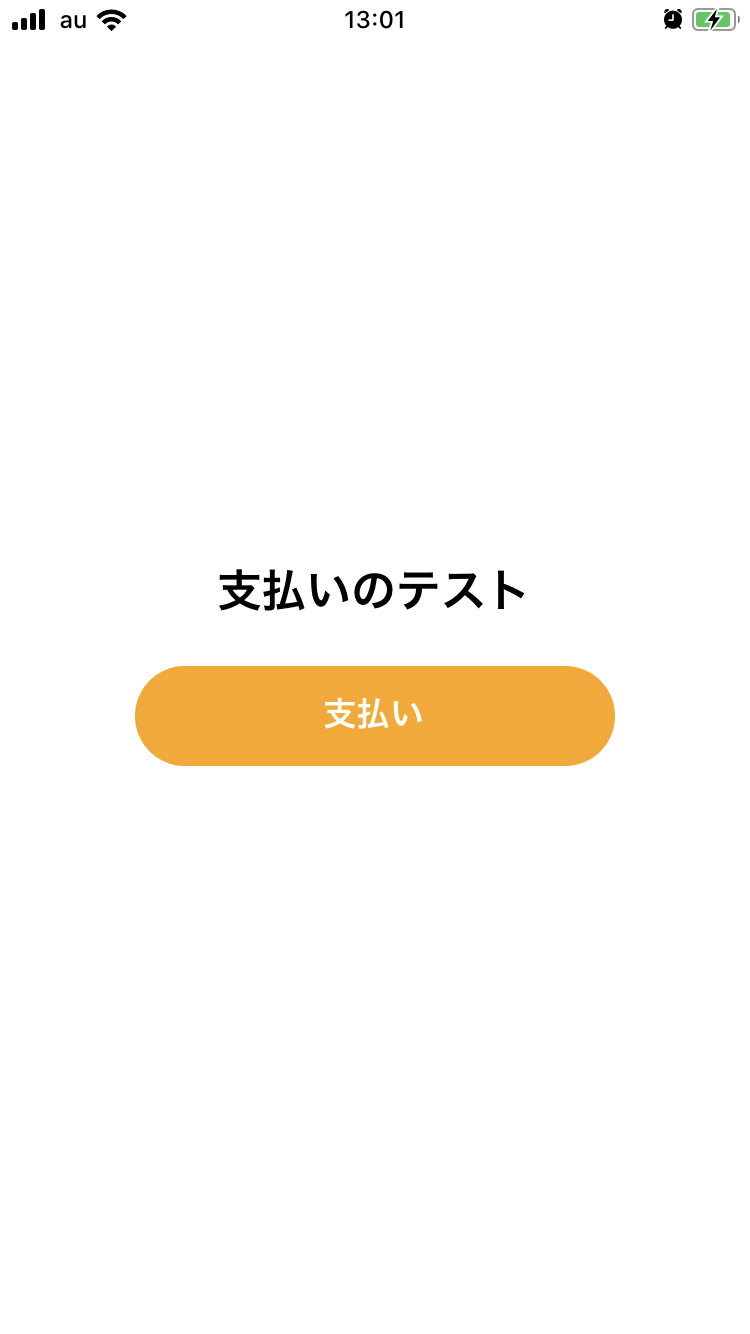
<Text style={styles.title}>支払いのテスト</Text>
<TouchableOpacity onPress={this.charge} disabled={succeeded || loading}>
<View
style={[
styles.button,
succeeded && styles.succeededButton
]}
>
{loading && <ActivityIndicator color="#ffffff" style={styles.buttonIndicator} />}
<Text
style={[styles.buttonText, succeeded && styles.succeededButtonText]}
>
{succeeded ? '支払いが完了しました' : '支払い'}
</Text>
</View>
</TouchableOpacity>
</View>
);
}
}
const styles = StyleSheet.create({
container: {
flex: 1,
height: '100%',
width: '100%',
backgroundColor: '#ffffff',
alignItems: 'center',
justifyContent: 'center'
},
title: {
position: 'relative',
fontSize: 24,
fontWeight: 'bold',
marginBottom: 24
},
modal: {
justifyContent: 'flex-end',
margin: 0
},
modalInner: {
height: '70%',
backgroundColor: '#ffffff'
},
button: {
position: 'relative',
width: 240,
height: 50,
borderRadius: 25,
justifyContent: 'center',
alignItems: 'center',
backgroundColor: 'orange'
},
succeededButton: {
borderColor: 'orange',
borderWidth: 2,
backgroundColor: 'transparent'
},
buttonText: {
fontSize: 18,
fontWeight: 'bold',
color: '#ffffff'
},
succeededButtonText: {
color: 'orange'
},
buttonIndicator: {
position: 'absolute',
top: 0,
left: 0,
width: 50,
height: 50,
justifyContent: 'center',
alignItems: 'center'
}
});
paymentRequestWithCardFormAsyncに渡すオプションはiOSのみ有効です。住所などの入力を必須としたり、UIの色を変更できたりします。
まずはこれをejectせずAndroidで確認してみます。ボタンをタップすると、
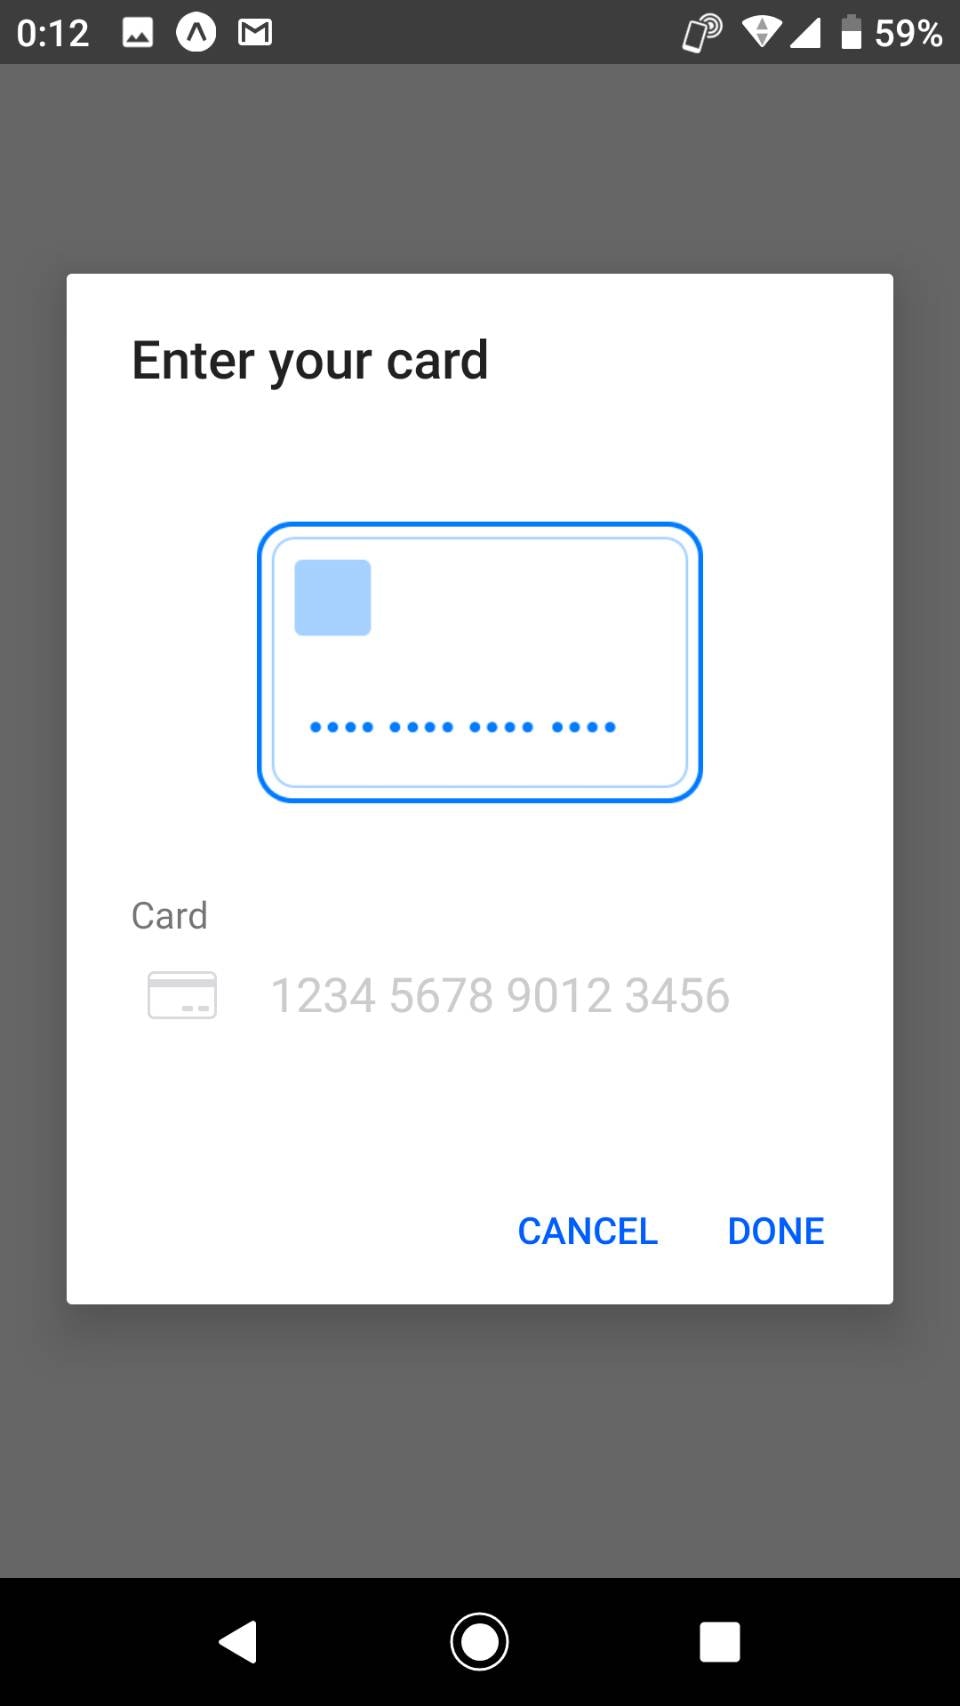
カード入力画面がモーダルで表示されました。
テストカードを入力し、


先ほど用意したサーバー側の処理を含めて成功したら、ダッシュボードを確認。

無事決済が完了しています。
Bare WorkflowでPaymentsを確認
さて、ここまでは簡単なのですが、前述した通りiOSでは完全にejectが必須、あるいは最初からBare Workflowで使用することになります。また、Androidのカード入力画面を日本語化するためにもejectが必要になります。
ということで、ここからはBare WorkflowやExpoKitを使用したReact Nativeプロジェクトを前提とします。
それに伴ったビルドの流れやデバッグなどはこの記事の要旨から外れるので割愛するとして、iOSでの動作確認・設定項目、Androidでの言語設定の方法を説明していきます。
iOSで確認
Expo Clientで表示するとsetOptionsAsyncの時点でTypeError: Cannot read property 'init' of undefinedというエラーが発生すると思いますが、eject後、スタンドアロンビルドしてXCodeからビルドして確認するとすんなり使用できます。
ボタンをタップすると、
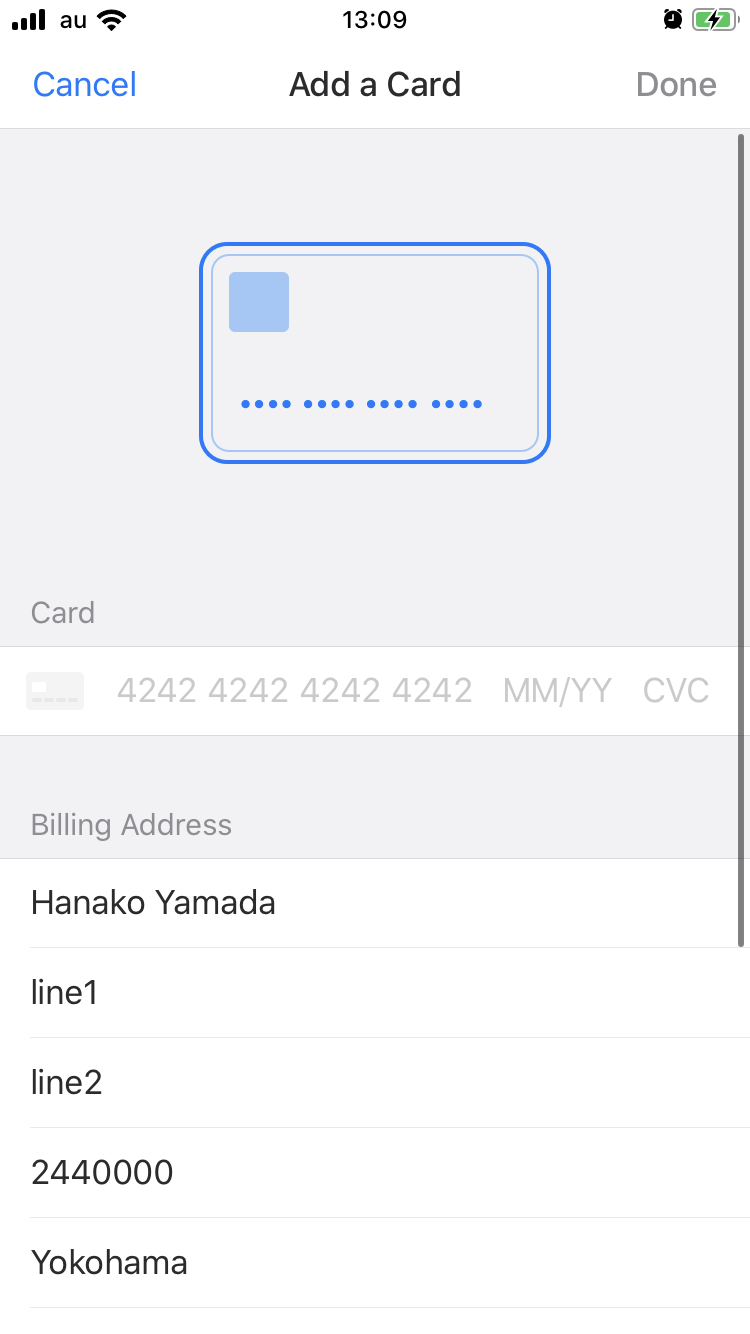
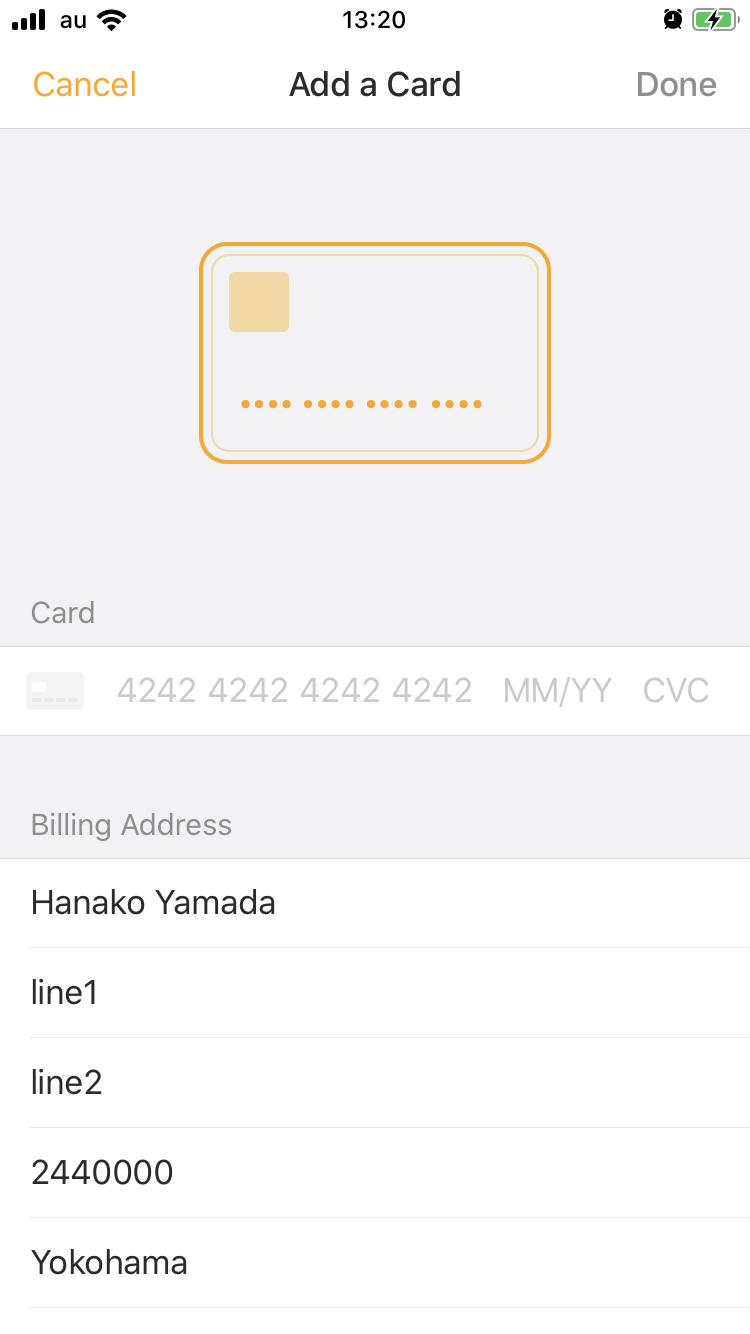
カード入力画面が立ち上がります。住所欄にはpaymentRequestWithCardFormAsyncのオプションで渡した内容が表示されています。
テストカードを入力し、「Done」をタップすると、
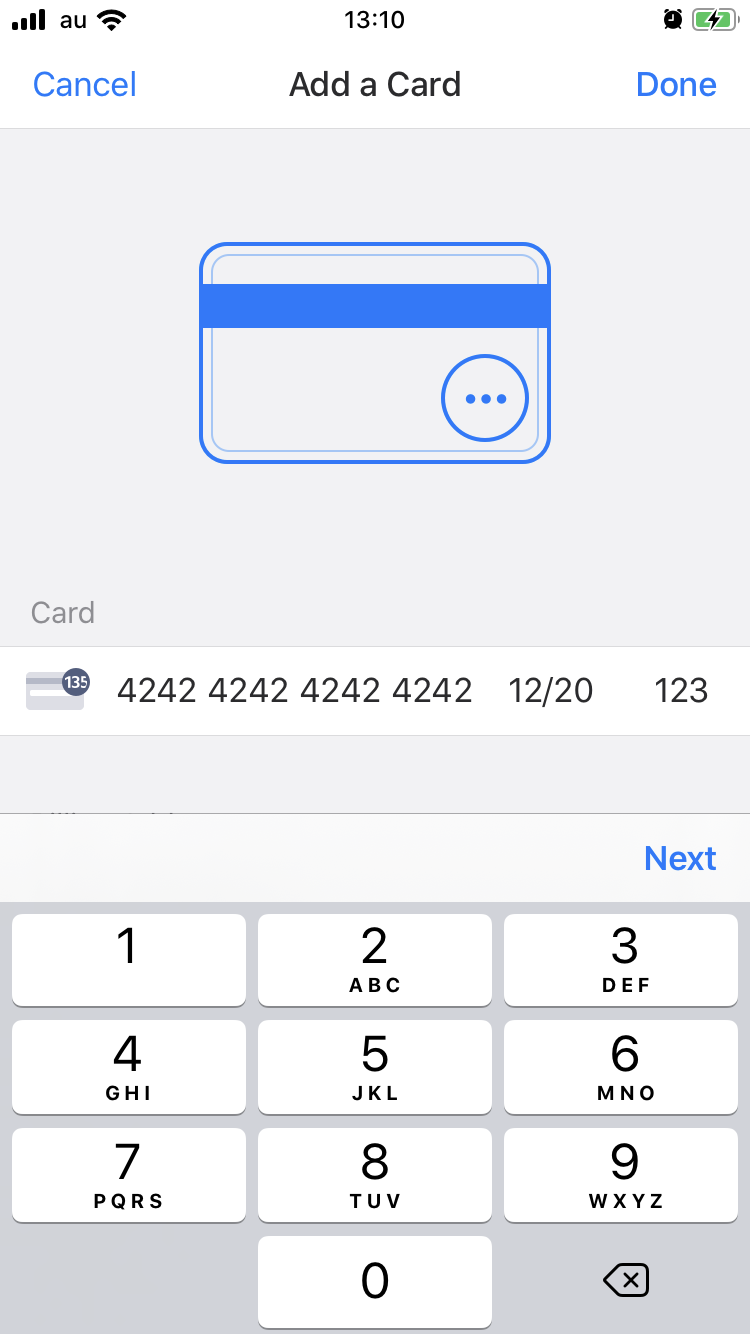
問題なく決済ができました。

UIの色を変更
iOSのカード入力UIの色はオプションで変更することができます。
const params = {
  // Only iOS support this options
  smsAutofillDisabled: true,
  requiredBillingAddressFields: 'full',
  prefilledInformation: {
    billingAddress: {
      name: 'Hanako Yamada',
      line1: 'line1',
      line2: 'line2',
      city: 'Yokohama',
      state: 'Kanagawa',
      country: 'JP',
      postalCode: '2440000',
      email: 'test@test.com',
    }
  },
  theme: { // UIの色を変更
    primaryBackgroundColor,
    secondaryBackgroundColor,
    primaryForegroundColor,
    secondaryForegroundColor,
    accentColor,
    errorColor
  }
};
const source = await Stripe.paymentRequestWithCardFormAsync(params);
とりあえずaccentColorをブランドカラー的な色に変更するだけでも十分かなと思います。
日本語対応
上の画像のようにデフォルトではUIが英語になっているので、これを日本語に変更してみます。
tipsi-stripeの下記のissueを参考にします。
https://github.com/tipsi/tipsi-stripe/issues/97
iOSではXCodeのプロジェクト設定→「info」タブ→「Localizations」を開き、
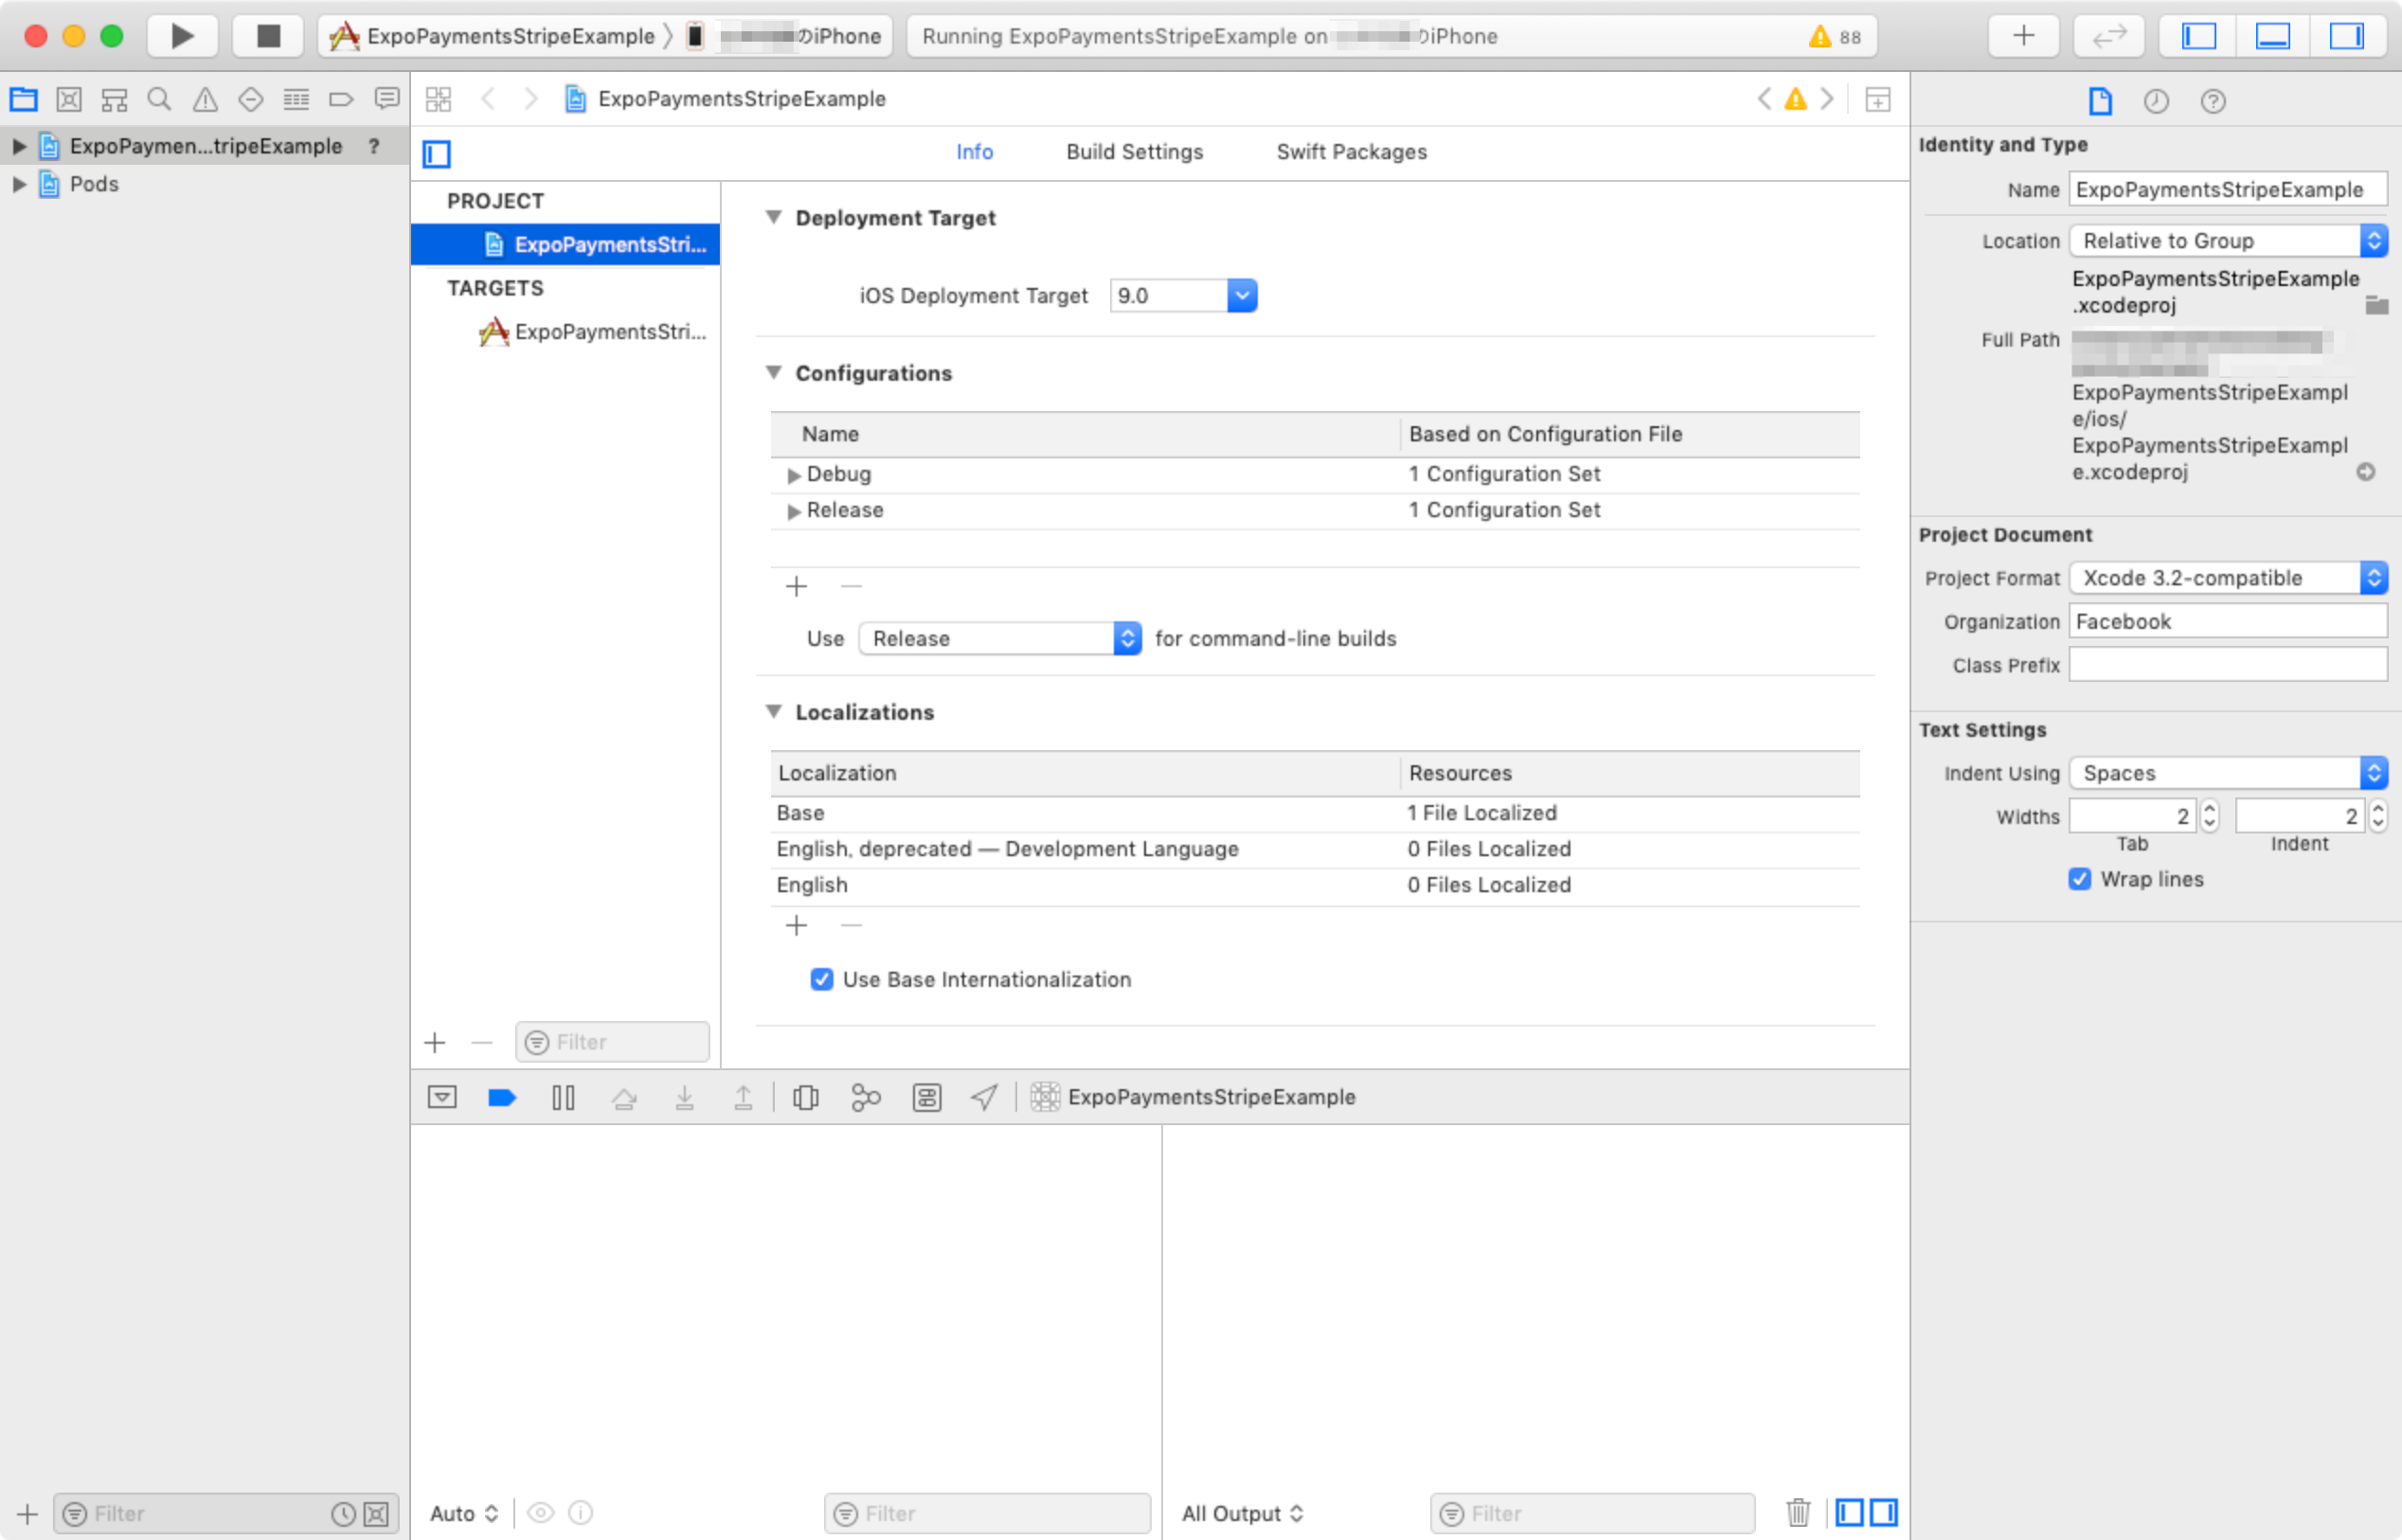
-
Use Base Internationalizationをチェック(通常チェックされているはず) - 「+」で「Japanese」を選択し、「Finish」
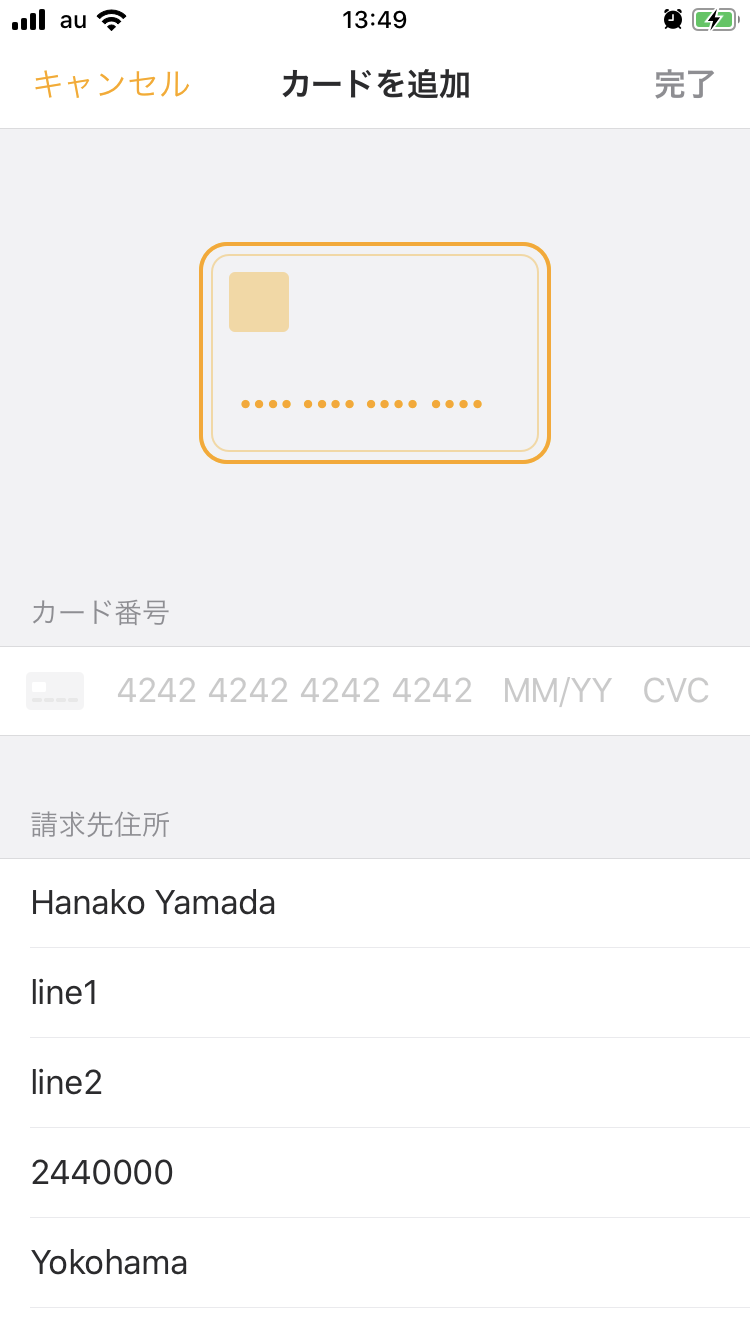
このようにUIが日本語になりました。
住所入力無しの場合
住所入力を必要としない場合はrequiredBillingAddressFieldsを指定せず、
const params = {
  smsAutofillDisabled: true,
  theme: {
    accentColor: 'orange'
  }
};
const source = await Stripe.paymentRequestWithCardFormAsync(params);
このような見た目になります。

Androidの設定
日本語対応
Androidでのカード入力画面はnode_modules/expo-payments-stripe/android/src/main/res/内のリソースをandroid/app/src/main/res/内のリソースで上書きするような形で設定が可能です。
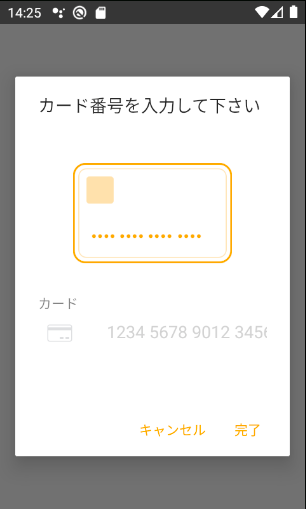
上記のissueにacro5piano氏が紹介している例の通りにandroid/app/src/main/res/values/strings.xmlを以下のように変更してみます。
<resources>
    <string name="app_name">ここはアプリ名</string>
    <string name="gettipsi_card_number">カード番号</string>
    <string name="gettipsi_save">保存</string>
    <string name="gettipsi_card_cvc">確認番号(CVC)</string>
    <string name="gettipsi_google_pay_unavaliable">この端末では、 Google Pay はご利用になれません。</string>
    <string name="gettipsi_user_cancel_dialog">キャンセルしました。カードは追加されていません。</string>
    <string name="gettipsi_card_enter_dialog_title">カード番号を入力して下さい</string>
    <string name="gettipsi_card_enter_dialog_positive_button">完了</string>
    <string name="gettipsi_card_enter_dialog_negative_button">キャンセル</string>
    <string name="gettipsi_card_number_label">カード</string>
    <string-array name="gettipsi_currency_array">
        <item>通貨 (任意)</item>
        <item>指定しない</item>
        <item>円</item>
    </string-array>
</resources>
ビルドして確認すると、このように文言が指定したものに変更できました。

色の変更など
colors.xmlを追加し、アクセントカラーを変更してみます。
<?xml version="1.0" encoding="utf-8"?>
<resources>
    <color name="colorAccent">#FFA500</color>
</resources>
ボタンの色が変わります。iOSと違って、カード画像の色は変わりませんでした。

PNG画像を使っているので動的な変更は難しそうです。
同じ要領でandroid/app/src/main/res/drawable/stp_card_form_front.pngの画像を変更してみると、UIに反映されます。
tipsi-stripe関連で発生したエラーとその対応(Android)
ビルド時にCould not resolve com.github.tipsi:CreditCardEntryというエラーが発生しました。
JitPackというサービスが必要なようなので、build.gradleに追加します。
// Top-level build file where you can add configuration options common to all sub-projects/modules.

buildscript {
    ext {
        buildToolsVersion = "28.0.3"
        minSdkVersion = 21
        compileSdkVersion = 28
        targetSdkVersion = 27
        supportLibVersion = "28.0.0"
    }
    repositories {
        google()
        jcenter()
    }
    dependencies {
        classpath 'com.android.tools.build:gradle:3.3.0'

        // NOTE: Do not place your application dependencies here; they belong
        // in the individual module build.gradle files
    }
}

allprojects {
    repositories {
        mavenLocal()
        google()
        jcenter()
        maven {
            // All of React Native (JS, Obj-C sources, Android binaries) is installed from npm
            url "$rootDir/../node_modules/react-native/android"
        }
        maven {
            // Android JSC is installed from npm
            url("$rootDir/../node_modules/jsc-android/dist")
        }
        maven { url 'https://www.jitpack.io' } // この行を追加
    }
}


task wrapper(type: Wrapper) {
    gradleVersion = '4.7'
    distributionUrl = distributionUrl.replace("bin", "all")
}
終わり
以上です。ユースケースに従って実装方法を検討してみてください。