■■■Oracle Cloudのウェビナーシリーズは→こちら■■■
はじめに
例えば、日次バッチでファイルを生成して、そのファイルをCloud環境にUploadするようなケースを想定します。
Oracle Cloud Infrastructure(以降、OCI)のObject Storageに、ファイルをアップロードするPythonプログラムを動かしてみました。
(サンプルがGitHubで公開されているのでそれを動かしてみましたというレベルの内容です)
※OCI用の管理系CLIツールである、ocicli を使ってもファイルのアップロードが可能ですが、今回はPython SDKを使用しました。
ざっくり環境
[Linux VM]
 - /batchdir/data/ 配下にあるファイルをUploadしたい
|
| <作成したIAMユーザで接続>
|
↓
[Object Storage]
 - バケット名:dailydata
- [Linux VM] はOCI上のIaaS(Compute Instance)を利用しました。
- ディレクトリ名やバケット名は任意ですが、ここ ↑↑ では最後の upload.py に合わせて記載しています。
準備
オブジェクトストレージ操作用のOCIのユーザ(IAMユーザ)の作成と、Object Storageのバケットの作成
(今、管理者としてログインしているユーザがあれば、この手順をSKIPしてとりあえずそのユーザでも実行はできますが、)プログラム実行用に専用のユーザの作成は、権限管理の観点で作成必須といってもよいでしょう。
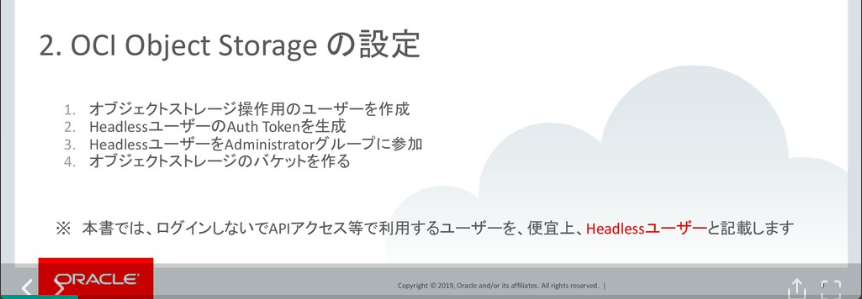
Autonomous Data Warehouse Cloud 様々なデータロードガイド
の「2. OCI Object Storageの設定」(p.9 ~ p.26) の手順で、OCIのユーザを作成と、バケットを作成します。
python仮想環境を整える
OCICLIはPythonベースのツールなので、まずはPython環境を整えます。
Python仮想環境には、好みのものをそれぞれ利用できますが、ここではpyenv + pipenv を利用しました。この場合、特定のディレクトリ($HOME/mypj とする)に移動し、pipenv shell を実行することで、仮想環境に入れます(抜けるのはexit)。
ここの「実行したコマンド一覧」にあるコマンドを順番に実行しました。
Oracle Cloud Infrastructure 環境で Jupyter NotebookとTensorFlowをインストール:実行したコマンド一覧
OCI CLI と Python SDKをインストール
Python SDKの利用に、OCI CLIは必須ではありませんが利便性向上目的にインストールします。
$ cd $HOME/mypj
$ pipenv install oci-cli ★OCI CLI
$ pipenv install oci    ★Python SDK
Python仮想環境に入る
$ cd $HOME/mypj
$ pipenv shell
Launching subshell in virtual environment...
. /home/ds/.local/share/virtualenvs/mypj-idEvtsw3/bin/activate
$  . /home/ds/.local/share/virtualenvs/mypj-idEvtsw3/bin/activate
(mypj) $
以降、全て仮想環境に入った状態で実行しています。
oci setup config で デフォルトのOCI接続情報を設定
以下を実行すると、デフォルトの接続情報として、~/.oci/config に[DEFAULT] として書かれます。冒頭で作成したOCIユーザ情報を使って設定します。
$ oci setup config
    This command provides a walkthrough of creating a valid CLI config file.

    The following links explain where to find the information required by this
    script:

    User OCID and Tenancy OCID:

        https://docs.cloud.oracle.com/Content/API/Concepts/apisigningkey.htm#Other

    Region:

        https://docs.cloud.oracle.com/Content/General/Concepts/regions.htm

    General config documentation:

        https://docs.cloud.oracle.com/Content/API/Concepts/sdkconfig.htm


Enter a location for your config [/home/ds/.oci/config]:
Enter a user OCID: ocid1.user.oc1..xxxxx ★ユーザのOCIDを入力
Enter a tenancy OCID: ocid1.tenancy.oc1..xxxxx ★テナンシーのOCIDを入力
Enter a region (e.g. ap-mumbai-1, ap-seoul-1, ap-tokyo-1, ca-toronto-1, eu-frankfurt-1, eu-zurich-1, uk-london-1, us-ashburn-1, us-gov-ashburn-1, us-gov-chicago-1, us-gov-phoenix-1, us-langley-1, us-luke-1, us-phoenix-1): us-phoenix-1 ★リージョンを入力
Do you want to generate a new RSA key pair? (If you decline you will be asked to supply the path to an existing key.) [Y/n]: Y
Enter a directory for your keys to be created [/home/ds/.oci]:
Enter a name for your key [oci_api_key]:
Public key written to: /home/ds/.oci/oci_api_key_public.pem ★公開鍵(後で使う)
Enter a passphrase for your private key (empty for no passphrase):
Private key written to: /home/ds/.oci/oci_api_key.pem
Fingerprint: XX:XX:XX:XX:XX:XX:XX:XX:XX:XX:XX:XX:XX:XX:XX:XX ★Fingerprintが表示されるのでメモする
Config written to /home/ds/.oci/config

    If you haven't already uploaded your public key through the console,
    follow the instructions on the page linked below in the section 'How to
    upload the public key':

        https://docs.cloud.oracle.com/Content/API/Concepts/apisigningkey.htm#How2


$
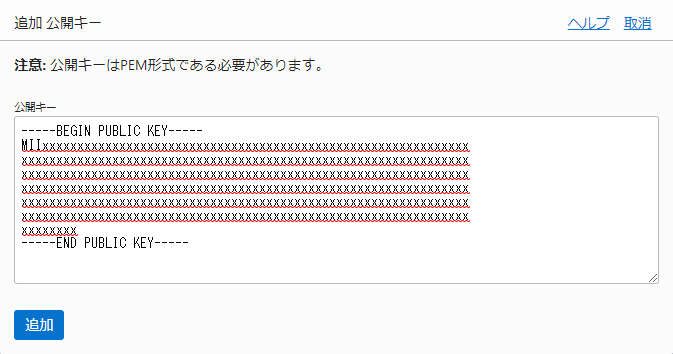
このあと使うので、上で実行中に作成された公開鍵
Public key written to: /home/ds/.oci/oci_api_key_public.pem
の内容を表示しコピーしておきます。
$ cat /home/ds/.oci/oci_api_key_public.pem
-----BEGIN PUBLIC KEY-----
MIIxxxxxxxxxxxxxxxxxxxxxxxxxxxxxxxxxxxxxxxxxxxxxxxxxxxxxxxxxxxxx
xxxxxxxxxxxxxxxxxxxxxxxxxxxxxxxxxxxxxxxxxxxxxxxxxxxxxxxxxxxxxxxx
xxxxxxxxxxxxxxxxxxxxxxxxxxxxxxxxxxxxxxxxxxxxxxxxxxxxxxxxxxxxxxxx
xxxxxxxxxxxxxxxxxxxxxxxxxxxxxxxxxxxxxxxxxxxxxxxxxxxxxxxxxxxxxxxx
xxxxxxxxxxxxxxxxxxxxxxxxxxxxxxxxxxxxxxxxxxxxxxxxxxxxxxxxxxxxxxxx
xxxxxxxxxxxxxxxxxxxxxxxxxxxxxxxxxxxxxxxxxxxxxxxxxxxxxxxxxxxxxxxx
xxxxxxxx
-----END PUBLIC KEY-----
$
公開鍵の登録
OCIコンソールのメニュー、
アイデンティティ >> ユーザー から、冒頭で作成したOCIのユーザの詳細を表示し、APIキーをクリック。
「公開キーの追加」をクリックし、先程コピーした公開鍵の内容をペーストし、「追加」をクリック。
登録が成功すると、FINGERPRINTが表示されるので、oci setup config の最後で表示されたfingerprintと一致していることを確認します。
Python SDK用に、OpenSSLのバージョンを確認する
https://oracle-cloud-infrastructure-python-sdk.readthedocs.io/en/latest/installation.html
を参照。バージョンが古い場合は対処方法も書かれています。
$ python -c "import ssl; print(ssl.OPENSSL_VERSION)"
Python SDKを実行
まずはPython SDKが動くことを確認
ユーザ情報が取得できることを確認しています。
https://github.com/oracle/oci-python-sdk の内容を実行しました。
$ python
Python 3.6.8 (default, Aug 20 2019, 12:06:51)
[GCC 4.8.5 20150623 (Red Hat 4.8.5-36)] on linux
Type "help", "copyright", "credits" or "license" for more information.
>>> import oci
>>> config = oci.config.from_file("~/.oci/config","DEFAULT")
>>> identity = oci.identity.IdentityClient(config)
>>> user = identity.get_user(config["user"]).data
>>> print(user)
{
  "capabilities": {
    "can_use_api_keys": true,
(中略)
  },
  "compartment_id": "ocid1.tenancy.oc1..xxxxx",
  "defined_tags": {},
(中略)
  "name": "usernamexxx",
  "time_created": "2019-01-08T11:02:14.051000+00:00"
}
>>>
※oci setup config で作成された ~/.oci/config ファイル内に書かれている内容以上の情報が表示されている。正しく情報を取得してきている様子。
Python SDKで Object Storage にファイルをアップロード
サンプルプログラムを参考に実行する。
https://github.com/oracle/oci-python-sdk/blob/master/examples/multipart_object_upload.py
サンプルプログラムの内容
- アップロードするためのファイルをプログラム内で作成している
- 接続に必要な情報は、設定ファイルから読込む
config = oci.config.from_file()- 補足:()内を省略すると、デフォルトの ~/.oci/config 内の[DEFAULT]設定を使用する。API Reference参照
- Object Storageのバケットを新規に作成
- 最後にcleanupする(プログラム内で作成したObject Storage上のバケットとファイルを削除)
でしたので
今回の目的に合わせて一部削除&編集、upload.pyとして保存
- アップロード先のObject Storageのバケットは、事前作成済みのものを使用する
- upload.py 内で以下を指定する
- Upload元のファイルを置いてあるローカルのディレクトリ名 (datadir)
- Upload先のコンパートメント名 (compartment_id)
- Upload先のバケット名 (bucket_name)
-
python upload.py <filename>で、datadir/<filename> を、同じファイル名でbucket_nameへ Uploadできるよう引数指定
(コピペして動かしてみた状態のため、プログラム内容は何卒ご容赦下さい)
from __future__ import print_function
import os
import oci
from oci.object_storage import UploadManager
from oci.object_storage.models import CreateBucketDetails
from oci.object_storage.transfer.constants import MEBIBYTE
import sys

datadir="/batchdir/data/"

args = sys.argv
if len(args) <= 1:
    sys.exit("Usage: python upload.py <filename>")

fname=args[1]

filepath=datadir + fname
print(filepath)

def progress_callback(bytes_uploaded):
    print("{} additional bytes uploaded".format(bytes_uploaded))


config = oci.config.from_file()
compartment_id = "ocid1.compartment.oc1..aaaxxxxxx"
object_storage = oci.object_storage.ObjectStorageClient(config)

namespace = object_storage.get_namespace().data
bucket_name = "dailydata"
object_name = fname
filename = filepath

print("Uploading new object {!r}".format(object_name))

# upload manager will automatically use mutlipart uploads if the part size is less than the file size
part_size = 2 * MEBIBYTE  # part size (in bytes)
upload_manager = UploadManager(object_storage, allow_parallel_uploads=True, parallel_process_count=3)
response = upload_manager.upload_file(
    namespace, bucket_name, object_name, filename, part_size=part_size, progress_callback=progress_callback)
補足
Object Storage への Uploadに関して、ocicliやPython SDKを使うと、高速化を目的に、大きなファイルを自動で分割して送るマルチパート処理が利用できます。上のサンプルでもその処理が含まれています。
参考
本文中に参照したものも含みます。
ドキュメント(マニュアル)
- Oracle Cloud Infrastructure Documentation - Software Development Kits and Command Line Interface
- Installation (Python SDK)
- API Reference (Python SDK)
- GitHub Python SDK for Oracle Cloud Infrastructure


