はじめに
環境が必要になりインストールしたので、備忘録です。
Python仮想環境には、pyenv + pipenv を利用しました。
環境
- Oracle Cloud Infrastructure 環境の Compute インスタンス
- Compartmentを作成(任意。デフォルトでは最上位のrootコンパートメント)
- VCNを作成
- Computeインスタンスを作成(今回は CentOS 7 イメージを利用)
- Public IPアドレスを確認しておく
※Jupyter Notebookへのアクセスは手元のPCからインターネット経由で行いたいので、Notebookを起動するPORT:8888 にアクセスできるよう、ComputeインスタンスのFirewall設定と、VCNのセキュリティ設定を行う。下記を参考に、PORTを8888に読み替えて実行する。(リンク先では、PORT:5601と9200の2つを設定している)
インストール
pyenv + pipenv 環境を準備
Pythonでの仮想環境は、今回はpyenv + pipenvで行うことにする。
pipenvを使用する場合、特定のディレクトリ(今回は $HOME/mypj とした)に移動し、pipenv shell で、仮想環境に入れる。抜けるのはexit。以下はその実行イメージ。
[fn@yuzu ~]$ cd mypj/
[fn@yuzu mypj]$ pipenv shell
Launching subshell in virtual environment...
 . /home/fn/.local/share/virtualenvs/mypj-CamC0rlR/bin/activate
[fn@yuzu mypj]$  . /home/fn/.local/share/virtualenvs/mypj-CamC0rlR/bin/activate
(mypj) [fn@yuzu mypj]$ python
Python 3.6.8 (default, Mar 12 2019, 06:34:05)
[GCC 4.8.5 20150623 (Red Hat 4.8.5-36)] on linux
Type "help", "copyright", "credits" or "license" for more information.
>>> (略)
>>> exit()
(mypj) [fn@yuzu mypj]$ exit
exit
[fn@yuzu mypj]$
実行したコマンド一覧
こちらのページを参考に実施。詳しい内容はぜひリンク先を参照ください。pyenv + pipenv を何故選んだかもリンク先の記述を参考にしました。
[Python] pyenv と pipenv による python 仮想環境を構築する(CentOS 7 ほぼ初期状態から )
※TensorFlowが現時点でPython3.6までの対応なので、今回は3.6.8をインストール。
参考にしたページのほぼコピペなので大変申し訳無いのですが、備忘録としてコマンドのみ列挙。
$ curl https://bootstrap.pypa.io/get-pip.py | sudo python
$ sudo yum install git

$ git clone https://github.com/pyenv/pyenv.git ~/.pyenv
$ echo 'export PYENV_ROOT="$HOME/.pyenv"' >> ~/.bash_profile
$ echo 'export PATH="$PYENV_ROOT/bin:$PATH"' >> ~/.bash_profile
$ echo -e 'if command -v pyenv 1>/dev/null 2>&1; then\n  eval "$(pyenv init -)"\nfi' >> ~/.bash_profile
$ exec "$SHELL" -l

$ pyenv --version
pyenv 1.2.9-19-g7d02b24

$ pyenv install --list
(3.6.8 があることを確認した)
$ sudo yum install gcc zlib-devel bzip2 bzip2-devel readline-devel sqlite sqlite-devel openssl-devel tk-devel libffi-devel

$ sudo pip install pipenv

$ pipenv --version
pipenv, version 2018.11.26

★ 仮想環境(mypjディレクトリを使用する)に、python 3.6.8をインストール ★
$ mkdir mypj
$ cd mypj
$ pipenv --python 3.6.8
必要なパッケージをインストール
tensorflowとjupyterとipython、あとは必須ではないが、使いそうなものをとりあえずインストール。
pipenvコマンドで行う。
$ cd ~/mypj
$ pipenv install oci-cli
$ pipenv install tensorflow
$ pipenv install jupyter
$ pipenv install matplotlib scikit-learn spyder pandas ipython
インストール後、主要なパッケージのバージョンを表示した。
[fn@yuzu mypj]$ pipenv shell
(mypj) [fn@yuzu mypj]$ pip list | grep jupyter
jupyter                  1.0.0
jupyter-client           5.2.4
jupyter-console          6.0.0
jupyter-core             4.4.0
(mypj) [fn@yuzu mypj]$ pip list | grep tensorflow
tensorflow               1.13.1
tensorflow-estimator     1.13.0
(mypj) [fn@yuzu mypj]$
Jupyter Notebookの設定
以降全て、pipenv shell で、仮想環境に入った状態で実施している。
[fn@yuzu ~]$ cd ~/mypj/
[fn@yuzu mypj]$ pipenv shell
(mypj) [fn@yuzu mypj]$
設定ファイルの作成
$ jupyter-notebook --generate-config
Writing default config to: /home/fn/.jupyter/jupyter_notebook_config.py
$
アクセス時のパスワードを設定
以下を実行。指定したパスワードに対し返してくれる sha1:で始まるhash文字列を、後で使用する。
$ ipython3
Python 3.6.8 (default, Mar 12 2019, 06:34:05)
Type 'copyright', 'credits' or 'license' for more information
IPython 7.3.0 -- An enhanced Interactive Python. Type '?' for help.

In [1]: from notebook.auth import passwd

In [2]: passwd()
Enter password: ★ここでパスワードを入力★
Verify password:
Out[2]: 'sha1:bf3XXXXXXXXXXXXXXXXXXXXXXXXXXXXXXXXXXXXXXXXXXXXXXXXXX' <-- 後で使用する
In [3]: exit
$
設定ファイルを編集
以下の5行を --generate-config で作成したファイルに追記する。最終行のところは、上で調べたhash文字列。
$ vi ~/.jupyter/jupyter_notebook_config.py

(以下を追記)
c.IPKernelApp.pylab = 'inline'
c.NotebookApp.ip = '0.0.0.0'
c.NotebookApp.open_browser = False
c.NotebookApp.port = 8888
c.NotebookApp.password = u'sha1:bf3XXXXXXXXXXXXXXXXXXXXXXXXXXXXXXXXXXXXXXXXXXXXXXXXXX'
Jupyter Notebookを起動
$ jupyter-notebook &
[1] 2293
$ [I 12:22:06.152 NotebookApp] Writing notebook server cookie secret to /home/fn/.local/share/jupyter/runtime/notebook_cookie_secret
[I 12:22:06.387 NotebookApp] Serving notebooks from local directory: /home/fn/mypj
[I 12:22:06.387 NotebookApp] The Jupyter Notebook is running at:
[I 12:22:06.387 NotebookApp] http://(yuzu or 127.0.0.1):8888/
[I 12:22:06.387 NotebookApp] Use Control-C to stop this server and shut down all kernels (twice to skip confirmation).
アクセスして動作確認
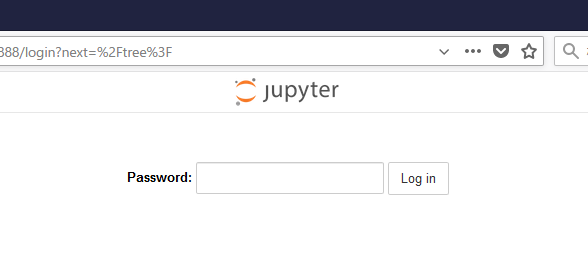
ブラウザから http://<Public IP アドレス>:8888/
指定したパスワードを入力し、Log in.
※PORT:8888にアクセスできる環境で実行する(例えば、VPN経由だと許可されていない場合がある)
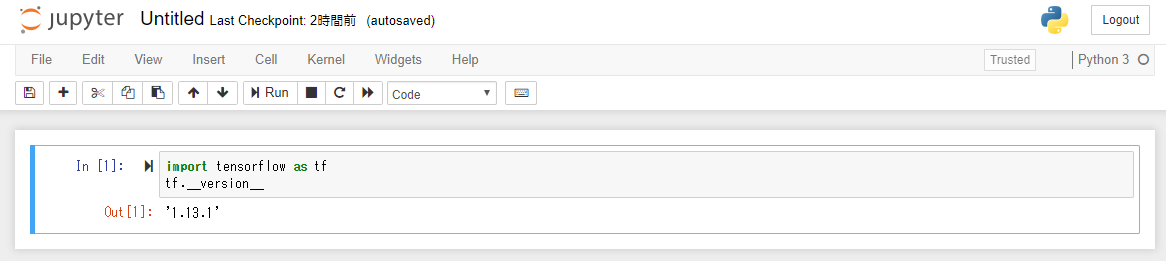
New -> Python3 で新規Notebookを起動して以下を実行し、TensorFlowがimportできることを確認。
参考
https://github.com/pypa/pipenv
https://pipenv.readthedocs.io/en/latest/