仕事でDockerを使うのは2016年から4年近く経ちました。会社の技術雑談会のきっかけで今まで、断片的に習うDockerについての知識を整理してみます。この文章はdockerの操作コマンドやDockerfileの書き方より本来はなんでdockerというものが作られるのか、dockerの後ろに使われる技術を掘り下げます。
目次
- ITインフラの進化を振り返り
- 仮想化
- Docker
- Dockerの特徴
〜ITインフラの進化を振り返り〜
ITインフラがコンピューターの発明から約70年となっていろんな進化を遂げた。その中に、ITインフラのリソースをいかに効率的に利用できるよう、いろんな技術が誕生しました。現在のサーバ仮想化の原点は1970年代にメインフレームに使われる仮想化技術となり、そのあと、1999ごろにVMWare社の誕生によるx86 CPUサーバ仮想化も一気に進めることになりました。

図は[1]を参考しています。
クラウド時代において不可欠の〜仮想化〜
仮想化といっても、いろんな仮想化が存在しております。ネットワーク仮想化する、サーバ仮想化、アプリケーション仮想化などの多数のキーワードがあります。ここでサーバー仮想化をメインにまとめます。
サーバ仮想化
サーバ仮想化とは、1台の物理サーバ上に複数のサーバとみなしで稼働させることです。
サーバ仮想化をすることで、サーバ台数の減少でコスト削減につながります。
では、サーバ仮想化はどういう手法があるでしょう。ネットで仮想化を検索すると、必ずホスト型とハイパーバイザー型があるという言葉が出てきます。
しかし、wikipediaのハイパーバイザーの定義をみると、実際にはこの二つ型全部ハイパーバイザーとなるといえるでしょう。
そもそも、ハイパーバイザー[2]とはコンピュータ用語における、コンピュータの仮想化技術のひとつである仮想機械(バーチャルマシン)を実現するための、制御プログラムである。仮想化モニタや仮想化OSと呼ばれることもある。
wikipediaの定義によると、ハイパーバイザーは二つのタイプがあります。
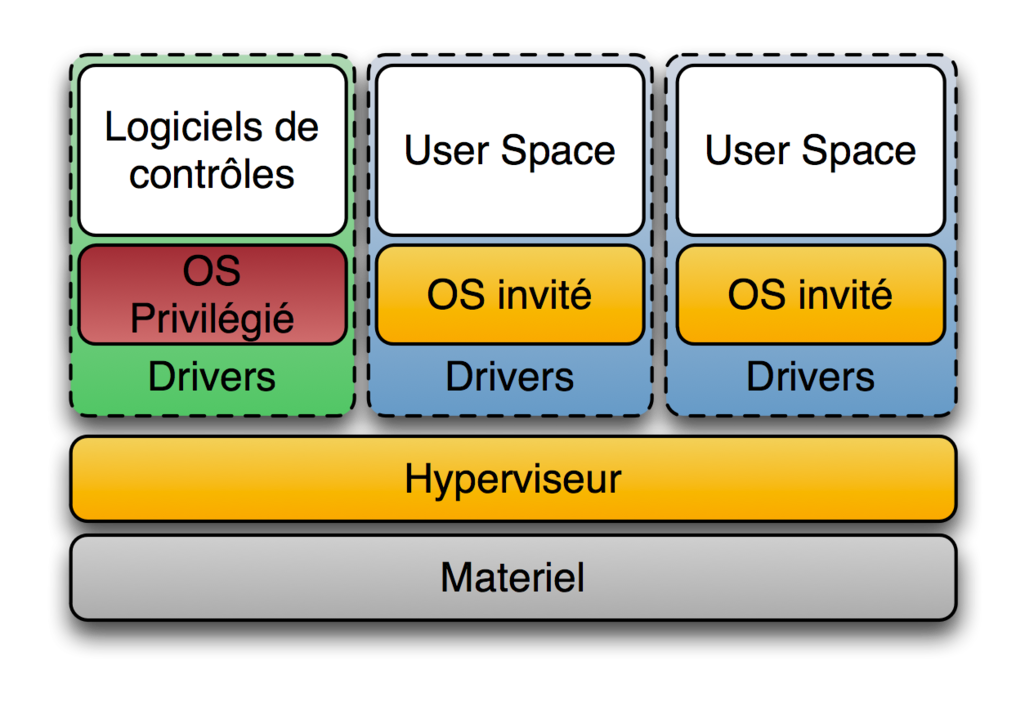
- Type 1(「ネイティブ」または「ベアメタル」)ハイパーバイザ
ハイパーバイザがハードウェア上で直接動作し、全てのOS(ゲストOS)はそのハイパーバイザ上で動作する方式を指す。狭義の「ハイパーバイザ」はこちらのみを指す。
製品:Microsoft Hyper-V、Citrix XenServer
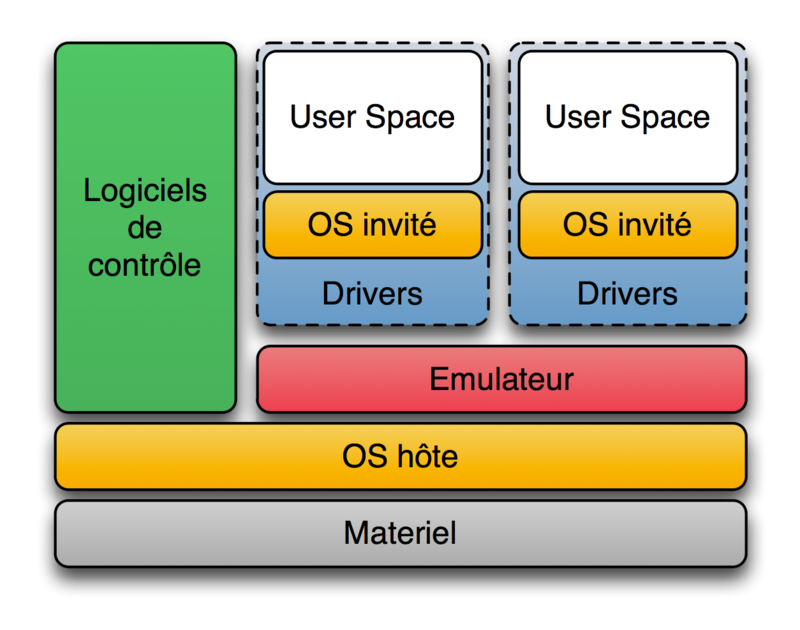
- Type 2(「ホスト」)ハイパーバイザ
ハードウェア上でまず別のOSが稼働し(このOSをホストOSと呼ぶ)、その上でハイパーバイザが(ホストOSのアプリケーションとして)稼働し、更にはハイパーバイザの上で更に別のOS(このOSをゲストOSと呼ぶ)を稼働させる方法である。狭義においては、Type 2はハイパーバイザには含まれない。
製品:オラクルのVirtualBox、パラレルスのParallels WorkstationとParallels Desktop
よく言われるホスト型仮想化はハイパーバイザーのType2、ハイパーバイザーはType1ということでしょう。
Type 1はリソースの完全分離し、各仮想サーバは直接ハードウェアとやりとりするので、処理スピードが早いというメリットがあります。一方で、導入コストが高いというデメリットもあります。
Type 2は仮想化ソフトウェアをホストOSにインストールすれば、すぐに仮想サーバを構築できることで、導入コストが少ないメリットがありますが、仮想サーバはホストOSを介してハードウェアとやりとりので、オーバヘッドが大きくなて処理スピードが落ちるというデメリットがあります。
Linux container (LXC)
通常、物理サーバー上にインストールしたホストOSでは、1つのOS上で動く複数のアプリケーションは、同じシステムリソースを使います。このとき、動作する複数のアプリケーションは、データを格納するディレクトリを共有し、サーバーに設定された同じIPアドレスで通信します。そのため、複数のアプリケーションで使用しているミドルウェアやライブラリのバージョンが異なる場合などは、お互いのアプリケーションが影響を受けないよう注意が必要です[3]。
サーバ仮想化をすることで、OS丸ごとに分離し、各仮想OSに一個のアプリケーションを実装することは完全に上記の課題を解決するのが可能ですが、そうすると、物理サーバの利用率が非常に悪いでしょう。そのため、ここでハイパーバイザーによりハイレベルで軽量の仮想化技術が誕生しました。
LXC(英語: Linux Containers)[4]は、1つのLinuxカーネルを実行しているコントロールホスト上で、複数の隔離されたLinuxシステム(コンテナ)を走らせる、OSレベル仮想化のソフトウェアである。
Linuxカーネルがcgroupsという機能を提供を利用することで、リソース(CPU、メモリ、ブロックI/O、ネットワークなど)の制限と優先順位付けが可能になっており、そのために仮想マシンを使用する必要がない。また、名前空間の隔離機能を利用すれば、アプリケーションから見たオペレーティング・システムの環境を完全に隔離することができるため、プロセスツリー、ネットワーク、ユーザー識別子、マウント(英語版)されたファイルシステムを仮想化することができる。
LXCはカーネルのcroupsと隔離された名前空間のサポートを組み合わせることで、アプリケーションのために隔離された環境を提供する。
cgroup
cgroups (control groups) [5]とは、プロセスグループのリソース(CPU、メモリ、ディスクI/Oなど)の利用を制限・隔離するLinuxカーネルの機能。"process containers" という名称で Rohit Seth が2006年9月から開発を開始し、2007年に cgroups と名称変更され、2008年1月に Linux カーネル 2.6.24 にマージされた。それ以来、多くの機能とコントローラが追加された。
Linux man[6]の説明は以下の通りです。
Control groups, usually referred to as cgroups, are a Linux kernel feature which allow processes to be organized into hierarchical groups whose usage of various types of resources can then be limited and monitored. The kernel's cgroup interface is provided through a pseudo-filesystem called cgroupfs. Grouping is implemented in the core cgroup kernel code, while resource tracking and limits are implemented in a set of per-resource-type subsystems (memory, CPU, and so on).
Subsystemsはカーネルのリソースモジュールとして理解すればいいだと思います。cgroupがコントロールするSubsystemsは以下の通りです。
  cpu (since Linux 2.6.24; CONFIG_CGROUP_SCHED)
          Cgroups can be guaranteed a minimum number of "CPU shares"
          when a system is busy.  This does not limit a cgroup's CPU
          usage if the CPUs are not busy.  For further information, see
          Documentation/scheduler/sched-design-CFS.txt.

          In Linux 3.2, this controller was extended to provide CPU
          "bandwidth" control.  If the kernel is configured with CON‐
          FIG_CFS_BANDWIDTH, then within each scheduling period (defined
          via a file in the cgroup directory), it is possible to define
          an upper limit on the CPU time allocated to the processes in a
          cgroup.  This upper limit applies even if there is no other
          competition for the CPU.  Further information can be found in
          the kernel source file Documentation/scheduler/sched-bwc.txt.

   cpuacct (since Linux 2.6.24; CONFIG_CGROUP_CPUACCT)
          This provides accounting for CPU usage by groups of processes.

          Further information can be found in the kernel source file
          Documentation/cgroup-v1/cpuacct.txt.

   cpuset (since Linux 2.6.24; CONFIG_CPUSETS)
          This cgroup can be used to bind the processes in a cgroup to a
          specified set of CPUs and NUMA nodes.

          Further information can be found in the kernel source file
          Documentation/cgroup-v1/cpusets.txt.

   memory (since Linux 2.6.25; CONFIG_MEMCG)
          The memory controller supports reporting and limiting of
          process memory, kernel memory, and swap used by cgroups.

          Further information can be found in the kernel source file
          Documentation/cgroup-v1/memory.txt.

   devices (since Linux 2.6.26; CONFIG_CGROUP_DEVICE)
          This supports controlling which processes may create (mknod)
          devices as well as open them for reading or writing.  The
          policies may be specified as allow-lists and deny-lists.
          Hierarchy is enforced, so new rules must not violate existing
          rules for the target or ancestor cgroups.

          Further information can be found in the kernel source file
          Documentation/cgroup-v1/devices.txt.

   freezer (since Linux 2.6.28; CONFIG_CGROUP_FREEZER)
          The freezer cgroup can suspend and restore (resume) all pro‐
          cesses in a cgroup.  Freezing a cgroup /A also causes its
          children, for example, processes in /A/B, to be frozen.

          Further information can be found in the kernel source file
          Documentation/cgroup-v1/freezer-subsystem.txt.

   net_cls (since Linux 2.6.29; CONFIG_CGROUP_NET_CLASSID)
          This places a classid, specified for the cgroup, on network
          packets created by a cgroup.  These classids can then be used
          in firewall rules, as well as used to shape traffic using
          tc(8).  This applies only to packets leaving the cgroup, not
          to traffic arriving at the cgroup.

          Further information can be found in the kernel source file
          Documentation/cgroup-v1/net_cls.txt.

   blkio (since Linux 2.6.33; CONFIG_BLK_CGROUP)
          The blkio cgroup controls and limits access to specified block
          devices by applying IO control in the form of throttling and
          upper limits against leaf nodes and intermediate nodes in the
          storage hierarchy.

          Two policies are available.  The first is a proportional-
          weight time-based division of disk implemented with CFQ.  This
          is in effect for leaf nodes using CFQ.  The second is a throt‐
          tling policy which specifies upper I/O rate limits on a
          device.

          Further information can be found in the kernel source file
          Documentation/cgroup-v1/blkio-controller.txt.

   perf_event (since Linux 2.6.39; CONFIG_CGROUP_PERF)
          This controller allows perf monitoring of the set of processes
          grouped in a cgroup.

          Further information can be found in the kernel source file
          tools/perf/Documentation/perf-record.txt.

   net_prio (since Linux 3.3; CONFIG_CGROUP_NET_PRIO)
          This allows priorities to be specified, per network interface,
          for cgroups.

          Further information can be found in the kernel source file
          Documentation/cgroup-v1/net_prio.txt.

   hugetlb (since Linux 3.5; CONFIG_CGROUP_HUGETLB)
          This supports limiting the use of huge pages by cgroups.

          Further information can be found in the kernel source file
          Documentation/cgroup-v1/hugetlb.txt.

   pids (since Linux 4.3; CONFIG_CGROUP_PIDS)
          This controller permits limiting the number of process that
          may be created in a cgroup (and its descendants).

          Further information can be found in the kernel source file
          Documentation/cgroup-v1/pids.txt.

   rdma (since Linux 4.11; CONFIG_CGROUP_RDMA)
          The RDMA controller permits limiting the use of RDMA/IB-spe‐
          cific resources per cgroup.

          Further information can be found in the kernel source file
          Documentation/cgroup-v1/rdma.txt.
例:CPU利用率を制限
cgroupの操作はcgroupfsというファイルシステムを経由で行います。基本的にLinuxが起動する際に、cgroupfsを自動的にmountをする。
$ mount | grep cgroup
cgroup on /sys/fs/cgroup/unified type cgroup2 (rw,nosuid,nodev,noexec,relatime,nsdelegate)
cgroup on /sys/fs/cgroup/systemd type cgroup (rw,nosuid,nodev,noexec,relatime,xattr,name=systemd)
cgroup on /sys/fs/cgroup/cpu,cpuacct type cgroup (rw,nosuid,nodev,noexec,relatime,cpu,cpuacct)
cgroup on /sys/fs/cgroup/blkio type cgroup (rw,nosuid,nodev,noexec,relatime,blkio)
cgroup on /sys/fs/cgroup/hugetlb type cgroup (rw,nosuid,nodev,noexec,relatime,hugetlb)
cgroup on /sys/fs/cgroup/memory type cgroup (rw,nosuid,nodev,noexec,relatime,memory)
cgroup on /sys/fs/cgroup/freezer type cgroup (rw,nosuid,nodev,noexec,relatime,freezer)
cgroup on /sys/fs/cgroup/pids type cgroup (rw,nosuid,nodev,noexec,relatime,pids)
cgroup on /sys/fs/cgroup/perf_event type cgroup (rw,nosuid,nodev,noexec,relatime,perf_event)
cgroup on /sys/fs/cgroup/net_cls,net_prio type cgroup (rw,nosuid,nodev,noexec,relatime,net_cls,net_prio)
cgroup on /sys/fs/cgroup/devices type cgroup (rw,nosuid,nodev,noexec,relatime,devices)
cgroup on /sys/fs/cgroup/rdma type cgroup (rw,nosuid,nodev,noexec,relatime,rdma)
cgroup on /sys/fs/cgroup/cpuset type cgroup (rw,nosuid,nodev,noexec,relatime,cpuset)
ここから、cgroupでアプリのCPU使用率を制限する操作を行います。すべての操作はubuntu18.04で行います。
- まず、簡単な無限ループのcプログラムを作成します。
# include <stdio.h>

int main(){
        while(1){
        }
}
プログラムをコンパイルします。
$ gcc -o loop_sample_cpu loop_sample_cpu.c
実行します。
$./loop_sample_cpu
CPU利用率を確認する。loop_sample_cpuの利用率はほぼ100%に近いです。
zhenbin@zhenbin-VirtualBox:~$ top

top - 14:51:45 up 28 min,  1 user,  load average: 0.29, 0.08, 0.02
Tasks: 175 total,   2 running, 140 sleeping,   0 stopped,   0 zombie
%Cpu(s): 98.6 us,  1.4 sy,  0.0 ni,  0.0 id,  0.0 wa,  0.0 hi,  0.0 si,  0.0 st
KiB Mem :  8345424 total,  6421164 free,   875200 used,  1049060 buff/cache
KiB Swap:  2097148 total,  2097148 free,        0 used.  7187568 avail Mem

  PID USER      PR  NI    VIRT    RES    SHR S %CPU %MEM     TIME+ COMMAND
10403 zhenbin   20   0    4372    764    700 R 95.0  0.0   0:19.75 loop_sample_cpu
 9547 zhenbin   20   0 3020252 278368 108992 S  2.3  3.3   0:09.34 gnome-shell
10342 zhenbin   20   0  870964  38352  28464 S  1.0  0.5   0:00.88 gnome-termi+
 9354 zhenbin   20   0  428804  95048  61820 S  0.7  1.1   0:02.25 Xorg
  922 root      20   0  757084  82776  45764 S  0.3  1.0   0:00.50 dockerd
    1 root      20   0  159764   8972   6692 S  0.0  0.1   0:01.06 systemd
    2 root      20   0       0      0      0 S  0.0  0.0   0:00.00 kthreadd
    3 root       0 -20       0      0      0 I  0.0  0.0   0:00.00 rcu_gp
    4 root       0 -20       0      0      0 I  0.0  0.0   0:00.00 rcu_par_gp
    6 root       0 -20       0      0      0 I  0.0  0.0   0:00.00 kworker/0:0+
    7 root      20   0       0      0      0 I  0.0  0.0   0:00.15 kworker/u2:+
    8 root       0 -20       0      0      0 I  0.0  0.0   0:00.00 mm_percpu_wq
    9 root      20   0       0      0      0 S  0.0  0.0   0:00.13 ksoftirqd/0
   10 root      20   0       0      0      0 I  0.0  0.0   0:00.16 rcu_sched
   11 root      rt   0       0      0      0 S  0.0  0.0   0:00.00 migration/0
   12 root     -51   0       0      0      0 S  0.0  0.0   0:00.00 idle_inject+
   13 root      20   0       0      0      0 I  0.0  0.0   0:00.11 kworker/0:1+
- cgroupにCPU制限を追加する
/sys/fs/cgroup/cpu,cpuacctの下に、フォルダを作成する。
$ cd /sys/fs/cgroup/cpu,cpuacct
$ mkdir loop_sample_cpu
$ cd loop_sample_cpu
loop_sample_cpuのPIDをcgroupに追加する。ここで、rootユーザしか行われない。
$ sudo su
$ echo 10403 > cgroup.procs
CPUの制限を追加する。loop_sample_cpuのフォルダにいくつかリソースの制限タイプがありますが、今回には操作対象はこの二つです。ほかの項目の意味は[7]をご参考となります。
-
cpu.cfs_period_us
cgroup による CPU リソースへのアクセスを再割り当てする一定間隔をマイクロ秒単位 (µs、ただしここでは "us" と表示) で指定します。cgroup 内のタスクが 1 秒あたり 0.2 秒間、単一の CPU にアクセスできる必要がある場合には、cpu.cfs_quota_us を 200000に、cpu.cfs_period_us を 1000000 に設定してください。cpu.cfs_quota_us パラメーターの上限は 1 秒、下限は 1000 マイクロ秒です。 -
cpu.cfs_quota_us
cgroup 内の全タスクが (cpu.cfs_period_us で定義された) 一定の期間に実行される合計時間をマイクロ秒単位 (µs、ただしここでは "us" と表示) で指定します。クォータによって指定された時間を cgroup 内のタスクがすべて使い切ってしまうと、その期間により指定されている残りの時間はタスクがスロットリングされ、次の期間まで実行を許可されなくなります。cgroup 内のタスクが 1 秒あたり 0.2 秒間、単一の CPU にアクセスできる必要がある場合には cpu.cfs_quota_us を 200000 に、cpu.cfs_period_us を 1000000 に設定します。クォータおよび期間のパラメーターは CPU ベースで動作する点に注意してください。プロセスが 2 つの CPU を完全に使用できるようにするには、たとえば、cpu.cfs_quota_us を 200000 に、 cpu.cfs_period_us を 100000 に設定します。
cpu.cfs_quota_us の値を -1 に設定すると、cgroup が CPU 時間制限を順守しないことを示します。これは、全 cgroup のデフォルト値でもあります (root cgroup は除く)。
CPUを1コアに20%に制限します。(50msごとに10msのCPU時間をしか利用できない)
$ echo 10000 > cpu.cfs_quota_us
$ echo 50000 > cpu.cfs_period_us
loop_sample_cpuのCPU利用率が20%に制限されています。
zhenbin@zhenbin-VirtualBox:~$ top

top - 15:06:05 up 42 min,  1 user,  load average: 0.40, 0.72, 0.57
Tasks: 181 total,   2 running, 146 sleeping,   0 stopped,   0 zombie
%Cpu(s): 23.8 us,  1.0 sy,  0.0 ni, 75.2 id,  0.0 wa,  0.0 hi,  0.0 si,  0.0 st
KiB Mem :  8345424 total,  6366748 free,   912068 used,  1066608 buff/cache
KiB Swap:  2097148 total,  2097148 free,        0 used.  7134248 avail Mem

  PID USER      PR  NI    VIRT    RES    SHR S %CPU %MEM     TIME+ COMMAND
10403 zhenbin   20   0    4372    764    700 R 19.9  0.0  12:16.90 loop_sample_cpu
 9547 zhenbin   20   0 3032212 287524 111556 S  1.7  3.4   0:18.14 gnome-shell
 9354 zhenbin   20   0  458868 125556  77832 S  1.3  1.5   0:06.06 Xorg
10342 zhenbin   20   0  873156  40500  28464 S  1.0  0.5   0:03.34 gnome-termi+
 9998 zhenbin   20   0 1082256 120516  36164 S  0.3  1.4   0:01.92 gnome-softw+
    1 root      20   0  159764   8972   6692 S  0.0  0.1   0:01.12 systemd
    2 root      20   0       0      0      0 S  0.0  0.0   0:00.00 kthreadd
    3 root       0 -20       0      0      0 I  0.0  0.0   0:00.00 rcu_gp
    4 root       0 -20       0      0      0 I  0.0  0.0   0:00.00 rcu_par_gp
    6 root       0 -20       0      0      0 I  0.0  0.0   0:00.00 kworker/0:0+
    7 root      20   0       0      0      0 I  0.0  0.0   0:00.24 kworker/u2:+
    8 root       0 -20       0      0      0 I  0.0  0.0   0:00.00 mm_percpu_wq
    9 root      20   0       0      0      0 S  0.0  0.0   0:00.16 ksoftirqd/0
   10 root      20   0       0      0      0 I  0.0  0.0   0:00.22 rcu_sched
   11 root      rt   0       0      0      0 S  0.0  0.0   0:00.00 migration/0
   12 root     -51   0       0      0      0 S  0.0  0.0   0:00.00 idle_inject+
   14 root      20   0       0      0      0 S  0.0  0.0   0:00.00 cpuhp/0
Namespace
名前空間[8]は、 グローバルシステムリソースを抽象化層で覆うことで、 名前空間内のプロセスに対して、 自分たちが専用の分離されたグローバルリソースを持っているかのように見せる仕組みである。 グローバルリソースへの変更は、 名前空間のメンバーである他のプロセスには見えるが、 それ以外のプロセスには見えない。 名前空間の一つの利用方法はコンテナーの実装である。
例:Network Namespace
Network Namespaceを利用して一個のNICに二つ仮想のネットワークを作り出すことが可能です。
- Network Namespaceを作成する
zhenbin@zhenbin-VirtualBox:~$ sudo unshare --uts --net /bin/bash
root@zhenbin-VirtualBox:~# hostname container001
root@zhenbin-VirtualBox:~# exec bash
root@container001:~# ip link set lo up
root@container001:~# ifconfig
lo: flags=73<UP,LOOPBACK,RUNNING>  mtu 65536
        inet 127.0.0.1  netmask 255.0.0.0
        inet6 ::1  prefixlen 128  scopeid 0x10<host>
        loop  txqueuelen 1000  (Local Loopback)
        RX packets 0  bytes 0 (0.0 B)
        RX errors 0  dropped 0  overruns 0  frame 0
        TX packets 0  bytes 0 (0.0 B)
        TX errors 0  dropped 0 overruns 0  carrier 0  collisions 0
root@container001:~# echo $$ # $$はコマンド自身の PID (プロセスID)が設定される変数
1909
- 仮想ネットワークインターフェースリンクを作成します。仮想ネットワークインターフェスの説明は[9]をご参考。
新しいshellを立ち上げる。リンクペーアを作成する。
$ sudo ip link add veth0 type veth peer name veth1
veth1を先ほど作成したnetwork namespaceに割り当て。
$ sudo ip link set veth1 netns 1909
veth0のセットアップする
$ sudo ip address add dev veth0 192.168.100.1/24
$ sudo ip link set veth0 up
container001のshellでveth1をセットアップする。
$ sudo ip address add dev veth1 192.168.100.2/24
$ sudo ip link set veth1 up
ホストとcontainer001の間に通信できるようになりました。
zhenbin@zhenbin-VirtualBox:~$ ping 192.168.100.2
PING 192.168.100.2 (192.168.100.2) 56(84) bytes of data.
64 bytes from 192.168.100.2: icmp_seq=1 ttl=64 time=0.019 ms
64 bytes from 192.168.100.2: icmp_seq=2 ttl=64 time=0.037 ms
^C
--- 192.168.100.2 ping statistics ---
2 packets transmitted, 2 received, 0% packet loss, time 1001ms
rtt min/avg/max/mdev = 0.019/0.028/0.037/0.009 ms
LXCを本格に活用するDockerの登場
初期のバージョンのDockerはLXCをコンテナ実行ドライバとして利用していたが、Docker v0.9ではオプションとなり、Docker v1.10でサポートが終了した。それ以降のDockerはDocker社が開発したlibcontainerというライブラリを利用してcgroupとnamespaceをコントロールします。
ここで、一つ重要なポイントがあります。Dockerというものが仮想化の技術ではないこと!どちらというと、cgroupとnamespaceの管理ツールとしての存在です。開発者やサーバ運用の人がもっと簡単にlinuxカーネルが提供している仮想化機能を利用できるようなツールです。
さらに、DockerfileとDocker Hubの存在による、アプリケーションのカプセル化と移植性にも向上させました!
ここで、dockerの一般的なコマンドよりdockerのリソースの隔離とコントロールの特性を強調したいと思います。
例:dockerでcontainerのCPU使用率を制限する。
- アプリケーションを含むdocker containerを作成する。
先ほどで作成したloop_sample_cpu.cというプログラムを含むubuntuベースのdocker imageを作成する。
FROM ubuntu

RUN apt update && apt install -y gcc

WORKDIR /src

COPY loop_sample_cpu.c .

RUN gcc -o loop_sample_cpu loop_sample_cpu.c

CMD ./loop_sample_cpu
docker imageをビルドする。
docker build -t ubuntu_cpu .
- CPU制限しないコンテナを起動する。
docker run -d ubuntu_cpu
CPU利用率をみてみましょう。
zhenbin@zhenbin-VirtualBox:~/workspace/presentation$ top

top - 17:06:45 up 43 min,  1 user,  load average: 0.89, 0.56, 0.37
Tasks: 178 total,   2 running, 142 sleeping,   0 stopped,   0 zombie
%Cpu(s): 99.0 us,  1.0 sy,  0.0 ni,  0.0 id,  0.0 wa,  0.0 hi,  0.0 si,  0.0 st
KiB Mem :  8345424 total,  6156972 free,   894060 used,  1294392 buff/cache
KiB Swap:  2097148 total,  2097148 free,        0 used.  7184360 avail Mem

  PID USER      PR  NI    VIRT    RES    SHR S %CPU %MEM     TIME+ COMMAND
 8853 root      20   0    4372    804    740 R 94.0  0.0   0:15.97 loop_sample_cpu
 1253 zhenbin   20   0 3020528 278012 108704 S  2.0  3.3   0:31.41 gnome-shell
 1056 zhenbin   20   0  424560  90824  55364 S  1.3  1.1   0:09.92 Xorg
 1927 zhenbin   20   0  877384  44356  28584 S  1.3  0.5   0:08.01 gnome-terminal-
    1 root      20   0  225292   9040   6724 S  0.0  0.1   0:01.62 systemd
    2 root      20   0       0      0      0 S  0.0  0.0   0:00.00 kthreadd
    3 root       0 -20       0      0      0 I  0.0  0.0   0:00.00 rcu_gp
    4 root       0 -20       0      0      0 I  0.0  0.0   0:00.00 rcu_par_gp
    6 root       0 -20       0      0      0 I  0.0  0.0   0:00.00 kworker/0:0H-kb
    8 root       0 -20       0      0      0 I  0.0  0.0   0:00.00 mm_percpu_wq
    9 root      20   0       0      0      0 S  0.0  0.0   0:00.29 ksoftirqd/0
   10 root      20   0       0      0      0 I  0.0  0.0   0:00.31 rcu_sched
   11 root      rt   0       0      0      0 S  0.0  0.0   0:00.00 migration/0
   12 root     -51   0       0      0      0 S  0.0  0.0   0:00.00 idle_inject/0
   14 root      20   0       0      0      0 S  0.0  0.0   0:00.00 cpuhp/0
   15 root      20   0       0      0      0 S  0.0  0.0   0:00.00 kdevtmpfs
   16 root       0 -20       0      0      0 I  0.0  0.0   0:00.00 netns
- CPUを制限するコンテナを起動する。
docker run -d --cpu-period=50000 --cpu-quota=10000 ubuntu_cpu
CPUの利用率をチェックしてみましょう。
zhenbin@zhenbin-VirtualBox:~$ top

top - 17:08:50 up 45 min,  1 user,  load average: 0.77, 0.68, 0.45
Tasks: 178 total,   2 running, 141 sleeping,   0 stopped,   0 zombie
%Cpu(s): 25.8 us,  2.3 sy,  0.0 ni, 71.9 id,  0.0 wa,  0.0 hi,  0.0 si,  0.0 st
KiB Mem :  8345424 total,  6160808 free,   892384 used,  1292232 buff/cache
KiB Swap:  2097148 total,  2097148 free,        0 used.  7188556 avail Mem

  PID USER      PR  NI    VIRT    RES    SHR S %CPU %MEM     TIME+ COMMAND
 9066 root      20   0    4372    800    740 R 19.9  0.0   0:04.36 loop_sample+
 1253 zhenbin   20   0 3017968 275536 106144 S  3.0  3.3   0:32.83 gnome-shell
 1056 zhenbin   20   0  422000  88336  52876 S  2.7  1.1   0:10.59 Xorg
 1927 zhenbin   20   0  877380  44468  28584 S  2.0  0.5   0:08.54 gnome-termi+
  580 root      20   0  776548  46696  24888 S  0.3  0.6   0:02.71 containerd
 1202 zhenbin   20   0  193504   2912   2536 S  0.3  0.0   0:03.92 VBoxClient
 1461 zhenbin   20   0  441756  22836  17820 S  0.3  0.3   0:00.09 gsd-wacom
 1475 zhenbin   20   0  670048  23676  18316 S  0.3  0.3   0:00.29 gsd-color
    1 root      20   0  225292   9040   6724 S  0.0  0.1   0:01.65 systemd
    2 root      20   0       0      0      0 S  0.0  0.0   0:00.00 kthreadd
    3 root       0 -20       0      0      0 I  0.0  0.0   0:00.00 rcu_gp
    4 root       0 -20       0      0      0 I  0.0  0.0   0:00.00 rcu_par_gp
    6 root       0 -20       0      0      0 I  0.0  0.0   0:00.00 kworker/0:0+
    8 root       0 -20       0      0      0 I  0.0  0.0   0:00.00 mm_percpu_wq
    9 root      20   0       0      0      0 S  0.0  0.0   0:00.30 ksoftirqd/0
   10 root      20   0       0      0      0 I  0.0  0.0   0:00.32 rcu_sched
   11 root      rt   0       0      0      0 S  0.0  0.0   0:00.00 migration/0
/sys/fs/cgroup/cpu,cpuacctをチェックすると、dockerというフォルダが作られることがわかりました。
zhenbin@zhenbin-VirtualBox:/sys/fs/cgroup/cpu,cpuacct$ ls
cgroup.clone_children  cpuacct.usage             cpuacct.usage_percpu_user  cpu.cfs_quota_us  notify_on_release  user.slice
cgroup.procs           cpuacct.usage_all         cpuacct.usage_sys          cpu.shares        release_agent
cgroup.sane_behavior   cpuacct.usage_percpu      cpuacct.usage_user         cpu.stat          system.slice
cpuacct.stat           cpuacct.usage_percpu_sys  cpu.cfs_period_us          docker            tasks
ここで、dockerでcgroupとnamespaceを利用することでアプリケーションがランタイムのリソースを制限することがわかりました。
Dockerの特徴
- 上記の説明のようにdockerはあくまで管理ツールで、つまり、OSの一つのプロセスということです。そのため、バーチャルマシーンより起動が早い。
- 移植性がいい。Dockerfileがアプリケーションが実行するような環境(ライブラリ、パラメータ)を記載するので、どこでも同じアプリケーションを再現できること
- 一個のコンテナに一個のプロセスを実行すること。基本的にはdocker containerには複数のプロセスを実行させるのがおすすめしません。複数プロセスを実行させると、結局、アプリケーションをホストに同じ環境に実行することと変わらない、リソースの分離ができなくなる。
- kernelやハードウェアの変更ができない。ホスト上に実行するcontainerはホストのカーネルを共有するので、カーネルモジュールの変更を行うと、すべてのcontainerに影響があります。あと、ハードウェアに対しても制限が多い。例えば、usbなどの操作にはかなり問題があります。
参考URL
[1] https://blogs.itmedia.co.jp/itsolutionjuku/2017/10/1it_1.html
[2] https://ja.wikipedia.org/wiki/%E3%83%8F%E3%82%A4%E3%83%91%E3%83%BC%E3%83%90%E3%82%A4%E3%82%B6
[3] https://codezine.jp/article/detail/11336
[4] https://ja.wikipedia.org/wiki/LXC
[5] https://ja.wikipedia.org/wiki/Cgroups
[6] http://man7.org/linux/man-pages/man7/cgroups.7.html
[7] https://access.redhat.com/documentation/ja-jp/red_hat_enterprise_linux/6/html/resource_management_guide/sec-cpu
[8] https://linuxjm.osdn.jp/html/LDP_man-pages/man7/namespaces.7.html
[9] https://gihyo.jp/admin/serial/01/linux_containers/0006