 きっかけ
きっかけ
Lineに画像を送信すると、AIが全部文字おこしして返してくれる「文字おこし君」ができましたー!卒論とか、書評とか書くときに、いちいち元の文献を手で写すの面倒くさいので、写真撮って送るだけなのでだいぶ楽になるぞー!友達追加できます! pic.twitter.com/9DVI20f3oG
— Dai (@never_be_a_pm) 2018年4月24日
- というのを見てPythonで作ってみました
 実際に作ったやつ
- 下のボタン、もしくは
@brm8856lでID検索すると友達に追加できます
- 次のように文字の入った画像を送るとテキストにして返してくれます

 必要なアカウント
- Heroku
- LINE Developers
- Microsoft Azure
 手順
手順
- LINEのbotを用意する
- webhookを受け取るアプリを作る
- Herokuにデプロイする
- LINEとアプリを連携する
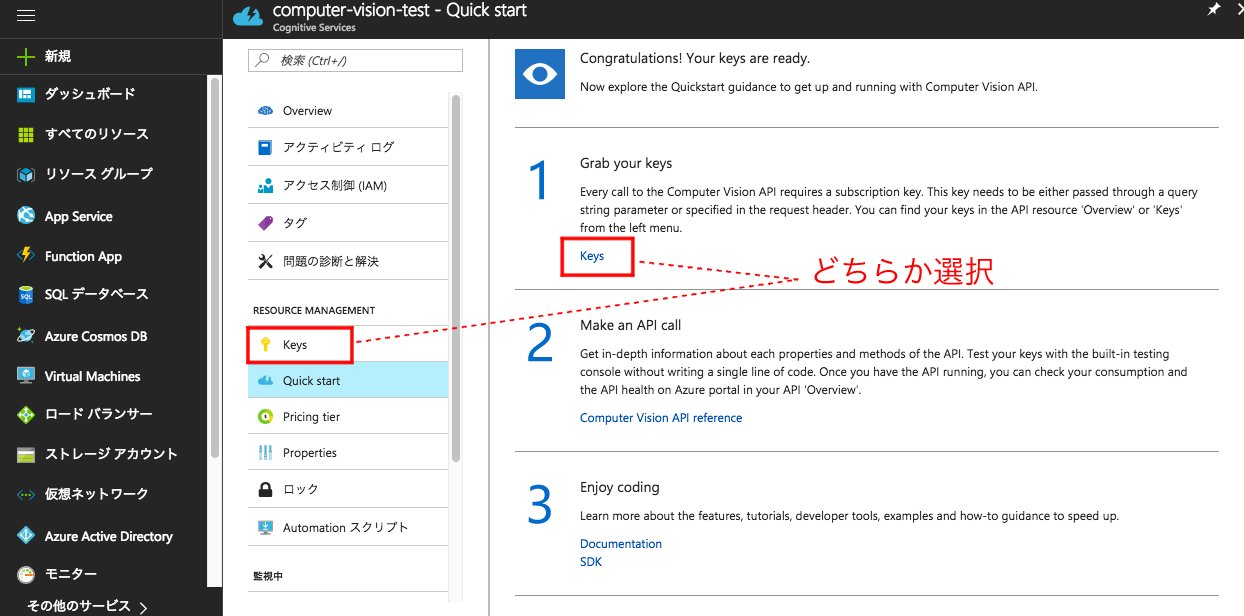
- Computer Vision API のAPIキーを取得する
- Computer Vision API を使って画像からテキストを取得する
 LINEのbotを用意する
- LINEのmessagingAPIを使うことでlinebotを作ることができます
- # Messaging APIを利用するには の手順でlinebotのアカウントを作りましょう
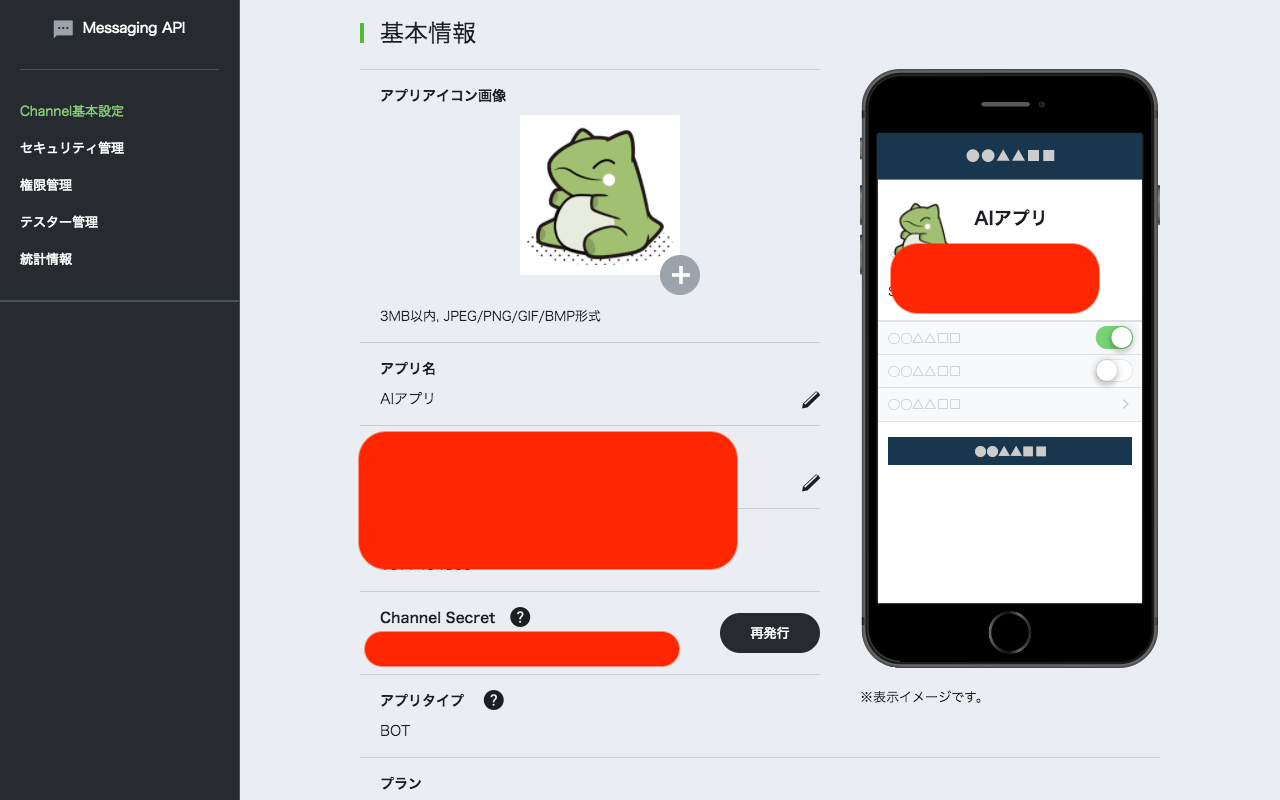
- linebotが作れていれば、次のような画面が表示されます
 webhookを受け取るアプリを作る
- ディレクトリを用意し、webhookを受け取るアプリを作ります
- まずは# line-bot-sdk-python のサンプルコードを使ってみましょう
index.py
import os
from flask import Flask, request, abort

from linebot import (
    LineBotApi, WebhookHandler
)
from linebot.exceptions import (
    InvalidSignatureError
)
from linebot.models import (
    MessageEvent, TextMessage, TextSendMessage,
)

app = Flask(__name__)

line_bot_api = LineBotApi('YOUR_CHANNEL_ACCESS_TOKEN')
handler = WebhookHandler('YOUR_CHANNEL_SECRET')


@app.route("/callback", methods=['POST'])
def callback():
    # get X-Line-Signature header value
    signature = request.headers['X-Line-Signature']

    # get request body as text
    body = request.get_data(as_text=True)
    app.logger.info("Request body: " + body)

    # handle webhook body
    try:
        handler.handle(body, signature)
    except InvalidSignatureError:
        abort(400)

    return 'OK'


@handler.add(MessageEvent, message=TextMessage)
def handle_message(event):
    line_bot_api.reply_message(
        event.reply_token,
        TextSendMessage(text=event.message.text))


if __name__ == "__main__":
    port = os.environ.get('PORT', 3333)
    app.run(
        host='0.0.0.0',
        port=port,
    )
- Herokuで動かすために、
app.run()の部分だけ修正してあります - これで、送られたメッセージをそのまま返す、いわゆるオウム返しbotができます
 Herokuにデプロイする
- Herokuのアカウントを持っていない場合はアカウントを用意する必要があります
- Herokuにデプロイする前にやっておかないといけないことがいくつかあります
- まずは
requirement.txtを作って、インストールが必要なモジュールを記述しましょう
requirement.txt
line-bot-sdk==1.5.0
future==0.16.0
requests==2.14.2
Flask== 0.12.2
click==6.7
itsdangerous==0.24
Jinja2==2.9.6
MarkupSafe==0.23
Werkzeug==0.12.2
bottle==0.12.9
certifi==2017.4.17
chardet==3.0.3
idna==2.5
oauthlib==2.0.2
urllib3==1.21.1
python-dotenv==0.7.1
- Herokuで起動するコマンドをProcfileに書きます
Procfile
web: python index.py
-
.gitignoreにgit管理しないファイルを記述します
.gitignore
.env
__pycache__
- 以上の準備ができたら# Deploying with Git | Heroku Dev Center に書いてあるコマンドでdeployしましょう
$ git init
$ git add .
$ git commit -m "My first commit"
$ heroku login
$ heroku create "アプリ名"
$ git push heroku master
 LINEとアプリを連携する
- ブラウザ上でdeployが完了しているか確認し、SettingsでDomainをコピーしておきましょう

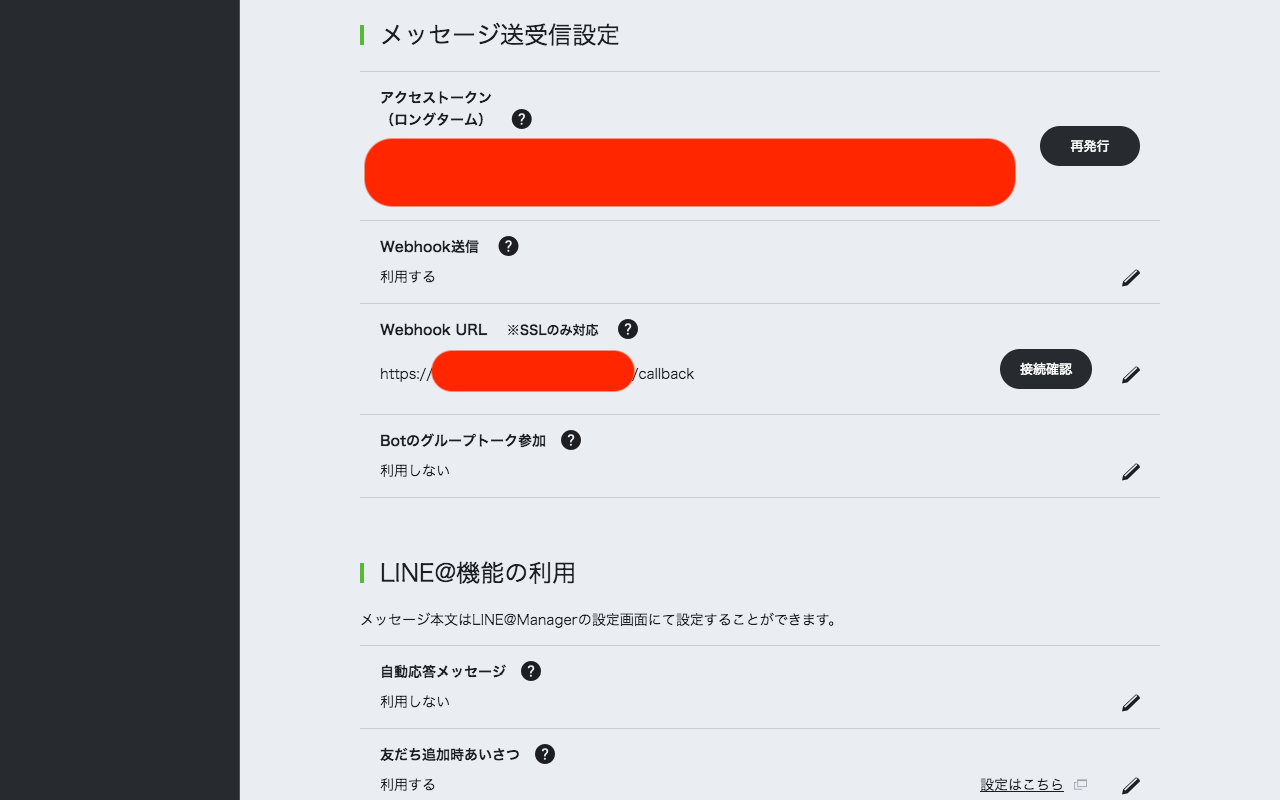
- LINEの設定画面で「webhook送信」を「利用する」にします
- webhookURLに先ほどのHerokuのDomainに
/callbackをつけて設定します - アクセストークンも必要になるので「再発行」をクリックして発行しておきましょう
- また、ChannelSecretも必要になります
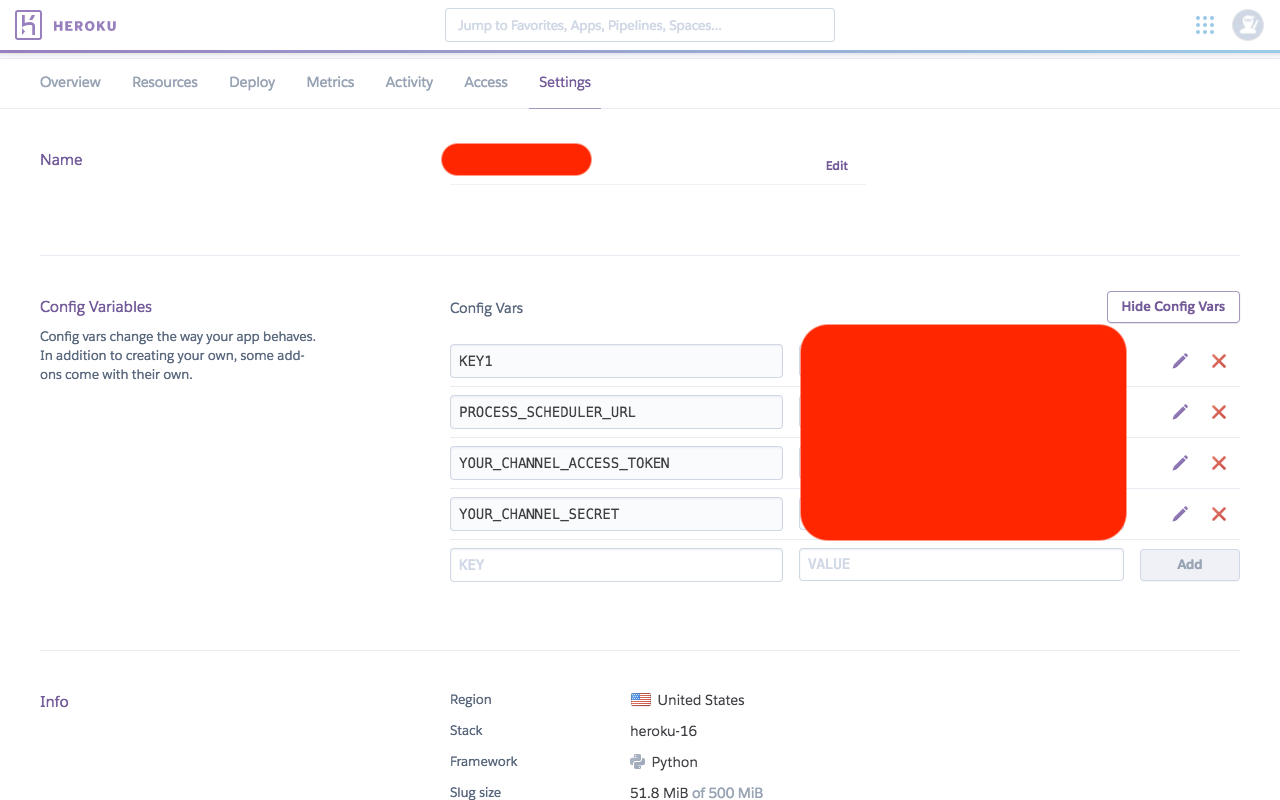
- Herokuに戻り、
ConfigVariablesでアクセストークンとChannelSecretを設定しましょう
- さらに、アプリで環境変数を読み込む
settings.pyを用意しましょう
settings.py
# coding: UTF-8

import os
from os.path import dirname, join

from dotenv import load_dotenv

dotenv_path = join(dirname(__file__), '.env')
load_dotenv(dotenv_path)

# LINE
YOUR_CHANNEL_SECRET = os.environ.get("YOUR_CHANNEL_SECRET")
YOUR_CHANNEL_ACCESS_TOKEN = os.environ.get("YOUR_CHANNEL_ACCESS_TOKEN")
-
index.pyの次の部分も修正しましょう
index.py
import settings

line_bot_api = LineBotApi(settings.YOUR_CHANNEL_ACCESS_TOKEN)
handler = WebhookHandler(settings.YOUR_CHANNEL_SECRET)
- これで再度deployすれば、LINEでメッセージを送ると同じメッセージが返ってくるようになったはずです
 Computer Vision API のAPIキーを取得する
- MicrosoftのComputer Vision APIを使うことで、画像からテキストを取得することができます
- テキスト取得の精度はGooogleのAPIの方が上のような印象がありますが、RateLimit(APIの使用回数)がGoogleは1000回、Microsoftは3000回なので、今回はMicrosoftを採用しました
- # Computer Vision API で試しにAPIを使って情報を取ってくることができます
- Microsoft Azureの登録手順はこちらが分かりやすいと思います
- # Azure Computer Vision APIとFace APIをPythonから利用する
 Computer Vision API を使って画像からテキストを取得する
- Compiter Vision API のAPIキーを取得したら、HerokuのConfigVariablesに追加しておきましょう
- アプリで次のような
vision.pyを作成することで、Computer Vision API からテキストを取得して文章にして出力する処理を実装できます - 画像URLの場合と画像バイナリの場合でリクエストを変えています
vision.py
import requests

import settings

KEY1 = settings.KEY1

# locationを東アジアで登録した場合のendpoint
endpoint = 'https://eastasia.api.cognitive.microsoft.com/vision/v1.0/ocr'

def get_text_by_ms(image_url=None, image=None):
    if image_url is None and image is None:
        return '必要な情報が足りません'

    params = {'visualFeatures': 'Categories,Description,Color'}

    if image_url:
        headers = {
            'Ocp-Apim-Subscription-Key': KEY1,
            'Content-Type': 'application/json',
        }
        data = {'url': image_url}
        response = requests.post(
            endpoint,
            headers=headers,
            params=params,
            json=data
        )

    elif image is not None:
        headers = {
            'Ocp-Apim-Subscription-Key': KEY1,
            "Content-Type": "application/octet-stream"
        }
        response = requests.post(
            endpoint,
            headers=headers,
            params=params,
            data=image,
        )

    status = response.status_code
    data = response.json()

    if status != 200:

        if data['code'] == 'InvalidImageSize':
            text = '画像のサイズが大きすぎます'

        elif data['code'] == 'InvalidImageUrl':
            text = 'この画像URLからは取得できません'

        elif data['code'] == 'InvalidImageFormat':
            text = '対応していない画像形式です'

        else:
            text = 'エラーが発生しました'

        print(status, data)
        return text

    text = ''
    for region in data['regions']:
        for line in region['lines']:
            for word in line['words']:
                text += word.get('text', '')
                if data['language'] != 'ja':
                    text += ' '
        text += '\n'

    if len(text) == 0:
        text += '文字が検出できませんでした'

    print('text:', text)
    return text


if __name__ == "__main__":
    get_text_by_ms(image_url)
-
index.pyでvision.pyの関数を呼び出すように修正しましょう
index.py
import os
from io import BytesIO

from flask import Flask, abort, request
from linebot import LineBotApi, WebhookHandler
from linebot.exceptions import InvalidSignatureError
from linebot.models import (ImageMessage, MessageEvent, TextMessage,
                            TextSendMessage)

import settings
from vision import get_text_by_ms

app = Flask(__name__)


line_bot_api = LineBotApi(settings.YOUR_CHANNEL_ACCESS_TOKEN)
handler = WebhookHandler(settings.YOUR_CHANNEL_SECRET)


@app.route("/callback", methods=['POST'])
def callback():
    # get X-Line-Signature header value
    signature = request.headers['X-Line-Signature']

    # get request body as text
    body = request.get_data(as_text=True)
    print("body:", body)

    # handle webhook body
    try:
        handler.handle(body, signature)

    except InvalidSignatureError as e:
        print("InvalidSignatureError:", e)
        abort(400)

    return 'OK'


@handler.add(MessageEvent, message=TextMessage)
def handle_message(event):
    print("handle_message:", event)
    text = event.message.text

    if (text.startswith('http')):
        image_text = get_text_by_ms(text)
        messages = [
            TextSendMessage(text=image_text),
        ]

    else:
        messages = [
            TextSendMessage(text=text),
            TextSendMessage(text='画像を送信するか、画像のURLを送ってみてね!'),
        ]

    reply_message(event, messages)


@handler.add(MessageEvent, message=ImageMessage)
def handle_image(event):
    print("handle_image:", event)

    message_id = event.message.id
    message_content = line_bot_api.get_message_content(message_id)

    image = BytesIO(message_content.content)

    try:
        image_text = get_text_by_ms(image=image)

        messages = [
            TextSendMessage(text=image_text),
        ]

        reply_message(event, messages)

    except Exception as e:
        reply_message(event, TextSendMessage(text='エラーが発生しました'))


def reply_message(event, messages):
    line_bot_api.reply_message(
        event.reply_token,
        messages=messages,
    )


if __name__ == "__main__":
    port = os.environ.get('PORT', 3333)
    app.run(
        host='0.0.0.0',
        port=port,
    )
 完成!!
完成!!
- 以上でLINEの文字起こし君と同じ機能を実装できました


