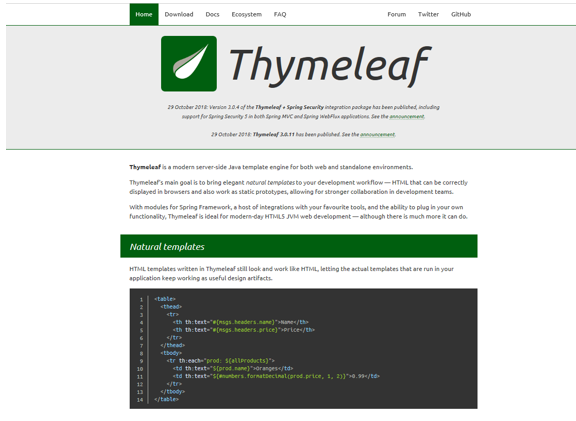
Thymeleafとは?
ThymeleafはJava用に作成されたテンプレートライブラリです。プログラムはJavaのクラスとして実装されています。Thymeleafは、タグの中に「th:□□」という特殊な属性を用意し、また${ } といった特殊な記号を使って値を記載することで、HTMLタグの構造に影響を与えることなく内容を記述できます。後ほど詳細について見ていきます。(https://www.thymeleaf.org/)
MEMO:
「Thymeleaf」はHTMLなどのテンプレートエンジン。
「Spring Boot」ではJSPではなく「Thymeleaf」を使う。
(https://javazuki.com/articles/thymeleaf-introduction.html)
次に
Spring Boot を開発で利用するか否か?
ということも考えてみたいと思います。
Spring Boot を開発で利用するか否か?
そもそも「Spring Boot」とは? -開発で利用するメリット
⇒ SpringMVCや、そのほかのSpring Frameworkのライブラリ類を組み合わせて、Webアプリケーション環境を素早く構築するためのスターターキット的なライブラリ
● Spring Bootでは、開発環境の構築が楽
⇒専用のスターターライブラリを設定ファイルに記述するだけで、一通りのライブラリを組み込み、開発構築できる
● Eclipseから専用開発ツール「Spring Tool Suite(STS)」をインストールして利用できる
● データベースアクセスなど自動で生成できる(JPAなど)
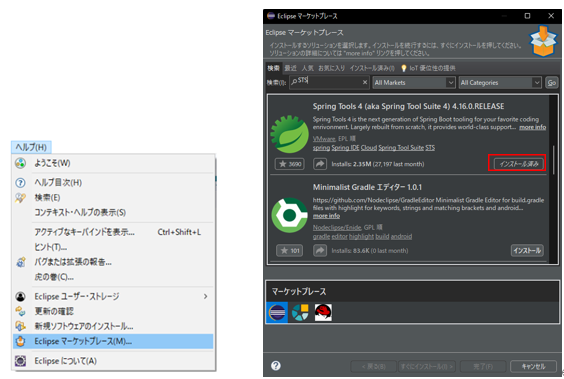
Eclipseに導入するには?
https://qiita.com/0ashina0/items/d02cabfba73bffadead8ヘルプ⇒「Eclipseマーケットプレース」メニュ選択⇒STS検索⇒インストール
*確認後「使用条件の条項に同意します」を選択し、「完了」ボタンを押下
●プロジェクトの作成
[パッケージ・エクスプローラー]から[新規]⇒[Springスタータープロジェクト]
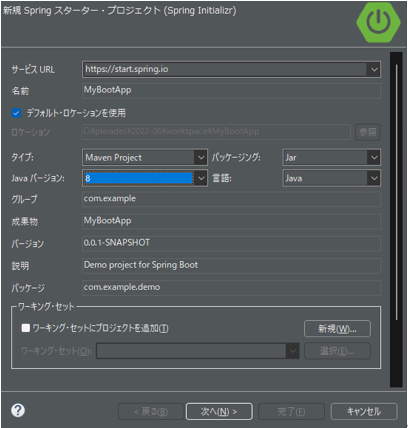
[次へ]を選択
使用頻度が高い「Spring Web」と「Thymeleaf」を選択 (青枠から選択) ⇒ [完了]

ページテンプレートである「Thymeleaf」を利用する前に
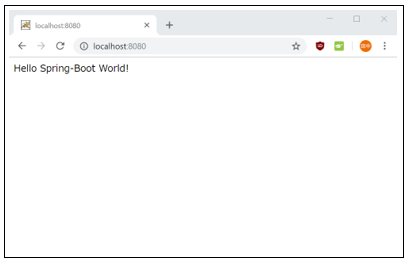
プロジェクト作成の例として、「Hello World」を出力させる例を見てみます。
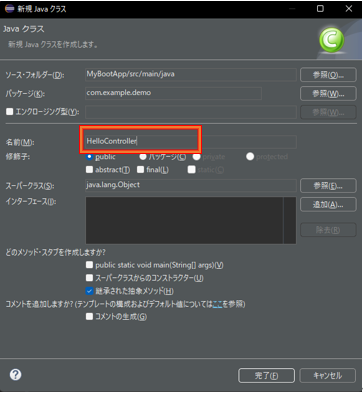
HelloController
まずは、特定のアドレスにアクセスした時に実装される処理を記述していくため、Controllerクラスを作成してみます。
[新規]⇒[クラス] 名前:HelloController ⇒ 完了
package com.example.demo;

import org.springframework.web.bind.annotation.RequestMapping;
import org.springframework.web.bind.annotation.RestController;

@RestController
public class HelloController {

	@RequestMapping("/")
	public String index() {
		return "Hello Spring-Boot World!";
	}
}
実行はプロジェクト右クリック⇒実行⇒Spring Boot アプリケーション
SpringBootでは、Thymeleafを使ってテンプレートを作成するのが一般的です。Thymeleafを使い、Webアプリの基本的な値のやり取りを見てみます。
テンプレートファイルを作る
パッケージエクスプローラで「src/main/resorces」内の「templates」フォルダを選択した状態で、新規⇒その他⇒HTML を選択(ファイル名:index.html)<!DOCTYPE html>
<html xmlns:th="http://www.thymeleaf.org" >
<head>
<title>top page</title>
<meta http-equiv="Content-Type" content="text/html" charset="UTF-8" />
<style>
h1{ font-size:18pt; font-weight:bold; color:gray; }
body{ font-size:13pt; color:gray; margin:5px 25px; }
</style>
</head>
<body>
<h1>Hello page</h1>
<p>This is a Thymeleaf Page</p>
<!-- テンプレートに値を表示するには、下記のように使用します
<p class="msg" th:text="${msg}"></p>
-->
</body>
</html>
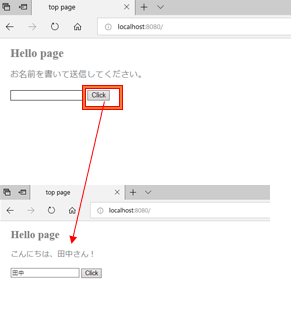
▶ Sample : フォーム利用
package com.example.demo;

import org.springframework.stereotype.Controller;
import org.springframework.web.bind.annotation.RequestMapping;
import org.springframework.web.bind.annotation.RequestMethod;
import org.springframework.web.bind.annotation.RequestParam;
import org.springframework.web.servlet.ModelAndView;

@Controller
public class HelloController {
	@RequestMapping(value="/", method=RequestMethod.GET)
	public ModelAndView index(ModelAndView mav) {
		mav.setViewName("index");
		mav.addObject("msg", "お名前を書いて送信してください。");
		return mav;
	}
	@RequestMapping(value="/", method=RequestMethod.POST)
	public ModelAndView send(@RequestParam("text1")String str, ModelAndView mav) {
		mav.setViewName("index");
		mav.addObject("msg", "こんにちは、" +str+ "さん!");
		mav.addObject("value", str);
    	mav.setViewName("index");
		return mav;
	}
}
<!DOCTYPE html>
<html xmlns:th="http://www.thymeleaf.org" >
<head>
<title>top page</title>
<meta http-equiv="Content-Type" content="text/html" charset="UTF-8" />
	<style>
	h1{ font-size:18pt; font-weight:bold; color:gray; }
	body{ font-size:13pt; color:gray; margin:5px 25px; }
	</style>
</head>
<body>
	<h1>Hello page</h1>
	<p class="msg" th:text="${msg}">please wait...</p>
	<form method="post" action="/">
		<input type="text" name="text1" th:value="${value}" />
		<input type="submit" value="Click" />
	</form>
</body>
</html>
興味があれば、他にも色々なサイトを参考に、Thymeleafの例を見てみてください。
● 参考:Spring boot + Thymeleaf 超入門
https://www.shookuro.com/entry/2017/11/18/142212
●はじめてのSpringBoot -ThymeleafとJSPで条件分岐
https://www.casleyconsulting.co.jp/blog/engineer/284/
●Thymeleafリファレンス ⇒ 日本語訳あります
https://www.thymeleaf.org/documentation.html
