はじめに
去年のadventCalenderでJUCEでフラッグメントシェーダーを適用する方法を書きました。
その時はテクスチャを使用する方法が分からなかったのですが
その辺りの理解が深まったので試してみたメモになります。
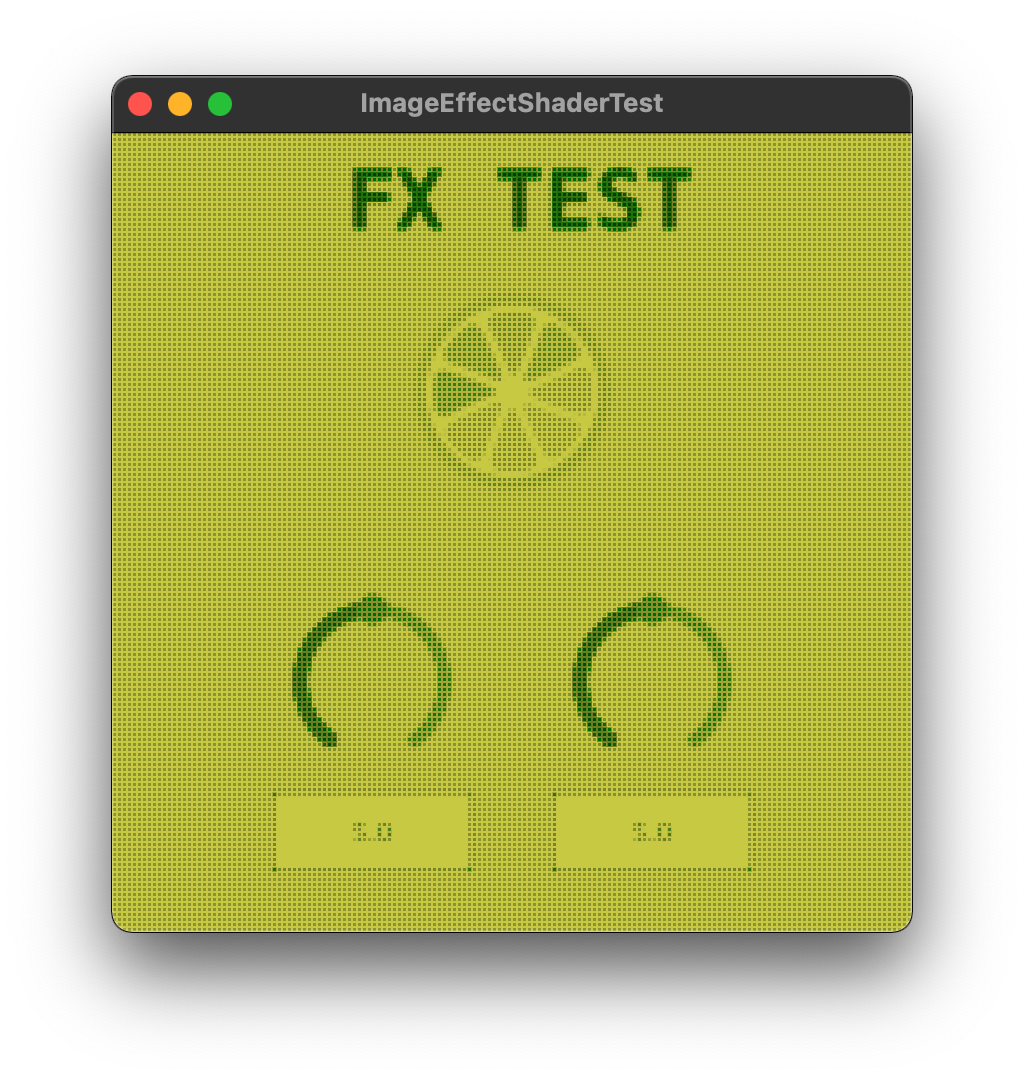
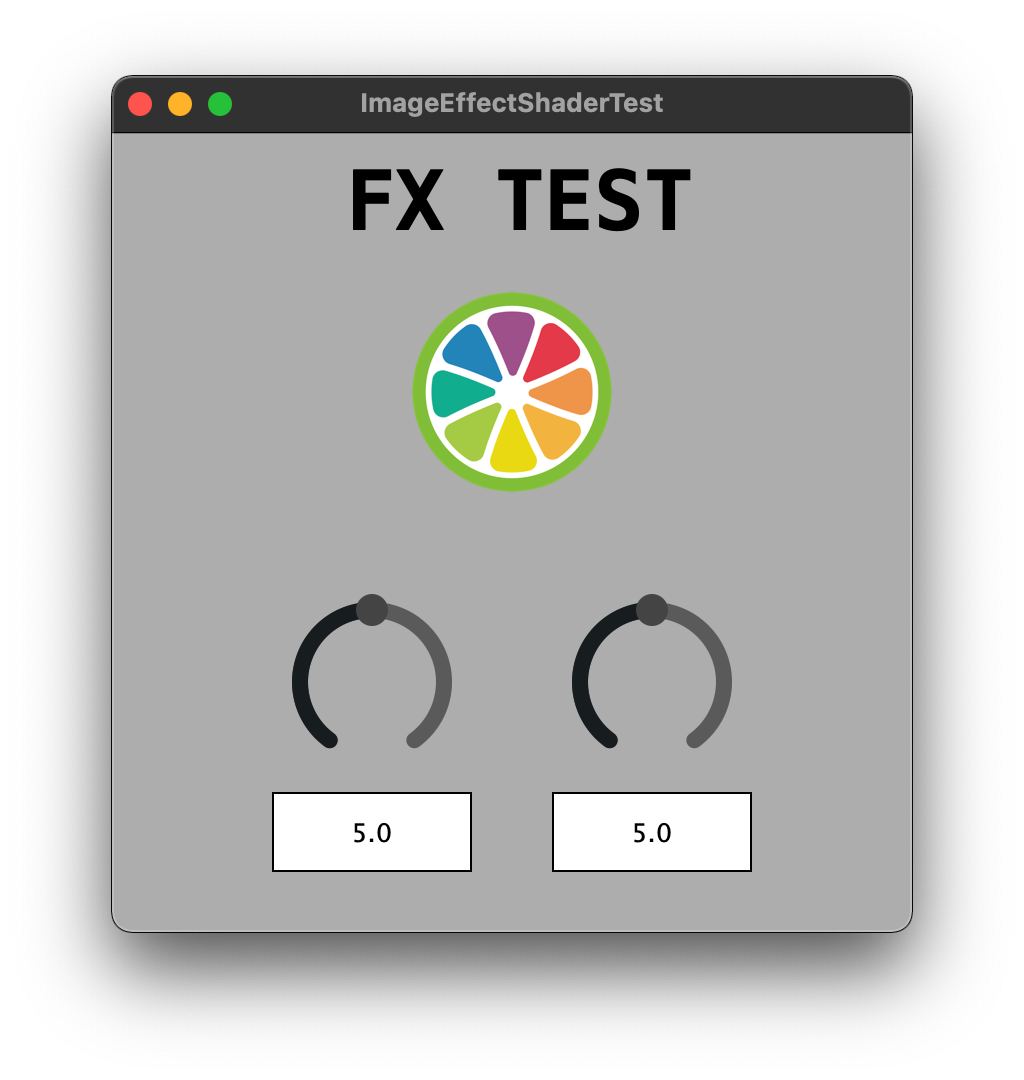
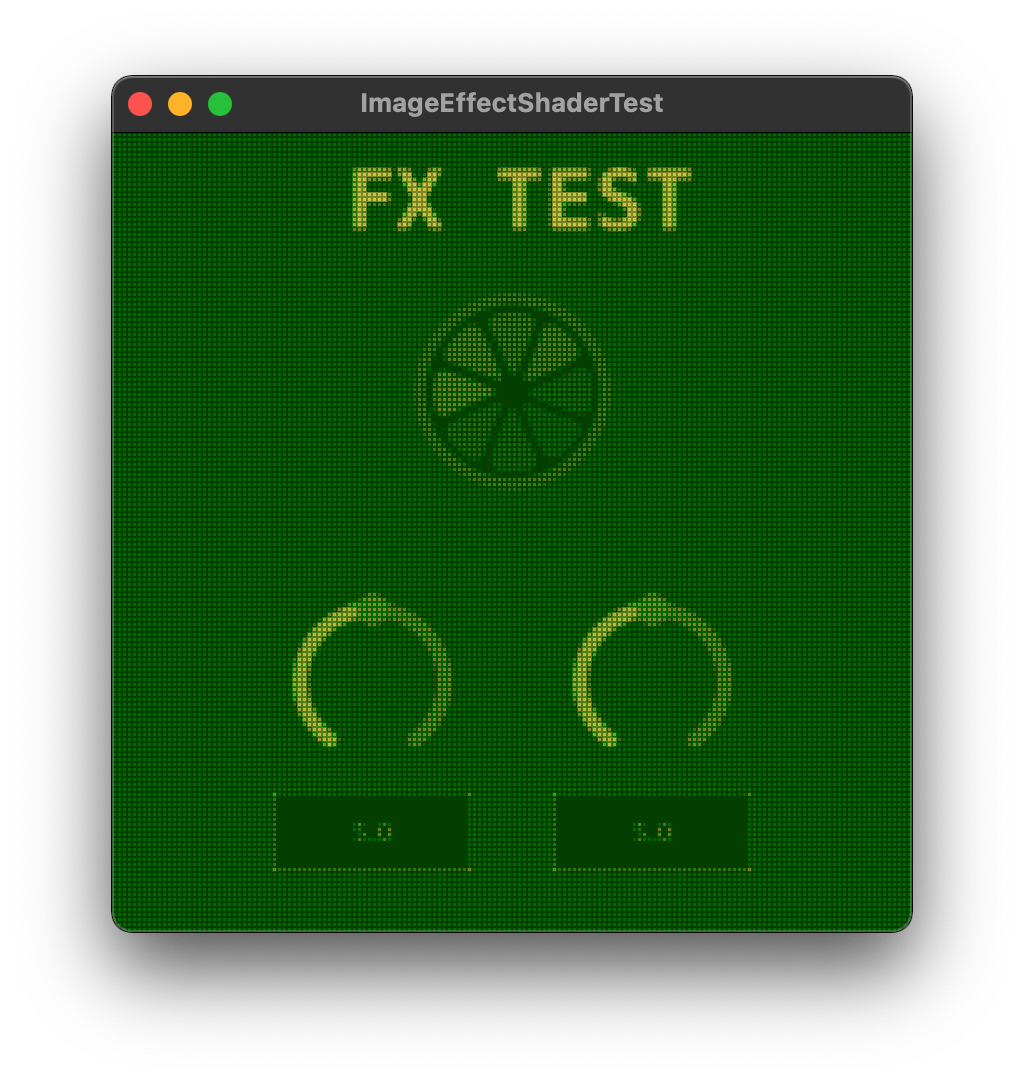
↓ざっくりこんな感じでUIにエフェクトをかけることが可能です。
用法
juce::OpenGLGraphicsContextCustomShaderを使用する場合にonShaderActivatedコールバック内で以下のように指定します
shader->onShaderActivated = [&](juce::OpenGLShaderProgram& p)
{
    using namespace juce::gl;
    glActiveTexture (GL_TEXTURE0);
    glEnable (GL_TEXTURE_2D);
    texture.bind();
    glTexParameteri (GL_TEXTURE_2D, GL_TEXTURE_WRAP_S, GL_REPEAT);
    glTexParameteri (GL_TEXTURE_2D, GL_TEXTURE_WRAP_T, GL_REPEAT);

    // glsl内で任意のuniform変数として取得できるようにする
    p.setUniform("uTexture", (GLint)0);

    // その他uniform設定など...
};
サンプル : ゲームボーイ風エフェクト
今回は以下のようなゲームボーイ風エフェクトを適用する方法を紹介します。
サンプルコード
JUCEの実装
今回はとりあえず(1)キャプチャ対象のコンポーネントと、その上に重ねる(2)エフェクトコンポーネントの二つを用意し、その親コンポーネントで橋渡しする実装にしました。
(1)キャプチャ対象コンポーネント
JUCEのGUI EditorでSourceComponentという名前で用意しました。
(2)エフェクトコンポーネント
ImageEffectComponentという名前で以下のように作成しました。
class ImageEffectComponent  : public juce::Component, public juce::OpenGLRenderer
{
public:
    ImageEffectComponent();
    ~ImageEffectComponent() override;

    // juce::OpenGLRenderer継承
    void newOpenGLContextCreated() override;
    void renderOpenGL() override;
    void openGLContextClosing()override;

    // スナップショットをシェーダーに渡すための関数
    void setSnapshot(const juce::Image& img);

private:
    juce::OpenGLContext openGLContext;
    std::unique_ptr<juce::OpenGLGraphicsContextCustomShader> shader;

    juce::OpenGLTexture texture;    // シェーダーで扱うテクスチャ
    juce::Image srcImage;           // setSnapshot()経由でテクスチャに設定されるイメージ

    JUCE_DECLARE_NON_COPYABLE_WITH_LEAK_DETECTOR (ImageEffectComponent)
};
ImageEffectComponent::ImageEffectComponent()
{
    // ソースとなるコンポーネントの上に表示させるための設定
    setInterceptsMouseClicks(false, false);

    // openGL設定
    openGLContext.setRenderer(this);
    openGLContext.attachTo (*this);
    openGLContext.setContinuousRepainting(true);
    openGLContext.setComponentPaintingEnabled (false);

    setSize (400, 400);
}

ImageEffectComponent::~ImageEffectComponent()
{
    openGLContext.detach();
}

void ImageEffectComponent::newOpenGLContextCreated()
{
    // texture
    auto imgW = getWidth() != 0 ? getWidth() : 1024;
    auto imgH = getHeight() != 0 ? getHeight() : 1024;
    srcImage = juce::Image(juce::Image::PixelFormat::ARGB, imgW, imgH, true);
    juce::Graphics g(srcImage);
    g.fillAll(juce::Colours::transparentBlack);

    // shader
    shader.reset (new juce::OpenGLGraphicsContextCustomShader (fragmentShader));
}

void ImageEffectComponent::renderOpenGL()
{
    if (shader.get() == nullptr) return;

    if (srcImage != juce::Image())
    {
        texture.loadImage(srcImage);
        srcImage = juce::Image();
    }

    // 描画クリア
    juce::OpenGLHelpers::clear (juce::Colours::black);

    // コンテキスト取得
    auto desktopScale = openGLContext.getRenderingScale();
    int w = juce::roundToInt (desktopScale * getWidth());
    int h = juce::roundToInt (desktopScale * getHeight());

    std::unique_ptr<juce::LowLevelGraphicsContext> glContext(createOpenGLGraphicsContext(openGLContext, w, h));
    if (glContext.get() == nullptr) return;

    shader->onShaderActivated = [this, w, h](juce::OpenGLShaderProgram& p)
    {
        using namespace juce::gl;
        glActiveTexture (GL_TEXTURE0);
        glEnable (GL_TEXTURE_2D);
        texture.bind();
        glTexParameteri (GL_TEXTURE_2D, GL_TEXTURE_WRAP_S, GL_REPEAT);
        glTexParameteri (GL_TEXTURE_2D, GL_TEXTURE_WRAP_T, GL_REPEAT);
        p.setUniform("uTexture", (GLint)0);
        p.setUniform("uResolution", w, h);
    };
    shader->fillRect (*glContext.get(), glContext->getClipBounds());
}

void ImageEffectComponent::openGLContextClosing()
{
    texture.release();
}

void ImageEffectComponent::setSnapshot(const juce::Image& img)
{
    srcImage = img;
}
親コンポーネント
addAndMakeVisible()で(1)キャプチャ対象のコンポーネントと、その上に重ねる(2)エフェクトコンポーネントの二つを追加し、
juce::Timerを継承し、timerCallback()関数でキャプチャ対象コンポーネントのキャプチャを定期的にエフェクトコンポーネントに渡します。
void MainComponent::timerCallback()
{
   fxComponent.setSnapshot(srcComponent.createComponentSnapshot(srcComponent.getLocalBounds()));
}
GLSLの実装
↑こちらを参考に少し手を加えました。
ざっくりとした流れとしては以下になります。
- グリッドサイズや変換後の色等を定義
- グリッド内で平均化したグレースケールを取得
- グリッド間のグレースケール値を調整
- グレースケールから色を取得
GLSLのサンプルコードはこちらになります。
uniform sampler2D uTexture;
uniform vec2 uResolution;
varying vec3 pos;

vec3 color1 = vec3(0.784313725, 0.788235294, 0.262745098); // brigher
vec3 color2 = vec3(0.490196078, 0.521568627, 0.152941176);
vec3 color3 = vec3(0.000000000, 0.415686275, 0.000000000);
vec3 color4 = vec3(0.015686275, 0.243137255, 0.000000000); // darker

float gridSize = 5.0;
float padding = 1.0;
bool isInverted = false;

float getGrayscale(vec2 coord)
{
    vec2 uv = coord.xy / uResolution.xy;
    vec3 srcColor = texture2D(uTexture, uv).rgb;
    return (srcColor.r + srcColor.g + srcColor.b) / 3.0;
}

vec3 grayToColor(float gray)
{
    vec3 color = color1;
    if      (gray < 0.3) color = mix(color4, color3, smoothstep(0.0, 0.3, gray));
    else if (gray < 0.6) color = mix(color3, color2, smoothstep(0.3, 0.6, gray));
    else if (gray < 1.0) color = mix(color2, color1, smoothstep(0.6, 1.0, gray));
    return color;
}

void main (void)
{
    vec2 gridCoord = floor(gl_FragCoord.xy / gridSize);

    // [A] calculate average gray
    float gray = 0.0;
    vec2 originInGrid = gridCoord.xy * gridSize;
    for (int i = 0; i < int(gridSize*gridSize); i++)
    {
        float x = mod(float(i), gridSize);
        float y = floor(float(i) / gridSize);
        gray = gray + getGrayscale(originInGrid.xy + vec2(x, y));
    }
    gray /= gridSize*gridSize;

    // [B] simple gray
//    float gray = getGrayscale(gridCoord.xy * gridSize);

    vec2 coordInGrid = fract(gl_FragCoord.xy / gridSize) * gridSize;
    float gridW = 1.0;
    gridW = gridW * step(padding, coordInGrid.x) * step(coordInGrid.x, gridSize - padding);
    gridW = gridW * step(padding, coordInGrid.y) * step(coordInGrid.y, gridSize - padding);
    gray = gray + (1.0 - gridW) * 0.4;

    // invert
    if (isInverted)
    {
        gray = 1.0 - gray;
    }

    // gray to converted Color
    vec4 color = vec4(grayToColor(gray), 1.0);

    gl_FragColor.rgba = color.rgba;
}
ちなみにですがisInverted=trueにすると以下のようになります。
補足
現状起動時に一瞬だけエフェクトがかからない瞬間があり、本当はその辺りしっかり対処する必要がありそうです。
スライダー数値のテキストも本来大きなサイズの方が読みやすそうだったのですが、今回は省略しています。
さいごに
今回紹介したシェーダー以外にもブラーやかっこいいアニメーション、その他look dev的要素を適用したい場合に参考にしていただければ幸いです。