目的
前回の続き。
人間にはどうしようもないレベルまで行くことを目指す。
現時点の課題
とりあえず、OpenCVとPillowの相互変換の部分や、判定の順番などに手を加えてみたが、タイプ出来た文字数が400文字が420文字になるぐらいで大きな効果はなかった。
なのでコードでどこの部分に時間が取られているかをプロファイリングしてみよう。参考にしたのは下記のページ。
気になった部分を抜粋したのが下記の部分。何らかの原因で文字を打つたびにsleepが入っているようだった。
| ncalls | tottime | percall | cumtime | percall | filename:lineno(function) |
|---|---|---|---|---|---|
| 490/1 | 0.001 | 0 | 72.294 | 72.294 | {built-in method builtins.exec} |
| 1 | 0 | 0 | 72.293 | 72.293 | main.py:1() |
| 1 | 0.282 | 0.282 | 65.271 | 65.271 | main.py:39(main_loop_pillow) |
| 941 | 46.977 | 0.05 | 46.977 | 0.05 | {built-in method time.sleep} |
| 420 | 0.002 | 0 | 45.688 | 0.109 | (仮想環境のパス)\lib\site-packages\pyautogui_init_.py:583(wrapper) |
| 420 | 0.002 | 0 | 45.219 | 0.108 | (仮想環境のパス)\lib\site-packages\pyautogui_init_.py:623(_handlePause) |
| 522 | 0.013 | 0 | 17.467 | 0.033 | (プロジェクトのパス)\keyreader.py:74(get_key_pillow) |
| 523 | 0.002 | 0 | 17.324 | 0.033 | (仮想環境のパス)\lib\site-packages\pyscreeze_init_.py:131(wrapper) |
| 523 | 0.222 | 0 | 17.322 | 0.033 | (仮想環境のパス)\lib\site-packages\pyscreeze_init_.py:420(_screenshot_win32) |
| 523 | 0.007 | 0 | 17.1 | 0.033 | (仮想環境のパス)\lib\site-packages\PIL\ImageGrab.py:28(grab) |
| 523 | 15.64 | 0.03 | 15.64 | 0.03 | {built-in method PIL._imaging.grabscreen_win32} |
| 1 | 6.814 | 6.814 | 6.814 | 6.814 | {built-in method builtins.input} |
pyautoguiはgithubにコードがあるので、中身を見たところ、多分キーを入力しているときに無駄なsleepが入っているのだろう、という予測を立てた。
また、このスピード感であれば、パターンマッチングの処理の方がキーボードの入力より軽そうだ。
コード
今回の問題は文字の幅がバラバラで、更に中央揃えになっていることだ。そのため、今回は全部の文字に対してパターンマッチを行って、結果を並び替えることによって文章を作り出すことにした。
なお、フォントの仕様上、サブピクセル単位で文字は書き込まれるようなので、パターンマッチ時に連続して検知判定が出ることがある。
それだけ取り除く処理を追加し、大まかな動作原理は前回の記事から流用した。
import numpy as np
import cv2
import pyautogui

tag_image = cv2.imread("position_tag.png")
_tag_position = []
DEBUG = False

# 入力するキーコードの配列
KEY_ALPHAS = "abdefghiklmnopqrstuwyz-"
KEYS = KEY_ALPHAS + ".,"

KEYS_IMGAE_NAMES = [c for c in KEY_ALPHAS]
KEYS_IMGAE_NAMES.extend(["dot", "comma"])
# キーコードに対応するフォントの画像の配列
image_array = [cv2.imread(f".\\alphabets\\{name}.png") for name in KEYS_IMGAE_NAMES]

# パターンマッチの対象エリア(ロゴからの相対距離)
line_read_area = ((183, 240), (203, 690))
READ_LINE_THRESHOLD = 0.85


def get_screen():
    pillow_image = pyautogui.screenshot()
    np_image = np.asarray(pillow_image)
    process_image = cv2.cvtColor(np_image, cv2.COLOR_RGB2BGR)

    return process_image


def set_tag(screen=None, threshold=0.95):
    if screen is None:
        screen = get_screen()
    match_result = cv2.matchTemplate(screen, tag_image, cv2.TM_CCOEFF_NORMED)
    _, max_value, _, max_location = cv2.minMaxLoc(match_result)

    global _tag_position
    _tag_position = max_location if max_value >= threshold else []
    print(f"tag:{_tag_position}")

    return _tag_position


def get_tag_pos():
    if not _tag_position:
        set_tag()
    return _tag_position


def get_key_line(screen=None):
    test_screen = screen if screen is not None else get_screen()
    tag_pos = get_tag_pos()
    # パターンマッチの画像は小さければ小さい方が良い
    read_line_screen = test_screen[
                        tag_pos[1] + line_read_area[0][0]:tag_pos[1] + line_read_area[1][0],
                        tag_pos[0] + line_read_area[0][1]:tag_pos[0] + line_read_area[1][1], :]
    result_line = []

    for keycode, key_image in zip(KEYS, image_array):
        match_result = cv2.matchTemplate(read_line_screen, key_image, cv2.TM_CCOEFF_NORMED)
        # 若干上下に余裕をもたせているため、パターンマッチの結果を1次元に圧縮してから文字があったかどうかの確認をする
        match_result_xmax = np.max(match_result, axis=0)
        match_x = np.where(match_result_xmax > READ_LINE_THRESHOLD)[0]
        last_x = -1
        for x in match_x:
            # 同じ文字が連続して検知されることがある
            if x > last_x + 1:
                result_line.append((x, keycode))
            last_x = x

    result_line.sort()

    return "".join([c[1] for c in result_line])


def main_loop():
    started = False
    while True:
        ans = get_key_line()
        if ans:
            pyautogui.typewrite(ans)
            print(ans)
            started = True
        else:
            if started:
                break


def test_image(source_path):
    image = cv2.imread(source_path)
    set_tag(image)
    print(f"ans:{get_key_line(image)}")


if __name__ == '__main__':
    command = input("command > ")
    if command == "t":
        test_image("TestImages\\sample_line.png")
    elif command == "d":
        main_loop()
なお、alphabetsフォルダには下記のような画像ファイルが収まっている。

出力結果
今回の動作はこんな感じ。
文字の検知方式を変えてタイピング速度を爆速にしました。 pic.twitter.com/ojexAJPbQi
— Mickie (@mickie_on_Paper) February 23, 2021
十分に早くていい感じだが、誤タイプ率が結構多い。
コンソールの出力を見たら、「僕の生まれは兵庫県です」→「bdqokundqoumarehahydougdqokendesu.」のような誤タイプが多く見られた。
パターンマッチのしきい値を上げれば文字の過剰検知は減るが、今度はRやMなどの複雑な文字の検知ができなくなっていた。
今回は1分で上限の100点を取ることを目標にしていたので問題ないが、誤検知も減らそうとする場合は文字ごとにしきい値を変更したほうが良さそうだ。
おまけ:速度検証
pyautoguiの謎のウェイトがどこから来たかを確認する。
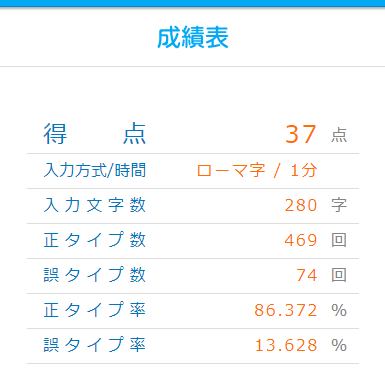
そのため上記のmain_loop関数内の文字を入力する部分を次のように書き換えた。
もしpressの直後にsleepが走っていた場合、得点は40点ぐらいには落ちるだろうか。
def main_loop_test():
    started = False
    while True:
        ans = lr.get_key_line()
        if ans:
            for c in ans:
                pyautogui.press(c)
            print(ans)
            started = True
        else:
            if started:
                break
検証結果は下記の画像の通り。
入力の関数の後にウェイトが入っているのは文字を流し込んだ後、guiに文字を処理させる必要があるからだろうか。
