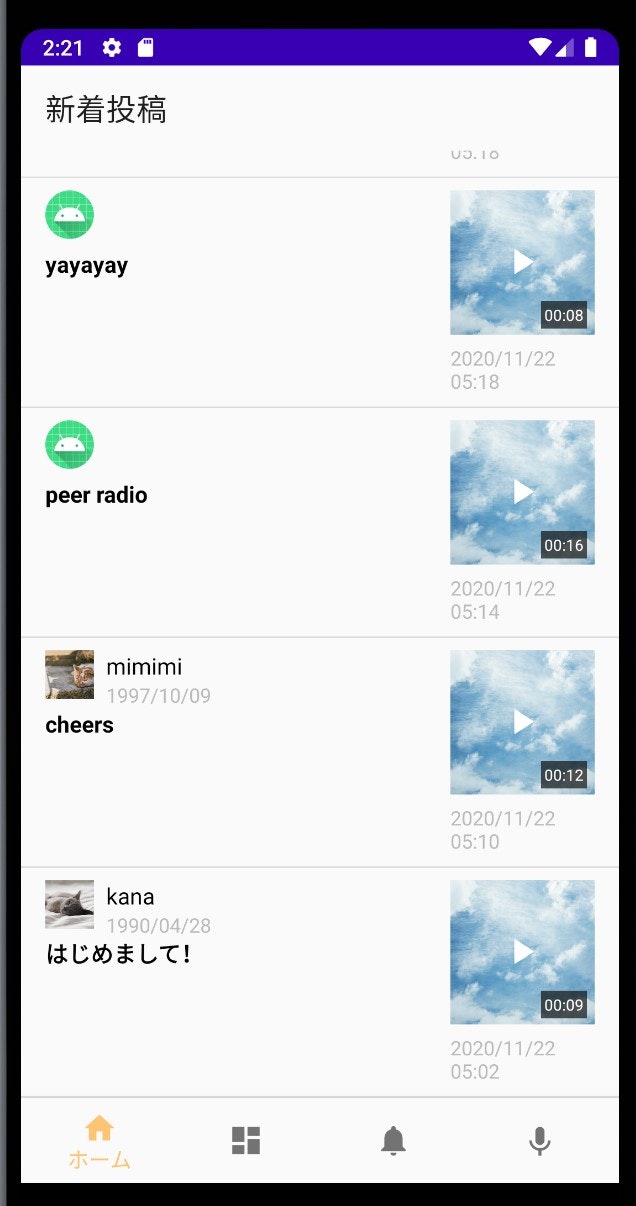
この記事で達成したい目的
Firestoreからデータを取得してこんな感じに表示したい!
レイアウト
まず、上記画像のように取得したデータを表示したいなぁと思う画面にRecyclerViewをドラッグアンドドロップで配置します。以下は配置したRecyclerViewにlistというidをつけました。
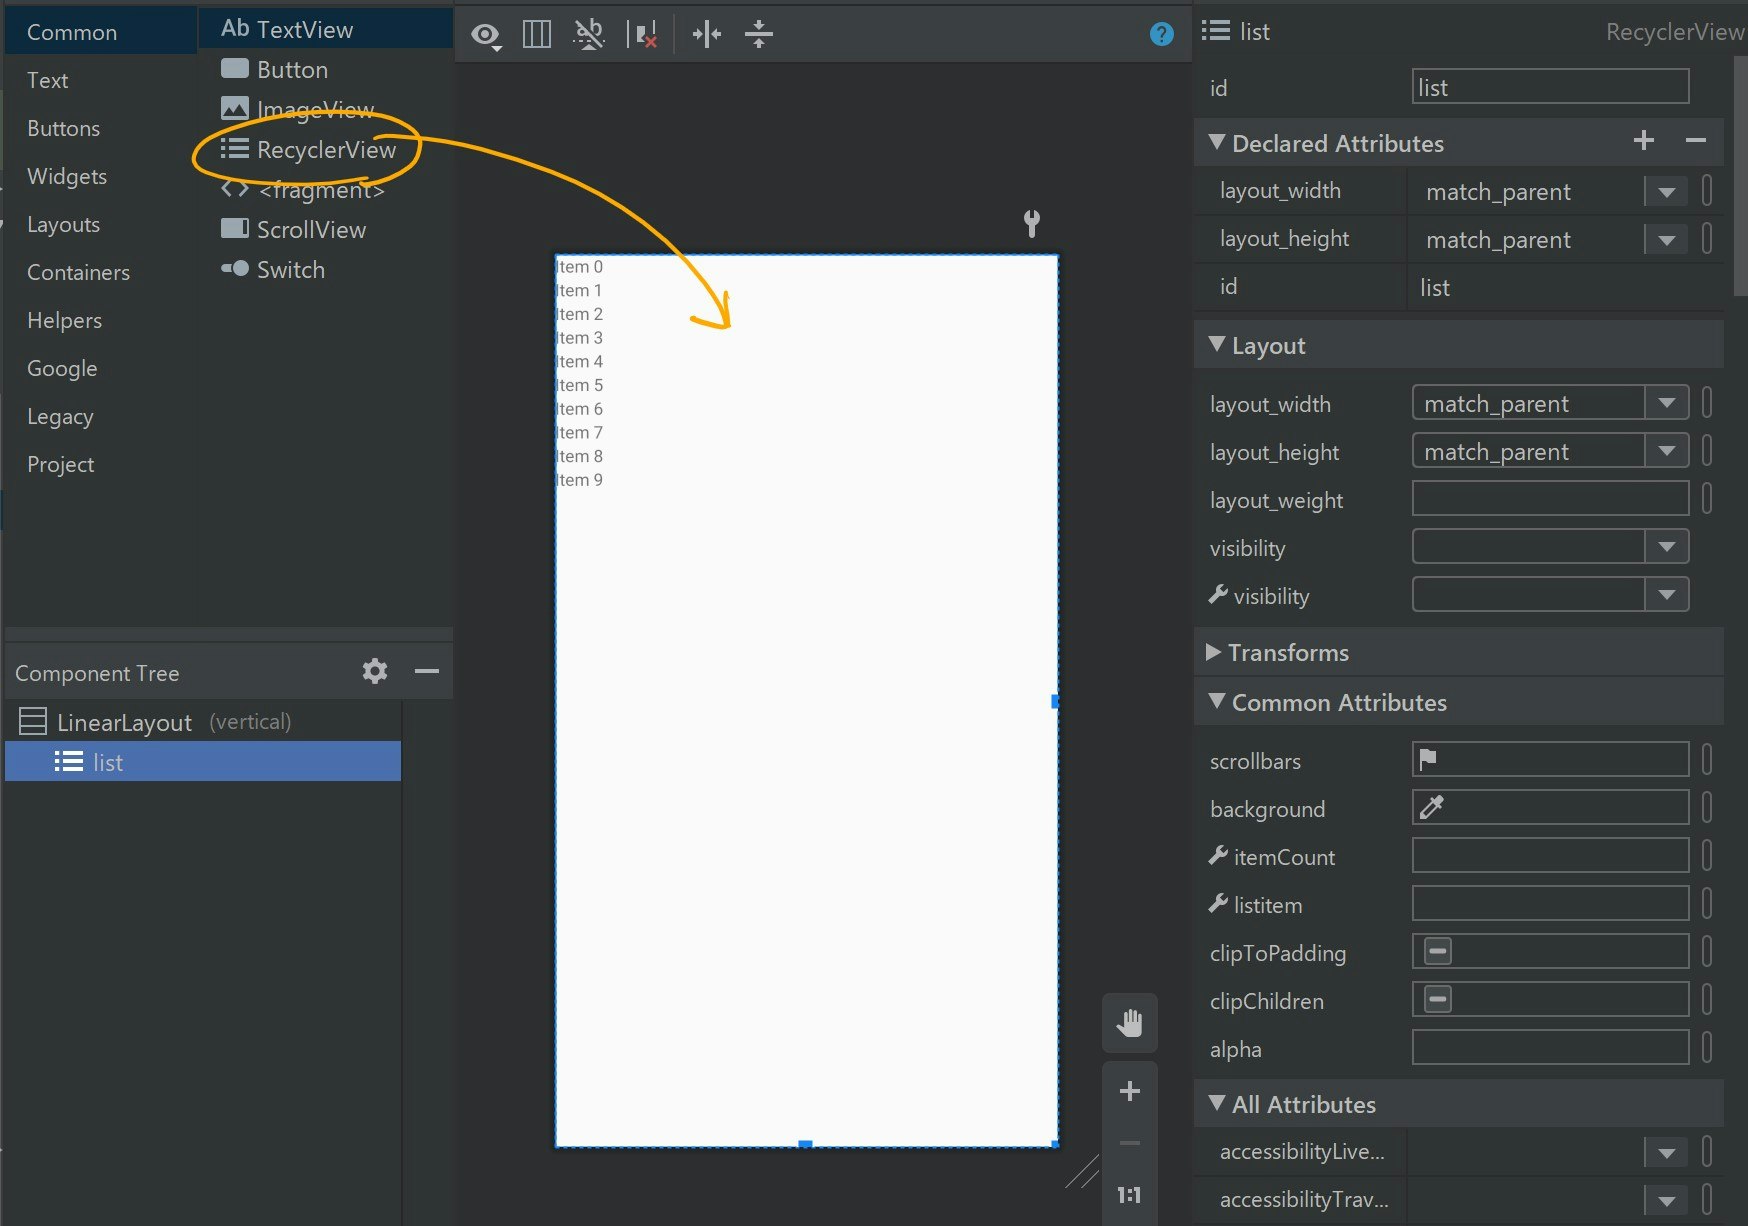
コードでいうとこんな感じ。
<?xml version="1.0" encoding="utf-8"?>
<LinearLayout xmlns:android="http://schemas.android.com/apk/res/android"
    xmlns:app="http://schemas.android.com/apk/res-auto"
    xmlns:tools="http://schemas.android.com/tools"
    android:layout_width="match_parent"
    android:layout_height="match_parent"
    android:orientation="vertical"
    tools:context=".ui.home.HomeFragment">

    <androidx.recyclerview.widget.RecyclerView
        android:id="@+id/list"
        android:layout_width="match_parent"
        android:layout_height="match_parent" />

</LinearLayout>
上記はただ棚を用意しただけの状態です。表示したいリストアイテムを格納するための棚です。では棚にひとつひとつ置いていくリストアイテムのレイアウトを次に考えていきましょう。
見た目はこんなかんじにします。
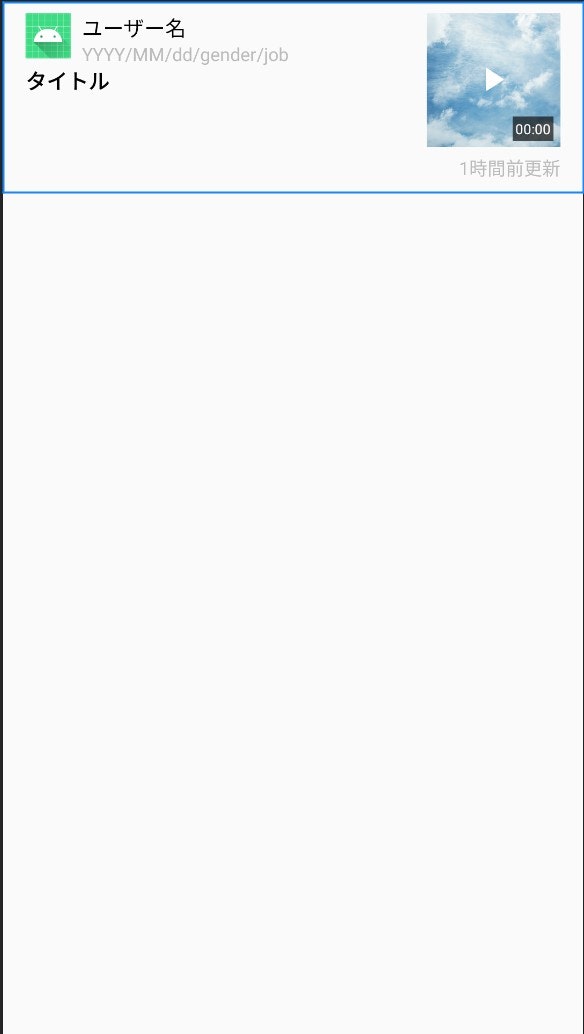
なので、コードはこんなかんじにしてみました。
<?xml version="1.0" encoding="utf-8"?>
<LinearLayout xmlns:android="http://schemas.android.com/apk/res/android"
    xmlns:app="http://schemas.android.com/apk/res-auto"
    xmlns:tools="http://schemas.android.com/tools"
    android:layout_width="match_parent"
    android:layout_height="wrap_content"
    android:baselineAligned="false"
    android:paddingLeft="16dp"
    android:paddingTop="8dp"
    android:paddingBottom="8dp"
    android:paddingRight="16dp"
    android:orientation="horizontal">

    <LinearLayout
        android:layout_width="0dp"
        android:layout_height="wrap_content"
        android:layout_weight="1"
        android:orientation="vertical">

        <LinearLayout
            android:layout_width="wrap_content"
            android:layout_height="wrap_content"
            android:orientation="horizontal">

            <ImageView
                android:id="@+id/avatar"
                android:layout_width="32dp"
                android:layout_height="32dp"
                android:contentDescription="@null"
                android:scaleType="centerCrop"
                app:srcCompat="@mipmap/ic_launcher" />

            <LinearLayout
                android:layout_width="wrap_content"
                android:layout_height="wrap_content"
                android:layout_marginStart="8dp"
                android:orientation="vertical">

                <TextView
                    android:id="@+id/name"
                    android:layout_width="wrap_content"
                    android:layout_height="wrap_content"
                    android:textColor="@android:color/black"
                    android:textSize="15sp"
                    tools:text="ユーザー名" />

                <TextView
                    android:id="@+id/user_info"
                    android:layout_width="wrap_content"
                    android:layout_height="wrap_content"
                    android:textColor="#bbbbbb"
                    android:textSize="13sp"
                    tools:text="YYYY/MM/dd/gender/job" />
            </LinearLayout>
        </LinearLayout>

        <TextView
            android:id="@+id/post_title"
            android:layout_width="wrap_content"
            android:layout_height="wrap_content"
            android:fontFamily="sans-serif"
            android:textColor="@android:color/black"
            android:textSize="15sp"
            android:textStyle="bold"
            tools:text="タイトル" />
    </LinearLayout>

        <LinearLayout
            android:layout_width="95dp"
            android:layout_height="wrap_content"
            android:layout_marginLeft="8dp"
            android:orientation="vertical">

            <FrameLayout
                android:layout_width="match_parent"
                android:layout_height="95dp">

                <ImageView
                    android:id="@+id/image"
                    android:layout_width="match_parent"
                    android:layout_height="match_parent"
                    android:contentDescription="@null"
                    android:src="@drawable/blue_sky_and_polygon" />

                <TextView
                    android:id="@+id/replay_length"
                    android:layout_width="wrap_content"
                    android:layout_height="wrap_content"
                    android:layout_gravity="bottom|end"
                    android:layout_marginRight="5dp"
                    android:layout_marginBottom="4dp"
                    android:background="#b2111111"
                    android:paddingLeft="2dp"
                    android:paddingTop="2dp"
                    android:paddingRight="2dp"
                    android:paddingBottom="2dp"
                    android:textColor="@android:color/white"
                    android:textSize="10sp"
                    tools:text="00:00" />
            </FrameLayout>

            <TextView
                android:id="@+id/post_time"
                android:layout_width="wrap_content"
                android:layout_height="wrap_content"
                android:layout_gravity="end"
                android:layout_marginTop="6dp"
                android:textColor="#bbbbbb"
                android:textSize="13sp"
                tools:text="1時間前更新" />
        </LinearLayout>
</LinearLayout>
Fragment/Activity
次はRecyclerViewを表示したいFragment/Activityの処理を書いていきます。今回はFragmentの場合です。このFragmentは上記冒頭らへんのfragment_home.xmlと繋がっています。
コード全体としては以下のようになります。
class HomeFragment : Fragment() {
    private var _binding: FragmentHomeBinding? = null
    private val binding
        get() = _binding!!

    private val viewModel: HomeViewModel by viewModels()
    private lateinit var homeListAdapter: HomeListAdapter

    override fun onCreateView(
        inflater: LayoutInflater,
        container: ViewGroup?,
        savedInstanceState: Bundle?
    ): View? {
        _binding = FragmentHomeBinding.inflate(inflater, container, false)
        return binding.root
    }

    // Viewの処理やbindingの初期化以外の処理を行う
    override fun onViewCreated(view: View, savedInstanceState: Bundle?) {
        super.onViewCreated(view, savedInstanceState)
        callHomeViewMode()
        viewModel.postsData.observe(
            viewLifecycleOwner,
            { homeListAdapter.submitList(it) }
        )
        binding.list.apply {
            layoutManager = LinearLayoutManager(context)
            addItemDecoration(
                DividerItemDecoration(
                    context,
                    DividerItemDecoration.VERTICAL
                )
            )
            adapter = HomeListAdapter().also {
                homeListAdapter = it
            }
        }
    }

    override fun onDestroyView() {
        super.onDestroyView()
        _binding = null
    }

    private fun callHomeViewMode() {
        viewModel.loadPost()
    }
}
細かいところを見ていきましょう。
この辺はViewBindingの準備をしたり、Firestoreからデータを取得するためのviewModelを初期化したりしています。ViewModelに関しては、こちらをどうぞ。MVVMというアーキテクチャでコーディングしています。LiveDataに関してもこちらの記事を参考にして頂きたいです。https://qiita.com/mi_iroha/items/771f0797d375c9f3bbb9
また、onCreateViewの中ではViewBindingの初期化以外の処理は書かないようにしましょう。
private var _binding: FragmentHomeBinding? = null
    private val binding
        get() = _binding!!

    private val viewModel: HomeViewModel by viewModels()
    private lateinit var homeListAdapter: HomeListAdapter

    override fun onCreateView(
        inflater: LayoutInflater,
        container: ViewGroup?,
        savedInstanceState: Bundle?
    ): View? {
        _binding = FragmentHomeBinding.inflate(inflater, container, false)
        return binding.root
    }
続いて後半のコードをみてみます。
ViewBindingの初期化以外の処理はonViewCreatedの中に書きます。あくまでFragmentの場合です。FragmentやActivityのViewBindingについては詳しくはこちらをどうぞhttps://qiita.com/mi_iroha/items/dbc07737e81776e05f8d
表示したいデータを取得してくれるViewModelを呼び出すと、Firestoreからデータが取得されてLiveDataに格納されます。LiveDataに格納されたデータをListAdapter(RecyclerViewにリストアイテムを表示させる設定を書くファイル的な存在)に伝えるためにobserve()という関数の中でhomeListAdapter.submitList(it)としています。observe()やらLiveDataやらに関しては私のMVVMについて書いた記事をよんでもらえると分かると思います。https://qiita.com/mi_iroha/items/771f0797d375c9f3bbb9
で、observe()の中ではitがLiveDataに格納されたデータとなり、これをsubmitList()というListAdapterにデータを受け渡してくれる働きの関数に渡します。これだけで、取得してきたデータをListAdapter側で扱えるようになります。
binding.list.apply{}の部分は先ほどfragment_home.xmlにて配置したidがlistのRecyclerViewと繋げています。垂直方向に配置することなどをここで設定しています。まぁ、この辺は割と公式的と言うか、「こういうもん」っていう気持ちが大事だと考えています((笑))
// Viewの処理やbindingの初期化以外の処理を行う
    override fun onViewCreated(view: View, savedInstanceState: Bundle?) {
        super.onViewCreated(view, savedInstanceState)
        callHomeViewMode()
        viewModel.postsData.observe(
            viewLifecycleOwner,
            { homeListAdapter.submitList(it) }
        )
        binding.list.apply {
            layoutManager = LinearLayoutManager(context)
            addItemDecoration(
                DividerItemDecoration(
                    context,
                    DividerItemDecoration.VERTICAL
                )
            )
            adapter = HomeListAdapter().also {
                homeListAdapter = it
            }
        }
    }

    override fun onDestroyView() {
        super.onDestroyView()
        _binding = null
    }

    private fun callHomeViewMode() {
        viewModel.loadPost()
    }
}
ListAdapter
では最後にリストアダプターを見ていきます。AdapterというのはrecyclerView(棚)にリストアイテムをどういう感じで置く(表示する)かを設定・調整するためのやつです!その中でも、今回のように画面に垂直方向にズラズラと表示したい時はListAdapterというAdapterがピッタリです。ではListAdapterのコード全体をみていきましょう。以下が全体のコードです。
class HomeListAdapter : ListAdapter<Post, RecyclerView.ViewHolder>(DiffCallback) {

    override fun onCreateViewHolder(parent: ViewGroup, viewType: Int): HomeViewHolder {
        val layoutInflater = LayoutInflater.from(parent.context)
        return HomeViewHolder(ListitemNewPostBinding.inflate(layoutInflater, parent, false))
    }

    override fun onBindViewHolder(holder: RecyclerView.ViewHolder, position: Int) {
        val item = getItem(position) ?: return
        (holder as? HomeViewHolder)?.bind(item)
    }

    companion object DiffCallback : DiffUtil.ItemCallback<Post>() {
        override fun areItemsTheSame(oldItem: Post, newItem: Post): Boolean {
            return oldItem.postUrl == newItem.postUrl
        }

        override fun areContentsTheSame(oldItem: Post, newItem: Post): Boolean {
            return oldItem == newItem
        }
    }

    class HomeViewHolder(private val binding: ListitemNewPostBinding) :
        RecyclerView.ViewHolder(binding.root) {
        fun bind(item: Post) {
            binding.run {
                name.text = item.userName
                userInfo.text = item.userInfo
                postTitle.text = item.postTitle
                replayLength.text = item.postDuration
                postTime.text = item.createdAt

                when (item.userImage) {
                    1 -> {
                        avatar.setImageResource(R.drawable.profile1)
                    }
                    2 -> {
                        avatar.setImageResource(R.drawable.profile2)
                    }
                    3 -> {
                        avatar.setImageResource(R.drawable.profile3)
                    }
                    4 -> {
                        avatar.setImageResource(R.drawable.profile4)
                    }
                    5 -> {
                        avatar.setImageResource(R.drawable.profile5)
                    }
                    6 -> {
                        avatar.setImageResource(R.drawable.profile6)
                    }
                    7 -> {
                        avatar.setImageResource(R.drawable.profile7)
                    }
                    8 -> {
                        avatar.setImageResource(R.drawable.profile8)
                    }
                }
            }
        }
    }
}
以下詳しく見ていきます。
まずこの部分、先ほどHomeFragmentでLiveDataの内容(Firestoreから取得してきたデータ)をListAdapterに渡しましたよね?それをitemという変数に入れなおしているかんじです。例えば受け取ってきたデータの中からuserNameという名前のデータを取り出してLogcat上で確認したい場合なんかはLog.d("TAG", item.userName.toString())とかやったら見れると思います(確認してませんが💦)。注意ですが、userNameというのは、Firestoreに保存しているフィールドの名前ではありません。データクラスでの名前です。データクラスに関してはこちらの記事に詳しく書いておりますので是非ご参考に。https://qiita.com/mi_iroha/items/9d4da0c1a4f76864eaab
 override fun onBindViewHolder(holder: RecyclerView.ViewHolder, position: Int) {
        val item = getItem(position) ?: return
        (holder as? HomeViewHolder)?.bind(item)
    }
それで、itemの中から適切にデータを取り出し、run{}の中でlistitem_new_post.xmlの各Viewと繋げあわせてます。
class HomeViewHolder(private val binding: ListitemNewPostBinding) :
        RecyclerView.ViewHolder(binding.root) {
        fun bind(item: Post) {
            binding.run {
                name.text = item.userName
                userInfo.text = item.userInfo
                postTitle.text = item.postTitle
                replayLength.text = item.postDuration
                postTime.text = item.createdAt
また、when以下はユーザーがどのプロフィール画像を選択したかによって表示する画像を変えている処理です。
when (item.userImage) {
                    1 -> {
                        avatar.setImageResource(R.drawable.profile1)
                    }
                    2 -> {
                        avatar.setImageResource(R.drawable.profile2)
                    }
                    3 -> {
                        avatar.setImageResource(R.drawable.profile3)
                    ....
さいごに
これで実行するとうまく表示されるはずです!!間違っている点やより詳しく書いた方が良い部分があれば是非ご指摘お願い致します!!