CRXJS Vite Pluginを使わない Vite + React + TypeScriptでChrome拡張機能開発
以前投稿した Vite + React + TSでChrome拡張機能開発:かんたん環境構築からHello Worldまで では、ViteプラグインのCRXJSを使用してChrome拡張機能の開発環境を構築しましたが、今回はCRXJSを使用しない場合のプロジェクト作成の手順をまとめています。
Popup、Content Script、Service Workerを含むプロジェクトテンプレートの作成とプレビュー方法について説明しています。
この記事に含まれないこと:
拡張機能を構成する概念(manifest, service worker, content scriptsなど)やReact、TSの詳しい説明は含まれません。
環境構築
Viteプロジェクトの作成
$ npm create vite@latest

// コマンドのダイアログに従いプロジェクトをセットアップ
✔ Project name: … my-chrome-extension
✔ Select a framework: › React
✔ Select a variant: › TypeScript

$ cd my-chrome-extension

$ npm i
プロジェクト名は my-chrome-extension とします。
サーバー起動
$ npm run dev
サーバーを起動すると➜ Local: http://localhost:5173/ のように表示されているlocal serverのURLにアクセスしてVite + Reactのスタート画面が表示されることを確認します。

Chrome API 型定義ファイルのインストール
@types/chrome
chrome.types APIにはChromeの型定義が含まれています。
エディタにChrome APIの型を認識させたり、オートコンプリート機能を有効にするため、型定義ファイルのパッケージをインストールしておきます。
$ npm install --save-dev @types/chrome
ビルド設定
Popup、Content Script、Service Workerの各環境でHello worldするための設定をします。
ディレクトリ構成
全体像をイメージしやすいように、最終的なディレクトリ構成を載せておきます。
.
├── dist/
├── public/
│   ├── images/
│   │   └── icon_16.png
│   ├── manifest.json
├── src/
│   ├── background/ ...service worker
│   │   └── index.tsx
│   ├── content/ ...content scripts ★
│   │   └── index.tsx ★
│   └── popup/ ... popup
│       ├── index.tsx
│       └── index.html
├── package.json
├── vite.config.content.ts ...content script用のvite config ★
├── vite.config.ts ...その他のvite config
★ ... content scriptのビルド設定は一手間を加える必要があるため、この記事の最後の項目で説明します。
実装準備
Viteプロジェクトを生成した状態から、srcディレクトリから不要なファイルを削除しておきます。(一部のファイルを省略しています)
  .
  ├── dist/
  ├── public/
  ├── src/
- │   ├── App.css
- │   ├── App.tsx
- │   ├── index.css
- │   └── main.tsx
- ├── index.html
  ├── package.json
  ├── vite.config.ts
Popupの実装
まずはPopupに"Hello Popup"と表示し、Chromeに拡張機能としてロードしプレビューしてみます。
ビルド後のファイル群は以下の様になるよう設定していきます。(関連ファイルのみ記載)
.
├── dist/
│   ├── assets/
│   │   └── popup.js
│   ├── popup/
│   │   └── index.html
│   ├── manifest.json
Popup
  .
  ├── public/
  ├── src/
+ │   ├── popup/
+ │   │   ├── index.tsx
+ │   │   └── index.html
<!doctype html>
<html lang="en">
  <head>
    <meta charset="UTF-8" />
    <meta name="viewport" content="width=device-width, initial-scale=1.0" />
    <title>My Chrome Extension</title>
  </head>
  <body>
    <script type="module" src="./index.tsx"></script>
  </body>
</html>
import { StrictMode } from 'react'
import { createRoot } from 'react-dom/client'

// 1. consoleにテキストを出力
console.log('Hello Popup')

const root = document.createElement('div')
root.id = 'crx-popup-root'
document.body.appendChild(root)

createRoot(root).render(
  <StrictMode>
    // 2. ポップアップ画面にテキストを表示
    <h1>Hello Popup!</h1>
  </StrictMode>
)
vite.config.ts
import { defineConfig } from 'vite'
+ import { join, resolve } from 'path'
import react from '@vitejs/plugin-react'

// https://vite.dev/config/
export default defineConfig({
  root: resolve(__dirname, 'src'),
+ publicDir: resolve(__dirname, 'public'),
+ build: {
+   outDir: resolve(__dirname, 'dist'),
+   rollupOptions: {
+     input: {
+       popup: join(__dirname, 'src/popup/index.html'),
+     },
+     output: {
+       entryFileNames: 'assets/[name].js'
+     },
+   }
+ },
+ resolve: {
+   alias: {
+     '@src': resolve(__dirname, 'src')
+   }
+ },
  plugins: [react()],
})
path モジュールの型定義ファイルをインストールします。
$ npm install --save @types/node
UIコーディング時のプレビュー

$ npm run dev
Devサーバーを起動し下記のパスにアクセスすると、Popupのコンテンツの表示を確認できます。
UIのコーディングをするときは拡張機能としてロードせずに、この方法でホットリロードを利用してレイアウト作成していくと効率が良いと思います。
http://localhost:5173/popup/index.html
*port番号はterminalの表示を確認してください。
Chromeに拡張機能をロードする
次に拡張機能としてロードするための設定をします。
manifest
マニフェストファイルは静的ファイルとして追加します。
  .
  ├── public/
+ │   └── manifest.json
  ├── src/
  │   ├── popup/
  │   │   ├── index.tsx
  │   │   ├── index.html
manifest.jsonに、拡張機能アイコンをクリックした時に表示するポップアップファイルを登録します。
{
  "manifest_version": 3,
  "name": "My Chrome Extension",
  "version": "1.0.0",
  "action": {
     "default_popup": "/popup/index.html"
  }
}
ビルドして期待通りファイルが作成されていることを確認します。
$ npm run build
.
├── dist/
│   ├── assets/
│   │   └── popup.js
│   ├── popup/
│   │   └── index.html
│   ├── manifest.json
package.json
scripts に拡張機能のプレビュー用のscriptを追加します。--watchオプションを有効にしてファイルを変更した際に再ビルドされるようにします。
{
  // 省略
  "scripts": {
    "dev": "vite",
    "build": "tsc -b && vite build",
+   "build:watch": "vite build --watch",
    "lint": "eslint .",
    "preview": "vite preview"
  },
  // 省略
}
Chromeで拡張機能としてプレビューする
$ npm run build:watch
でウォッチャーを起動した状態で、下記の手順でプロジェクトファイルをロードすることで、ホットリロードを活用して開発ができます。
- Google Chromeの拡張機能の管理画面にアクセス chrome://extensions/
-
Developer mode/デベロッパー モードをONにする -
Load unpacked/パッケージ化されていない拡張機能を読み込むを選択する - 作成したプロジェクトの
distフォルダを選択しロードする
拡張機能の一覧 / All Extensions に"My Chrome Extension"が追加されたことを確認したら、新しいタブを開き、拡張機能アイコンをクリックします。
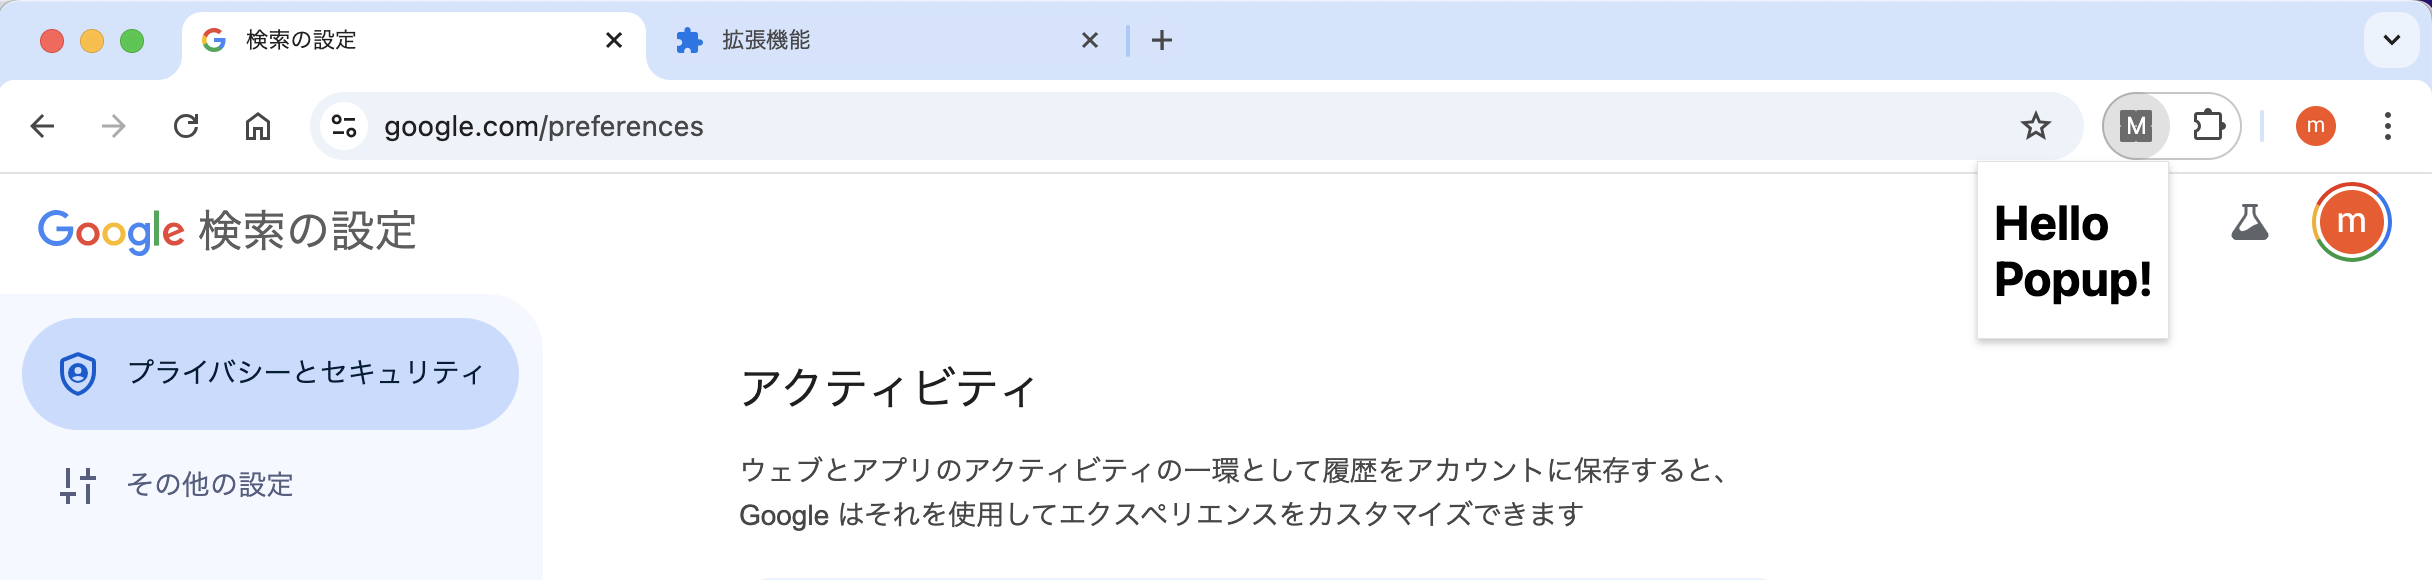
ポップアップが表示され、先ほどDevサーバーで確認したHello Popup!が表示されていれば、開発準備完了です。

この設定ではpublicフォルダは監視の対象外なので、manifestファイル更新の都度$ npm run buildを実行する必要があります。
srcファイルに変更があると再ビルドされ、Chromeの拡張機能のリロードは不要ですが、Popupを表示させた状態では変更が反映されません。
一度Popupを閉じて、表示しなおす必要があります。
効率よくレイアウト作成するため、DevサーバーでUIコーディングをするのがおすすめです。
Service Workerの追加 (background.js)
次に、Sevice workerのConsoleに"Hello Background"のテキストを出力します。
  .
  ├── src/
+ │   ├── background/
+ │   │   └── index.tsx
  │   ├── popup/
  │   │   ├── index.tsx
  │   │   ├── index.html
console.log('Hello Background')
vite.config.ts
import { defineConfig } from 'vite'
import { join, resolve } from 'path'
import react from '@vitejs/plugin-react'

// https://vite.dev/config/
export default defineConfig({
  root: resolve(__dirname, 'src'),
  publicDir: resolve(__dirname, 'public'),
  build: {
    outDir: resolve(__dirname, 'dist'),
    rollupOptions: {
      input: {
        popup: join(__dirname, 'src/popup/index.html'),
+       background: join(__dirname, 'src/background/index.tsx'),
      },
      output: {
        entryFileNames: 'assets/[name].js'
      },
    }
  },
  resolve: {
    alias: {
      '@src': resolve(__dirname, 'src')
    }
  },
  plugins: [react()],
})
 .
 ├── dist/
 │   ├── assets/
+│   │   ├── background.js
 │   │   └── popup.js
 │   ├── popup/
 │   │   └── index.html
 │   ├── manifest.json
{
  "manifest_version": 3,
  "name": "My Chrome Extension",
  "version": "1.0.0",
+  "background": {
+    "service_worker": "/assets/background.js"
+  },
  "action": {
    "default_popup": "/popup/index.html"
  }
}
*manifestファイルを変更したら $ npm run buildでpublicフォルダのファイルをビルドします。
Service WorkerのConsole表示
拡張機能の管理画面にアクセスします chrome://extensions/
リロードボタンをクリックするとInspect views: service workerのテキストリンクが表示されます。クリックすると開発者ツールが表示され、service workerのConsoleを表示することができます。

Consoleに"Hello Background"とログが出力されていれば成功です。
Content Scriptビルド設定
最後に、ページコンテンツの操作をするContent Scriptのビルド設定と実装を行います。
閲覧中のページ(アクティブなタブ)に要素を追加し、"Hello Content"と表示します。

  .
  ├── src/
  │   ├── background/
  │   │   └── index.tsx
+ │   ├── content/
+ │   │   └── index.tsx
  │   ├── popup/
  │   │   ├── index.tsx
  │   │   ├── index.html
import { StrictMode } from 'react'
import { createRoot } from 'react-dom/client'

// 1. consoleにテキストを出力
console.log('Hello Content')

const root = document.createElement('div')
root.id = 'crx-content-root'
document.body.appendChild(root)

createRoot(root).render(
  <StrictMode>
    {/* 2. アクティブなタブコンテンツにテキストを表示 */}
    <h1 style={{position: 'fixed', left: 0, top: 0}}>Hello Content!</h1>
  </StrictMode>
)
ビルド後のファイル
 .
 ├── dist/
 │   ├── assets/
 │   │   ├── background.js
+│   │   ├── content.js
 │   │   └── popup.js
 │   ├── popup/
 │   │   └── index.html
 │   ├── manifest.json
{
  "manifest_version": 3,
  "name": "My Chrome Extension",
  "version": "1.0.0",
  "background": {
     "service_worker": "/assets/background.js"
  },
+ "content_scripts": [
+    {
+        "js": ["/assets/content.js"],
+        "matches": ["https://www.google.com/*"]
+    }
+ ],
  "action": {
    "default_popup": "/popup/index.html"
  }
}
*スクリプト実行の対象ページはhttps://www.google.com/ドメインのページとしました。
*manifestファイルを変更したら $ npm run buildでpublicフォルダのファイルをビルドします。
Content Scriptでimport構文は使用できない
ここでbackgroundやpopupと同じようにvite.config.tsのinputにcontent scriptのファイルを追加してみます。
rollupOptions: {
  input: {
    popup: join(__dirname, 'src/popup/index.html'),
    background: join(__dirname, 'src/background/index.tsx'),
+   content: join(__dirname, 'src/content/index.tsx')
  },
//省略
}
次のようなエラーが表示されます。
Uncaught SyntaxError: Cannot use import statement outside a module
ビルドしたjsにimport構文が含まれているが、scriptがmoduleとして読み込まれていないために出ているエラーです。単純にhtmlにscriptタグで読み込む場合は、type="module"のようにscriptのtype属性を指定することができますが、Content Scriptsはアクティブなタブのコンテンツにインジェクトされるためそのような指定をすることができません。
Content Script用のvite.configを追加
前の項目で説明した通り、Content Scriptに限ってはimport構文を含まない形でビルドする必要があるため、別途vite.configを用意します。
vite.config.content.ts
import { defineConfig } from 'vite'
import { join, resolve } from 'path'
import react from '@vitejs/plugin-react'

// https://vite.dev/config/
export default defineConfig({
  root: resolve(__dirname, 'src'),
  publicDir: resolve(__dirname, 'public'),
  build: {
    outDir: resolve(__dirname, 'dist'),
    rollupOptions: {
      input: {
        content: join(__dirname, 'src/content/index.tsx')
      },
      output: {
        entryFileNames: 'assets/[name].js',
        inlineDynamicImports: true // import構文を使用しないためのオプションです
      },
    }
  },
  resolve: {
    alias: {
      '@src': resolve(__dirname, 'src')
    }
  },
  plugins: [
    react(),
  ],
})
*rollupのinlineDynamicImportsオプションを有効にする場合、inputファイルを複数指定することができません。
そのためcontent scriptとその他のconfigファイルを分けています。
二つのnpmコマンドを同時に実行するためパッケージconcurrentlyを追加します。
$ npm install concurrently
content scriptとその他のconfigファイルに指定の通り、変更を監視してビルドを行います。
  // 省略
  "scripts": {
    "dev": "vite",
    "build": "tsc -b && vite build",
-   "build:watch": "vite build --watch",
+   "build:watch": "concurrently \"npm run build:watch-content\" \"npm run build:watch-others\"",
+   "build:watch-content": "vite build --watch --config vite.config.content.ts",
+   "build:watch-others": "vite build --watch",
    "lint": "eslint .",
    "preview": "vite preview"
  },
  // 省略
Content Scriptを更新したら、拡張機能の管理画面にアクセスし、 chrome://extensions/
リロードボタンをクリックします。
manifestでスクリプト実行の対象ページはhttps://www.google.com/ドメインのページとしたので、https://www.google.com/preferences などにアクセスします。
ページのソースに要素が追加され、ページ上にHello Content!が表示されていたら成功です。
Watcherを有効にしているとファイルに変更を加える都度再ビルドはされるものの、ロードしている拡張機能に変更を反映させるためには、拡張機能の管理画面で拡張機能をリロードし、ページもリロードする必要があります。
変更の都度リロードの作業をするのは手間なので、メッセージパッシングなど拡張機能としてロードしなければ機能しないものの確認でなければ、npm run dev でホットリロードを利用してプレビューしながら開発しています。
最終ビルド
最後にパッケージ化する際のビルド設定を追加します。
distディレクトリをクリーンにするコマンドを追加し、content scriptとその他を実行します。
  // 省略
  "scripts": {
    "dev": "vite",
-   "build": "tsc -b && vite build",
+   "build": "npm run clean && tsc -b && vite build && vite build --config vite.config.content.ts",
    "build:watch": "vite build --watch",
    "build:watch": "concurrently \"npm run build:watch-content\" \"npm run build:watch-others\"",
    "build:watch-content": "vite build --watch --config vite.config.content.ts",
    "build:watch-others": "vite build --watch",
+   "clean": "rimraf dist",
    "lint": "eslint .",
    "preview": "vite preview"
  },
  // 省略
rimrafパッケージの追加をします。
$ npm install --D rimraf
buildコマンドを実行して、ビルド後のファイル構成を確認してください。
$ npm run build
ビルド後のファイル構成
 .
 ├── dist/
 │   ├── assets/
 │   │   ├── background.js
 │   │   ├── content.js
 │   │   └── popup.js
 │   ├── popup/
 │   │   └── index.html
 │   └── manifest.json
manifestで指定した通りに各ファイルが生成されていることを確認し、Chromeに拡張機能としてロードし、動作確認をして開発完了です。
{
    "manifest_version": 3,
    "name": "My Chrome Extension.",
    "version": "1.0.0",
    "background": {
        "service_worker": "/assets/background.js"
    },
    "content_scripts": [
        {
            "js": ["/assets/content.js"],
            "matches": ["https://www.google.com/*"]
        }
    ],
    "action": {
       "default_popup": "/popup/index.html"
    }
}