こんにちは、株式会社Handiiのmegumishです。
Rustの有力なWebフレームワークとして、「actix-web」があります。今回は「actix-web」のミドルウェア機能を使ったリクエストやレスポンスへのラッパーの書き方について紹介します。
なお、この記事ではRustとは?actix-webとは?という疑問についてはお答えできません。もし需要があれば別の記事で書くかもしれません……。
0. 検証環境
検証用コンピューターの情報
ubuntu18.04 on WSL
$ lsb_release -a
No LSB modules are available.
Distributor ID: Ubuntu
Description:    Ubuntu 18.04.2 LTS
Release:        18.04
Codename:       bionic
Rustのバージョン
$ rustup -V
rustup 1.18.3 (435397f48 2019-05-22)
$ cargo -V
cargo 1.36.0 (c4fcfb725 2019-05-15)
Cargo.toml
[package]
name = "actix-web-original-middleware-example"
version = "0.1.0"
authors = ["megumish <keishi.kawada@handii.co.jp>"]
edition = "2018"

# See more keys and their definitions at https://doc.rust-lang.org/cargo/reference/manifest.html

[dependencies]
actix-web = "1.0.7"
env_logger = "0.6.2"
またこの記事で使われたコードは以下のレポジトリで公開されています。
1. 基本となるactix-webサーバーの実装
リクエストやレスポンスを書き換える土台となるactix-webサーバーの実装が次のものになります。
use actix_web::{web, App, Responder, HttpServer};

fn index(name: web::Path<String>) -> impl Responder {
    format!("Hello {}!", name)
}

fn main() {
    run("127.0.0.1:13370");
}

fn run(host : &'static str) {
    HttpServer::new(|| App::new().service(
        web::resource("/{name}").to(index)
    ))
    .bind(host)
    .expect(&format!("Host: {} is disabled", host))
    .run()
    .expect("Can't running HTTP Server");
}
挙動としてはHost「127.0.0.1:13370」で待ち受けて、パス「/{name}」で「Hello {name}!」を返すというものになっています。
試しに起動して、HTTPリクエストをhttpieで投げてみるとこうなります。
(httpieはPython製のHTTPのCLIクライアントです。
httpieについて書かれた記事は
curlに変わる便利コマンドHTTPieを使ってみた
がありました。)
$ http 127.0.0.1:13370/megumish
HTTP/1.1 200 OK
content-length: 15
content-type: text/plain; charset=utf-8
date: Fri, 13 Sep 2019 03:49:40 GMT

Hello megumish!
2. お試しミドルウェア「Logger」
まずはミドルウェアの独自実装に入る前にactix-webで実装されているミドルウェアを試してみましょう。
actix-webのドキュメント https://docs.rs/actix-web/1.0.7/actix_web/middleware/struct.Logger.html を参考にLoggerミドルウェアを実装します。
まず、actixのアプリケーションにwrap(Logger::default())を追加します。
ですが、Rustのログの環境変数が設定されていないためこれだけではログは出力されません。
今回は解説は省略しますが、env_loggerというクレートを使いログ出力の設定を行います。
use actix_web::middleware::Logger;
use actix_web::{web, App, HttpServer, Responder};

fn index(name: web::Path<String>) -> impl Responder {
    format!("Hello {}!", name)
}

fn main() {
    run("127.0.0.1:13370");
}

fn run(host: &'static str) {
    // on Logger level info
    std::env::set_var("RUST_LOG", "actix_web=info");
    env_logger::init();

    HttpServer::new(|| {
        App::new()
            .wrap(Logger::default())
            .service(web::resource("/{name}").to(index))
    })
    .bind(host)
    .expect(&format!("Host: {} is disabled", host))
    .run()
    .expect("Can't running HTTP Server");
}
いくつかHTTPリクエストを出すとちゃんとログが残っていました。
Running `target/debug/actix-web-original-middleware-example`
[2019-09-13T04:07:23Z INFO  actix_web::middleware::logger] 127.0.0.1:50860 "GET /megumish HTTP/1.1" 200 15 "-" "HTTPie/0.9.8" 0.000383
[2019-09-13T04:07:47Z INFO  actix_web::middleware::logger] 127.0.0.1:50862 "GET /hogemish HTTP/1.1" 200 15 "-" "HTTPie/0.9.8" 0.000361
[2019-09-13T04:07:52Z INFO  actix_web::middleware::logger] 127.0.0.1:50864 "GET /fugamish HTTP/1.1" 200 15 "-" "HTTPie/0.9.8" 0.000346
3. actix-webのミドルウェアはどのように実装されるのか
さて、ではいよいよミドルウェアを独自に実装していくべく、どのように実装すればいいのかについて調べていきます。
とりあえずactix-webのアプリケーションのメソッドwrapについて観察しましょう。
pub fn wrap<M, B1, F>(
    self,
    mw: F,
) -> App<
    impl NewService<
        Config = (),
        Request = ServiceRequest,
        Response = ServiceResponse<B1>,
        Error = Error,
        InitError = (),
    >,
    B1,
>
where
    M: Transform<
        T::Service,
        Request = ServiceRequest,
        Response = ServiceResponse<B1>,
        Error = Error,
        InitError = (),
    >,
    B1: MessageBody,
    F: IntoTransform<M, T::Service>,
ジェネリクスTについては、ドキュメントの同じページの
impl<T, B> App<T, B>
where
    B: MessageBody,
    T: NewService<Config = (), Request = ServiceRequest, Response = ServiceResponse<B>, Error = Error, InitError = ()>,
より、NewServiceトレイトを実装していればいいみたいです。
したがって、どうやらミドルウェアの型は
actix_service::IntoTransform<
        actix_web::dev::Transform<
            Service = S,
            Request = actix_web::dev::ServiceRequest,
            Response = actix_web::dev::ServiceResponse<B>,
            Error = actixweb::error::Error,
            InitError = (),
        >,
        S,
    >,
B: actix_web::dev::MessageBody,
S: actix_web::dev::Service,
になるようです。
また、こちらの記述
impl<T, S> IntoTransform<T, S> for T
where
    T: Transform<S>,
より、Transformトレイトを実装しておけば、IntoTransformは自動実装されるようです。
4. 独自ミドルウェアの実装
前節より、ミドルウェアを実装するにはTransformトレイトを実装すればいいことが分かりました。
早速、すべてのリクエストとレスポンスを変更するミドルウェアを実装してみましょう。
まずはじめに、前述のTransformを実装します。このTransformには実際のミドルウェアの処理は書かれず、ミドルウェアを返すだけのコードを書くことになります。
// It makes Middleware. It's Intermediate Object.
struct HackMyWeb;

impl<S, B> Transform<S> for HackMyWeb
where
    S: Service<Request = ServiceRequest, Response = ServiceResponse<B>, Error = Error>,
    S::Future: 'static,
{
    type Request = ServiceRequest;
    type Response = ServiceResponse<B>;
    type Error = Error;
    type InitError = ();
    type Transform = HackMyWebMiddleware<S, B>;
    type Future = future::FutureResult<Self::Transform, Self::InitError>;

    // New Middlware Instance
    fn new_transform(&self, service: S) -> Self::Future {
        future::ok(HackMyWebMiddleware { service })
    }
}
そして本体の処理は次のコードで実装されます。
// Middleware Instance.
// In here, you write actual process.
struct HackMyWebMiddleware<S, B>
where
    // This is not necessary, but make it easier to understand.
    S: Service<Request = ServiceRequest, Response = ServiceResponse<B>, Error = Error>,
{
    service: S,
}

impl<S, B> Service for HackMyWebMiddleware<S, B>
where
    S: Service<Request = ServiceRequest, Response = ServiceResponse<B>, Error = Error>,
    S::Future: 'static,
{
    type Request = ServiceRequest;
    type Response = ServiceResponse<B>;
    type Error = Error;
    type Future = Box<dyn Future<Item = Self::Response, Error = Self::Error>>;

    fn poll_ready(&mut self) -> Result<futures::Async<()>, Self::Error> {
        Ok(futures::Async::Ready(()))
    }

    fn call(&mut self, mut service_request: Self::Request) -> Self::Future {
        // if Request path is "/hack_secret", then overwrite truly secret uri.
        if service_request.path() == "/hack_secret" {
            let secret_uri = "/f18b211dd1744570bb643e800308b1e4"
                .parse::<http::Uri>()
                .unwrap();
            service_request
                .match_info_mut()
                .get_mut()
                .update(&secret_uri);
        }
        Box::new(self.service.call(service_request).map(|mut res| {
            // When this middleware is set, it append my custom header to received response.
            let header_name = http::HeaderName::from_lowercase(b"hacker-code").unwrap();
            let header_value =
                http::HeaderValue::from_str("69de96e2-d5b0-41d4-89b8-864222140e24").unwrap();
            res.headers_mut().append(header_name, header_value);
            res
        }))
    }
}
ここで以下のような制約がついているのでそれに気を付けて実装します。
pub trait Service
where
    <Self::Future as Future>::Item == Self::Response,
    <Self::Future as Future>::Error == Self::Error,
{
    type Request;
    type Response;
    type Error;
    type Future: Future;
    fn poll_ready(&mut self) -> Result<Async<()>, Self::Error>;
    fn call(&mut self, req: Self::Request) -> Self::Future;
}
追加した処理としては /hack_secret にアクセスすると隠されたページに到達できるのと、レスポンスヘッダーにカスタムヘッダーを追加したものの2点となります。
ぜひお手元でクローンしてお試しください。
5. おわりに
というレポジトリの存在に気づかずにここまで書いてしまいました。
朝からの苦労は何だったのか……。
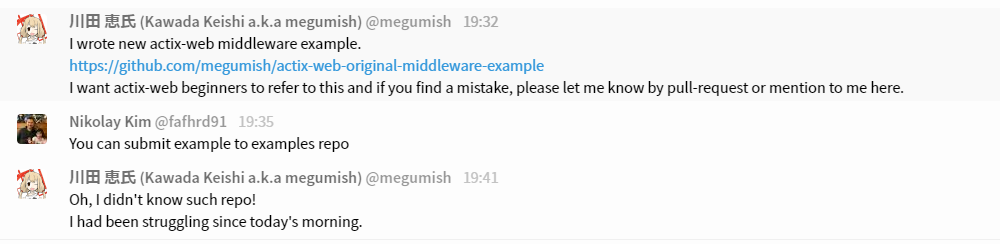
自慢げにexample書いたよ。と投稿したら「それexamplesレポに投げれば」と提案され気づく。