前回の記事「姿勢推定の精度をval2017で評価しつつiOSでの動作を試していく」ではCoreMLを試しました。
今度はTensorFlowLiteでもVitPoseを動かしてみます。
モデルをTFLiteに変換する
Pytorch -> ONNX -> Tensorflow -> TensorFlowLiteの順に変換しました。
注意点としては、proftobufのバージョン違いが発生するので変換する環境は別々に作った方がいいです。
Pytorch -> ONNX
ViTPoseが提供しているONNX変換コードを使います。
https://github.com/ViTAE-Transformer/ViTPose/blob/main/tools/deployment/pytorch2onnx.py
変換に必要なViTPoseの実行環境を作るのに地味にハマります。
環境が出来ればコマンドラインから実行します。
$ python tools/deployment/pytorch2onnx.py \
./configs/body/2d_kpt_sview_rgb_img/topdown_heatmap/coco/ViTPose_base_coco_256x192.py \
./vitpose-b.pth \
--output-file vitpose-b.onnx
ONNX -> Tensorflow -> TensorFlowLite
import onnx

from onnx_tf.backend import prepare

onnx_model = onnx.load("vitpose-b.onnx")  # load onnx model
tf_rep = prepare(onnx_model)  # prepare tf representation
tf_rep.export_graph("vitpose-b_tensorflow")  # export the model
import tensorflow as tf

saved_model_dir = "vitpose-b_tensorflow"
# Convert the model
converter = tf.lite.TFLiteConverter.from_saved_model(saved_model_dir) # path to the SavedModel directory
converter.target_spec.supported_ops = [
        tf.lite.OpsSet.TFLITE_BUILTINS, tf.lite.OpsSet.SELECT_TF_OPS
]
tflite_model = converter.convert()

# Save the model.
with open('vitpose-b.tflite', 'wb') as f:
  f.write(tflite_model)
SELECT_TF_OPSを使用します。後からiOSで動かす時に苦労するオプションです。
iOSでTensorFlowLiteが動かない
SELECT_TF_OPSを指定しましたので、TensorFlowLiteSelectTfOpsフレームワークを使います。
https://www.tensorflow.org/lite/guide/ops_select?hl=ja
しかし、TensorFlowLiteSelectTfOpsフレームワークの使い方をドキュメントの通りに設定しても動きません。
2.9.0以降はパスの書き方が違うからです。
ドキュメントページには存在せず、GitHubを見る必要があります。
https://github.com/tensorflow/tensorflow/blob/master/tensorflow/lite/g3doc/guide/ops_select.md
しかし、問題はそこではなかった。
シュミレータでは動かず実機でしか動かないのは薄々気づいていたのですが、最新の2.11.0から2.9.0まで順にバージョンダウングレード、ついでにnightlyにして動かしてもUndefined symbolが出て動きません。
Issue眺めながらようやく解りました。v2.6.0でかつ実機でしか動きません。
Podに2.6.0を設定します。
use_frameworks!
pod 'TensorFlowLiteObjC', "2.6.0", :subspecs => ["Metal"]
pod 'TensorFlowLiteSelectTfOps', "2.6.0"
Build Settings -> Other Linker Flags の設定も忘れずにしましょう。
-force_load $(SRCROOT)/TensorFlowLiteSelectTfOps/Frameworks/TensorFlowLiteSelectTfOps.framework/TensorFlowLiteSelectTfOps
ようやく動作する環境ができました。
ObjCでの実装方法
各言語毎の実行方法が載っていますが情報が古いようでImportの仕方がドキュメント見ても解りません。
https://www.tensorflow.org/lite/guide/inference?hl=ja
パス周りを見て試したところ、簡単でした orz
#import <TFLTensorFlowLite.h>
#import <TFLMetalDelegate.h>
下記のコードに付け加える形でBridging-Header経由でObjCを実装しました。
const size_t keypointsNumber = 17;
const size_t modelWidth = 192;
const size_t modelHeight = 256;
const float aspect_ratio = modelWidth * 1.0 / modelHeight;
const float pixel_std = 200.0;

NSString *modelPath = [[NSBundle mainBundle] pathForResource:@"vitpose-b_fp16"
                                                    ofType:@"tflite"];

TFLMetalDelegate* metalDelegate = [[TFLMetalDelegate alloc] init];

// Initialize interpreter with model path and GPU delegate
TFLInterpreterOptions* options = [[TFLInterpreterOptions alloc] init];
NSError* error = nil;

// Initialize an interpreter with the model.
TFLInterpreter* interpreter = [[TFLInterpreter alloc]
                             initWithModelPath:modelPath
                             options:options
                             delegates:@[ metalDelegate ]
                             error:&error];
if (error != nil) { /* Error handling... */ }

// Allocate memory for the model's input `TFLTensor`s.
[interpreter allocateTensorsWithError:&error];
if (error != nil) { /* Error handling... */ }

UIImage* uiImage = [UIImage imageNamed:@"test.jpg"];

cv::Mat image;
UIImageToMat(uiImage, image);

std::vector<float> box = { 269.44891357421875, 124.16687774658203, 514.134765625, 386.0028076171875 };
box[2] = box[2] - box[0];
box[3] = box[3] - box[1];
std::vector<float> center;
std::vector<float> scale;
cv::Mat bgr = preExecute(image, box, modelWidth, modelHeight, center, scale);
std::vector<uchar>rawBytes((uchar*)bgr.datastart, (uchar*)bgr.dataend);

// normalize the pixel buffer
size_t w = modelWidth;
size_t h = modelHeight;
size_t heatmap_height = modelHeight / 4;
size_t heatmap_width = modelWidth / 4;
std::vector<float> normalizedBuffer( w * h * 3 );

for (int i = 0; i < w * h; ++i){
  normalizedBuffer[i]             = (Float32(rawBytes[i * 3 + 0]) / 255.0 - 0.406) / 0.225; // B
  normalizedBuffer[w * h + i]     = (Float32(rawBytes[i * 3 + 1]) / 255.0 - 0.456) / 0.224; // G
  normalizedBuffer[w * h * 2 + i] = (Float32(rawBytes[i * 3 + 2]) / 255.0 - 0.485) / 0.229; // R
}

double average = accumulate(normalizedBuffer.begin(), normalizedBuffer.end(), 0.0) / normalizedBuffer.size();
std::cout << "average: " << average << "\n";

NSData *inputData = [NSData dataWithBytes:normalizedBuffer.data() length: normalizedBuffer.size() * sizeof(float)];

// Get the input `TFLTensor`
TFLTensor *inputTensor = [interpreter inputTensorAtIndex:0 error:&error];
if (error != nil) { /* Error handling... */ }

// Copy the input data to the input `TFLTensor`.
[inputTensor copyData:inputData error:&error];
if (error != nil) { /* Error handling... */ }

// Run inference by invoking the `TFLInterpreter`.
[interpreter invokeWithError:&error];
if (error != nil) { /* Error handling... */ }

// Get the output `TFLTensor`
TFLTensor *outputTensor = [interpreter outputTensorAtIndex:0 error:&error];
if (error != nil) { /* Error handling... */ }

// Copy output to `NSData` to process the inference results.
NSData *outputData = [outputTensor dataWithError:&error];
if (error != nil) { /* Error handling... */ }

float output[keypointsNumber * heatmap_height * heatmap_width];
[outputData getBytes:output length: sizeof(output)];

std::vector<float> heatmap(output, output + sizeof output / sizeof output[0]);
std::vector<float> keypoints;
std::vector<float> preds = postExecute(heatmap, modelWidth, modelHeight, center, scale);
copy(preds.begin(), preds.end(), back_inserter(keypoints) );

float *boxes = box.data();
float *keypoint = keypoints.data();
return [self renderHumanPose:uiImage keypoints:keypoint peopleNum:1 boxes:boxes];
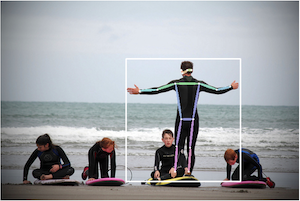
boundingboxの座標は画像の白枠の通りです。
あとは、モデルの入出力がfloatなのにNSDATAを経由する必要があり、中々手間取らせてくれました。
いつものmean = [0.485, 0.456, 0.406]、std = [0.229, 0.224, 0.225]の正規化
Python
# HWC -> CHW
np_image = np_image.transpose(2, 0, 1) # CxHxW
# normalize the image
mean_vec = np.array([0.485, 0.456, 0.406])
std_vec = np.array([0.229, 0.224, 0.225])
norm_img_data = np.zeros(np_image.shape).astype('float32')
for i in range(np_image.shape[0]):
    norm_img_data[i,:,:] = (np_image[i,:,:]/255 - mean_vec[i])/std_vec[i]

np_image = np.expand_dims(norm_img_data, axis=0) # 1xCxHxW
iOS(Swift)
var normalizedBuffer: [Float32] = [Float32](repeating: 0, count: w * h * 3)
// normalize the pixel buffer
// see https://pytorch.org/hub/pytorch_vision_resnet/ for more detail
for i in 0 ..< w * h {
    normalizedBuffer[i]             = (Float32(rawBytes[i * 4 + 0]) / 255.0 - 0.485) / 0.229 // R
    normalizedBuffer[w * h + i]     = (Float32(rawBytes[i * 4 + 1]) / 255.0 - 0.456) / 0.224 // G
    normalizedBuffer[w * h * 2 + i] = (Float32(rawBytes[i * 4 + 2]) / 255.0 - 0.406) / 0.225 // B
}
pytorchのモデルを使うと画像の正規化が必要なので面倒ですね。
頻繁に出くわすのでメモを残しておきます。
サンプルコードではSwiftでかつ何故かRGBAなのでBGRに直してから利用しました。
おわりに
TensorFlowLiteをiOSで試しました。
iOSの実装前にはONNXとTensorflowとTensorflowLiteのPython実装をJupyter-notebookで書いてから移植しました。
この記事で皆様の手間が減ることを願います。
まぁ、TensorflowLiteが将来改善すれば不要になる記事です。