はじめに
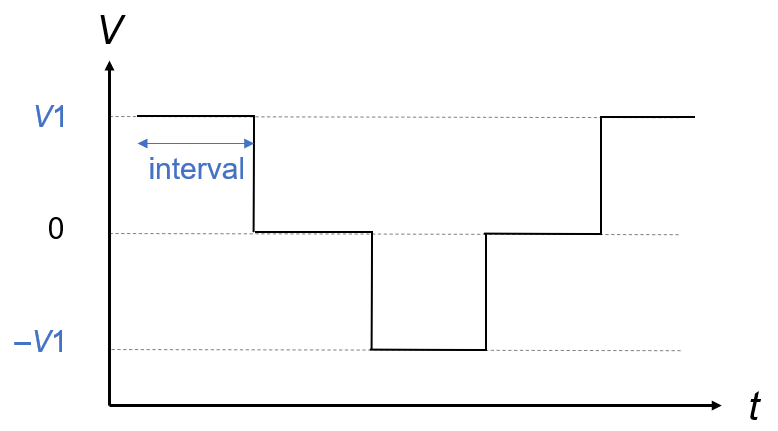
Python を用いて Keithley 2401 sourcemeter(以下 2401)から矩形波電流を印加させる。
任意の一定時間ごとに電流値を測定し、エクセルファイルに時間および電流値を記録する。
準備
こちらの記事 に従って諸準備を行う。
PC と 2401 を GPIB-USB ケーブルに接続する。
2401 本体をいじり、2401 の GPIBアドレス を 24 (ソースコード内で設定しているものと同じもの)に設定する。2401 の操作はこちらのマニュアルを参照のこと。
Anaconda Prompt なり Jupyter Notebookなりで、プログラムを動かせる準備をする。
コード
サンプルコード
# coding: UTF-8
import openpyxl
import time
from pymeasure.instruments.keithley import Keithley2400
from datetime import datetime
### common settings ###
date = int(datetime.now().strftime("%Y%m%d"))-20000000 # 日付。2020年9月10日なら「200910」

keithley1 = Keithley2400("GPIB::24")

def initial_settings():
    sheet.cell(row = 1, column = 1).value = 't1 (sec)'
    sheet.cell(row = 1, column = 2).value = 'I1(A)'
    sheet.cell(row = 1, column = 5).value = datetime.now()

    ### keithley settings ###
    keithley1.reset()
    keithley1.disable_buffer()
    keithley1.use_front_terminals()
    keithley1.apply_voltage()
    keithley1.source_voltage_range = 0.3
    keithley1.source_voltage = 0
    keithley1.enable_source()
    keithley1.measure_current()
    keithley1.compliance_current = 1

def v_1(voltage):
    target_time = interval
    current_time = current_interval
    time_accuracy = 0.2

    rest_direction = time.time() - base_time - target_time
    for step in range(steps):
        keithley1.ramp_to_voltage(voltage,steps=3)
        while  rest_direction < 0 : # 電圧の向き不変
            rest_current = time.time()-base_time - current_time
            while rest_current < 0 and rest_direction<0: # 電流測定しない、かつ、電圧の向き不変
                time.sleep(time_accuracy)
                rest_current = time.time()-base_time - current_time
                rest_direction = time.time() - base_time - target_time
            # 電流測定する、かつ、電圧の向き不変
            sheet.cell(row = int(current_time/current_interval)+1, column = 1).value = time.time()-base_time
            sheet.cell(row = int(current_time/current_interval)+1, column = 2).value = keithley1.current # 電圧記録の予定時間が来たらエクセルへ記録。
            current_time = current_time + current_interval # 電圧記録時間を再設定。
        #電圧の向き変更
        target_time = target_time + interval
        rest_direction = time.time() - base_time - target_time

        #電圧 0 にする(後の電圧の向き反転のため、voltageに0を代入していない)
        keithley1.ramp_to_voltage(0,steps=3)
        while  rest_direction < 0 : # 電圧の向き不変
            rest_current = time.time()-base_time - current_time
            while rest_current < 0 and rest_direction<0: # 電流測定しない、かつ、電圧の向き不変
                time.sleep(time_accuracy)
                rest_current = time.time()-base_time - current_time
                rest_direction = time.time() - base_time - target_time
            # 電流測定する、かつ、電圧の向き不変
            sheet.cell(row = int(current_time/current_interval)+1, column = 1).value = time.time()-base_time
            sheet.cell(row = int(current_time/current_interval)+1, column = 2).value = keithley1.current # 電圧記録の予定時間が来たらエクセルへ記録。
            current_time = current_time + current_interval # 電圧記録時間を再設定。
        #電圧の向き変更
        voltage = voltage*(-1) # 電圧の向き反転
        print(voltage)
        target_time = target_time + interval
        rest_direction = time.time() - base_time - target_time
    keithley1.shutdown()
    print('v_1_done.')

### conducting functions ###
if __name__ == "__main__":

    sample_name = "test"
    V1 = 0.1
    steps = 2
    interval = 2 #(sec)
    current_interval = 0.5 # 電流測定間隔

    Username = '***' #PCに設定されたUsername
    path = "C:\\Users\\{0}\\Desktop\\".format(Username)
    filename = "{0}_{1}_{2}V_{3}sec_{4}.xlsx".format(date, sample_name, V1, interval, steps)

    print(datetime.now())
    book = openpyxl.Workbook() # エクセルファイルを作成
    sheet = book.worksheets[0]
    initial_settings() #ソースメータの電源を入れる

    base_time = time.time()
    v_1(V1)
    book.save(path + filename)
    print('finished.')
サンプルコード解説
概要
if __name__ == "__main__":
    sample_name = "test"
    V1 = 0.1
    steps = 2
    interval = 2 #(sec)
    current_interval = 0.5 # 電流測定間隔

    Username = '***' #PCに設定されたUsername
    path = "C:\\Users\\{0}\\Desktop\\".format(Username)
    filename = "{0}_{1}_{2}V_{3}sec_{4}.xlsx".format(date, sample_name, V1, interval, steps)

    print(datetime.now())
    book = openpyxl.Workbook() # エクセルファイルを作成
    sheet = book.worksheets[0]
    initial_settings() #ソースメータの電源を入れる

    base_time = time.time()
    v_1(V1)
    book.save(path + filename)
    print('finished.')
initial_settings 以前
- 測定パラメータ設定。
- 保存場所およびファイル名設定。
- エクセルファイル生成。
initial_settings
- エクセルファイルに測定情報入力。
- 2401 を電圧印加モードに設定。source_voltage_range, compliance_currentなどの値はテキトーに設定した。
base_time = time.time
この時間を0秒として測定結果が記録される。
v_1(V1)
関数 v_1 全体は以下のフローチャートで概説される。

以下はソースコード中の細かい説明である。
rest_direction(電圧の向き変更までの待ち時間) > 0 のとき、電圧の向き(あるいは大きさ)を変更する。
rest_current(電流値測定までの待ち時間) > 0 かつ rest_direction > 0 のとき、電流値を測定する。
例えばrest_direction は以下の通り。
rest_direction = time.time() - base_time - target_time
rest_direction は
{time.time()-base_time} (測定開始後からの経過時間) - target_time (電圧の向き・大きさを変更させる時間)
を表す。
book.save(path + filename)
設定した場所にファイルを保存する。
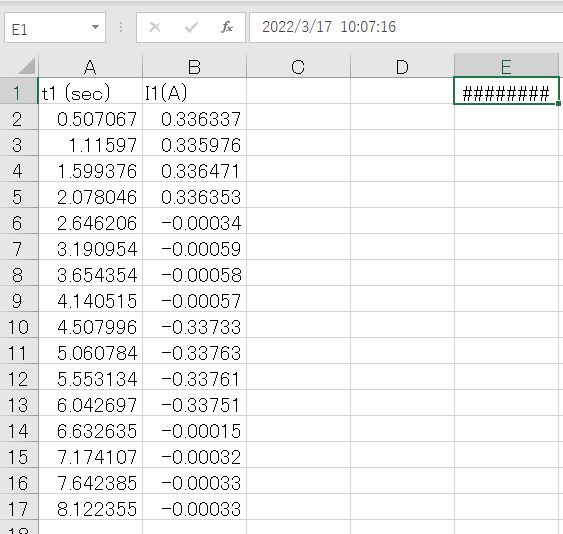
測定結果(例)
ワニ口同士を噛ませて、0.1V の電流を2秒ごとに向きが変わるように2サイクル印加した結果。
(ファイル名:200317_test_0.1V_2sec_2)
補足
V = 0 の部分を消去すれば、+V1 → -V1 → +V1 →… のように、単純な矩形波電圧も可能。