
Reverse ETLのOSS『drt』を作ったので紹介
データエンジニア2年目です。仕事でリバース ETL (DWH に積んだデータを Slack や HubSpot などに流す) のツールが必要だったんですが、フィットするものが見つからず、自分で作りました。
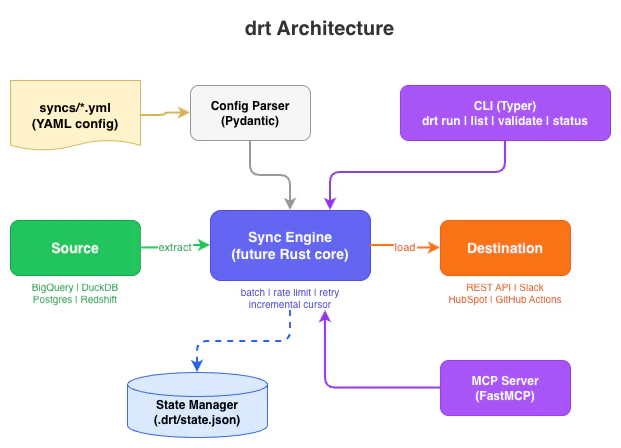
drt (data reverse tool) は、dbt のように YAML を書いて CLI で動かす code-first な Reverse ETL の OSS です。Python 3.10+ で動き、Apache 2.0。
この記事は Claude Code(Anthropic の AI コーディングアシスタント)と共同で執筆しました。
設計思想や開発の経緯は Zenn の方にじっくり書いたので、この記事では 何ができて、どう使うか に絞って紹介します。
drt が解決すること
- DWH (BigQuery / Snowflake / Postgres / DuckDB など) で計算した結果を 本番 DB (Postgres / MySQL / ClickHouse) の users / customers テーブルに書き戻したい
- 同様に Slack / HubSpot / Salesforce / Google Ads / 任意の REST API に流したい
- それを GUI じゃなくて CLI と YAML で、
git diffレビュー可能な形でやりたい - CI/CD (GitHub Actions / Cron / Airflow / Dagster / Prefect) に自然に乗せたい
- AI エージェント (Claude / Cursor) からも操作できるようにしたい
これら全部に応える形で、code-first / OSS / dbt エコシステム親和 / MCP server 同梱 を1つにまとめてます。本番 DB への書き戻しに関しては、replace_strategy: swap (zero-downtime atomic swap) や upsert_key (ON CONFLICT)、lookups.check_only (FK 存在チェック)、json_columns (JSONB 安全 serialization) など、production 利用を想定した機能を入れてます (詳細は本記事下部 + Zenn 記事)。
インストール
pip install drt-core
destination ごとに extras を分けてるので、必要なものだけ入れます。
pip install drt-core[bigquery]    # BigQuery を source にする場合
pip install drt-core[postgres]    # Postgres を destination にする場合
pip install drt-core[mcp]         # MCP server を立てる場合
Quickstart
ローカル DuckDB の users テーブルから、REST API に POST する最小例です。
1. プロジェクト初期化
mkdir my-drt && cd my-drt
drt init   # source に duckdb を選ぶ
drt_project.yml と syncs/ ディレクトリができます。
2. sync を書く
syncs/post_users.yml:
name: post_users
description: "POST user records to an API"
model: ref('users')   # ← warehouse のテーブル
destination:
  type: rest_api
  url: https://httpbin.org/post
  method: POST
  headers:
    Content-Type: "application/json"
  body_template: |
    { "id": {{ row.id }}, "name": "{{ row.name }}", "email": "{{ row.email }}" }
sync:
  mode: full
  batch_size: 100
  on_error: fail
3. 実行
drt run --dry-run   # プレビュー (HTTP リクエスト送らずに件数や送信先確認)
drt run             # 本番実行
drt status          # 直近の実行結果
drt status --history --limit 10   # 履歴

おまけ: 本番 DB への書き戻し例 (Postgres)
REST API 以外でよくあるパターン。「DWH の集計を毎晩、本番 Postgres の customers テーブルに反映する」を replace_strategy: swap で書くと:
# syncs/customer_health.yml
name: customer_health
model: ref('customer_health_daily')
destination:
  type: postgres
  host_env: APP_DB_HOST
  dbname_env: APP_DB_NAME
  user_env: APP_DB_USER
  password_env: APP_DB_PASSWORD
  table: public.customers
  upsert_key: [id]                # ON CONFLICT (id) DO UPDATE
  json_columns: [metadata]        # JSONB 列を明示
sync:
  mode: replace
  replace_strategy: swap          # zero-downtime atomic swap
  batch_size: 1000
  on_error: fail
replace_strategy: swap は内部で shadow テーブル (customers__drt_swap) に全行書き、最後に ALTER TABLE ... RENAME をトランザクション内で原子的に実行。書き戻し中もアプリは古いテーブルを読み続けられて、切り替えは瞬間。MySQL は RENAME TABLE、ClickHouse は EXCHANGE TABLES で同等の zero-downtime swap を実現してます。
4. 検証コマンドも揃ってます
drt validate        # YAML の整合性チェック
drt list            # 定義済み sync 一覧
drt sources         # 利用可能な source connector
drt destinations    # 利用可能な destination connector
drt doctor          # 環境チェック (Python / 依存 / プロファイル / 環境変数)
drt test            # ポストシンクの validation テスト (freshness / unique など)
主要機能
| 機能 | 内容 |
|---|---|
| Sources | BigQuery / Snowflake / Redshift / Databricks / DuckDB / Postgres / MySQL / SQLite / ClickHouse / SQL Server |
| Destinations | REST API / Slack / Discord / Teams / GitHub Actions / HubSpot / Google Sheets / Postgres / MySQL / ClickHouse / Snowflake / Parquet / CSV / JSON / Jira / Linear / SendGrid / Notion / Twilio / Intercom / Email SMTP / Salesforce Bulk / Google Ads / Staged Upload |
| Sync mode |
full (毎回全件) / incremental (cursor watermark で差分のみ) / replace (TRUNCATE → INSERT、replace_strategy: swap で zero-downtime も) |
| Auth | Bearer / API Key / Basic / OAuth2 Client Credentials (REST API destination) + 各 SaaS 固有 |
| エラー処理 |
on_error: fail / skip / 行レベルエラー詳細 / destination 単位の retry override |
| 本番運用向け | SIGTERM/SIGINT グレースフルシャットダウン (K8s対応) / sync 実行履歴 / 失敗通知 (Slack/webhook) / zero-downtime テーブル置換 |
| dbt 連携 |
model: ref('users') で dbt の model 直接参照 / drt init --from-dbt manifest.json で雛形生成 |
| オーケストレーター |
dagster-drt 別パッケージあり / Airflow / Prefect / Cron / GitHub Actions 何でも |
AI エージェント連携 (MCP)
pip install drt-core[mcp]
drt mcp run
これで Model Context Protocol の server が立ち、Claude や Cursor から drt_run_sync / drt_validate / drt_get_status などが呼べるようになります。
Claude Desktop の設定 (~/Library/Application Support/Claude/claude_desktop_config.json):
{
  "mcpServers": {
    "drt": {
      "command": "drt",
      "args": ["mcp", "run"]
    }
  }
}
これで「@drt drinks_sync を試して」「設定 validate して」が自然に動きます。設定ファイルの整合性チェックや雛形生成のような repetitive task をエージェントに委譲する流れに乗せられる shape にしてます。
CI/CD 連携の例 (GitHub Actions)
# .github/workflows/sync.yml
name: drt sync
on:
  schedule:
    - cron: "0 */6 * * *"   # 6時間ごと
  workflow_dispatch:

jobs:
  sync:
    runs-on: ubuntu-latest
    steps:
      - uses: actions/checkout@v4
      - uses: actions/setup-python@v5
        with:
          python-version: "3.12"
      - run: pip install drt-core[bigquery]
      - run: drt run --output json
        env:
          GOOGLE_APPLICATION_CREDENTIALS_JSON: ${{ secrets.GCP_SA_KEY }}
          HUBSPOT_TOKEN: ${{ secrets.HUBSPOT_TOKEN }}
--output json を付けると CI 集計やエラーハンドリングがしやすい構造で出力されます。
まとめ
-
pip install drt-coreだけで始められる - YAML 1ファイル = 1 sync で git レビュー可能
- dbt エコシステムと自然に噛み合う
- 本番運用に必要なグレースフルシャットダウン / 履歴 / 失敗通知が揃ってる
- MCP server で AI エージェントから操作できる
リンク
- Repo: https://github.com/drt-hub/drt
- Docs: README に CLI コマンド一覧、サンプル、Quickstart など
- Discussions: https://github.com/drt-hub/drt/discussions
- Good First Issues: https://github.com/drt-hub/drt/labels/good%20first%20issue
- 記事 (Zenn / 設計思想編): https://zenn.dev/poyo010/articles/drt-intro-zenn
⭐ Star してもらえると次の機能を考えるモチベーションが続きます。Reverse ETL の OSS、ぜひ触ってみてください。