はじめに
この記事は、Django Advent Calendar 2016 17日目の記事です。
Django Channelsとは
Django Channels — Channels 0.17.2 documentation
Channels is a project to make Django able to handle more than just plain HTTP requests, including WebSockets and HTTP2, as well as the ability to run code after a response has been sent for things like thumbnailing or background calculation.
Channelsは、DjangoがWebSocketやHTTP2などの単純なHTTPリクエストだけでなく、サムネイルやバックグラウンド計算のようにレスポンスが送信された後にコードを実行できるようにするプロジェクトである。
The core of the system is, unsurprisingly, a datastructure called a channel. What is a channel? It is an ordered, first-in first-out queue with message expiry and at-most-once delivery to only one listener at a time.
- システムの核心はチャネルと呼んでいるデータ構造
- チャネルとは順序付けられた先入れ先出しキュー
- 有効期限がある
- 一度に一人のリスナへのみat-most-once送信を行う(最高1回&届くかは保証しない)
If you’ve used channels in Go: Go channels are reasonably similar to Django ones. The key difference is that Django channels are network-transparent; the implementations of channels we provide are all accessible across a network to consumers and producers running in different processes or on different machines.
- 論理的にはGoのchannelsと似ている
- Django channelsはネットワークトランスペアレントであることが主な違い
- 異なるプロセスや異なるマシン上で動いているコンシューマとプロデューサにアクセス可能
※ SlackやTwitterに通知が送れるライブラリであるdjango-channelsとは別物になります。
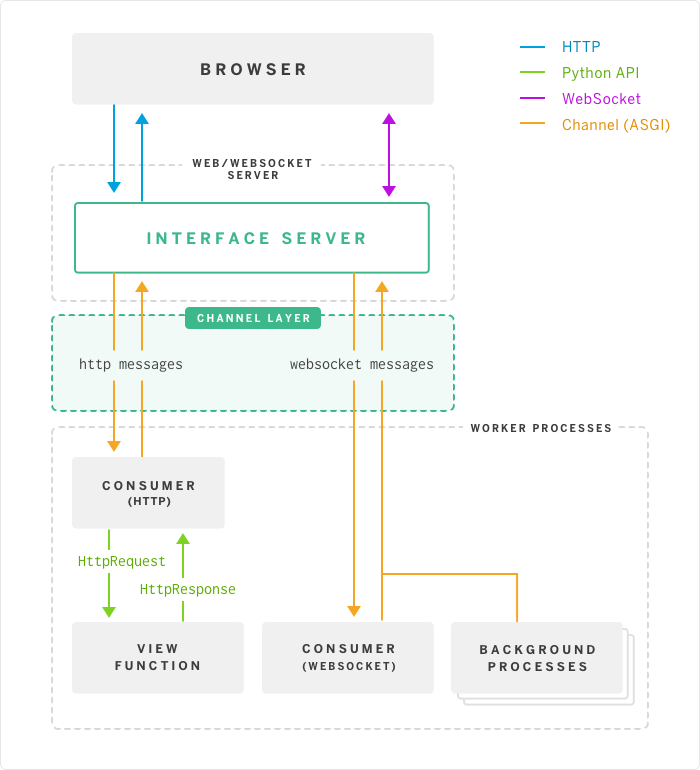
モデル図
伝統的なリクエスト・レスポンスモデル
Channelsによるワーカーモデル
※ 出典: Finally, Real-Time Django Is Here: Get Started with Django Channels
ASGIとは
ASGI (Asynchronous Server Gateway Interface) Draft Spec — Channels 0.17.2 documentation
This document proposes a standard interface between network protocol servers (particularly webservers) and Python applications, intended to allow handling of multiple common protocol styles (including HTTP, HTTP2, and WebSocket).
複数の一般的なプロトコルスタイル(HTTPやHTTP2、WebSocketを含む)の取り扱いを可能にするための、ネットワーク・プロトコル・サーバ(特にWebサーバ)とPythonアプリケーションとの間の標準インターフェース
※ あくまでWSGI拡張である(supplement and expand on WSGI)
インストール
pipでインストールして、INSTALLED_APPSに追加するだけでOK。
$ pip install -U channels
INSTALLED_APPS = (
    'django.contrib.auth',
    'django.contrib.contenttypes',
    'django.contrib.sessions',
    'django.contrib.sites',
    ...
    'channels',
)
はじめてみる
とりあえずドキュメントにあるGetting Started with Channelsを見ていきましょう。
$ pip install django channels
$ django-admin startproject myapp
$ tree
.
├── db.sqlite3
├── manage.py
└── myapp
    ├── __init__.py
    ├── settings.py
    ├── urls.py
    └── wsgi.py
First Consumers
まずは、組み込みのリクエストハンドリングをオーバーライドしてみます。
from django.http import HttpResponse
from channels.handler import AsgiHandler


def http_consumer(message):
    # Make standard HTTP response - access ASGI path attribute directly
    response = HttpResponse("Hello world! You asked for %s" % message.content['path'])
    # Encode that response into message format (ASGI)
    for chunk in AsgiHandler.encode_response(response):
        message.reply_channel.send(chunk)
INSTALLED_APPS = [
    'django.contrib.admin',
    'django.contrib.auth',
    'django.contrib.contenttypes',
    'django.contrib.sessions',
    'django.contrib.messages',
    'django.contrib.staticfiles',
    'myapp',
    'channels',
]
...
CHANNEL_LAYERS = {
    "default": {
        "BACKEND": "asgiref.inmemory.ChannelLayer",
        "ROUTING": "myproject.routing.channel_routing",
    },
}
from channels.routing import route

channel_routing = [
    route("http.request", "myapp.consumers.http_consumer"),
]
設定はこれで完了。
$ tree
.
├── db.sqlite3
├── manage.py
└── myapp
    ├── __init__.py
    ├── consumers.py
    ├── routing.py
    ├── settings.py
    ├── urls.py
    └── wsgi.py
$ python manage.py runserver
http://127.0.0.1:8000/ を確認して、「Hello world! You asked for /」というテキストが表示されていればOKです。
ただこれでは退屈なので、WebSocketsを使って基本的なチャットサーバを作りましょう。
全く実用的ではないけど、まずはメッセージを送ってきたクライアントにそのままメッセージを送り返すサーバを作ってみます。
def ws_message(message):
    # ASGI WebSocket packet-received and send-packet message types
    # both have a "text" key for their textual data.
    message.reply_channel.send({
        "text": message.content['text'],
    })
from channels.routing import route
from myapp.consumers import ws_message

channel_routing = [
    route("websocket.receive", ws_message),
]
$ python manage.py runserver
http://127.0.0.1:8000/ にアクセスして、jsのコンソールに以下の通りに打ち込んでください。
// Note that the path doesn't matter for routing; any WebSocket
// connection gets bumped over to WebSocket consumers
socket = new WebSocket("ws://" + window.location.host + "/chat/");
socket.onmessage = function(e) {
    alert(e.data);
}
socket.onopen = function() {
    socket.send("hello world");
}
// Call onopen directly if socket is already open
if (socket.readyState == WebSocket.OPEN) socket.onopen();
「hello world」というアラートが表示されればOKです。
Groups
そしたらお互いに会話できる実際のチャットを、Groupsを使って実装しましょう。
from channels import Group


# Connected to websocket.connect
def ws_add(message):
    message.reply_channel.send({"accept": True})
    Group("chat").add(message.reply_channel)


# Connected to websocket.receive
def ws_message(message):
    Group("chat").send({
        "text": "[user] %s" % message.content['text'],
    })


# Connected to websocket.disconnect
def ws_disconnect(message):
    Group("chat").discard(message.reply_channel)
from channels.routing import route
from myapp.consumers import ws_add, ws_message, ws_disconnect

channel_routing = [
    route("websocket.connect", ws_add),
    route("websocket.receive", ws_message),
    route("websocket.disconnect", ws_disconnect),
]
$ python manage.py runserver
複数のタブでhttp://127.0.0.1:8000/ を開いて、コンソールにさっきと同じjsコードを打ち込んでください。
各タブで「[user] hello world」のアラートが表示されればOKです。
Running with Channels
次はChannel layerを切り替えてみます。
これまではasgiref.inmemory.ChannelLayerを利用してましたが、これでは同じプロセスのうちでしか動作しません。本番環境では、asgi_redisのようなバックエンドを利用します。
$ pip install asgi_redis
CHANNEL_LAYERS = {
    "default": {
        "BACKEND": "asgi_redis.RedisChannelLayer",
        "CONFIG": {
            "hosts": [("localhost", 6379)],
        },
        "ROUTING": "myapp.routing.channel_routing",
    },
}
$ python manage.py runserver --noworker
$ python manage.py runworker
新たにrunworkerコマンドを実行できるようになりました。
Persisting Data
これまで見てきたreplay_channel属性は、繋がっているWebSocketに対するユニークなポイントです。これで、メッセージが誰からのものか辿ることができました。
本番環境ではHTTP通信におけるcookieのように、channel_sessionを用いてセッション永続化しましょう。
from channels import Group
from channels.sessions import channel_session


# Connected to websocket.connect
@channel_session
def ws_connect(message):
    # Accept connection
    message.reply_channel.send({"accept": True})
    # Work out room name from path (ignore slashes)
    room = message.content['path'].strip("/")
    # Save room in session and add us to the group
    message.channel_session['room'] = room
    Group("chat-%s" % room).add(message.reply_channel)


# Connected to websocket.receive
@channel_session
def ws_message(message):
    Group("chat-%s" % message.channel_session['room']).send({
        "text": message['text'],
    })


# Connected to websocket.disconnect
@channel_session
def ws_disconnect(message):
    Group("chat-%s" % message.channel_session['room']).discard(message.reply_channel)
from channels.routing import route
from myapp.consumers import ws_connect, ws_message, ws_disconnect

channel_routing = [
    route("websocket.connect", ws_connect),
    route("websocket.receive", ws_message),
    route("websocket.disconnect", ws_disconnect),
]
Authentication
Channelsは以下の2通りの方法で、ユーザ認証に必要なDjangoセッションを取得できます。
- cookie
- Getパラメータ
session_key
Djangoセッションを用いた認証はデコレータを指定して行います。
from channels import Channel, Group
from channels.sessions import channel_session
from channels.auth import http_session_user, channel_session_user, channel_session_user_from_http


# Connected to websocket.connect
@channel_session_user_from_http
def ws_add(message):
    # Accept connection
    message.reply_channel.send({"accept": True})
    # Add them to the right group
    Group("chat-%s" % message.user.username[0]).add(message.reply_channel)


# Connected to websocket.receive
@channel_session_user
def ws_message(message):
    Group("chat-%s" % message.user.username[0]).send({
        "text": message['text'],
    })


# Connected to websocket.disconnect
@channel_session_user
def ws_disconnect(message):
    Group("chat-%s" % message.user.username[0]).discard(message.reply_channel)
Routing
Djangoのurls.pyのように、正規表現などを用いて柔軟にrouting.pyを設定できます。
http_routing = [
    route("http.request", poll_consumer, path=r"^/poll/$", method=r"^POST$"),
]

chat_routing = [
    route("websocket.connect", chat_connect, path=r"^/(?P<room>[a-zA-Z0-9_]+)/$"),
    route("websocket.disconnect", chat_disconnect),
]

routing = [
    # You can use a string import path as the first argument as well.
    include(chat_routing, path=r"^/chat"),
    include(http_routing),
]
Models
DjangoのORMを用いて、メッセージの永続化を簡単に組み込めます。
from channels import Channel
from channels.sessions import channel_session
from .models import ChatMessage


# Connected to chat-messages
def msg_consumer(message):
    # Save to model
    room = message.content['room']
    ChatMessage.objects.create(
        room=room,
        message=message.content['message'],
    )
    # Broadcast to listening sockets
    Group("chat-%s" % room).send({
        "text": message.content['message'],
    })


# Connected to websocket.connect
@channel_session
def ws_connect(message):
    # Work out room name from path (ignore slashes)
    room = message.content['path'].strip("/")
    # Save room in session and add us to the group
    message.channel_session['room'] = room
    Group("chat-%s" % room).add(message.reply_channel)


# Connected to websocket.receive
@channel_session
def ws_message(message):
    # Stick the message onto the processing queue
    Channel("chat-messages").send({
        "room": message.channel_session['room'],
        "message": message['text'],
    })


# Connected to websocket.disconnect
@channel_session
def ws_disconnect(message):
    Group("chat-%s" % message.channel_session['room']).discard(message.reply_channel)
Enforcing Ordering
@enforce_ordering(slight=True)デコレータを与えることで、キューに突っ込まれた順番ではなくwebsocket.connectが最初に行われたものがまず実行されるように変更できます。
from channels import Channel, Group
from channels.sessions import channel_session, enforce_ordering
from channels.auth import http_session_user, channel_session_user, channel_session_user_from_http


# Connected to websocket.connect
@enforce_ordering(slight=True)
@channel_session_user_from_http
def ws_add(message):
    # Add them to the right group
    Group("chat-%s" % message.user.username[0]).add(message.reply_channel)


# Connected to websocket.receive
@enforce_ordering(slight=True)
@channel_session_user
def ws_message(message):
    Group("chat-%s" % message.user.username[0]).send({
        "text": message['text'],
    })


# Connected to websocket.disconnect
@enforce_ordering(slight=True)
@channel_session_user
def ws_disconnect(message):
    Group("chat-%s" % message.user.username[0]).discard(message.reply_channel
チュートリアル
ここで見てきたようなチャットアプリのチュートリアルがHerokuで用意されています。
Finally, Real-Time Django Is Here: Get Started with Django Channels
実際にHerokuにデプロイするまでやってみると、より感覚が掴めると思います。
参考したもの
おわりに
「Django で WebSocket によるサーバ Push」でvoluntasさんが書いてある通り、パフォーマンスを求めるのであれば他の言語で行ったほうが良いです。
SwampDragonやTornadoなどを別途立ち上げる必要がなく、Djangoアプリケーションに簡単に組み込むことができるのが最大の魅力です。
このChannelsは来年の12月にリリース予定のDjango2.0に取り込まれることも検討されています。皆さんもぜひ使ってみて、Channelsを盛り上げていきましょう!

