プログラミングの基本的な考え方として、__重複するコードは何度も書かず、テンプレートを作成して使い回す__というものがあるかと思います。SwiftUIでも同様に、同じようなビューをテンプレートとして用意し、記述をより簡単にすることができます。
テンプレを作らず書くとどうなるか
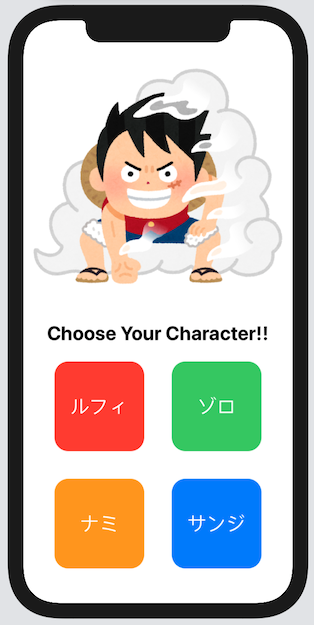
次のような、ボタンが4つあるアプリを考えます。
それぞれのボタンを押すと、それに対応したキャラクターが画面上部に表示される仕組みです。この機能を普通に書くとこのようになります。
import SwiftUI

let character = ["ルフィ", "ゾロ", "ナミ", "サンジ"]

struct ContentView: View {
    @State var id = 0

    var body: some View {
        VStack{
            Image(character[id])
                .resizable()
                .aspectRatio(contentMode: .fit)
            Text("Choose Your Character!!")
                .font(.title)
                .fontWeight(.bold)
            // ボタンを4つ並べる
            HStack{
                Button(action: {
                    id = 0
                }, label: {
                    Text("ルフィ")
                        .font(.title)
                        .foregroundColor(.white)
                        .frame(width: 130, height: 130)
                        .background(Color.red)
                        .cornerRadius(20)
                })
                .padding()
                Button(action: {
                    id = 1
                }, label: {
                    Text("ゾロ")
                        .font(.title)
                        .foregroundColor(.white)
                        .frame(width: 130, height: 130)
                        .background(Color.green)
                        .cornerRadius(20)
                })
                .padding()
            }
            HStack{
                Button(action: {
                    id = 2
                }, label: {
                    Text("ナミ")
                        .font(.title)
                        .foregroundColor(.white)
                        .frame(width: 130, height: 130)
                        .background(Color.orange)
                        .cornerRadius(20)
                })
                .padding()
                Button(action: {
                    id = 3
                }, label: {
                    Text("サンジ")
                        .font(.title)
                        .foregroundColor(.white)
                        .frame(width: 130, height: 130)
                        .background(Color.blue)
                        .cornerRadius(20)
                })
                .padding()
            }
        }
    }
}
長い。
コードをよく読むと、この部分が繰り返し使われていることがわかります。
                Button(action: {
                    id = 0
                }, label: {
                    Text("ルフィ")
                        .font(.title)
                        .foregroundColor(.white)
                        .frame(width: 130, height: 130)
                        .background(Color.red)
                        .cornerRadius(20)
                })
                .padding()
ボタンに書かれている文字や色、機能によって少しコードに違いは出ますが、だいたいは同じことが書かれています。この部分をテンプレートとして準備すれば良さそうです。
ビューの基本的な書き方
struct hoge: View {

    // プロパティなど

    var body: some View {

        // ここにビューを書く

    }
}
まず、ビューの基本的な書き方は上のようになります。ここで気づく方もいると思いますが、これは__SwiftUIで新しくファイルを作ったときに書かれる内容とまったく同じもの__です。このbodyの中にビューを書くことでテンプレートを作ることができます。では、実際に書いてみましょう。
テンプレートを作って書き換えよう
struct CharacterButton: View {
    // 違う部分はプロパティにしてそれぞれ変えられるようにする
    @Binding var id: Int
    let number: Int
    let buttonColor: Color

    var body: some View {
        // 重複しているコードを書き出す
        Button(action: {
            id = number
        }, label: {
            Text(character[number])
                .font(.title)
                .foregroundColor(.white)
                .frame(width: 130, height: 130)
                .background(buttonColor)
                .cornerRadius(20)
        })
        .padding()
    }
}
このようになります。重複しているコードをそのまま書いてしまうと違いが出せないため、違う部分はプロパティにし、インスタンス生成時に情報を書けるようにします。
このテンプレートを呼び出すときは次のように書きます。
CharacterButton(id: , number: , buttonColor: )
引数にそれぞれのボタンが持つ特性を書き込めば、インスタンスを生成できます。
このテンプレートを使用し、ContentView.swiftを書き換えたいと思います。
import SwiftUI

let character = ["ルフィ", "ゾロ", "ナミ", "サンジ"]

struct ContentView: View {
    @State var id = 0

    var body: some View {
        VStack{
            Image(character[id])
                .resizable()
                .aspectRatio(contentMode: .fit)
            Text("Choose Your Character!!")
                .font(.title)
                .fontWeight(.bold)
            // ボタンを4つ並べる
            HStack{
                CharacterButton(id: $id, number: 0, buttonColor: Color.red)
                CharacterButton(id: $id, number: 1, buttonColor: Color.green)
            }
            HStack{
                CharacterButton(id: $id, number: 2, buttonColor: Color.orange)
                CharacterButton(id: $id, number: 3, buttonColor: Color.blue)
            }
        }
    }
}

// テンプレート
struct CharacterButton: View {
    @Binding var id: Int
    let number: Int
    let buttonColor: Color

    var body: some View {
        Button(action: {
            id = number
        }, label: {
            Text(character[number])
                .font(.title)
                .foregroundColor(.white)
                .frame(width: 130, height: 130)
                .background(buttonColor)
                .cornerRadius(20)
        })
        .padding()
    }
}
スッキリして読みやすくなりましたね。それだけでなく、もしボタンのUIを一括に変更したい、ということがあった場合、テンプレートひとつをいじれば良いのでメンテナンス性も向上しています。
まとめ
スッキリとした読みやすいコードが書けると、アップデートなどで後々自分が楽になります。テンプレートを駆使して読みやすいコードが書けるよう、私も考えながら書きたいと思います。
