概要
フロントエンド勉強会
各課題を通してVue.jsに慣れる。
基本的にはフロントエンド勉強会 DOM操作をVue.jsでなぞる。
より詳しく段階を踏んで慣れ親しみたい場合はチュートリアルをやるとよい。
本記事ではVue3を用いる。ネットで調べるとVue2の書き方をしている記事もかなりヒットするので注意。
環境構築
vue.js クイックスタートに従う。
npm create vue@latest
色々訊かれるので以下のように回答。
プロジェクト名は好きな名前をつければよい。
%project_name% を置き換える。
Ok to proceed? (y) # Enter
Vue.js - The Progressive JavaScript Framework

✔ Project name: … %project_name%
✔ Add TypeScript? … Yes
✔ Add JSX Support? … No
✔ Add Vue Router for Single Page Application development? … No
✔ Add Pinia for state management? … No
✔ Add Vitest for Unit Testing? … No
✔ Add an End-to-End Testing Solution? › No
✔ Add ESLint for code quality? … Yes
✔ Add Prettier for code formatting? … Yes
回答し終えると次の指示が出てくるので、その通りに実行
Done. Now run:

  cd %project_name%
  npm install
  npm run format
  npm run dev
npm run dev でウェルカムページが立ち上がる。
VITE vx.y.z  ready in nnn ms

  ➜  Local:   http://localhost:%PORT%/
  ➜  Network: use --host to expose
  ➜  press h to show help
以後、動作確認は npm run dev で行うものとする。
また、これからこのプロジェクトで各問題を解くため、 App.vue を以下の通りに真っさらにする。
<script setup lang="ts">
</script>

<template>
  <main>
  </main>
</template>

<style scoped>
</style>
これに伴い、 components/ 配下のコンポーネントが要らなくなったので削除。
rm -rf src/components/*
消していいか確認されたら y でOK。
sure you want to delete all 4 files in /path/to/%project_name%/src/components [yn]? y
また、CSSが邪魔なので、 src/main.ts の
import './assets/main.css';
を削除。
全体的な資料
課題
アイテム追加
「追加」ボタンを押下することで、フォームの入力値をリストに追加できる。
加えて、追加ボタンが押下された後にフォームの中身をクリアする。
<script setup lang="ts">
import { ref } from 'vue';

/** 入力値 */
const itemInput = ref<string>('');
/** アイテム一覧 */
const items = ref<string[]>([]);

/** アイテム追加 */
function appendItem() {
  const currentInputValue = itemInput.value;
  if (currentInputValue) {
    items.value.push(currentInputValue);
    itemInput.value = '';
  }
}
</script>

<template>
  <main>
    <div class="forms">
      <div class="input-form">
        <label for="new-item">アイテム</label>
        <input v-model.trim="itemInput" type="text" id="new-item">
      </div>
      <button @click="appendItem">追加</button>
    </div>
    <div>
      <p v-for="item in items">- {{ item }}</p>
    </div>
  </main>
</template>

<style scoped>
.input-form {
  display: flex;
  flex-direction: row;
  gap: 8px;
}

.forms {
  display: flex;
  flex-direction: row;
  gap: 16px;
}

</style>
カウンター
+を押したら表示された数字がインクリメント、-を押すとデクリメントされる。
特に処理はしていないので負の値も入る。
<script setup lang="ts">
import { ref } from 'vue';

const currentValue = ref<number>(0);
</script>

<template>
  <main>
    <p>現在値 {{ currentValue }}</p>
    <div class="my-button">
      <button @click="currentValue--">-</button>
      <button @click="currentValue++">+</button>
    </div>
  </main>
</template>

<style scoped>
.my-button {
  display: flex;
  flex-direction: row;
  gap: 16px;
}
</style>
バリデーション
必須文字を選択して、その文字が1文字も含まれていなければバリデーションを赤文字で表示する。
必須文字選択部分をコンポーネントで作成するため、先に以下の通りに components/ 配下に select-char.vue を作成
touch src/components/select-char.vue
select-char.vue
<script setup lang="ts">
import { computed } from 'vue';

/** 文字種 */
export type CheckedCharType = '英大文字' | '英小文字' | '数字';

const props = withDefaults(
  defineProps<{
    checkedChar: CheckedCharType[];
  }>(),
  {
    checkedChar: () => []
  }
);

const emit = defineEmits<{
  (e: 'update:checkedChar', value: CheckedCharType[]): void
}>();

const checkedCharComputed = computed({
  get: () => props.checkedChar,
  set: (value) => {
    emit('update:checkedChar', value);
  },
});
</script>

<template>
  <div>
    <p>必須文字を選択</p>

    <input type="checkbox" id="upperAlphabet" value="英大文字" v-model="checkedCharComputed">
    <label for="upperAlphabet">英大文字</label>

    <input type="checkbox" id="lowerAlphabet" value="英小文字" v-model="checkedCharComputed">
    <label for="lowerAlphabet">英小文字</label>

    <input type="checkbox" id="numberChar" value="数字" v-model="checkedCharComputed">
    <label for="numberChar">数字</label>
  </div>
</template>

<style scoped>
</style>
App.vue
<script setup lang="ts">
import { ref, watch } from 'vue';
import SelectChar from '@/components/select-char.vue';
import { type CheckedCharType } from '@/components/select-char.vue';

/** 選択されている文字種 */
const checkedChar = ref<CheckedCharType[]>([]);
/** 入力された値 */
const inputValue = ref<string>('');
/** バリデーションメッセージ */
let validatedHintMessage = '';
/** バリデーションメッセージを表示するか */
let isShowValidationMessage = false;

/** 共通バリデーションメッセージ変更 */
const commonValidateChange = (
  currentCheckedValue: CheckedCharType[],
  currentInputValue: string
): void => {
  isShowValidationMessage = false;

  // 何も入力されていなければバリデーションは出さない
  if (currentInputValue === '') {
    validatedHintMessage = '';
    return;
  }

  const invalid = new Array<CheckedCharType>();
  if (currentCheckedValue.includes('英大文字') && !/^(?=.*[A-Z]).+$/.test(currentInputValue)) {
    invalid.push('英大文字');
  }
  if (currentCheckedValue.includes('英小文字') && !/^(?=.*[a-z]).+$/.test(currentInputValue)) {
    invalid.push('英小文字');
  }
  if (currentCheckedValue.includes('数字') && !/^(?=.*[0-9]).+$/.test(currentInputValue)) {
    invalid.push('数字');
  }

  isShowValidationMessage = invalid.length > 0;
  validatedHintMessage = invalid.join(', ');
};

watch(inputValue, (newValue) => {
  const currentCheckedValue = checkedChar.value;
  commonValidateChange(currentCheckedValue, newValue);
});

watch(checkedChar, (newValue) => {
  const currentInputValue = inputValue.value;
  commonValidateChange(newValue, currentInputValue);
});
</script>

<template>
  <main>
    <SelectChar v-model:checkedChar="checkedChar"></SelectChar>
    <div>
      <label for="my-input">入力</label>
      <input type="text" id="my-input" v-model="inputValue" />
      <template v-if="isShowValidationMessage">
        <p class="validation-hint">{{ validatedHintMessage }}は必須です</p>
      </template>
    </div>
  </main>
</template>

<style scoped>
.validation-hint {
  font-size: small;
  color: red;
}
</style>
- v-if
- ビルトインの特別な要素
- watch
- Type-Only Imports and Export
- 特定の文字種だけを1文字以上含むことを強制するバリデーションを正規表現で実現する(PHP/Laravel)
補足 '@/components/select-char.vue' について
@/ スタートはエイリアス。
tsconfig.app.jsonを見ると
"paths": {
  "@/*": ["./src/*"]
}
の記述が。
components/ はsrc配下にあるので、 '@/components/**.vue' となる。
参考
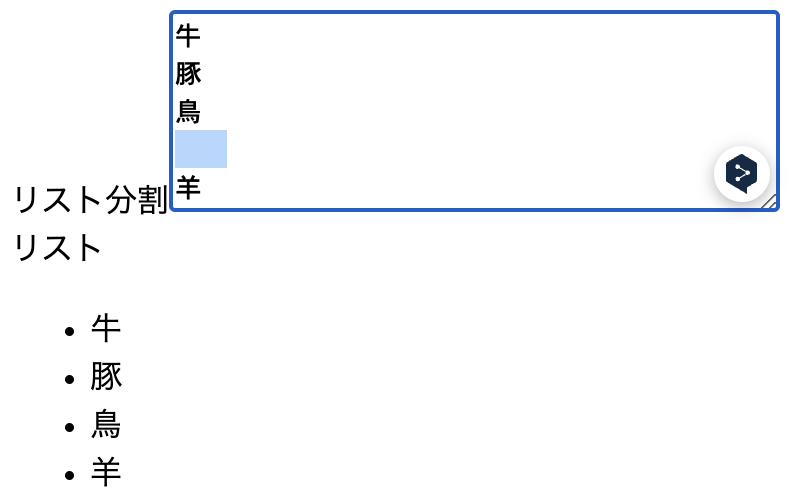
テキストエリアに改行区切りで入力されたものをリスト表示
改行区切りで文字をリスト表示する。
空文字だけならリストに追加はしない。
<script setup lang="ts">
import { ref, computed } from 'vue';

const itemInput = ref<string>('');
const items = computed<string[]>(() => itemInput
    .value
    .split('\n')
    .map((s) => s.trim())
    .filter((s) => s)
);
</script>

<template>
  <main>
    <label for="multi-input-area">リスト分割</label>
    <textarea
      v-model.trim="itemInput"
      id="multi-input-area"
      rows="5"
      cols="40"
    ></textarea>

    <div>リスト</div>
    <ul>
      <li v-for="item in items">{{ item }}</li>
    </ul>
  </main>
</template>

<style scoped>
</style>


