こんにちは。AWS CDK絶賛勉強中です。
さて、AWS CDK やCloud Formationで Infrastructure as Code していても、構成情報はドキュメントには残しておきたいですね。というわけで、CloudFormationのテンプレートファイルからExcelドキュメントを生成するツールを使ってみたので、その備忘メモです。
ググってみたところ、cfn-docgen というライブラリがありました。CloudFormationのテンプレートファイルから情報をとりだして、ExcelやHTMLなどのフォーマットにドキュメント化するライブラリです。
環境準備
Node.jsとかAWS CDK、Python3をインストールしておきます。
- WSL環境にAWS コマンドラインインターフェイス(AWS CLI)を構築する で「AWS CLI」
- WSL環境にNode.js環境を構築する で「Node.js」関連
このあたりの記事の冒頭にあるライブラリ達をインストールすればOKです。
またPythonは、他の方の記事ですが Windowsで環境を極力汚さずにPythonを動かす方法 (WSL利用 Windows10, version 1607以降限定) あたりがシンプルでよさそうです。
結果、下記のようなバージョンで疎通を取っています。
$ yarn --version
1.22.19

$ cdk --version
2.95.1 (build ae455d8)

$ python3 --version
Python 3.10.12
Pythonの分離環境の作成と、ライブラリのインストール
Pythonはライブラリをインストールするために隔離された分離環境を作成したりします。下記の手順でやればOK。
参考: 仮想環境作成モジュールvenvで作成した仮想環境をつかって、PyCharmで開発を行う
$ python3 -m venv ~/venv/venv_cdk
$ source ~/venv/venv_cdk/bin/activate

(venv_cdk) $ pip --version
pip 23.2.1 from /xxx/xxx/venv/venv_cdk/lib/python3.10/site-packages/pip (python 3.10)
 ( pip 22.0.2 だと次の処理でエラーになることがありました。その場合はこの分離環境に入った状態で、
  pip install --upgrade pip
  としてpip自体をバージョンアップしてください。)
 (venv_cdk) $
分離環境の作成が完了しました。
つづいて、その分離環境に cfn-docgen をインストールします。最初に書いた、CFnのテンプレートファイルから情報をとりだしてドキュメント化するライブラリです。
(venv_cdk) $ pip install cfn-docgen==0.7.0

(venv_cdk) $ cfn-docgen --version
cfn-docgen, version 0.7.0
(venv_cdk) $
インストールできたようですね。
やってみる
ドキュメント化対象のAWS CDKのコード
下記コマンドでダウンロード出来ます。
EC2インスタンスを作成するCDKのソースコードがはいっています。
(venv_cdk) $ git clone --branch feature/ec2 https://github.com/masatomix/cdk-samples.git
Cloning into 'cdk-samples'...
...
Resolving deltas: 100% (48/48), done.

(venv_cdk) $ cd cdk-samples/
(venv_cdk) ~/cdk-samples$ yarn
........
(venv_cdk) ~/cdk-samples$
AWS CDK のソースコードはこんな感じ。キーペアとセキュリティグループを作成して、EC2インスタンスを立てています。
#!/usr/bin/env node
import 'source-map-support/register'
import * as cdk from 'aws-cdk-lib'
import { VPCStack } from '../lib/VPCStack'
import { BastionStack } from '../lib/BastionStack'

const main = () => {
  const app = new cdk.App()

  const vpcStack = new VPCStack(app, 'VPCStack')
  new BastionStack(app, 'BastionStack', vpcStack.vpc, vpcStack.publicSubnets[0])

}

main()
import { App, CfnParameter, Stack, StackProps } from 'aws-cdk-lib'
import {
  CfnInstance,
  CfnKeyPair,
  CfnSecurityGroup,
  CfnSecurityGroupIngress,
  CfnSubnet,
  CfnVPC,
} from 'aws-cdk-lib/aws-ec2'
import { Profile, getProfile } from './Utils'

export class BastionStack extends Stack {
  constructor(scope: App, id: string, vpc: CfnVPC, subnet: CfnSubnet, props?: StackProps) {
    super(scope, id, props)
    const p = getProfile(this)

    const PublicSubnetEC2SecurityGroup = createSecurityGroup(this, vpc, p)
    const keyPair = new CfnKeyPair(this, 'KeyPair', {
      keyName: `KeyPair${p.name}`,
    })
    createEC2(this, subnet, [PublicSubnetEC2SecurityGroup.ref], keyPair.ref, true, p)
  }
}

const createEC2 = (
  stack: Stack,
  subnet: CfnSubnet,
  groupSet: string[],
  keyName: string,
  associatePublicIpAddress: boolean,
  p: Profile,
): CfnInstance => {
  return new CfnInstance(stack, 'BastionEC2', {
    imageId: 'ami-00d101850e971728d',
    keyName,
    instanceType: 't2.micro',
    networkInterfaces: [
      {
        associatePublicIpAddress,
        deviceIndex: '0',
        subnetId: subnet.attrSubnetId,
        groupSet,
      },
    ],
    tags: [{ key: 'Name', value: `ec2${p.name}` }],
  })
}

const createSecurityGroup = (stack: Stack, vpc: CfnVPC, p: Profile): CfnSecurityGroup => {
  const group = new CfnSecurityGroup(stack, 'PublicSubnetEC2SecurityGroup', {
    groupName: 'public-ec2-sg',
    groupDescription: 'Allow SSH access from MyIP',
    vpcId: vpc.attrVpcId,
    tags: [{ key: 'Name', value: `public-sg${p.name}` }],
  })

  new CfnSecurityGroupIngress(stack, 'PublicSubnetEC2SecurityGroupIngress000', {
    ipProtocol: '-1',
    groupId: group.ref,
    sourceSecurityGroupId: group.ref,
  })

  new CfnSecurityGroupIngress(stack, 'PublicSubnetEC2SecurityGroupIngress001', {
    ipProtocol: 'tcp',
    fromPort: 22,
    toPort: 22,
    groupId: group.ref,
    cidrIp: '0.0.0.0/0',
  })

  return group
}
ドキュメント生成
ではドキュメント生成をやってみます。
まずは先のAWS CDK のソースコードからCloudFormationのファイルを出力します。いくつか不要な要素を削るオプションをつけつつ、下記のコマンドを実行します。
(venv_cdk) ~/cdk-samples$ yarn cdk synth BastionStack --version-reporting false --path-metadata false --asset-metadata false --quiet --output outputDir
outputDir にBastionStack.template.jsonという、CFnのテンプレートのJSONファイルが出力されました。多少整形しましたが、こんな感じ。
{
 "Resources": {
  "PublicSubnetEC2SecurityGroup": {
   "Type": "AWS::EC2::SecurityGroup",
   "Properties": {
    "GroupDescription": "Allow SSH access from MyIP",
    "GroupName": "public-ec2-sg",
    "Tags": [
     {
      "Key": "Name",
      "Value": "public-sg-dev"
     }
    ],
    "VpcId": {
     "Fn::ImportValue": "VPCStack:ExportsOutputFnGetAttMyVPCVpcIdF2BB1C6C"
    }
   }
  },
  "PublicSubnetEC2SecurityGroupIngress000": {
   "Type": "AWS::EC2::SecurityGroupIngress",
   "Properties": {
    "GroupId": {
     "Ref": "PublicSubnetEC2SecurityGroup"
    },
    "IpProtocol": "-1",
    "SourceSecurityGroupId": {
     "Ref": "PublicSubnetEC2SecurityGroup"
    }
   }
  },
  "PublicSubnetEC2SecurityGroupIngress001": {
   "Type": "AWS::EC2::SecurityGroupIngress",
   "Properties": {
    "CidrIp": "0.0.0.0/0",
    "FromPort": 22,
    "GroupId": {
     "Ref": "PublicSubnetEC2SecurityGroup"
    },
    "IpProtocol": "tcp",
    "ToPort": 22
   }
  },
  "KeyPair": {
   "Type": "AWS::EC2::KeyPair",
   "Properties": {
    "KeyName": "KeyPair-dev"
   }
  },
  "BastionEC2": {
   "Type": "AWS::EC2::Instance",
   "Properties": {
    "ImageId": "ami-00d101850e971728d",
    "InstanceType": "t2.micro",
    "KeyName": {
     "Ref": "KeyPair"
    },
    "NetworkInterfaces": [
     {
      "AssociatePublicIpAddress": true,
      "DeviceIndex": "0",
      "GroupSet": [
       {
        "Ref": "PublicSubnetEC2SecurityGroup"
       }
      ],
      "SubnetId": {
       "Fn::ImportValue": "VPCStack:ExportsOutputFnGetAttMyPublicSubnet0SubnetIdBAD4E09B"
      }
     }
    ],
    "Tags": [
     {
      "Key": "Name",
      "Value": "ec2-dev"
     }
    ]
   }
  }
 }
}
JSONだとわかりにくいかもですね。さきほどのコマンドを --quiet オプションをつけないで実行すると、画面上にYAMLファイルが出力されます。こんな感じ。
Resources:
  PublicSubnetEC2SecurityGroup:
    Type: AWS::EC2::SecurityGroup
    Properties:
      GroupDescription: Allow SSH access from MyIP
      GroupName: public-ec2-sg
      Tags:
        - Key: Name
          Value: public-sg-dev
      VpcId:
        Fn::ImportValue: VPCStack:ExportsOutputFnGetAttMyVPCVpcIdF2BB1C6C
  PublicSubnetEC2SecurityGroupIngress000:
    Type: AWS::EC2::SecurityGroupIngress
    Properties:
      GroupId:
        Ref: PublicSubnetEC2SecurityGroup
      IpProtocol: "-1"
      SourceSecurityGroupId:
        Ref: PublicSubnetEC2SecurityGroup
  PublicSubnetEC2SecurityGroupIngress001:
    Type: AWS::EC2::SecurityGroupIngress
    Properties:
      CidrIp: 0.0.0.0/0
      FromPort: 22
      GroupId:
        Ref: PublicSubnetEC2SecurityGroup
      IpProtocol: tcp
      ToPort: 22
  KeyPair:
    Type: AWS::EC2::KeyPair
    Properties:
      KeyName: KeyPair-dev
  BastionEC2:
    Type: AWS::EC2::Instance
    Properties:
      ImageId: ami-00d101850e971728d
      InstanceType: t2.micro
      KeyName:
        Ref: KeyPair
      NetworkInterfaces:
        - AssociatePublicIpAddress: true
          DeviceIndex: "0"
          GroupSet:
            - Ref: PublicSubnetEC2SecurityGroup
          SubnetId:
            Fn::ImportValue: VPCStack:ExportsOutputFnGetAttMyPublicSubnet0SubnetIdBAD4E09B
      Tags:
        - Key: Name
          Value: ec2-dev
つづいてドキュメント出力です。JSONファイルをインプットに、xlsx形式のファイルを出力してみます。
(venv_cdk) ~/cdk-samples$ cfn-docgen --in outputDir/BastionStack.template.json --fmt xlsx
2023-09-10 14:15:32,195 cfn_docgen.main:68 docgen [INFO]: start process
2023-09-10 14:15:33,190 cfn_docgen.cfn_spec:532 __init__ [INFO]: spec for ap-northeast-1 loaded
...
2023-09-10 14:15:37,418 cfn_docgen.cfn_def:901 to_file [INFO]: save generated file as xlsx at outputDir/BastionStack.template.xlsx
2023-09-10 14:15:37,418 cfn_docgen.main:86 docgen [INFO]: end propcess
(venv_cdk) ~/cdk-samples$
おわりました。
$ ls -lrt outputDir/BastionStack.template.*
-rw-r--r-- 1 sysmgr sysmgr  2441 Sep 10 14:13 ./outputDir/BastionStack.template.json
-rw-r--r-- 1 sysmgr sysmgr 22973 Sep 10 14:15 ./outputDir/BastionStack.template.xlsx
(venv_cdk) :~/cdk-samples$
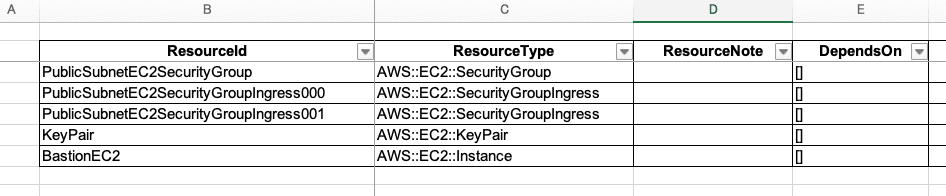
Excelファイルが出力されているようですね!中身を開いてみると、、、
一覧シート
詳細シート
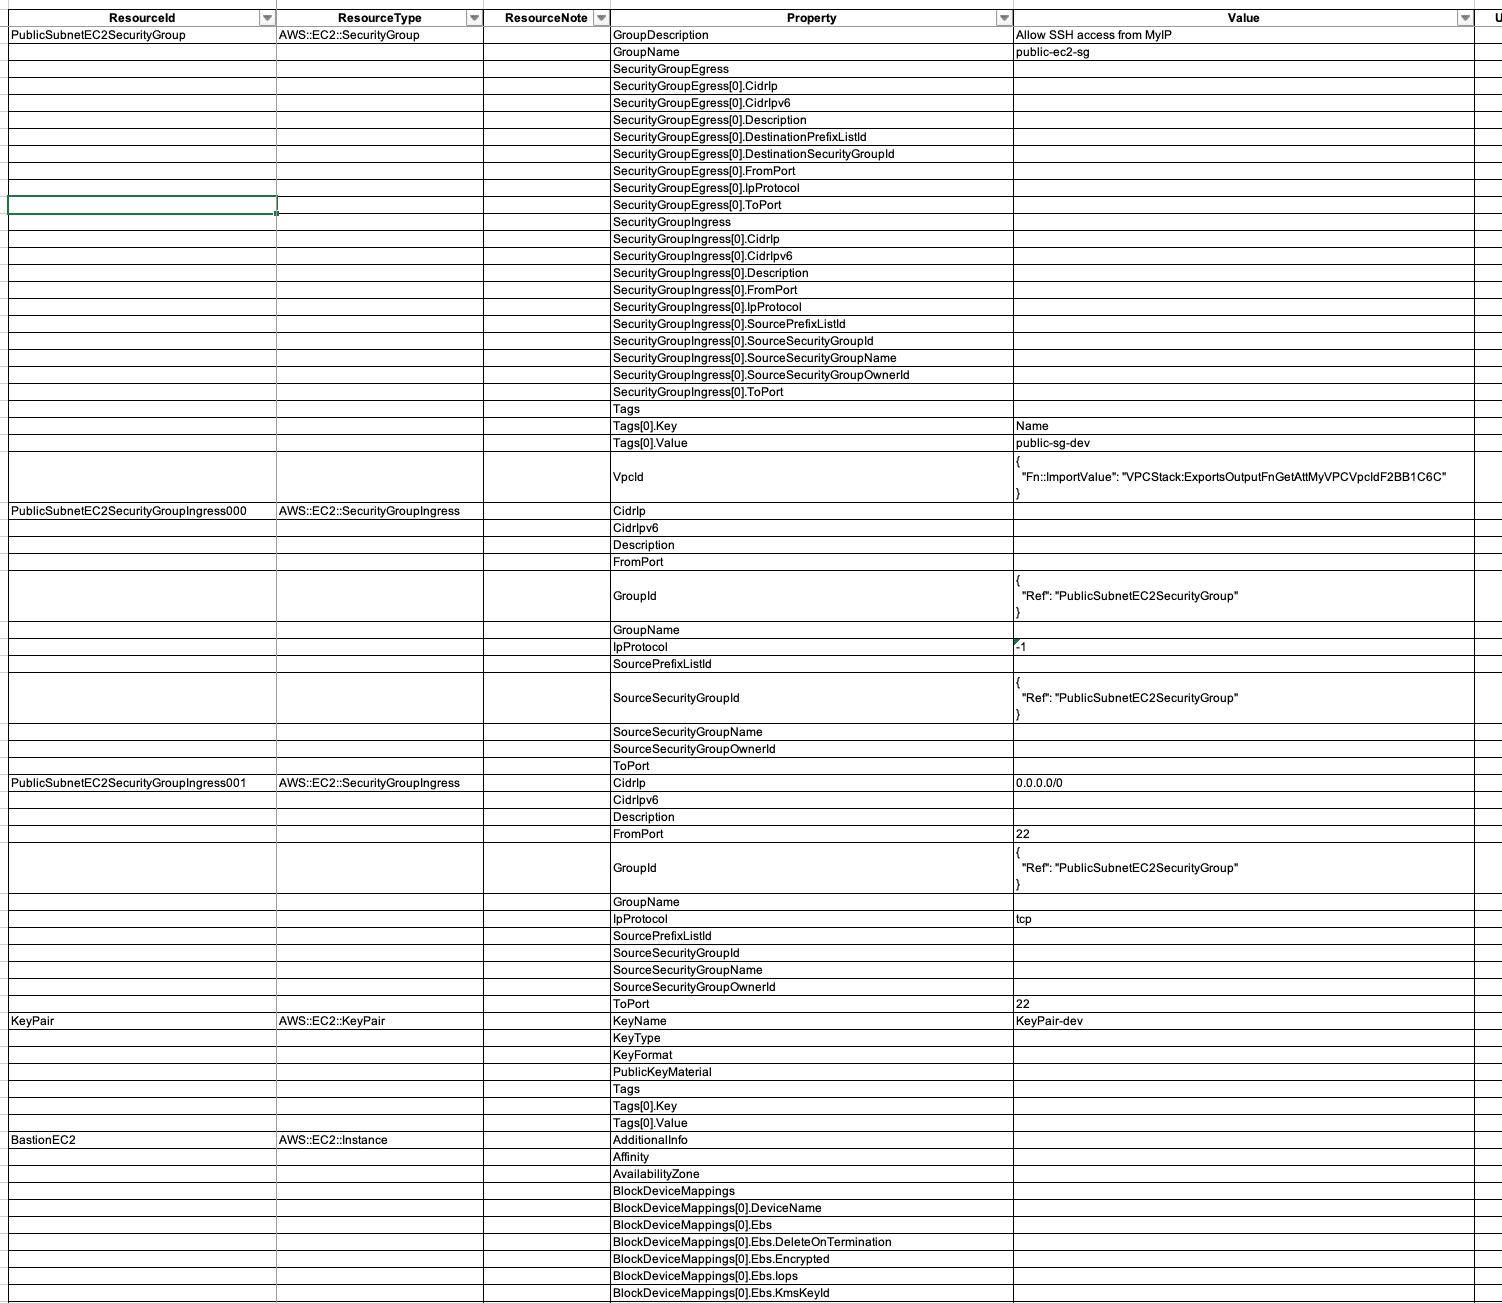
おお、なんだかいろいろ出力されたようです。設定可能な全ての項目が出力されているようですね。実際のファイルはココにありますので、見てみてください。
おつかれさまでしたー。