はじめにEclipse Kuraで採用されているOSGiについて少し復習してから、ドキュメントサイトにある簡単なHello Woldアプリを開発してEclipse Kuraへデプロイしてみます。
OSGiの復習
OSGiはEclipseのプラグインの仕組みに採用されているので名前を聞いたことがある方も多いと思います。1999年に設立されたOSGi Allianceが仕様を策定しています。
もともと「Open Service Gateway Initiative」と呼ばれるように、家庭やオフィスに設置したゲートウェイ端末上で家電やセンサーなどを制御するプログラムを動かすためのプラットフォームの仕様でした。その後ゲートウェイ以外に車載や組込機器、工場などエンタープライズの分野に採用が広がります。
OSGiバンドルとOSGiフレームワーク
リモートから動的にJavaモジュールを追加、更新できるのが特徴です。このモジュールをOSGiバンドルと呼びます。クラスファイルやリソースファイル、マニフェストなどを含んだ通常のjarファイルです。
OSGiバンドルはJVMで動作するOSGiフレームワークにインストールします。Eclipse KuraではOSGiフレームワークの実装としてEclipse Equinoxが採用されています。アプリケーションのコンポーネント化技術として他のモジュールを停止せずに機能の追加や更新ができます。現在主流になりつつあるコンテナ技術をベースにしたマイクロサービスのアーキテクチャと似ています。前回調査した、Resin.ioやUbuntu CoreもIoT Gatewayのアプリケーション管理に同様のコンテナ化のアプローチを取っています。
Working Setの作成
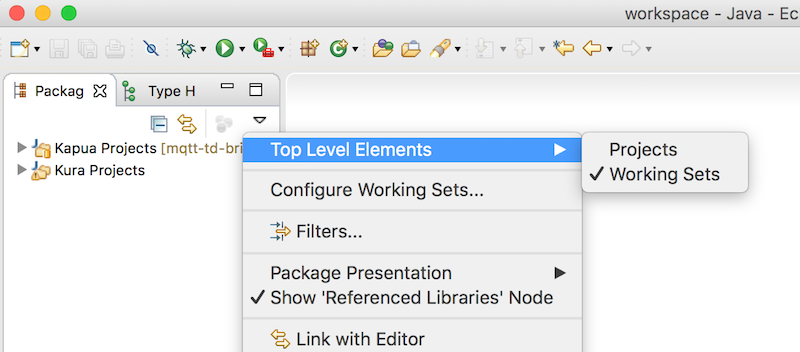
ここからEclipse使いHello Wolrdアプリを開発していきます。まずEclipseで複数のプロジェクトを管理する仕組みとしてワーキングセットを使います。パッケージエクスプローラの三角マークをクリックして、表示する単位をワーキングセットにします。適当な名前をつけて新しいワーキングセットを作成します。今回は「Kura Projects」にしました。
Package Exploler -> Top Level Elements -> Working Sets
サンプルプロジェクトをインポート
Getting StartedにあるKuraのサンプルワークスペースから以下の6つのプロジェクトをEclipseにインポートします。
- org.eclipse.kura.demo.heater
- org.eclipse.kura.emulator
- org.eclipse.kura.example.beacon
- org.eclipse.kura.example.ble.tisensortag
- org.eclipse.kura.example.publisher
- target-definition
Kura User Workspace archiveをダウンロードします。Eclipse Kuraは2.0.2をインストールしているので同じバージョンを使います。
$ wget http://www.eclipse.org/downloads/download.php?file=/kura/releases/2.0.2/user_workspace_archive_2.0.2.zip
ダウンロードしたzipファイルをEclipseにインポートします。プロジェクトは先ほど作成したKura Projetsに追加します。
File -> Import -> General -> Existing Projects into Workspace
Select archive file -> user_workspace_archive_2.0.2.zip -> Add projects to working sets -> select -> Kura Projects
プロジェクトの再ビルド
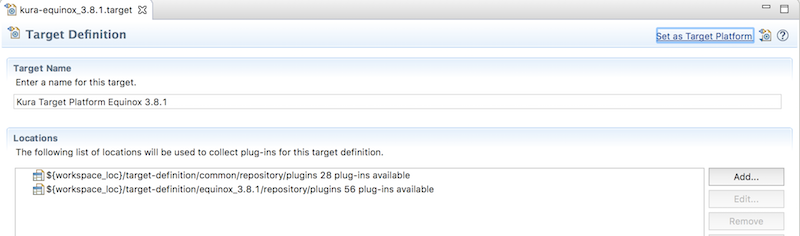
target-definitionプロジェクトにあるkura-equinox_3.8.1.targetをTarget Editorで開きます。
target-definition/kura-equinox_3.8.1.target -> 右クリック -> Open With -> Target Editor
Target Platformをリセットしてプロジェクトを再ビルドします。
Difinitionタブ -> Set as Target Platformをクリック
Plug-in プロジェクト
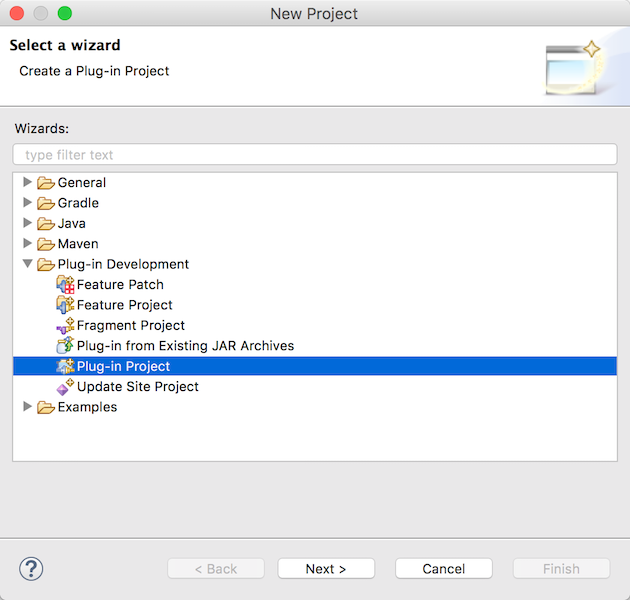
OSGiバンドルの開発はPlug-inプロジェクトで行います。 ウィザードを使いプロジェクトを作成します。
File -> New -> Project -> Plug-in Development -> Plug-in Project
Hello World Exampleの例に沿って新しいプロジェクトを作成します。
- Project name: org.eclipse.kura.example.hello_osgi
- Target Platform: an OSGi framework: チェック
- 選択: standard

ダイアログを次に進みプラグインのプロパティを設定します。
-
Name: Hello World Example with Logger
-
Execution Environment : JavaSE-1.8
-
Generate an activator... : チェックしない
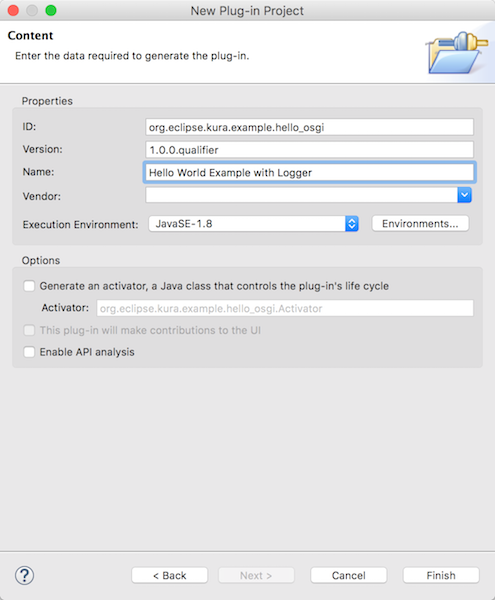
Kura Projectsワーキングセットにeclipse.kura.example.hello_osgiが作成されました。

MANIFEST.MFの編集
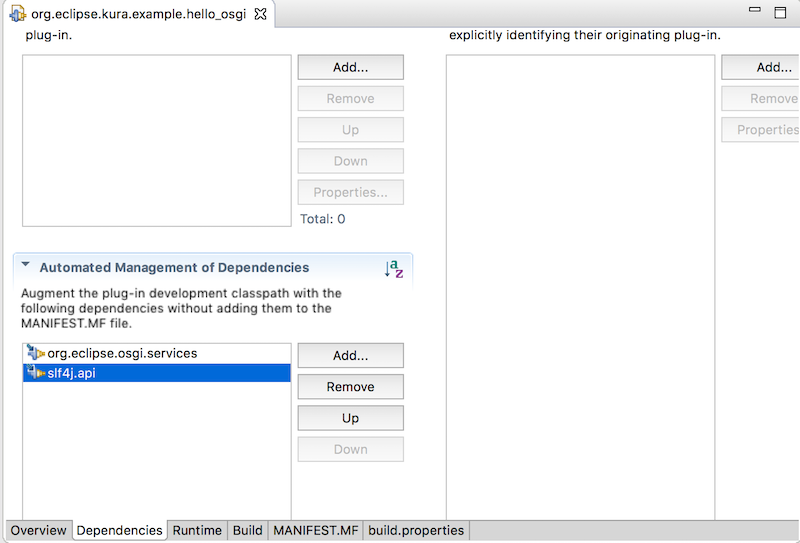
OSGiバンドルはバンドルのマニフェストファイルを含むjarファイルです。ここにバンドルのメタデータを定義します。プロジェクトに作成されたMETA-INF/MANIFEST.MFをPlug-in Manifest Editorで開きDependenciesタブをクリックします。
META-INF/MANIFEST.MFを右クリック -> Open With -> Plug-in Manifest Editor -> Dependenciesタブ
dependenciesにjarファイルを追加してファイルの変更を保存します。
- Automated Management of Dependencies を開く
- Add -> org.eclipse.osgi.services -> OK
- Add -> slf4j.api -> OK
作成されたMANIFEST.MFはEclipseでOpenJDK 8を利用しているためJavaSE-1.8となっています。Java 1.8のままOSGiバンドルをエクスポートするとExport Plug-ins' has encountered a problem.のエラーが出るためJavaSE-1.7に変更します。
Manifest-Version: 1.0
Bundle-ManifestVersion: 2
Bundle-Name: Hello World Example with Logger
Bundle-SymbolicName: org.eclipse.kura.example.hello_osgi
Bundle-Version: 1.0.0.qualifier
Bundle-RequiredExecutionEnvironment: JavaSE-1.7
Import-Package: org.osgi.service.component;version="1.2.0",
 org.slf4j;version="1.6.4"
Service-Component: component.xml
- Bundle-RequiredExecutionEnvironment: JavaSE-1.7
Javaクラスの作成
プロジェクトにサンプルにあるJavaクラスを作成してactivate()、deactivate()メソッドを定義します。この2つのメソッドはKuraのOSGiフレームワークによってインスタンスがActivate (活性化) 、Deactivate (非活性化)したときに実行され、OSGiバンドルをstart/stopした時に標準出力します。あとでにcomponent.xmlに指定します。
プロジェクトを右クリック -> New -> Class
- Source folder: org.eclipse.kura.example.hello_osgi/src
- Package field: org.eclipse.kura.example.hello_osgi
- Name field: HelloOsgi
package org.eclipse.kura.example.hello_osgi;

import org.osgi.service.component.ComponentContext;
import org.slf4j.Logger;
import org.slf4j.LoggerFactory;

public class HelloOsgi {

    private static final Logger s_logger = LoggerFactory.getLogger(HelloOsgi.class);
    private static final String APP_ID = "org.eclipse.kura.example.hello_osgi";

    protected void activate(ComponentContext componentContext) {
        s_logger.info("Bundle " + APP_ID + " has started!");
        s_logger.info(APP_ID + ": This is a debug message.");
    }

    protected void deactivate(ComponentContext componentContext) {
        s_logger.info("Bundle " + APP_ID + " has stopped!");
    }
}
MANIFEST.MFにパッケージを追加
MANIFEST.MFファイルをPlug-in Manifest Editorで開きDependencisesタブをクリックします。Automated Management of Dependenciesメニューのadd dependencies リンクをクリックすると、Javaファイルのimport宣言をベースにしてImported Packagesに自動的にjarファイルが追加されます。
- org.osgi.service.component (1.2.0)
- org.slf4j (1.6.4)
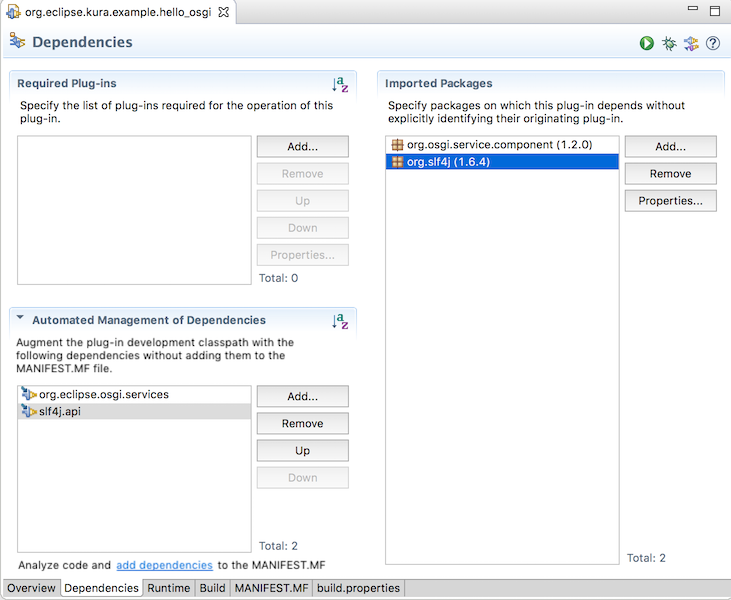
忘れずにMANIFEST.MFファイルの変更を保存して反映しておきます。
component.xmlの作成
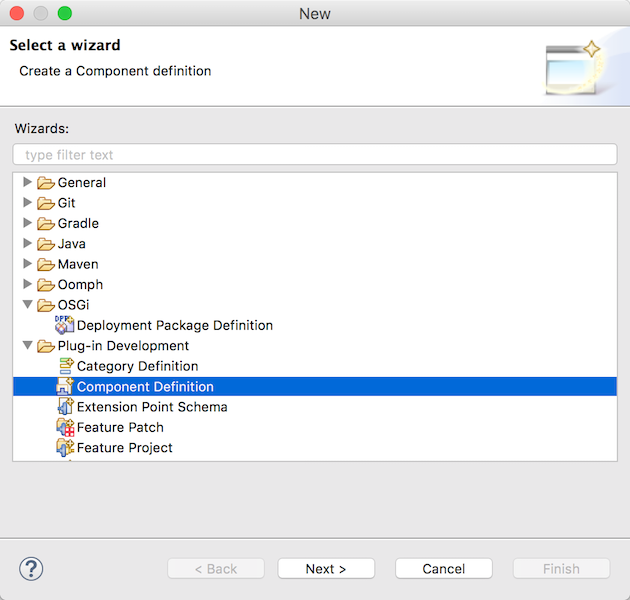
次にOSGiコンポーネント定義ファイルのcomponent.xmlを作成します。このファイルでHelloOsgi.javaのインスタンスをコンポーネントに定義します。
プロジェクトを右クリック -> New -> Other -> Plug-in Development -> Component Definition
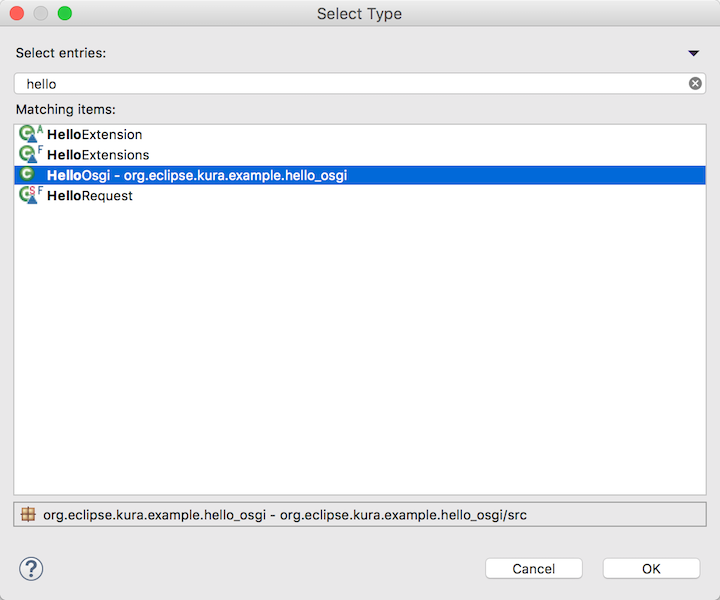
現在のプロジェクトのフォルダが選択されていることを確認して、Classの右にあるBrowseボタンをクリックします。
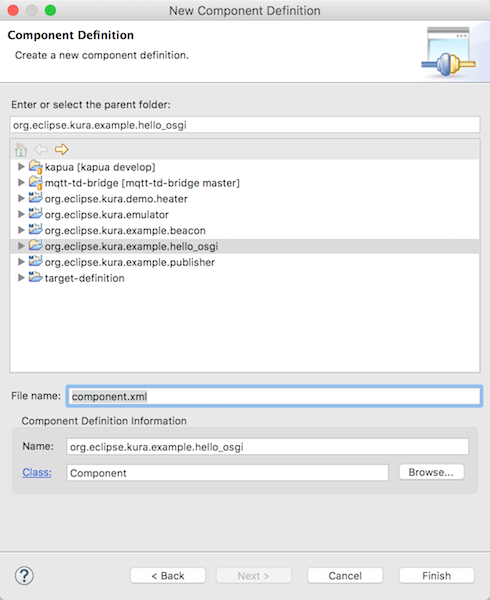
Select entriesのフィールドにhelloと入力して先ほど作成したJavaクラスを選択してOKボタンをクリックします。
- Select entries: hello
- Matching items: HelloOsgi
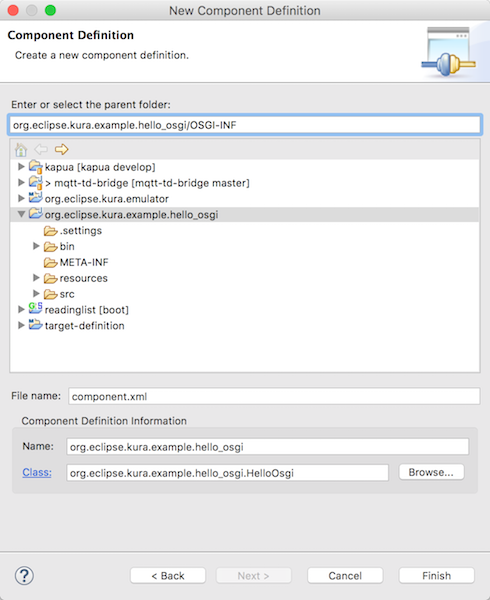
ウィザードに戻ると選択したクラスが入力された状態になります。最後にcomponent.xmlファイルを保存するOSGI-INFフォルダを入力します。Finishボタンをクリックしてウィザードは終了です。
- Enter or select the parent folder: org.eclipse.kura.example.hello_osgi/OSGI-INF
component.xmlをComponent Definition Editorで開きます。コンポーネントのライフサイクルは、OSGiフレームワークが管理します。Activate (活性化)、Deactivate (非活性化)のサイクルで実行するコンポーネントのメソッドを指定します。
- Activate: activate
- Deactivate: deactivate
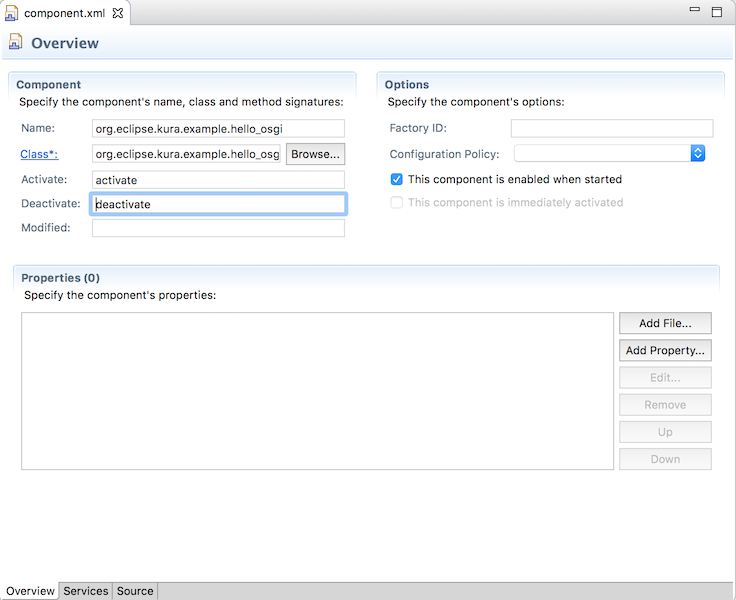
XMLファイルのコンポーネント定義が作成されました。
<?xml version="1.0" encoding="UTF-8"?>
<scr:component xmlns:scr="http://www.osgi.org/xmlns/scr/v1.1.0" activate="activate" deactivate="deactivate" name="org.eclipse.kura.example.hello_osgi">
   <implementation class="org.eclipse.kura.example.hello_osgi.HelloOsgi"/>
</scr:component>
OSGiバンドルのエクスポート
ここまで開発したOSGiバンドルをエクスポートしてEclipse KuraのOSGiフレームワークにデプロイする準備をします。OSGiバンドルのデプロイ方法は、スタンドアロンのOSGiプラグイン形式と、デプロイ管理サービスを使うDeploymentパッケージの2つあります。
OSGiプラグイン
最初にスタンドアロンのOSGiプラグインとしてOSGiバンドルを作成します。
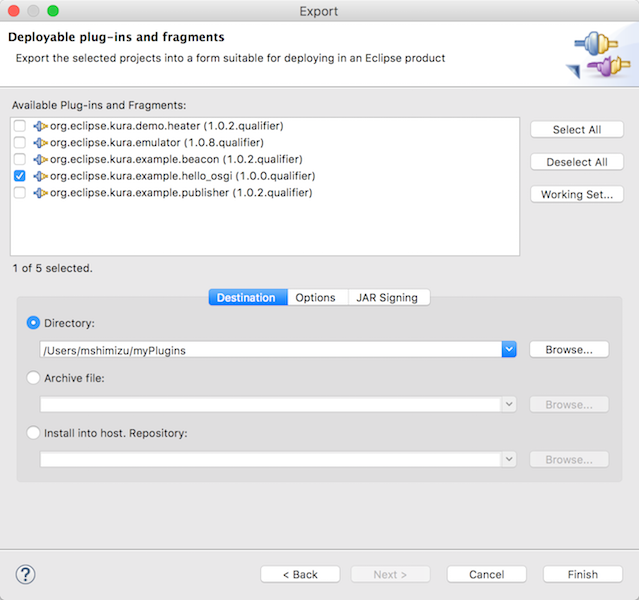
プロジェクトを右クリック -> Export -> Plug-in Development -> Deployable plug-ins and fragments

Available Plug-ins and Fragmentsで作成したOSGiプラグインを選択します。
- org.eclipse.kura.example.hello_osgi
Directoryをチェックして右のBrowseボタンをクリックします。jarファイルを保存するローカルのファイルシステムの場所を選択します。
MANIFEST.MFをJavaSE-1.8をJavaSE-1.7に変更していない場合はこのエクスポートの時にエラーになるため確認しておきます。
Bundle-RequiredExecutionEnvironment: JavaSE-1.7
Finishボタンでウィザードを終了すると以下のように指定したフォルダにjarファイルがエクスポートされます。
~/myPlugins/plugins/org.eclipse.kura.example.hello_osgi_1.0.0.201702060832.jar
Deploymentパッケージ
次はもう一つのDeploymentパッケージを作成します。拡張子は*.dpのファイルです。*.dppのパッケージ定義ファイルからビルドして複数のOSGiバンドルをパッケージ化できます。dpファイルはデプロイ管理サービスを使いリモートのEclipse Kuraにデプロイすることができます。
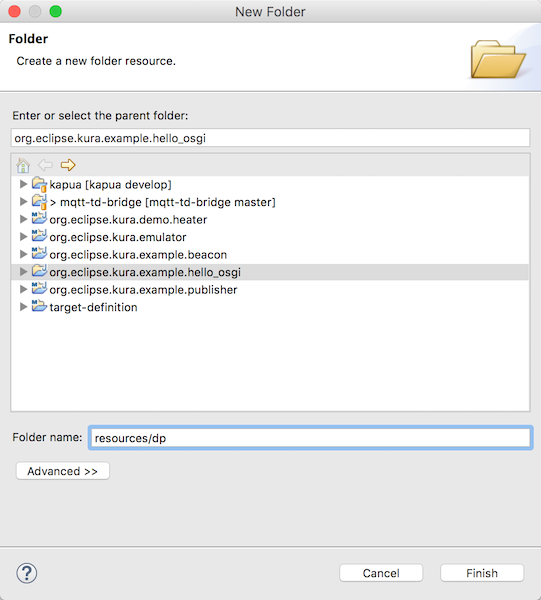
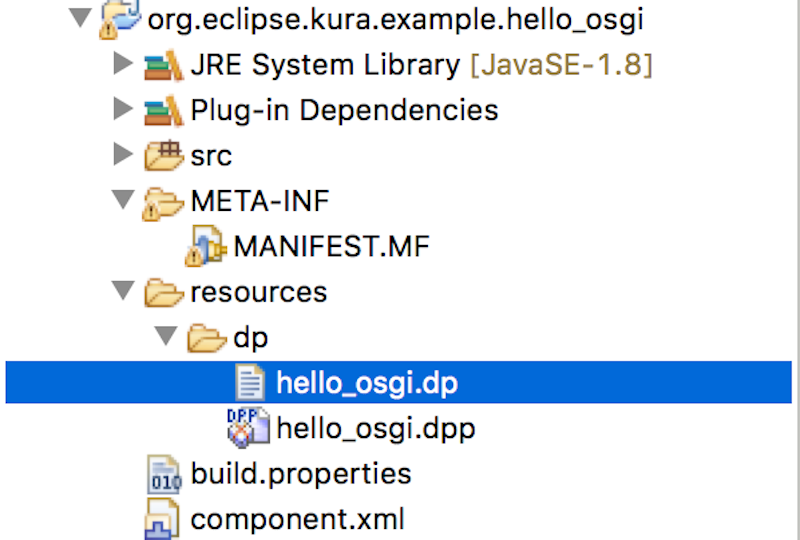
最初にdppとdpファイルをエクスポートするフォルダresources/dpを作成します。
プロジェクトを右クリック -> New -> Folder -> org.eclipse.kura.example.hello_osgi
- folder name: resources/dpを作成
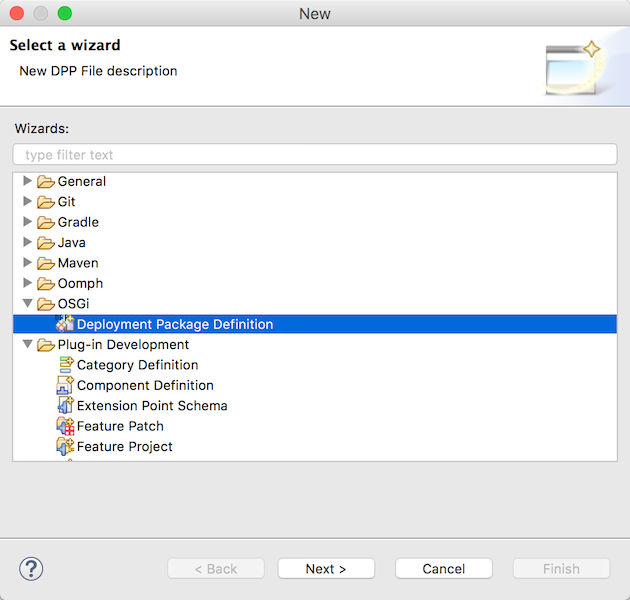
Deployment Package Definitionウィザードを起動してDeploymentパッケージ定義のdppファイルを作成します。
File -> New -> Other -> OSGi -> Deployment Package Definition
ファイルを出力するフォルダとファイル名を指定します。
- Target folder: /org.eclipse.kura.example.hello_osgi/resources/dp
- File name: hello_osgi
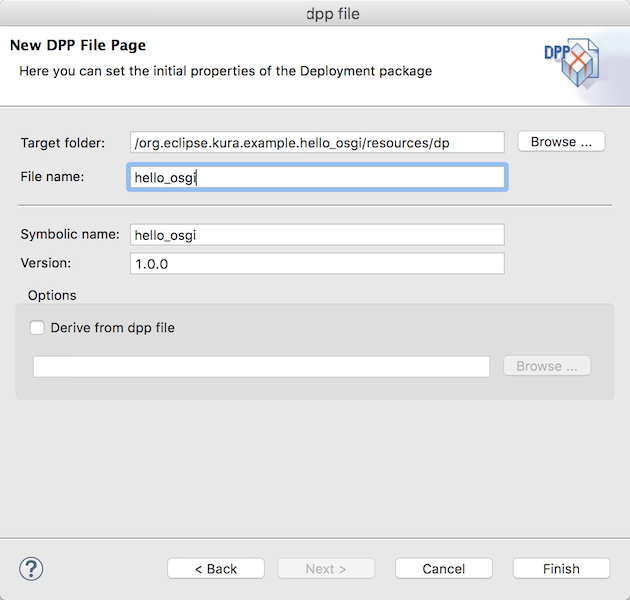
Finishボタンでウィザードを終了するとresources/dp/hello_osgi.dppに定義ファイルが作成されます。
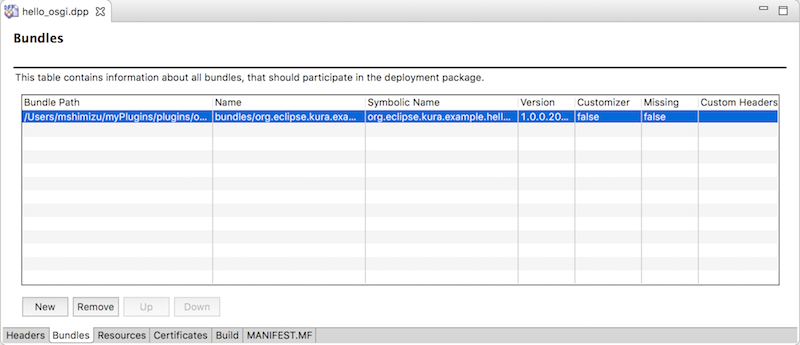
次にhello_osgi.dppファイルをDeployment Editorで開きます。BundlesタブにあるNewボタンをクリックして新しい行を作成したあと、Bundle Pathセルにある...ボタンをクリックします。ここで先ほどmyPluginsフォルダにエクスポートしたOSGiプラグインのjarファイルを選択します。
New -> Bundle Path column -> Browse
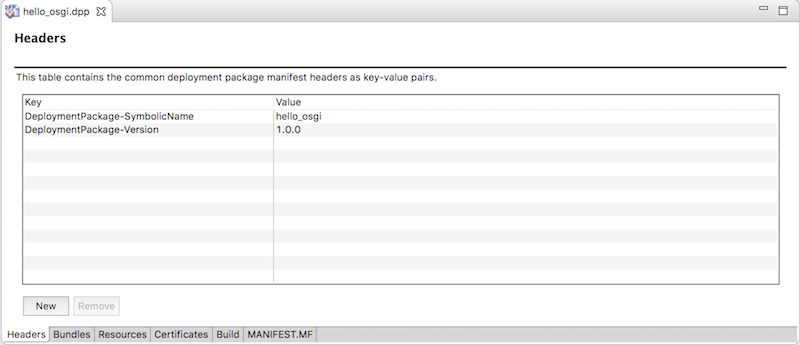
Headersタブは以下のようにキーが入力されます。
- DeploymentPackage-SymbolicName: hello_osgi
- DeploymentPackage-Version: 1.0.0
dppファイルからQuick Buildするとhello_osgi.dpが作成されます。
resources/dp/hello_osgi.dppを右クリック -> Quick Build
OSGiバンドルのデプロイ - Local Emulation Mode
Deploying Bundlesのページを読みながらOSGiバンドルをデプロイします。
エミュレータの起動
最初に試すLocal Emulation ModeはLinuxとmacOSだけで動作するモードです。KuraのエミュレータをEclipse上で起動してここにOSGiバンドルをデプロイします。
他のプロジェクトが開いているとエミュレータを起動した時に一緒に動いてしまうので、Working SetはインポートしたKuraのサンプルプロジェクトのorg.eclipse.kura.emulatorとhello_osgiを残し他はcloseしておきます。
macOSの場合src/main/resourcesフォルダにあるKura_Emulator_OSXを起動します。
/org.eclipse.kura.emulator/src/main/resources/Kura_Emulator_OSX.launch ファイル -> 右クリック -> Run as -> Kura_Emulator_OSX

エミュレータが起動するとhello_osgiのOSGiバンドルにあるactivate()メソッドが自動的に開始します。EclipseのConsoleにHelloOsgiのログが出力されました。
13:47:07,009 [Component Resolve Thread] INFO  HelloOsgi:13  - Bundle org.eclipse.kura.example.hello_osgi has started!
13:47:07,009 [Component Resolve Thread] INFO  HelloOsgi:14  - org.eclipse.kura.example.hello_osgi: This is a debug message.
Framework is running in emulation mode

OSGiコンソール
ConsoleウィンドウをクリックしてEnterキーを押すとOSGiコンソールのosgi>プロンプトが表示されます。ssコマンドでインストールされたOSGiバンドルのリストを表示することができます。バンドルID: 40が今回作成したhello_osgiのOSGiバンドルです。
osgi> ss
id	State       Bundle
0	ACTIVE      org.eclipse.osgi_3.8.1.v20120830-144521
	            Fragments=2
1	ACTIVE      org.eclipse.equinox.cm_1.0.400.v20120522-1841
2	RESOLVED    org.eclipse.kura.sun.misc_1.0.0
	            Master=0
3	ACTIVE      org.eclipse.equinox.common_3.6.100.v20120522-1841
...
38	ACTIVE      org.apache.felix.gogo.runtime_0.8.0.v201108120515
39	ACTIVE      org.apache.commons.fileupload_1.2.2.v20111214-1400
40	ACTIVE      org.eclipse.kura.example.hello_osgi_1.0.0.qualifier
...

stopコマンドにバンドルIDを指定して OSGiバンドルを停止させます。deactivate()メソッドが実行され定義してあるメッセージが出力されました。
osgi> stop 40
09:39:38,217 [Gogo shell] INFO  HelloOsgi:18  - Bundle org.eclipse.kura.example.hello_osgi has stopped!
同様にuninstallコマンドにバンドルIDを指定するとOSGiバンドルを削除することができます。
osgi> uninstall 40
osgi>
osgi> ss
...
38	ACTIVE      org.apache.felix.gogo.runtime_0.8.0.v201108120515
39	ACTIVE      org.apache.commons.fileupload_1.2.2.v20111214-1400
41	ACTIVE      org.hsqldb.hsqldb_2.3.0
...
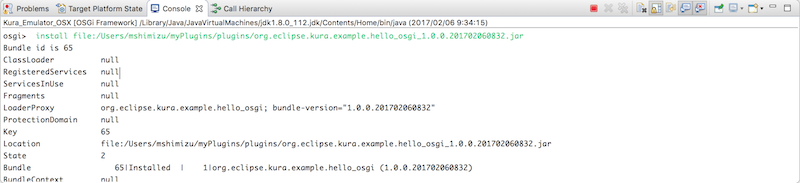
OSGiコンソールから直接OSGiバンドルをインストールしてみます。引数にはOSGiプラグインのjarを指定します。今度はバンドルID: 66でデプロイされました。
osgi> install file:/Users/mshimizu/myPlugins/plugins/org.eclipse.kura.example.hello_osgi_1.0.0.201702060832.jar
Bundle id is 66
...
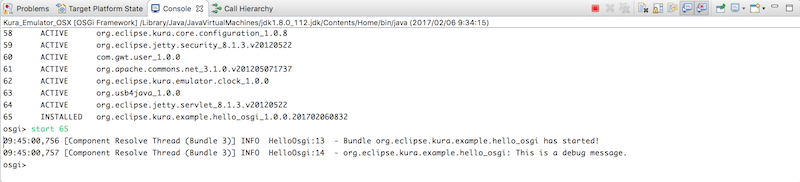
startコマンドにバンドルIDを指定してOSGiバンドルを起動します。activate()メソッドに定義したメッセージが標準出力されました。
osgi> start 66
14:11:37,276 [Component Resolve Thread (Bundle 29)] INFO  HelloOsgi:13  - Bundle org.eclipse.kura.example.hello_osgi has started!
14:11:37,276 [Component Resolve Thread (Bundle 29)] INFO  HelloOsgi:14  - org.eclipse.kura.example.hello_osgi: This is a debug message.
OSGiバンドルのデプロイ - Remote Target Device
最後に前回Raspberry Pi 2にインストールしたEclipse KuraのOSGiフレームワークにリモートからOSGiバンドルをデプロイしてみます。Raspberry Pi 2はmacOSと有線LANで接続してmDNSで名前解決できるようにしておきます。
mToolkitのFrameworksビュー
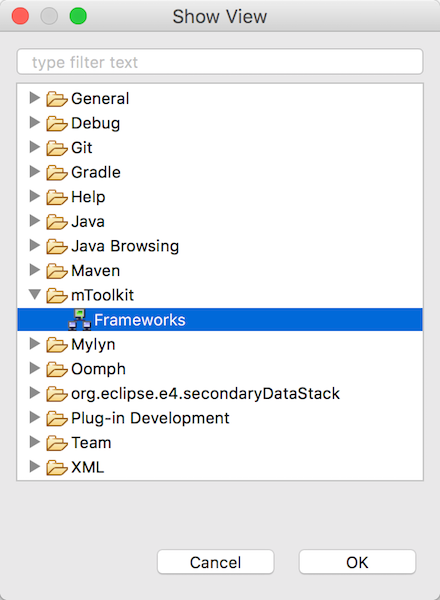
EclipseにインストールしたmToolkitプラグインからリモートのOSGiフレームワークに接続してみます。最初にmToolkitのFrameworksビューを開きます。
Window -> Show View -> Other -> mToolkit -> Frameworks
Frameworksビューを右クリックしてOSGiフレームワークを追加します。
右クリック -> Add Framework
macOSと有線LANで接続したRaspberry Pi 2の名前とアドレスを入力します。mDNSで名前解決する場合はraspberrypi.local、または直接IPアドレスを入力します。
- Name: RPi2
- Address: raspberrypi.local

Framework名は適当に「RPi2」と名前をつけました。右クリックして接続します。
Framework名を右クリック -> Connect Framework
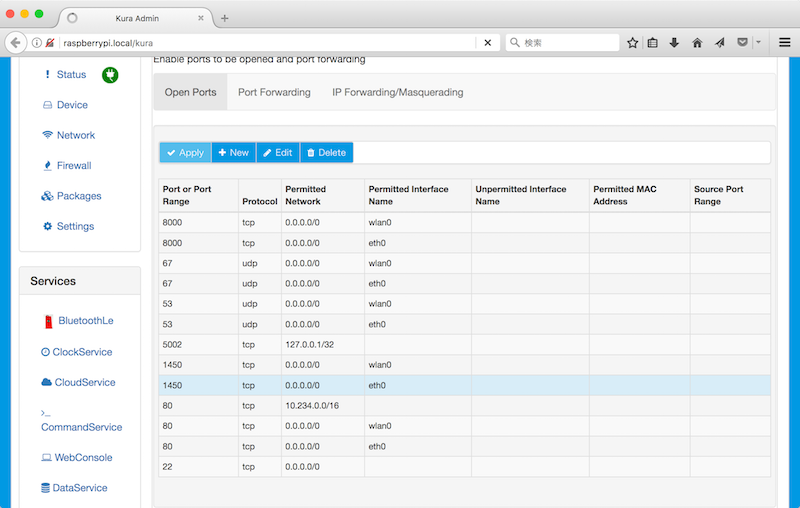
OSGiフレームワークのKuraはファイアウォールでポートを許可する必要があります。KuraのWeb UIからファイアウォールの設定を確認します。
OSGiフレームワークへの接続は1450ポートを使います。デフォルトで許可されていました。
Firewall -> Open Portsタブ -> 1450の許可
- Port or Port Range: 1450
- Protocol: tcp
- Permitted Network: 0.0.0.0/0
- Permitted Interface Name: eth0
OSGiプラグイン
スタンドアロンのOSGiプラグインのjarを選択してデプロイします。
* mToolkit Frameworksビュー -> Framework名を右クリック -> Install Bundle -> org.eclipse.kura.example.hello_osgi_1.0.0.201702060832.jar
Framework名のBundlesにデプロイしたorg.eclipse.kura.example.hello_osgiが表示されます。
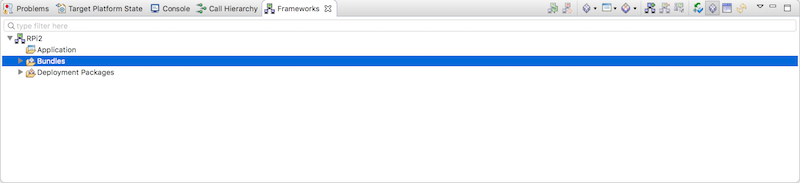
バンドル名を右クリックしてStart、StopするとOSGiコンソールの時と同じようにactivate()とdeactivate()メソッドのメッセージが表示されます。
Deploymentパッケージ
以前にインストールしたOSGiバンドルはuninstallしておきます。Framework名を右クリックして今度はInstall Deployment Packageを選択します。
mToolkit Frameworks view -> Framework名を右クリック -> Install Deployment Package
dpファイルは先ほどエクスポートしたhello_osgi.dpファイルを選択します。
~/Documents/workspace/org.eclipse.kura.example.hello_osgi/resources/dp/hello_osgi.dp
Deployment Packagesのツリーの中にOSGiバンドルが表示されました。

Eclipse Kuraから確認
Eclipse KuraへmacOSからSSH接続してログを確認します。Hello Worldバンドルのstartとstopのログが表示されています。
$ ssh pi@raspberrypi.local
$ tail -f /var/log/kura.log
...
2017-02-08 12:38:59,923 [Component Resolve Thread (Bundle 7)] INFO  o.e.k.e.h.HelloOsgi - Bundle org.eclipse.kura.example.hello_osgi has started!
2017-02-08 12:38:59,925 [Component Resolve Thread (Bundle 7)] INFO  o.e.k.e.h.HelloOsgi - org.eclipse.kura.example.hello_osgi: This is a debug message.
teleneでOSGiフレームワークに接続してOSGiバンドルを一覧します。
$ telnet localhost 5002
osgi> ss
"Framework is launched."


id	State       Bundle
0	ACTIVE      org.eclipse.osgi_3.8.1.v20120830-144521
	            Fragments=2
1	ACTIVE      org.eclipse.equinox.cm_1.0.400.v20120522-1841
2	RESOLVED    org.eclipse.kura.sun.misc_1.0.0
...
78	ACTIVE      org.eclipse.kura.example.hello_osgi_1.0.0.201702081230
OSGiバンドルを永続化する
mToolkitからリモートのOSGiフレームワークにデプロイする方法は一時的な方法なのでEclipse Kuraを再起動すると消えてしまいます。
SCPする場合
動作確認が終わったらdpファイルをターゲットデバイスの以下のディレクトリにコピーして永続化します。
/opt/eclipse/kura/kura/packages
macOSから一度Raspberry Pi 2にSCPでdpファイルを転送してから目的のディレクトリにコピーします。
$ scp ~/Documents/workspace/org.eclipse.kura.example.hello_osgi/resources/dp/hello_osgi.dp pi@raspberrypi.local:
$ ssh pi@raspberrypi.local
$ sudo cp ~/hello_osgi.dp /opt/eclipse/kura/kura/packages/
/opt/eclipse/kura/kura/dpa.propertiesファイルに以下の書式でパッケージ名とファイルのパスを追加します。
package_name=file\:/opt/eclipse/kura/kura/packages/package_filename.dp
org.eclipse.kura.example.hello_osgi=file\:/opt/eclipse/kura/kura/packages/hello_osgi.dp
Eclipse Kuraをリスタートします。restartコマンドを使うとプロセスの停止に失敗することがあるので、stop -> startします。
$ sudo /etc/init.d/kura stop
$ sudo /etc/init.d/kura start
KuraのWeb UIからアップロードする場合
Eclipse KuraのWeb UIにログインしてdpファイルをアップロードしてもOSGiバンドルは永続化されます。Webブラウザからデプロイできるのでこちらの方が簡単です。左のPackageメニューからdpファイルをSubmitします。
Package -> Upload - dpファイル -> Submit