前回ESP8266モジュールにCoolTermからシリアル接続をしてATコマンドを発行するWi-Fiの接続テストをしました。この時はArduinoはESP8266への電源供給にしか使っていませんでした。Arduino IDEでWebクライアントのスケッチを書いてシリアルモニタからプログラムの実行を確認します。
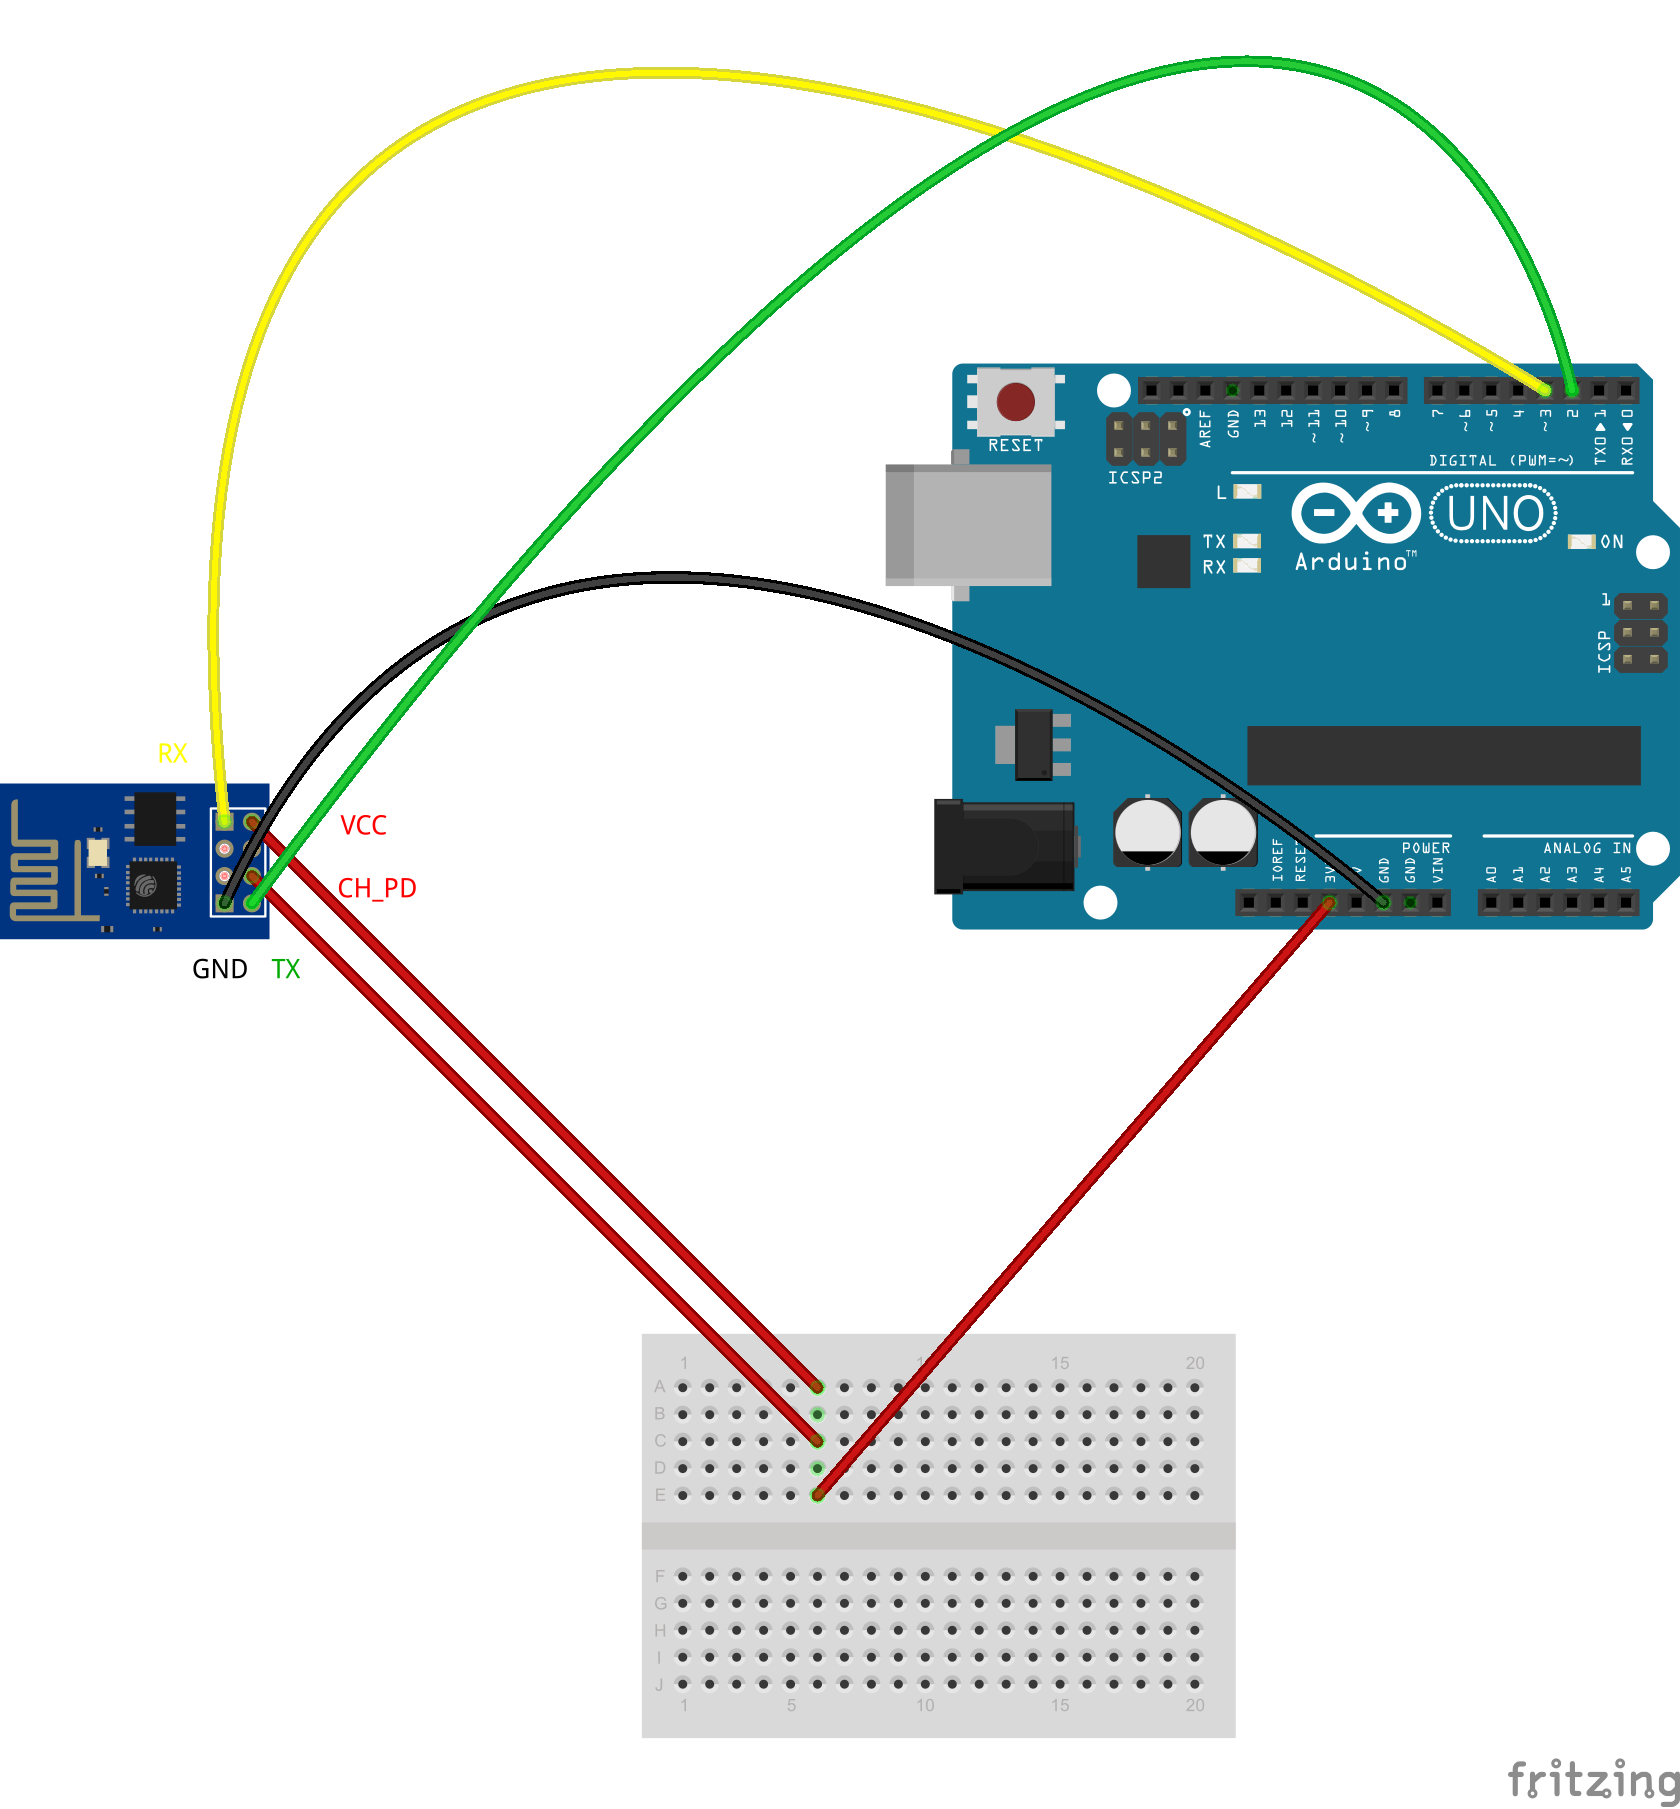
ブレッドボード配線
ESP8266の3.3VのRXとTXをArduino UnoのGPIOに接続しても動作しました。ロジックレベルコンバーターを使った方がよいと思います。
- RX (ESP8266) -> PIN 3 (Arduino)
- TX (ESP8266) -> PIN 2 (Arduino)
- CH_PD (ESP8266) -> VCC (Arduino Uno 3.3V)
- VCC (ESP8266) -> VCC (Arduino Uno 3.3V)
- GND (ESP8266) -> GND (Arduino)
スケッチ
Arduino IDEでスケッチを書きます。ATコマンドはCoolTermから実行したものと同じです。ArduinoのC++は慣れないので書くのが大変です。改行コードの扱いで嵌まりました。ESP8266のSoftwareSerialからHTTPレスポンスを読み込みSerialに出力するところでは、if(c == '\r') Serial.print('\n');のようにCRの後にLFを追加しないと出力が途中で切れてしまいます。それでもCoolTermで出力した内容より少ないので、コードは見直しが必要です。
# include <SoftwareSerial.h>

# define SSID "xxx"
# define PASS "xxx"
# define BROKER_URL "xxx.xxx.xxx.x"
# define ESP_RX_PIN 2
# define ESP_TX_PIN 3
# define TIMEOUT 4000

SoftwareSerial esp8266Serial(ESP_RX_PIN, ESP_TX_PIN);

void setup()
{
  if(connectWiFi())
  {
    getStatus();
    sendCmd("AT+CIPCLOSE",0);
  } else {
    Serial.println("not connected");
  }
  Serial.println("finished");
}

void loop()
{
}

void getStatus()
{
  String cmd = "AT+CIPSTART=\"TCP\",\"";
  cmd += BROKER_URL;
  cmd += "\",3000";
  sendCmd(cmd,500);

  String httpCmd = "GET /status HTTP/1.1\r\n";
    httpCmd += "Host: ";
    httpCmd += BROKER_URL;
    httpCmd += "\r\n\r\n";

  cmd = "AT+CIPSEND=";
  cmd += httpCmd.length();

  esp8266Serial.print(cmd);
  esp8266Serial.print("\r\n");

  Serial.println(cmd);

  if(esp8266Serial.find(">"))
  {
    esp8266Serial.print(httpCmd);
    delay(500);
    if(esp8266Serial.available())
    {
      while(esp8266Serial.available())
      {
        char c = esp8266Serial.read();
        Serial.write(c);
        if(c == '\r') Serial.print('\n');
      }
      Serial.print("\r\n");
    } else {
      Serial.println("http failed");
    }
  } else {
    Serial.println("not started");
  }
}

bool connectWiFi() {
  Serial.begin(9600);
  esp8266Serial.begin(9600);
  esp8266Serial.setTimeout(TIMEOUT);

  if( sendCmd("AT+RST",3000))
  {
    String cmd = "AT+CWJAP=\"";
    cmd += SSID;
    cmd += "\",\"";
    cmd += PASS;
    cmd += "\"";
    return sendCmd(cmd,5000);
  } else {
    return false;
  }
}

bool sendCmd(String cmd, int wait) {
  esp8266Serial.print(cmd);
  esp8266Serial.print("\r\n");
  Serial.println(cmd);
  delay(wait);

  if(esp8266Serial.find("OK")) {
    Serial.println("OK");
    return true;
  } else {
    Serial.println("NG");
    return false;
  }
}
スケッチをアップロードしてシリアルモニタから実行を確認します。Arduino単体からでもインターネットに接続してHTTPリクエストを発行することができました。ただC++でATコマンドを書くのも大変です。ArduinoはRaspberry PiからFirmataプロトコルで操作して、インターネット接続はLinuxに任せた方が簡単です。
AT+RST
OK
AT+CWJAP="xxx","xxx"
OK
AT+CIPSTART="TCP","xxx.xxx.xxx.x",3000
OK
AT+CIPSEND=45
 GET /status HTTP/1.1
Host: xxx.xxx.xxx.x


SEND OK


+IPD,54: restify

Request-Id: c641b1b0-dad9-11e4-9cf7-a53c7accdff6

Response-Time: 2


{"meshblu":"online"}

OK


AT+CIPCLOSE
OK
finished
