情報企画部の尾崎です。
AIの進化が目覚ましい昨今ですが、将棋の世界でも、
今やプロ棋士の方もAI将棋ソフトを使って研究をするのが当たり前になりつつあります。
また、順位戦や名人戦、朝日杯などの棋戦でも、対局者の映像とともにAI将棋ソフトを使って、候補手だったり、評価値を表示したりするいわゆる評価値配信がされております。
囲碁将棋TV -朝日新聞社-
AI将棋ソフトの検討モードを使うと、
どちらが優勢か、次の候補手は何かというのは、見ればわかるのですが、
評価値バーがあることで、見た目にもどちらが優勢なのかわかりやすくなります。
このあたりがしっくりくるのは、1対1というところから、「ストⅡ」のような格闘ゲームのパワーゲージを見て育った影響なのでしょうか(笑)
水匠というAI将棋ソフトの開発者である たややん(@tayayan_ts)さんが、
最近、評価値バーを以下の動画で公開していたので、この動画に基づいて解説します。
ShogiGUIのダウンロード
Windows環境で、
将棋のGUIを表示するソフトで、今回はShogiGUIを使います。
以下からダウンロードします。
ShogiGUI ←2023/3/27現在ver 0.0.8.0が最新
.NET framework 4.8.1が必要です。
今回は、zip版をダウンロードします。
デスクトップなどに解凍します。
「ShogiGUI」というフォルダができると思います。
その中に「ShogiGUI.exe」というファイルがあり、それがShogiGUIの本体になります。
最初の1回だけですが、ダブルクリックして実行してみると、以下のような警告画面が出てアプリが起動できないので、「詳細情報」をクリックして、「実行」をクリックしておきましょう(2回目以降は聞かれません)。

評価値バーのダウンロード
評価値バーは、たややん(@tayayan_ts)さんが
以下のGoogle Driveに公開してくれていますので、
ここからダウンロードします。
https://drive.google.com/file/d/1Thdyd9ITxQf-AiqNMoEnM9ClzGIqHL9y/view
ShogiEvalBar.zip
をダウンロードして、解凍します。
「ShogiEvalBar」というフォルダの中にあるShogibar.exeが評価値バーの本体になります。
評価値バーの設定
ShogiGUI.exeをダブルクリックで実行すると、ShogiGUIが立ち上がるので、
[ツール]-[エンジン設定]を選択します。

追加をクリックします。

先ほど、ダウンロードした評価値バーの本体(Shogibar.exe)を選択し、開くをクリックします。

すると、ShogiGUIのエンジン設定の画面になります。
この評価値バーには、デフォルトで水匠5というAI将棋ソフトが同梱されています。
エンジン設定については、インストールするパソコンのスペックにもよるので、ググるなりして調べてみてください。
なお、USI(Universal Shogi Interface)プロトコル対応の将棋ソフトであれば、別のエンジンに変更することも可能です。
詳細は、上記たややんさんの動画をご確認ください。

エンジンが追加されたら、OKをクリックします。

エンジン設定を追加できたら、
ShogiGUIの画面に戻るので、
「検討」ボタンをクリックすると、登録されているエンジンをプルダウンで選べますが、
先ほどのShogiBarが選ばれていることを確認して、「検討開始」をクリックします。
候補手の数を増やすと、最善手だけでなく、候補手を複数表示することができます。

しばらくすると、評価値バーのダイアログが立ち上がり、検討モードが開始されます。
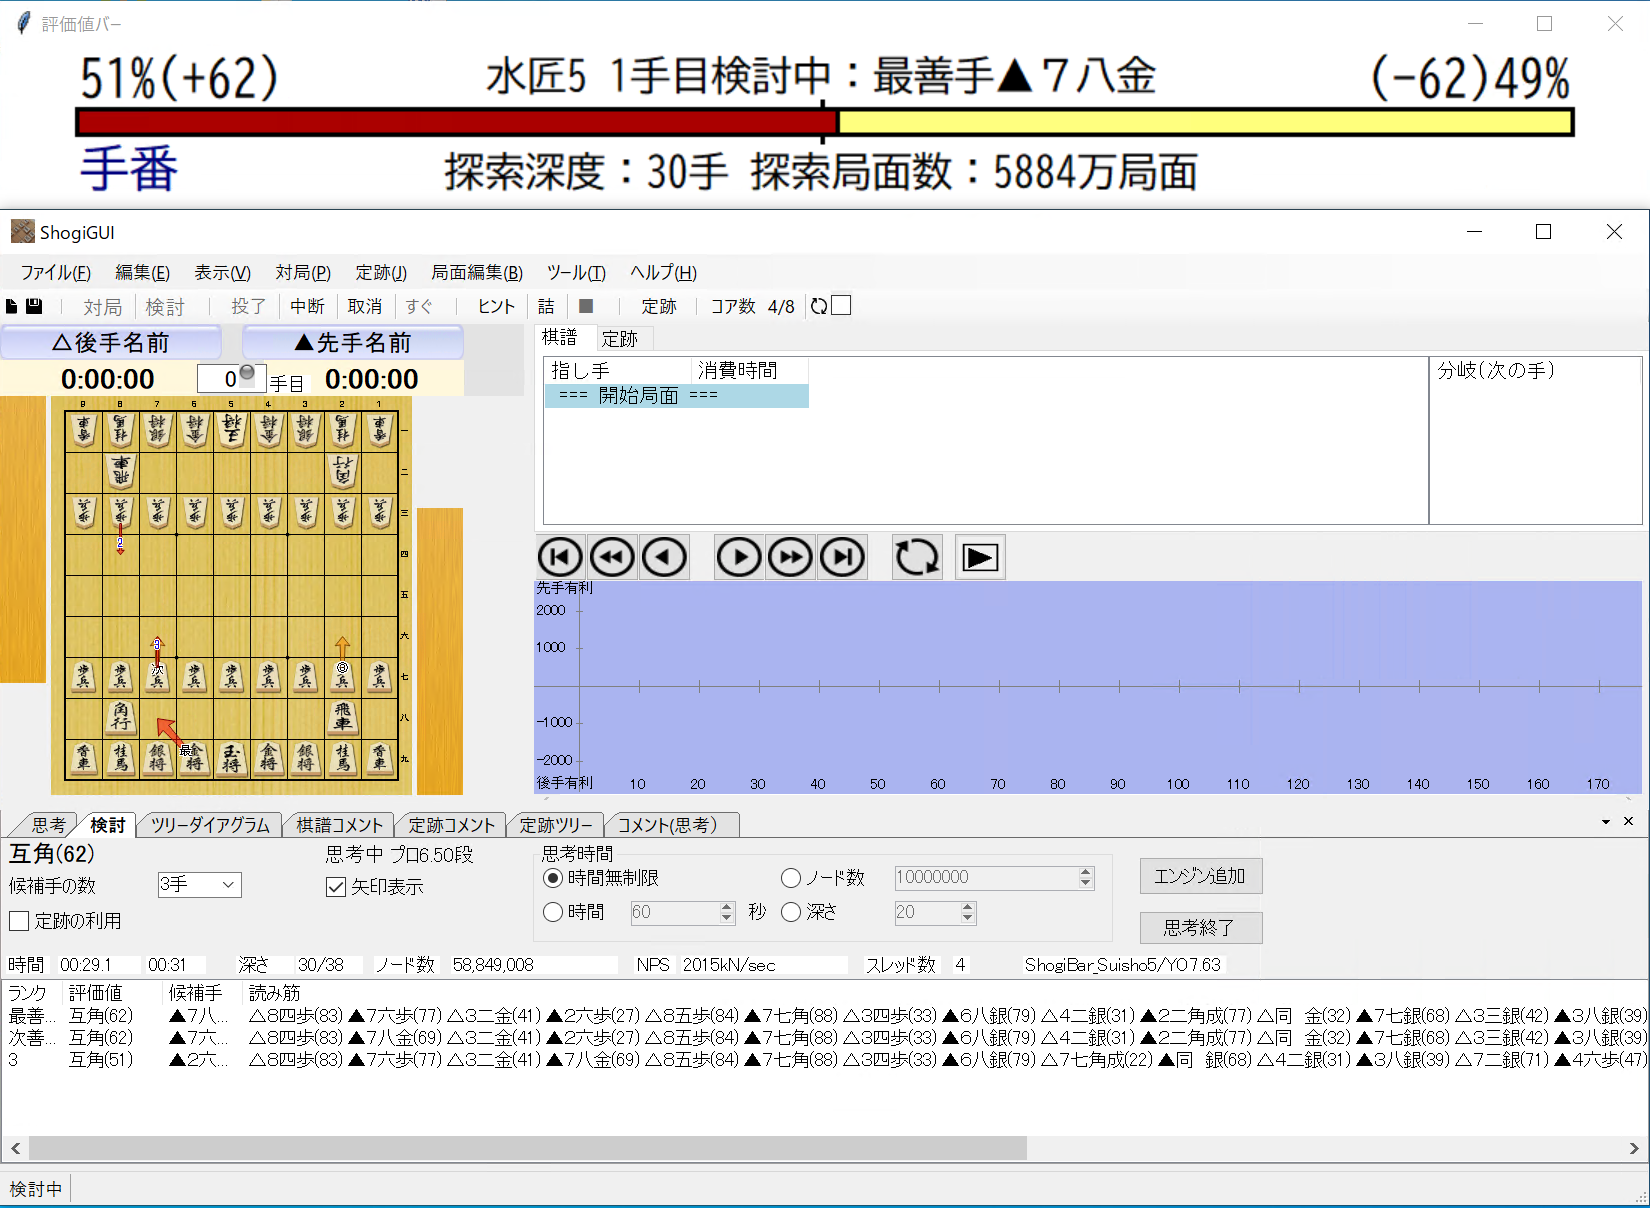
あとは、駒を動かしていくと、評価値に連動して、評価値バーのゲージが変化してきます。
評価値バーには、ゲージのほかに勝率(評価値)、将棋エンジン名、最善手、探索深度、探索局面数、手番などが表示されています。

また、評価値バーのダイアログを、マウスでドラッグしながら下に延ばすと、
Reverseのチェックボックスが出てくるので、先手と後手の左右を入れ替えることができます。

評価値バーのプログラムの中身は、Pythonのプログラムで書かれており、
ShogiEvalBar\sourceフォルダの下にある、ShogiBar.pyになります。
こちらをいじると、例えばエンジンをUSI(Universal Shogi Interface)プロトコルに対応した他のAI将棋ソフトに変更したり、評価値バーの色だったり、評価値‐勝率変換のシグモイド関数のパラメーターを変更するといったことも可能です。
from cshogi import *
from cshogi import KI2
import math
import sys
import numpy as np
import threading
import subprocess
import tkinter as tk


#エンジン名・フォント・文字色・背景色
engine = "水匠5"            # 水匠5
barfont = "BIZ UDGothic"    # BIZ UDGothic
bgcolor = "white"           # white
fgcolor = "black"           # black
turnfgcolor = "#00007f"     # #00007f
leftgraphbg = "#aa0000"     # #aa0000
rightgraphbg = '#ffff7f'    # #ffff7f


#外部エンジン起動
shogi = subprocess.Popen("./Suisho5.exe", stdin=subprocess.PIPE,
                                          stdout=subprocess.PIPE,
                                          encoding="UTF-8")
#局面初期化
board = Board()


#コマンド受付
def command():
    while True:
        cmdline = input()
        # 局面設定
        if cmdline[:8] == "position":
            board.set_position(cmdline[9:])
        usi(cmdline)

#コマンド入力処理
def usi(command):
    #終了処理
    if command == "quit":
        root.destroy()
        sys.exit()
    shogi.stdin.write(command+"\n")
    shogi.stdin.flush()

#コマンド出力処理
def output():
    while True:
        #エンジンからの出力を受け取る
        line = shogi.stdout.readline()
        #評価値バー処理
        shogibar(line)
        #標準出力
        sys.stdout.write(line)
        sys.stdout.flush()

#評価値バー情報更新
def shogibar(line):
    if line[:4] == "info":
        sfen = line.split()
        #評価値表示列かチェック
        if "multipv" not in sfen and "pv" in sfen:
            pass
        elif "multipv" in sfen and int(sfen[sfen.index("multipv")+1]) == 1:
            pass
        else:
            return
        #左右反転チェックを受け取る
        if bln.get():
            reverse = -1
        else:
            reverse = 1
        #データ処理
        turn = -(board.turn * 2 - 1) * reverse
        move_count = board.move_number
        depth = int(sfen[sfen.index("depth")+1])
        nodes = int(sfen[sfen.index("nodes")+1])
        if nodes < 10000:
            nodes = str(nodes) + "局面"
        elif nodes < 100000000:
            nodes = str(int(nodes/10000)) + "万局面"
        else:
            nodes = str(int(nodes/100000000)) + "億局面"
        pv = sfen[sfen.index("pv")+1]
        if "cp" in sfen:
            cp = int(sfen[sfen.index("cp")+1]) * turn
            #勝率変換(Ponanza定数 = 1200)
            winrate = int(round(100 / (1 + (math.exp(-cp/1200)))))
            lwinratelabel["text"] = str(winrate) + "%(" + "{:+}".format(cp) + ")"
            rwinratelabel["text"] = "(" + "{:+}".format(-cp) + ")" + str(100 - winrate) + "%"
            leftgraph.place(x=50, y=40, width=winrate * 10, height=20)
        if "mate" in sfen:
            mate = int(sfen[sfen.index("mate")+1]) * turn
            if mate > 0:
                lwinratelabel["text"] = "100%(" + str(mate) + "手詰)"
                rwinratelabel["text"] = "(" + str(-mate) + "手詰)0%"
                leftgraph.place(x = 50, y = 40, width = 1000, height = 20)
            elif mate < 0:
                lwinratelabel["text"] = "0%(" + str(mate) + "手詰)"
                rwinratelabel["text"] = "(" + str(-mate) + "手詰)100%"
                leftgraph.place(x = 50, y = 40, width = 0, height = 20)
        saizen["text"] = engine + " " + str(move_count) + "手目検討中:最善手" + KI2.move_to_ki2(board.move_from_usi(pv), board)
        tansaku["text"] = "探索深度:" + str(depth) + "手 探索局面数:" + nodes
        if turn == 1 and ltebanlabel["text"] != "手番":
            ltebanlabel["text"] = "手番"
            rtebanlabel["text"] = ""
        elif turn == -1 and rtebanlabel["text"] != "手番":
            ltebanlabel["text"] = ""
            rtebanlabel["text"] = "手番"


#コマンド受付と出力は並列処理(Tkinterとは別に動かす必要があるため)
t = threading.Thread(target=output, daemon=True)
t.start()

#初期設定(isreadyまで)
while True:
    cmdline = input()
    if cmdline[:7] == "isready":
        usi(cmdline)
        break
    elif cmdline[:4] == "quit":
        sys.exit()
    usi(cmdline)

#isready後は並列処理
t2 = threading.Thread(target=command, daemon=True)
t2.start()


#Tkinter表示
root = tk.Tk()
root.geometry("1100x108")
root.minsize(width=1100, height=108)
root.title("評価値バー")
root.configure(bg = bgcolor)

#勝率ラベル
lwinratelabel = tk.Label(root, text="50%(0)", font=(barfont, 25), bg=bgcolor, fg=fgcolor)
lwinratelabel.place(x = 50, y = 20, anchor=tk.W)
rwinratelabel = tk.Label(root, text="(0)50%", font=(barfont, 25), bg=bgcolor, fg=fgcolor)
rwinratelabel.place(x = 1050, y = 20, anchor=tk.E)

#手番ラベル
ltebanlabel = tk.Label(root, text="", font=(barfont, 25), bg=bgcolor, fg=turnfgcolor)
ltebanlabel.place(x = 50, y = 80, anchor=tk.W)
rtebanlabel = tk.Label(root, text="", font=(barfont, 25), bg=bgcolor, fg=turnfgcolor)
rtebanlabel.place(x=1050, y=80, anchor=tk.E)

#最善手ラベル
saizen = tk.Label(root, text=engine + " 0手目検討中:最善手", font=(barfont, 20), bg=bgcolor, fg=fgcolor)
saizen.place(x = 547, y = 18, anchor=tk.CENTER)

#探索ラベル
tansaku = tk.Label(root, text="探索深度:0手 探索局面数:0局面", font=(barfont, 20), bg=bgcolor, fg=fgcolor)
tansaku.place(x=547, y=82, anchor=tk.CENTER)

#勝率目盛り
label50 = tk.Label(root, text="", bg="black")
label50.place(x=547, y=35, width=3, height=30)

#評価値バー描画
rightgraph = tk.Label(root, text="", bg=rightgraphbg, relief=tk.SOLID, bd=3)
rightgraph.place(x=50, y=40, width=1000, height=20)
leftgraph = tk.Label(root, text="", bg=leftgraphbg, relief=tk.SOLID, bd=3)
leftgraph.place(x = 50, y = 40, width = 500, height = 20)


#左右反転チェック
bln = tk.BooleanVar()
bln.set(False)
check = tk.Checkbutton(root, variable=bln, text="Reverse", font=(barfont, 15), bg=bgcolor, fg=fgcolor, activeforeground = fgcolor)
check.place(x = 50, y = 150)

root.mainloop()
試してみてはいかがでしょうか。