概要
SalesforceからGoogle Chatへメッセージを送信する方法を紹介します。今回は、Lightning Web Component (LWC) と Apex を使用して、簡単なメッセージ送信の手順を説明します。


準備
Google Chat APIの設定とSalesforceの設定を行います。
Google Chat APIは、console.cloud.google.comから、SalesforceはSetupsから行います。
Google Chat APIの設定
まず、Google Chat APIを有効にし、必要な認証情報を取得します。Google Cloud Consoleでプロジェクトを作成し、APIとサービスの認証情報からOAuth 2.0クライアントIDを作成します。
Google Chat APIの有効化
console.cloud.google.com よりログインし、APIs & Servicesより「Google Chat API」を検索し有効化します。

有効化

Projectを作成
console.google.comにログインし、上部3点ドットの箇所をクリックして新規プロジェクトを作成します。

新規Credentialの作成
その次に、認証情報でNew Credentialで新しい認証情報を作成します。

Callback URLの入力
作成例ですが、名前は任意で「Salesforce」とします。また承認済みのリダイレクトURIですが、こちらは、後ほどSalesforce側でAuth. Providerを作成したのち、Callback URLとして表示されるものをコピペします。複数入力可能なので、ProductionとSandboxでそれぞれ違うAuth. ProviderにあるCallback URLを入れておくとどちらのAuth. Providerも対応できます。

Client ID/ Client Secretの取得
また、上記認証画面のAdditional InformationにあるClient IDとClient Secretは、後ほどSalesforce側のAuth. Provider設定で利用します。
Salesforceの設定
Auth. Provider, External Credentials, Named Credentials, Permission Setを設定します。
Auth. Providerの設定
Auth. Providerでは以下のような設定です。上記のClient IDとClient SecretをそれぞれConsumer KeyとConsumer Secretへコピペします。
| Field | Value |
|---|---|
| Authorize Endpoint URL | https://accounts.google.com/o/oauth2/auth?access_type=offline&approval_prompt=force |
| Token Endpoint URL | https://oauth2.googleapis.com/token |
| Default Scopes | openid email profile https://www.googleapis.com/auth/chat https://www.googleapis.com/auth/chat.spaces https://www.googleapis.com/auth/chat.messages |

また、保存すると下の方にCallback URLが生成されるのでそちらをコピペして、先ほどのCallback URLの入力へコピペして入力しておきます。

External Credentialsの作成
設定でNamed Credentialsで検索した画面で、External Credentials タブをクリック、新規Newボタンを押します。
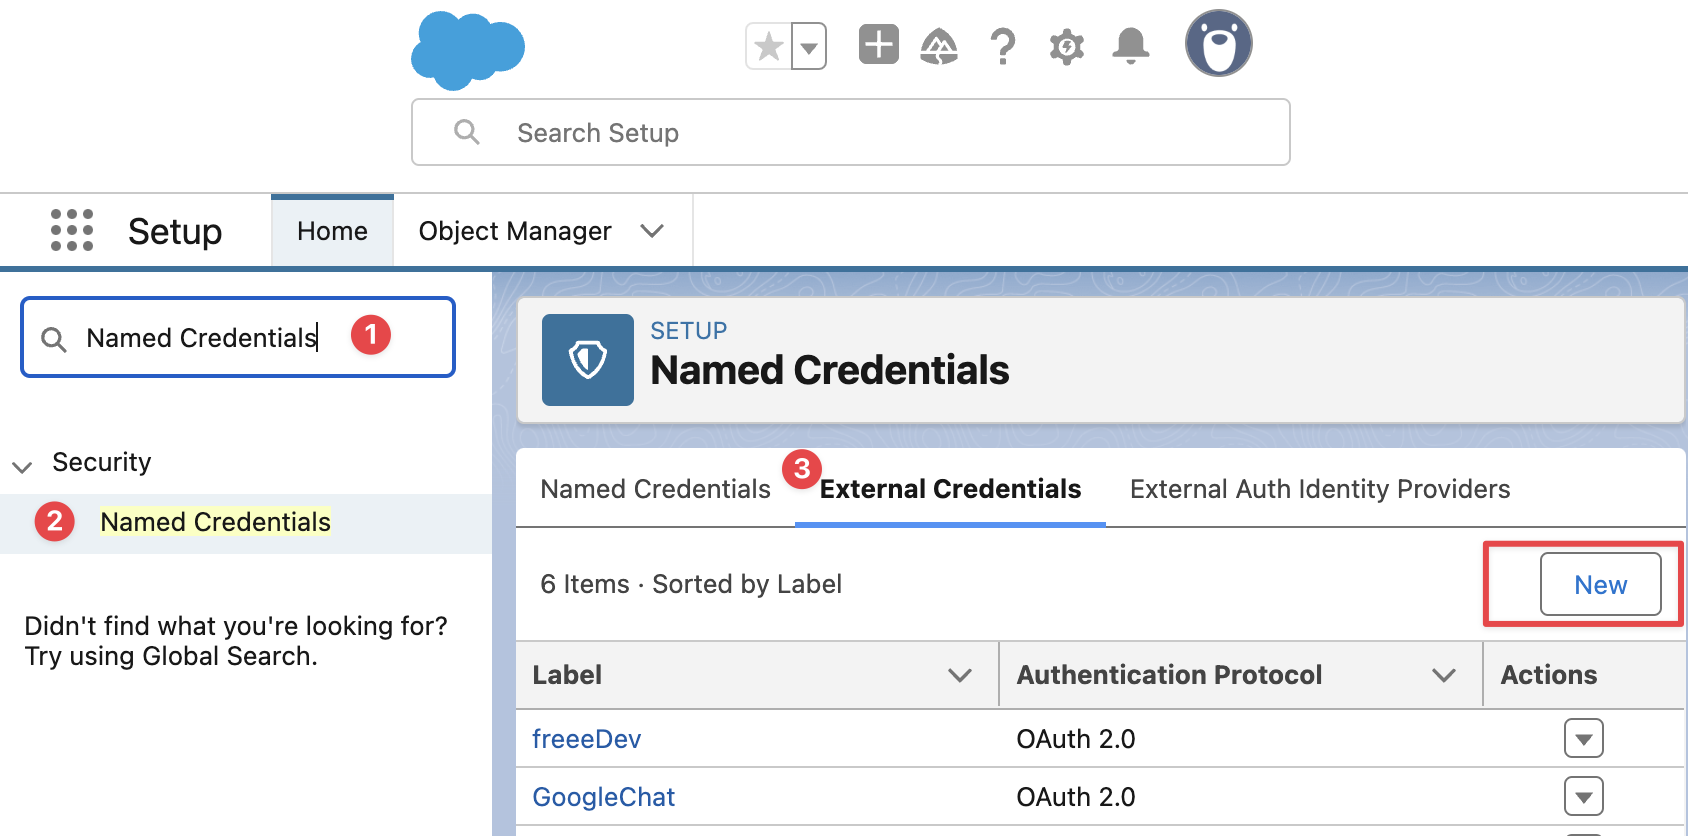
こちらで新たなExternal Credentialsを作成します。名前は任意ですが、今回はGoogleChatApiと名付けます。Authentication ProtpcolはOAuth 2.0、Authentication Flow TypeはBrowser Flow Identity Providerは先ほど作成したAuth. ProviderのGoogle Chatを選択します。

Named Credentialsを作成
次にExternal Credentialを利用したNamed Credentialsを作成します。
Named Credentialsの画面に戻り、今度はNamed Credentialsのタブを押し、そこの新規を押します。

するとNamed Credentialsの設定画面になるので、そちらを入力します。Labelは、任意ですがGoogleChatApi、URLはhttps://chat.googleapis.com、Enabled for Calloutsは有効 External Credentialは先ほど作成したGoogleChatApiを選択します。

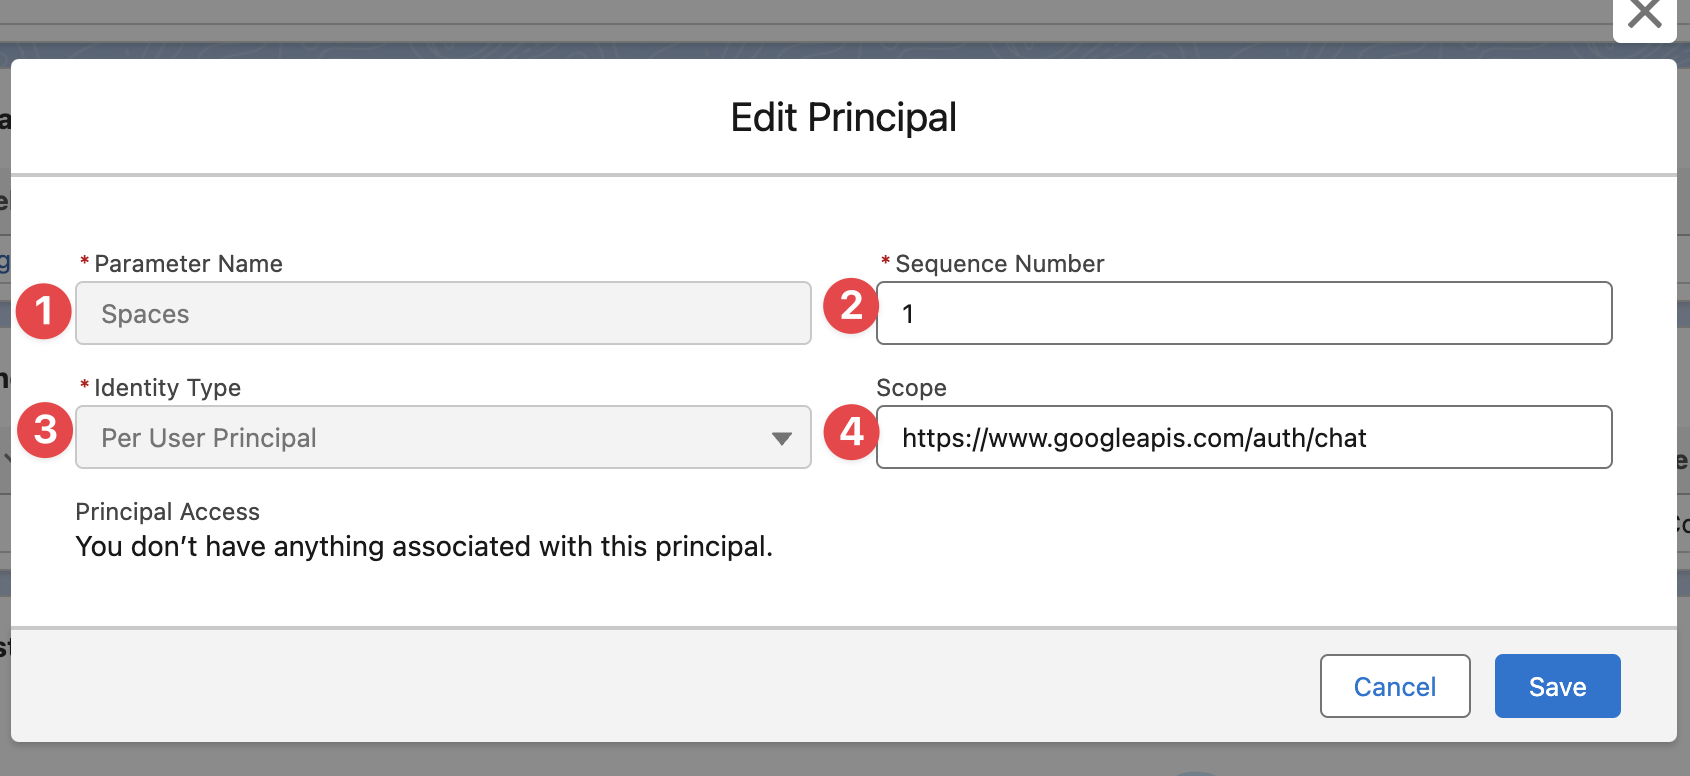
Principalの設定
こちらPrincipalですが、parameter名は任意ですがSpacesと名付けます。Sequence Numberは1, Identity TypeはPer User Principal、Scopeはhttps://googleapis.com/auth/chat です。
Per User Principalにすることで、次のApexでfindDirectMessageがユーザーにおける相手のIDまたはemailアドレスだけでチャットのスペースが絞れることになります。
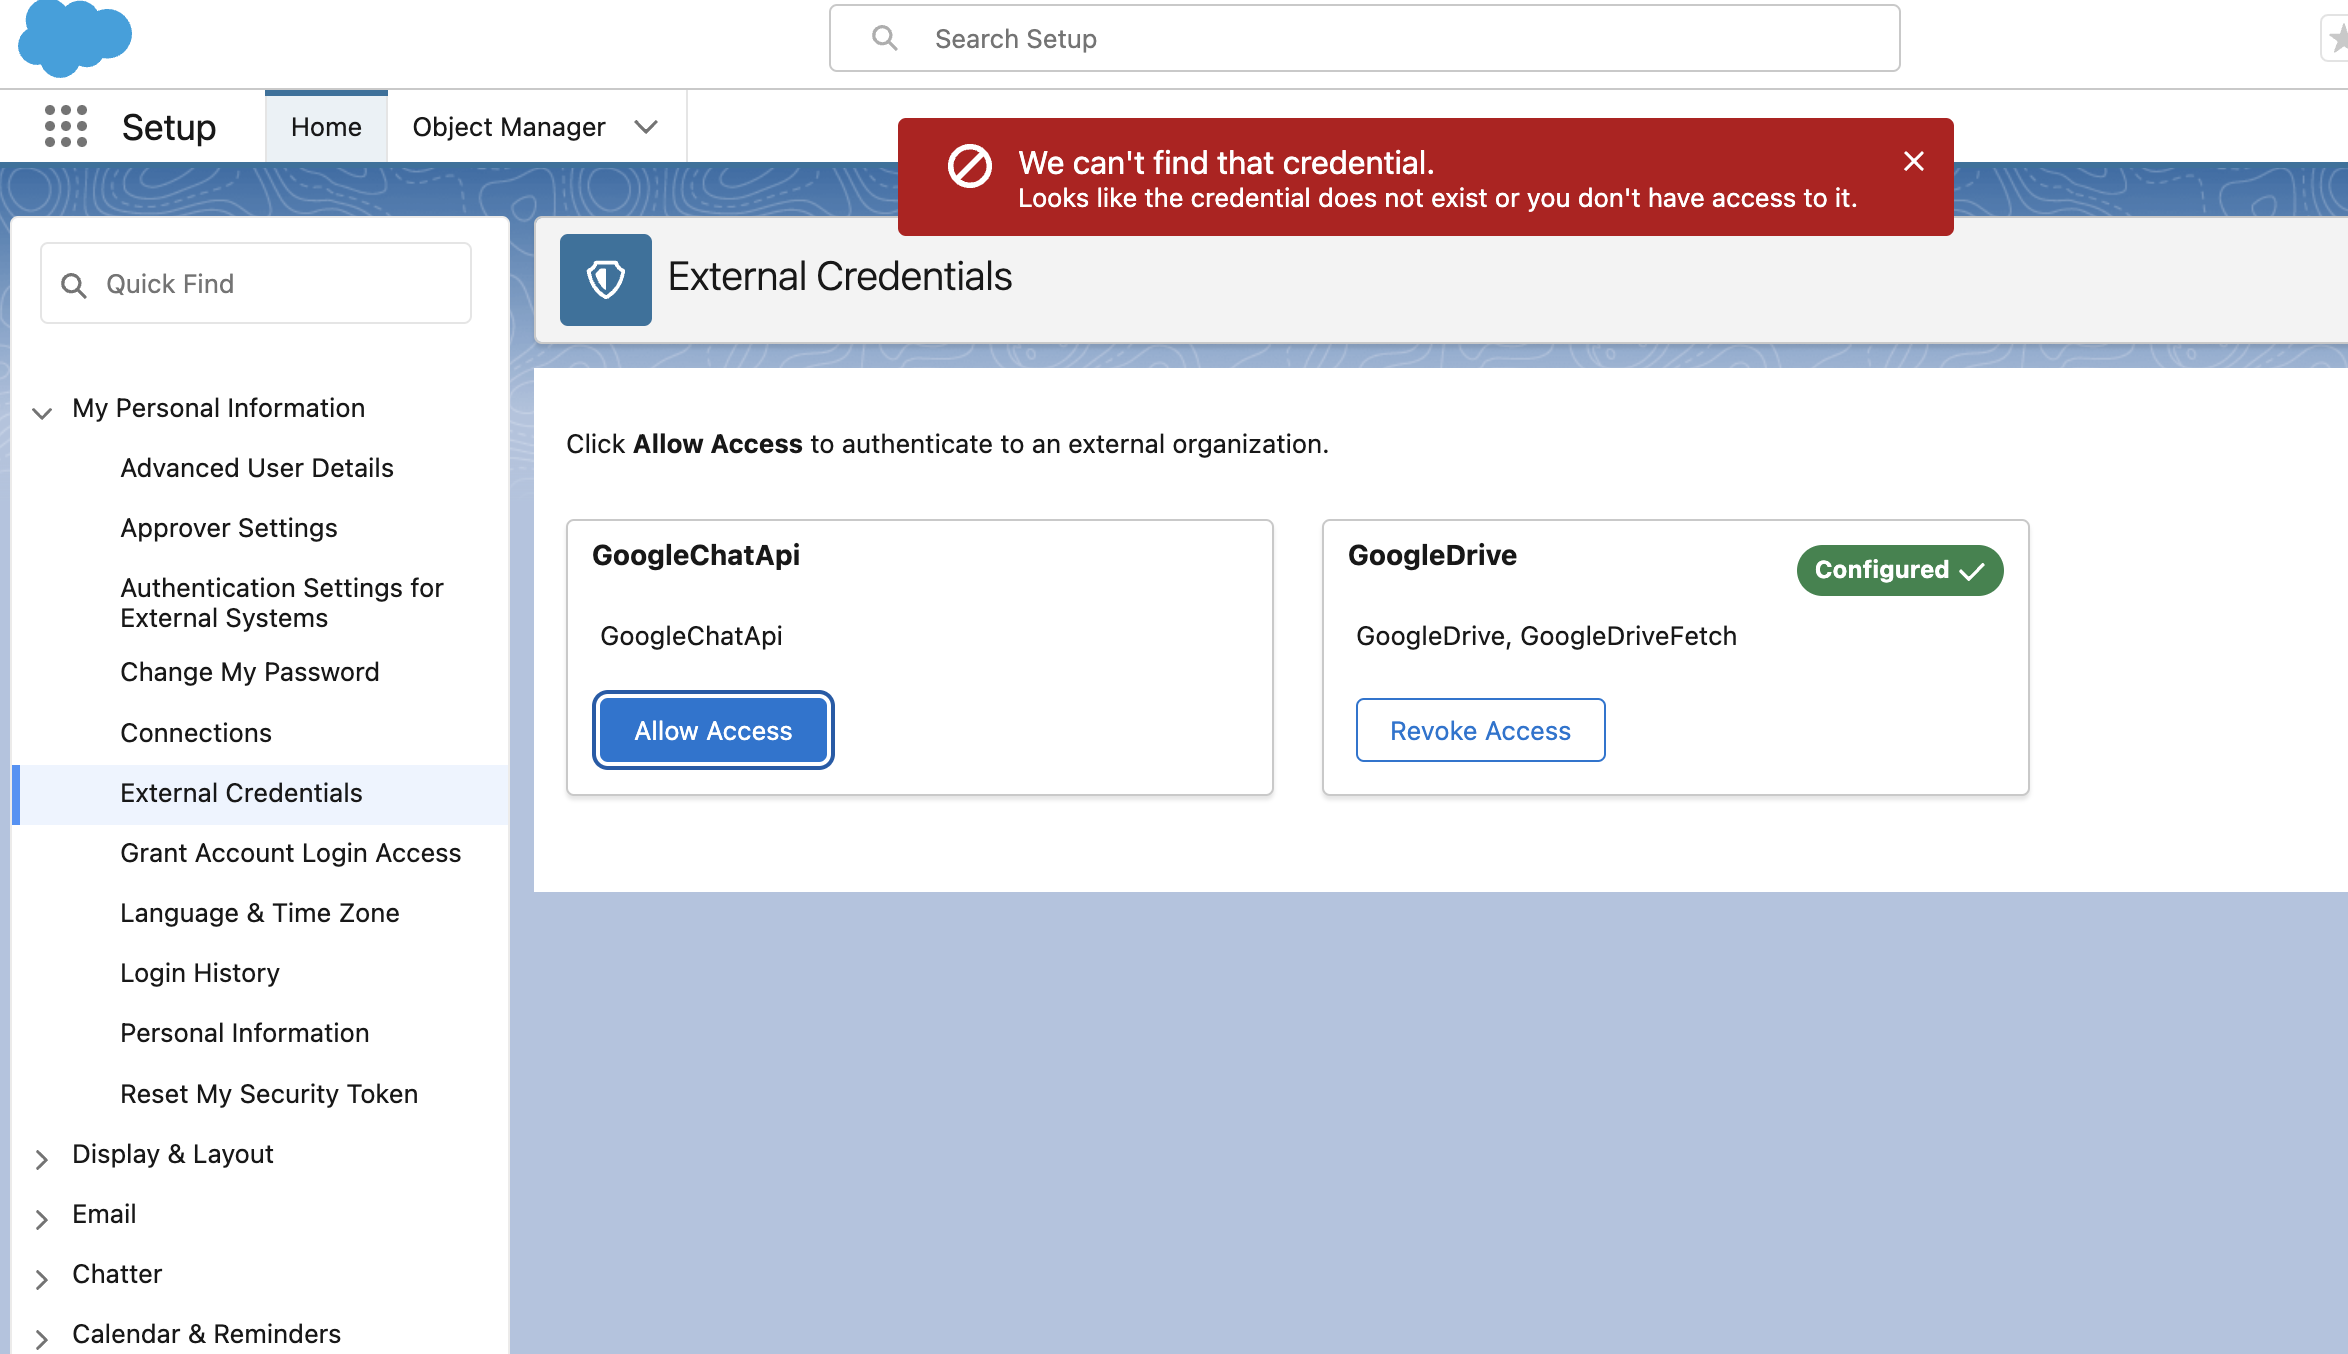
Per User Principalとすることで、各ユーザーがそれぞれ認証する必要があります。それぞれのユーザーの設定画面から、External Credentialを選び認証を行ってください。

Permission Setを割り当てないとここのAllow Accessはエラーになります。後述するPermission Setの作成で割り当てをユーザーにしてからAllow Accessに再度トライしてみてください。
Apexクラスの作成
次に、Google Chatにメッセージを送信するためのApexクラスを作成します。Methodは2つで findExistingGoogleChatSpace(spaceIdを取得する)、sendGoogleChatMessage (directMessageを送る)です。
GoogleChatApiController
public with sharing class GoogleChatApiController {
    private static final String GOOGLE_CHAT_API_URL = 'callout:GoogleChatApi/v1';

    @AuraEnabled
    public static Map<String, Object> findExistingGoogleChatSpace(String chatSpaceName) {
        try {
            HttpRequest req = new HttpRequest();
            String endpoint = GOOGLE_CHAT_API_URL + '/spaces:findDirectMessage?name=users/' + EncodingUtil.urlEncode(chatSpaceName, 'UTF-8');
            req.setEndpoint(endpoint);
            req.setMethod('GET');
            req.setHeader('Content-Type', 'application/json');

            Http http = new Http();
            HttpResponse res = http.send(req);

            if (res.getStatusCode() == 200) {
                Map<String, Object> responseBody = (Map<String, Object>) JSON.deserializeUntyped(res.getBody());
                return responseBody;
            } else if (res.getStatusCode() == 404) {
                System.debug('No existing DM space found with the user: ' + chatSpaceName);
            } else {
                System.debug('Failed to retrieve DM space. Response: ' + res.getBody());
            }
        } catch (Exception e) {
            System.debug('Exception occurred while finding existing Google Chat space: ' + e.getMessage());
        }
        return null;
    }

    @AuraEnabled
    public static Map<String, Object> sendGoogleChatMessage(String spaceId, String message) {
        if (String.isEmpty(spaceId) || String.isEmpty(message)) {
            throw new IllegalArgumentException('Space ID and message are required.');
        }
        HttpRequest req = new HttpRequest();
        req.setEndpoint(GOOGLE_CHAT_API_URL + '/' + spaceId + '/messages'); // spaceId is in format as 'spaces/xxxxx'
        req.setMethod('POST');
        req.setHeader('Content-Type', 'application/json');

        Map<String, Object> requestBody = new Map<String, Object>{
            'text' => message
        };
        req.setBody(JSON.serialize(requestBody));

        Http http = new Http();
        HttpResponse res = http.send(req);

        Map<String, Object> resopnseBody = new Map<String, Object>();
        if (res.getStatusCode() != 200 && res.getStatusCode() != 201) {
            throw new CalloutException('Failed to send Google Chat message: ' + res.getBody());
        } else {
            resopnseBody = (Map<String, Object>) JSON.deserializeUntyped(res.getBody());
            return resopnseBody;
        }
    }
}
Lightning Web Component (LWC) の作成
次に、LWCを作成し、ユーザーインターフェースとロジックを構築します。
@wireでuserのEmailを自動取得したり、lightning-record-pickerを活用すると実装が簡単です。
googleChat.html
<template>
    <lightning-card">
        <div class="slds-grid slds-grid_vertical-align-center slds-m-around_x-small">
            <img src={googleChatIcon} width="32" alt="Google Chat" class="slds-m-right_small" />
            <h2 id="modal-heading-01" class="slds-text-heading_medium slds-hyphenate">Google Chat</h2>
        </div>
        <div class="slds-m-around_medium">
            <div class="slds-m-bottom_small" style="position:relative;">
                <lightning-record-picker required object-api-name="User" icon-name="standard:user" size="small"
                    label="Send to" placeholder="Search..." filter={filter} value={selectedUserId}
                    display-info={displayInfo} onchange={handleUserChange}></lightning-record-picker>
                <lightning-textarea disabled={messageDisabled} label="Message" value={message}
                    onchange={handleMessageChange}></lightning-textarea>
                <lightning-spinner if:true={isLoading} alternative-text="Loading" size="x-small"></lightning-spinner>
            </div>
            <lightning-button label="Send Message" onclick={handleSendMessage}></lightning-button>
        </div>
    </lightning-card>
</template>
googleChat.js
import { LightningElement, wire, api } from 'lwc';
import { getRecord } from 'lightning/uiRecordApi';
import findExistingGoogleChatSpace from '@salesforce/apex/GoogleChatApiController.findExistingGoogleChatSpace';
import sendGoogleChatMessage from '@salesforce/apex/GoogleChatApiController.sendGoogleChatMessage';
import { ShowToastEvent } from 'lightning/platformShowToastEvent';
import googleChatIcon from '@salesforce/resourceUrl/GoogleChatIcon';

export default class GoogleChatApi extends LightningElement {
    @api recordId;
    chatSpaceName;
    selectedUserId;
    spaceId;
    message = '';
    messageDisabled;
    isLoading = false;
    googleChatIcon = googleChatIcon;

    @wire(getRecord, { recordId: '$selectedUserId', fields: ['User.Name', 'User.Email'] })
    user({ error, data }) {
        if (error) {
            console.error(error);
        } else if (data) {
            const chatSpaceName = data.fields.Email.value;
            this.getSpaceId(chatSpaceName);
        }
    }

    async getSpaceId(chatSpaceName) {
        const space = await findExistingGoogleChatSpace({ chatSpaceName: chatSpaceName });
        this.spaceId = space.name;
    }

    get filter() {
        return {
            criteria: [
                {
                    fieldPath: 'IsActive',
                    operator: 'eq',
                    value: true
                },
                {
                    fieldPath: 'UserType',
                    operator: 'eq',
                    value: 'Standard'
                },
            ]
        };
    }

    handleUserChange(event) {
        const selectedUserId = event.detail.recordId;
        this.messageDisabled = false;
        this.selectedUserId = selectedUserId;
    }

    handleMessageChange(event) {
        this.message = event.target.value;
    }

    handleSendMessage() {
        if (!this.spaceId || !this.message) {
            this.showToast('Error', 'Space ID and message are required', 'error');
            return;
        }

        this.isLoading = true;
        const baseUrl = window.location.origin;
        const finalMessage = this.message + '\n' + '<' + baseUrl + '/' + this.recordId + '|View in Salesforce>';
        sendGoogleChatMessage({ spaceId: this.spaceId, message: finalMessage })
            .then(() => {
                this.isLoading = false;
                this.showToast('Success', 'Message sent successfully', 'success');
                this.finishSendMessage();
            })
            .catch(error => {
                this.isLoading = false;
                this.showToast('Error', 'Failed to send message', 'error');
                console.error(error);
            });
    }

    showToast(title, message, variant) {
        const event = new ShowToastEvent({
            title,
            message,
            variant
        });
        this.dispatchEvent(event);
    }

    finishSendMessage() {
        this.message = '';
        this.messageDisabled = true;
        this.selectedUserId = null;
        this.spaceId = null;
    }
}
googleChatApi.js-meta.xml
<?xml version="1.0" encoding="UTF-8"?>
<LightningComponentBundle xmlns="http://soap.sforce.com/2006/04/metadata">
    <apiVersion>63.0</apiVersion>
    <isExposed>true</isExposed>
    <targets>
        <target>lightning__RecordPage</target>
    </targets>
</LightningComponentBundle>
Permission Setの作成
最後に、Permisssion Setを作成します。上記で作成した設定を利用できるPermissionをまとめて、ユーザーに割り当てていくことで利用可能になります。Permission名はGoogleChatApiとします。
External Credential Principal Access (GoogleChatApi - Spaces)
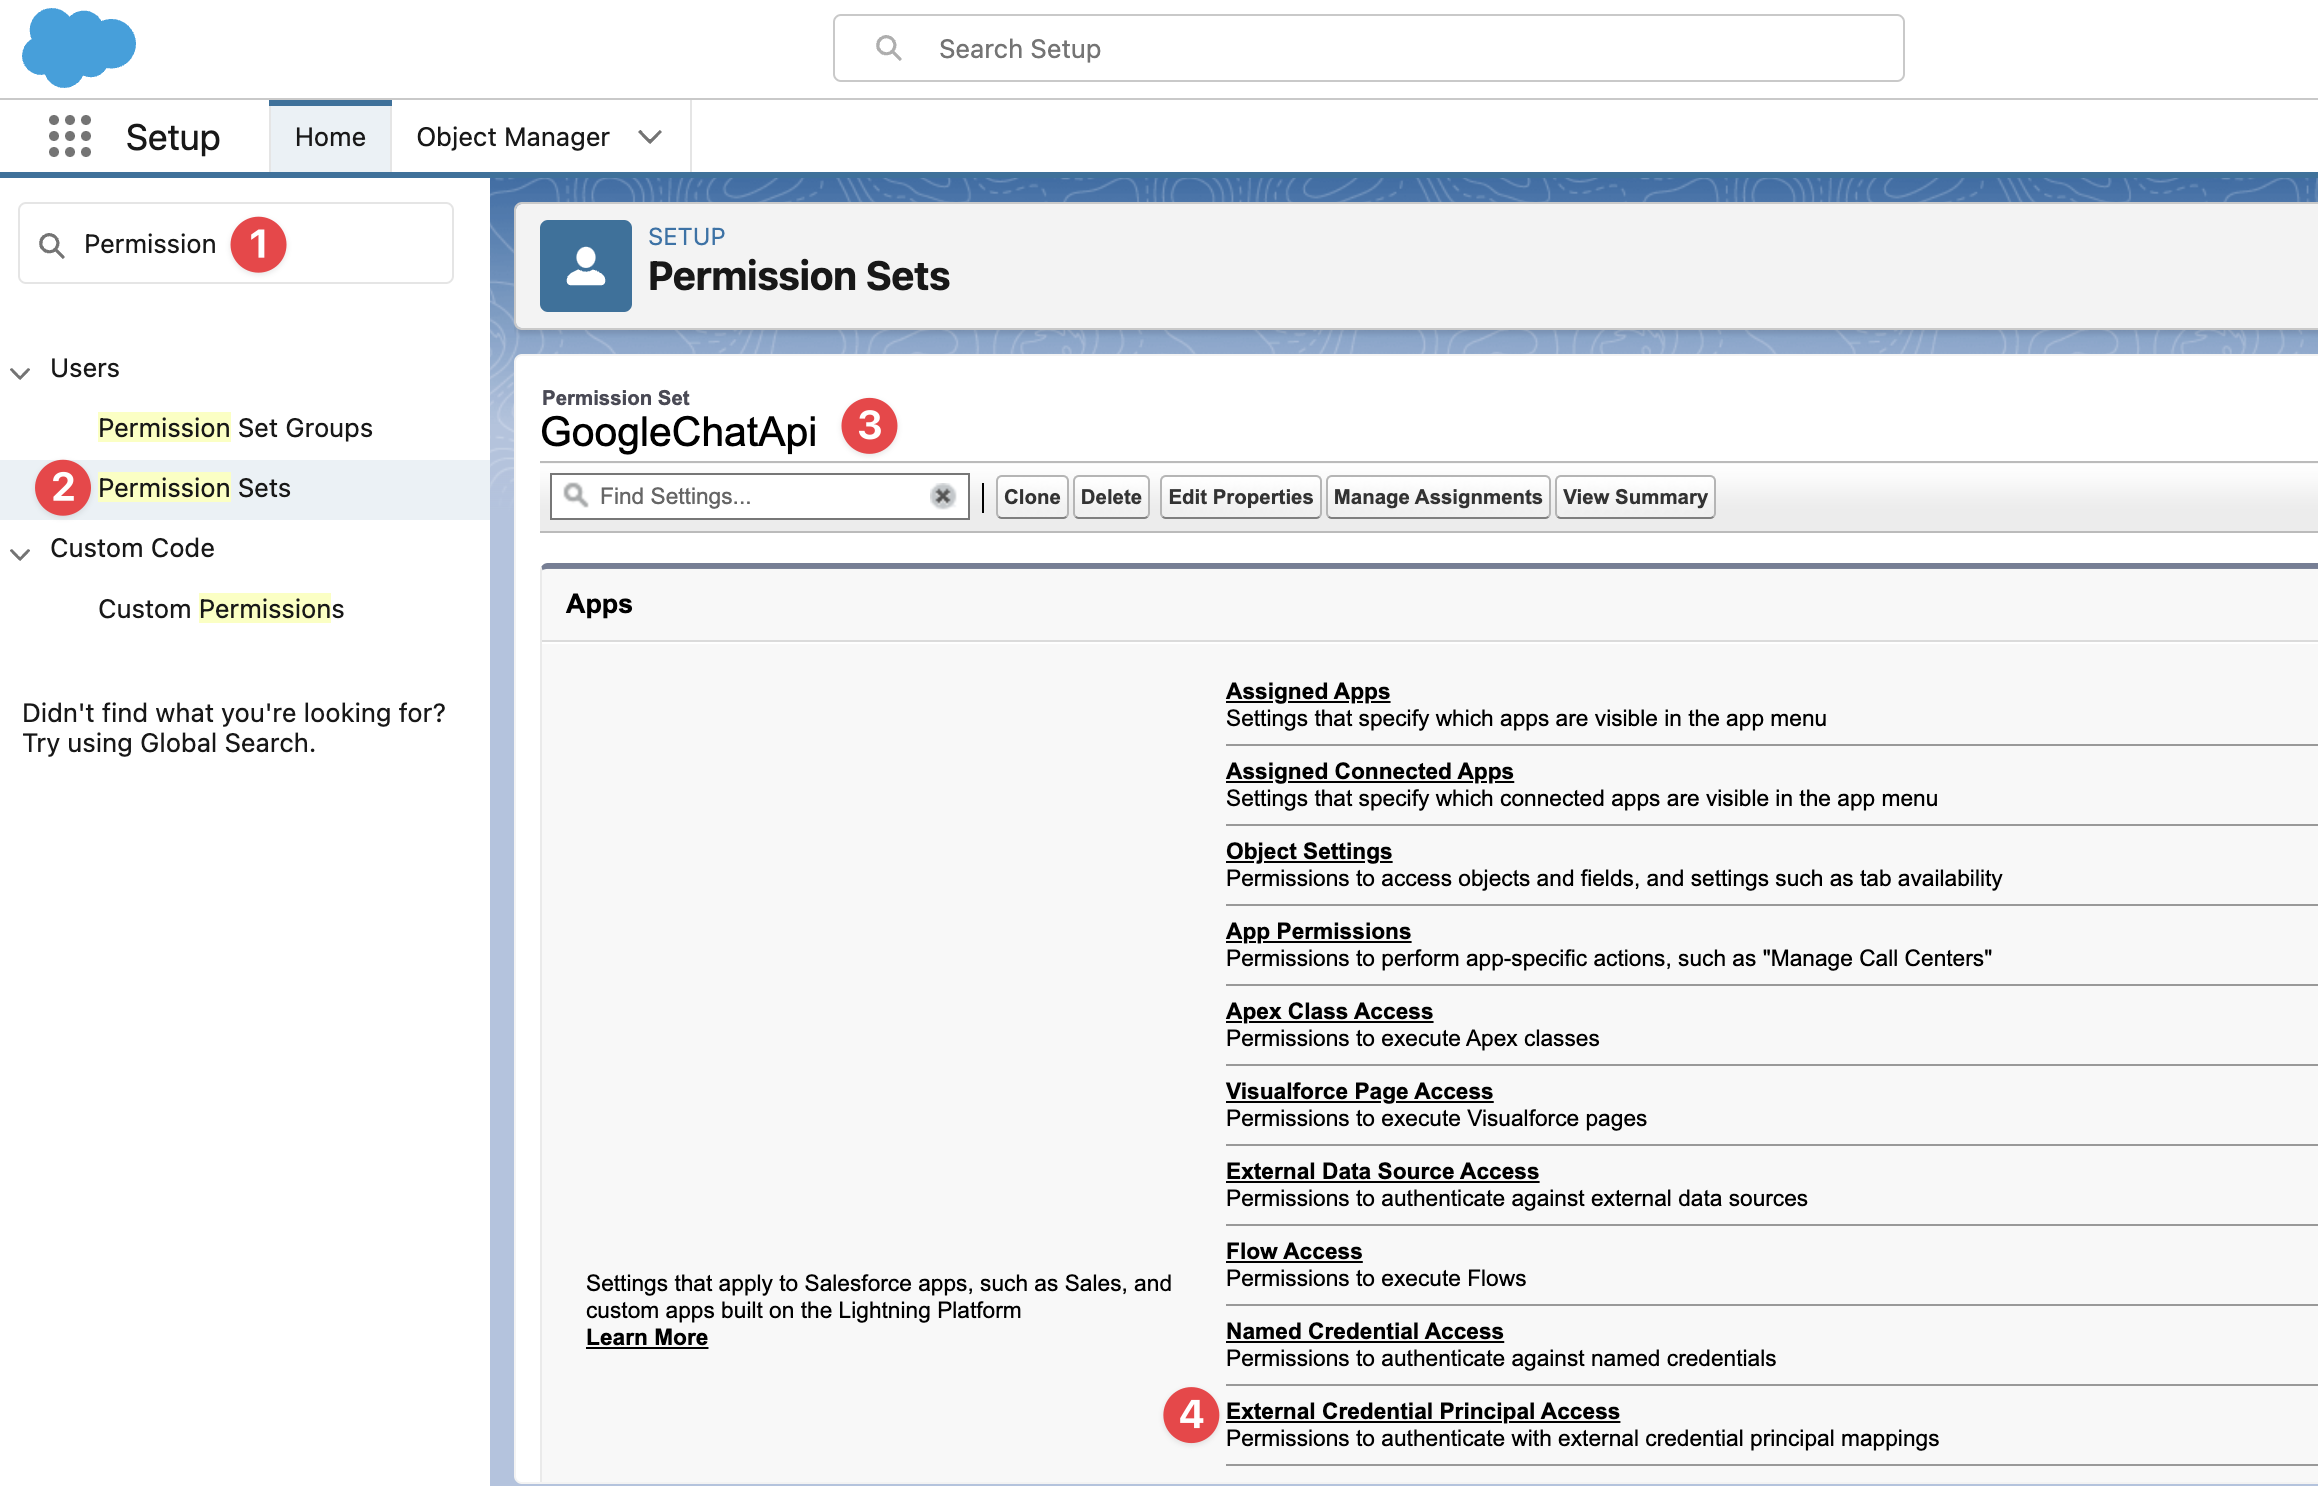
Apex Class Access (GoogleChatApiController)

割り当ては以下のボタンからユーザーを選択して割り当てます。

個人認証

① 右上アイコン
②(個人の)Settings
③(個人の)External Credentials
④ Allow Access
で認証が始まります。利用するユーザーすべて個人で認証するよう依頼してください。Allow Accessを押すとGoogleの認証画面に飛びます。許可するものをExternal CredentialのScopeで設定したものが反映されます。

Allowを押すと、今後はSalesforce側でExternal Access認証の確認がありますので、Confirmします。

上記のPermission Setを個人に割り当てていないと以下のようなエラーが出ます。External Crednetial Principalへのアクセスが付与されていないからですね。Permission Setを先に先制してユーザーに割り当ててから行いましょう。

動作確認
Salesforceにログインし、LWCを配置したページに移動します。
lightning-record-pickerでユーザーを選択し、選択されたUserのspaceIdを取得、メッセージを入力し、「Send Message」ボタンをクリックします。Google Chatにメッセージが送信されることを確認します。
追加要素
- 追加として、v1/spacesで全てのグループチャットスペースも取得できます。そちらも発展系として利用可能です。
spaces - API Callをなるべく少なくするには、カスタムオブジェクト(private)を作成して一度取得したspaceIdを登録しておき、参照するようにするとAPI callを節約できます。
- MessageはCards v2スタイルで送るとより綺麗な通知になりますが、Chat Appから投稿するように設定する必要があるため、もう一手間かかります。
Cards v2 - WebhookでもCards v2スタイルで送信できます。Webhookの場合は機能はシンプルですが、各ユーザーがWebhookの登録を行わないといけないので多くの従業員がいる場合はハードルが高いです。
-
Salesforce x Google Salesforce と Google、Gemini を Agentforce に導入を発表 パートナーシップ強化により顧客の選択肢をさらに拡大
とありましたね。 Salesforce x Slack x Google (gemini)と連携していくとより簡単な連携になっていくといいですね。
まとめ
以上で、SalesforceからGoogle Chatへメッセージを送信する方法の紹介は終わりです。LWCとApexを組み合わせることで、簡単にGoogle Chatへのメッセージ送信を実現できます。ぜひ試してみてください。