はじめに
こんにちわ。
この記事は、開発経験は手続き型を少々なプロダクトオーナーが**「りあクト! TypeScriptで始めるつらくないReact開発 第3版」を読んで、四苦八苦しながらReact**を使えるようになろうと苦戦しながら勉強したものを備忘録したものです。
1回では終わらないので何回か続くと思ので、お付き合いください。
因みに、この記事では端折っていますが、本の中では何故そのような技術を使っているのかという背景を踏まえて語られており、非常に理解しやすい内容です。ただ、動かすだけとは段違いです。
少しでもこの記事を見て面白そうだと思った方は、是非とも一度読んでみることをお勧めします。
普段は、TESTRUCTUREというテスト設計を支援するツールを作っていたりします。
実施環境
- Windows 10 pro
- core i7-8850H
- Visual Studio Code
- Ubuntu 20.04 LTS
環境準備
まずは、環境を準備します。
Node.jsのインストール
nodenvのインストール
本ではMacなのでこちらも合わせて参考にインストール。
まずは、anyenvをインストールします。
git clone https://github.com/riywo/anyenv ~/.anyenv
echo 'export PATH="$HOME/.anyenv/bin:$PATH"' >> ~/.bash_profile
echo 'eval "$(anyenv init -)"' >> ~/.bash_profile
anyenv install --init
exec $SHELL -l
anyenvのインストールが完了したら、nodenvをインストールします。
anyenv install nodenv
exec $SHELL -l
続いて、プラグインをインストールします。
mkdir -p $(anyenv root)/plugins
git clone https://github.com/znz/anyenv-update.git $(anyenv root)/plugins/anyenv-update
mkdir -p "$(nodenv root)"/plugins
git clone https://github.com/nodenv/nodenv-default-packages.git "$(nodenv root)/plugins/nodenv-default-packages"
touch $(nodenv root)/default-packages
/.anyenv/envs/nodenv/plugins/nodenv-default-packages
ここにあるdefault-packagesのファイルの中身を以下にする。
yarn
typescript
ts-node
typesync
Node.jsのインストール
これでようやく準備が整ったので、Node.jsをインストールします。
nodenv install -l
nodenv install 14.4.0
nodenv global 14.4.0
以上で、インストールが完了です。
Reactを動かしてみる
まず、お試しで、Hallo Worldしてみる。
npx create-react-app hello-world --tempate typescript
インストールが完了したら、次のコマンドで動作を見る。
cd hello-world
yarn start
http://localhost:3000 にブラウザでアクセスすると動いてるのが確認できます。
動いているのが見れると少し感動。
「Edit src/App.js and save to reload.」と書いてある通り、
App.jsを編集すると編集した内容を見ることができます。
Tutorial: Intro to Reactをやってみる
Hollo worldにある「Learn React」を押すとチュートリアルに案内されるので折角なのでやってみる。
Tutorial: Intro to React
最終的には、以下のファイルを書き換えて保存して、更新してみると、〇×ゲームが完成しています。
ここまでは、書いてある通りにやっていくので、途中は端折ります。
追加課題
そして、追加課題があるのでいくつかやってみようと思います。
追加課題を仕様変更だととらえると、各課題という名の仕様変更は、Reactのコンポーネントベースな考え方が、機能単位で分割されていて、それぞれが独立性が高く、ソースコードをいじりやすい気がしました。
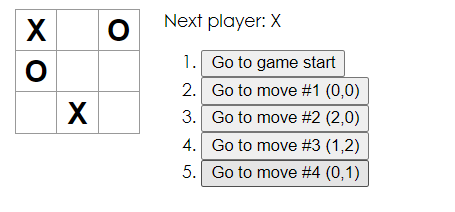
各移動の場所を移動履歴リストに(col, row)形式で表示します。
どこのボタンを押したかを判別するために押した場所を記憶するstateを追加します。
また、移動履歴リストは、gameクラスのrenderに書かれているので、次ように書き換えます。
正方形は次のように配置されているので、
| 0 | 1 | 2 |
| 3 | 4 | 5 |
| 6 | 7 | 8 |
col:3で割った余りを記載します。
row:3で割った商を記載します。
class Game extends React.Component {
  constructor(props) {
    super(props);
    this.state = {
      history: [
        {
          squares: Array(9).fill(null),
        }
      ],
      onClickHistory: [
        {
          onClickNum: 0,
        }
      ],
      stepNumber: 0,
      xIsNext: true
    };
  }

  handleClick(i) {
    const history = this.state.history.slice(0, this.state.stepNumber + 1);
    const current = history[history.length - 1];
    const squares = current.squares.slice();
    const onClickHistory = this.state.onClickHistory.slice(0, this.state.stepNumber + 1);
    if (calculateWinner(squares) || squares[i]) {
      return;
    }
    squares[i] = this.state.xIsNext ? "X" : "O";
    this.setState({
      history: history.concat([
        {
          squares: squares
        }
      ]),
      onClickHistory: onClickHistory.concat([
        {
          onClickNum: i
        }
      ]),
      stepNumber: history.length,
      xIsNext: !this.state.xIsNext
    });
  }

  ...

  render() {
    const history = this.state.history;
    const current = history[this.state.stepNumber];
    const winner = calculateWinner(current.squares);
    const historyNum = this.state.onClickHistory;

    const moves = history.map((step, move) => {
      const col = historyNum[move].onClickNum % 3;
      const row = (historyNum[move].onClickNum - col) / 3;
      const desc = move ?
        'Go to move #' + move + ' (' + col + ',' + row + ')' :
        'Go to game start';
      return (
        <li key={move}>
          <button onClick={() => this.jumpTo(move)}>{desc}</button>
        </li>
      );
    });

  ...
}
このように各ボタンに列と行が表示されていれば成功です。
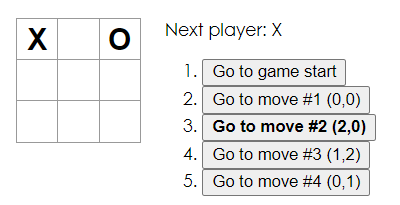
移動リストで現在選択されている項目を太字にします。
太字のスタイルを追加します。
button.button1 {
  font-weight: bold;
}
gameクラスのrenderで返す値を、現在選択されたものと一致している場合は、太字のボタンを使用するように指定します。
  render() {
    const history = this.state.history;
    const current = history[this.state.stepNumber];
    const winner = calculateWinner(current.squares);
    const historyNum = this.state.onClickHistory;

    const moves = history.map((step, move) => {
      const col = historyNum[move].onClickNum % 3;
      const row = (historyNum[move].onClickNum - col) / 3;
      const desc = move ?
        'Go to move #' + move + ' (' + col + ',' + row + ')' :
        'Go to game start';
      return move === this.state.stepNumber ?
        (
          <li key={move}>
            <button class="button1" onClick={() => this.jumpTo(move)}>{desc}</button>
          </li>
        ) : (
          <li key={move}>
            <button onClick={() => this.jumpTo(move)}>{desc}</button>
          </li>
        );
    });
太字になりました。
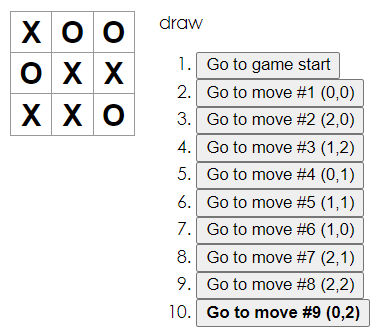
誰も勝てない場合は、引き分けの結果についてのメッセージを表示します。
勝利ステータスの処理のところで、勝者が決まっておらず、既に9回動いていた場合は、drawを表示してあげるようにします。
    let status;
    if (winner) {
      status = "Winner: " + winner;
    } else if (this.state.stepNumber === 9) {
      status = "draw";
    } else {
      status = "Next player: " + (this.state.xIsNext ? "X" : "O");
    }
引き分けになりました。
まとめ
ここまでで、最低限のReactの環境構築と、ソースコードがかけるようになりました。
今後は、中身の要素技術や、応用的な使い方について触れたいと思います。