はじめに
クラウドサービス(AWSとGCP)の学習をかねて、プロジェクトセカイカラフルステージの音楽ゲームの結果画面の画像から、画像認識を行なって結果を保存するシステムを作りました。また、以下の記事やサイトを参考にしました。
参考
https://dev.classmethod.jp/articles/ocr-with-lambda-using-cloud-vision-api/
https://docs.aws.amazon.com/cdk/latest/guide/hello_world.html
https://docs.aws.amazon.com/ja_jp/lambda/latest/dg/with-s3-tutorial.html#with-s3-tutorial-create-function-createfunction
https://aws.amazon.com/jp/premiumsupport/knowledge-center/lambda-layer-simulated-docker/
システムの構成
このシステムは以下のような構成で作られています。
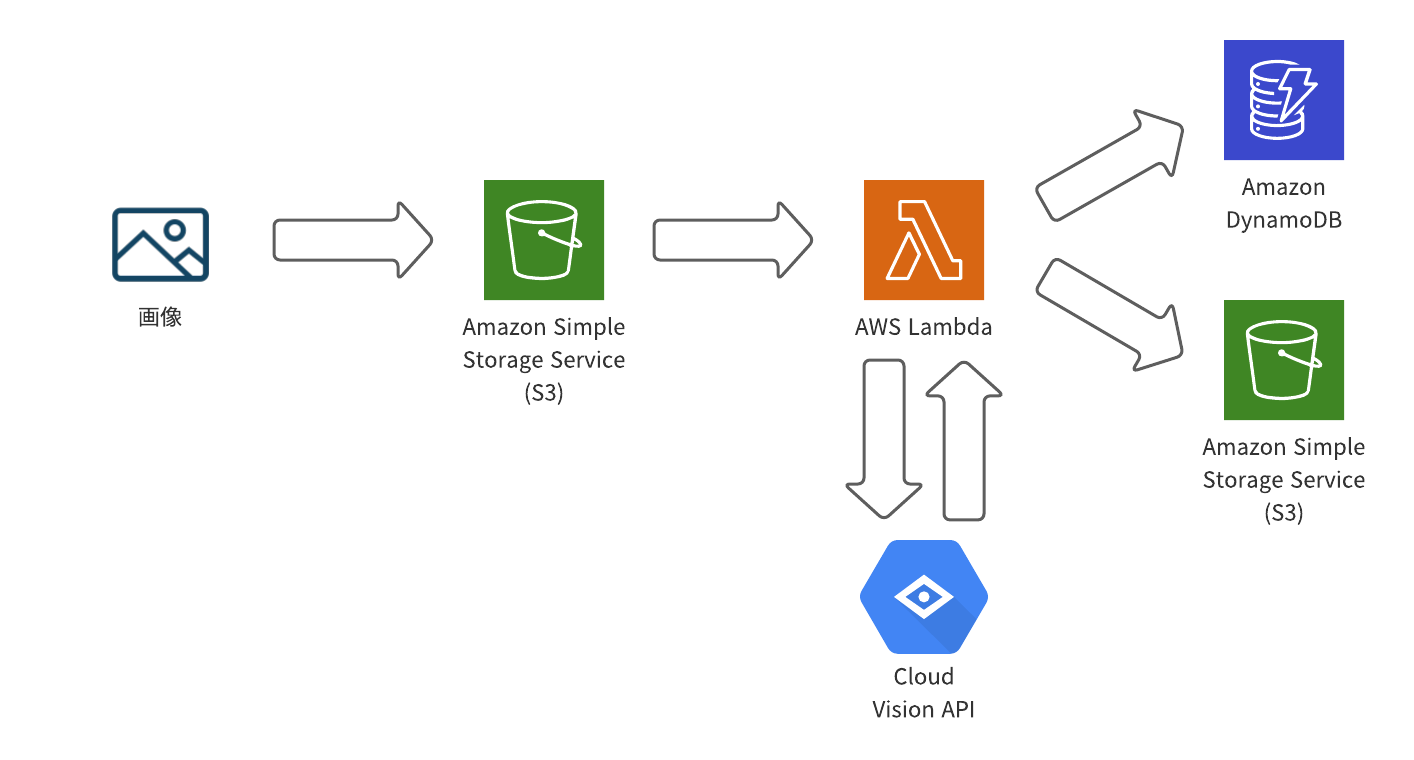
おそらく基本的なAWSのサーバレスの構成に近いのかなと思っています。S3に画像が上げられるとそれをフックにLambda起動し、CloudVisionAPIを通して画像認識を行い、それから得られた結果をS3とDynamoDBに保存するといった流れになっています。
また、AWSのリソースをいい感じに作ってくれるものはいくつかありますが、今回はAWSCDKを利用してみました。CDK自体は様々な言語で利用ができますが、今回はPythonでつくりました。
CloudFormationを直に書いて作るより、これぐらいシンプルな構成だとわかりやすく作れるのでいいのかなと思いました。できないこともあるのかもしれないですが、コードを書くようにリソースを定義できるので見やすかったり、エラーが事前に出てくれるのでわかりやすいのかなとも思います。
事前準備
AWSを使うためにIAMユーザーやCredentialなどの準備が必要です。また、画像認識のためにGCPも利用しているのでそこらへんの準備もします。お金は多分かからないですが、従量課金のサービスなので使いすぎるとかかります。
また、PythonのライブラリをLambdaでも使えるようにするためにDockerを利用しました。
CloudVisionAPIを使えるようにする
CloudVisionAPIを有効化する。
サービスアカウントを作成する。
サービスアカウントのキーから鍵を追加、新しい鍵を作成でJSONのファイルをダウンロードする。
権限周りでも少し設定がいるのかもしれませんが、自分はこれで利用することができました。
AWSCDKのインストールと初期化
$ npm install -g aws-cdk # cdkインストール
$ cdk bootstrap # デプロイ用のS3バケット作成
CDKでつくる
以下のようにするとCDKので作成するためのテンプレートが生成されます。また、このCDKで作られたアプリケーション専用のPython環境を使えるようにVirtualenvが用意されていますが、ここらへんは自分が使いやすい方法で大丈夫です。今回は、用意されたものを利用します。
$ mkdir score-record
$ cd score-record
$ cdk init app --language python # pythonでcdkを作る
$ source .venv/bin/activate # このアプリケーション専用のPython環境を使う(好きな環境で)
requirement.txtの変更とインストール
requirement.txtを修正します。これらは、AWSのリソースを作成するのに必要なものです。また、一応Lambdaで利用するライブラリもインストールします。
aws-cdk.core
aws-cdk.aws-s3
aws-cdk.aws-lambda
aws-cdk.aws-dynamodb
aws-cdk.aws-s3-notifications
google-cloud-vision
boto3
pillow
pandas
$ python -m pip install -r requirements.txt
つくっていくよ
フォルダ構成
score-record
├── function
│   │── gcp.json
│   └── index.py
├── layers
│   └── requirements.txt
├── score_record
│   └── score_record_stack.py
├── .venv
│   └── ....
│
├── app.py
├── cdk.json
└── requirements.txt
AWSのリソース作成
from aws_cdk import (
    core,
    aws_s3,
    aws_s3_notifications,
    aws_lambda,
    aws_dynamodb)

class ScoreRecordStack(core.Stack):

    def __init__(self, scope: core.Construct, construct_id: str, **kwargs) -> None:
        super().__init__(scope, construct_id, **kwargs)

       # The code that defines your stack goes here
        # 画像を入れるところのバケット
        score_image_bucket = aws_s3.Bucket(
            self,
            "ScoreImageBucket",
            bucket_name="score-image-bucket", #ここの名前は他の人が使うと使えない
            removal_policy=core.RemovalPolicy.DESTROY) #アプリケーションを消すとバケットが消える

        # 記録を保存するためのバケット
        score_data_bucket = aws_s3.Bucket(
            self,
            "ScoreDataBucket",
            bucket_name="score-data-bucket", #ここの名前は他の人が使うと使えない
            removal_policy=core.RemovalPolicy.DESTROY) #アプリケーションを消すとバケットが消える

        # 記録を保存するためのDynamoDBテーブル
        score_data_table = aws_dynamodb.Table(
            self,
            "score_table", # テーブル名
            partition_key=aws_dynamodb.Attribute( # Dynamodbテーブルpartition_keyの設定
                name="id",
                type=aws_dynamodb.AttributeType.STRING
            ),
            removal_policy=core.RemovalPolicy.DESTROY) #アプリケーションを消すとテーブルが消える

        # Lambdaからライブラリを使うためのLayer
        score_lambda_layer = aws_lambda.LayerVersion(
            self,
            "ScoreLambdaLayer",
            code=aws_lambda.AssetCode("layers/"),
            compatible_runtimes=[aws_lambda.Runtime.PYTHON_3_8])

        # Lambda関数
        lambdaFn = aws_lambda.Function(
            self,
            "ScoreVisionFunction",
            code=aws_lambda.Code.from_asset("function/"),
            runtime=aws_lambda.Runtime.PYTHON_3_8, # python3.8で行う
            handler="index.handler", # 起動場所
            function_name="score_vision_function",
            layers=[score_lambda_layer], # score_lambda_layerを利用する
            timeout=core.Duration.seconds(30)) # タイムアウト30秒に

        # 環境変数設定
        lambdaFn.add_environment("GOOGLE_APPLICATION_CREDENTIALS", "gcp.json")
        lambdaFn.add_environment("SCORE_BUCKET_NAME", score_data_bucket.bucket_name)
        lambdaFn.add_environment("SCORE_TABLE_NAME", score_data_table.table_name)

        # 画像が入ったのをフックにLambdaを起動
        notification = aws_s3_notifications.LambdaDestination(lambdaFn)
        score_image_bucket.add_event_notification(aws_s3.EventType.OBJECT_CREATED, notification)

        # 各S3とDynamoDBにアクセス権限をLambdaに与える
        score_image_bucket.grant_read_write(lambdaFn)
        score_data_bucket.grant_read_write(lambdaFn)
        score_data_table.grant_read_write_data(lambdaFn)
LambdaLayerの作成
google-cloud-vision
Pillow
pandas
$ cd layers
$ docker run --rm -v "$PWD":/var/task "public.ecr.aws/sam/build-python3.8" /bin/sh -c "pip install -r requirements.txt -t python/lib/python3.8/site-packages/; exit"
このようにするとlayersのフォルダにLambdaで実行するようのライブラリをインストールすることができます。
score-record
├── function
│   │── gcp.json
│   └── index.py
├── layers
│   │── requirements.txt
│   └── python # ここから下が追加される
│       └── lib
│           └── python3.8
│               └── site-packages
│                   │── ライブラリ
│                   └── ライブラリ
├── score_record
│   └── score_record_stack.py
├── .venv
│   └── ....
│
├── app.py
├── cdk.json
└── requirements.txt
LambdaFunctionの作成
import boto3
import uuid
import os
import pandas as pd
import datetime
import re
from urllib.parse import unquote_plus
from PIL import Image, ImageDraw
from google.cloud import vision

s3 = boto3.client('s3')
dynamodb = boto3.resource('dynamodb')

# 画像編集関連
def edit_image(image_path, edited_path):
    with Image.open(image_path) as image:
        img_width, img_height = image.size
        img = image.crop((0, 0, 1300, img_height))
        draw = ImageDraw.Draw(img)
        draw.rectangle((0, 0, 170, 170), fill=(0, 0, 0))
        draw.rectangle((0, 170, 1300, 550), fill=(0, 0, 0))
        draw.rectangle((0, 820, 1300, 940), fill=(0, 0, 0))
        draw.rectangle((0, 700, 500, 850), fill=(0, 0, 0))
        draw.rectangle((0, 400, 80, 850), fill=(0, 0, 0))
        draw.rectangle((880, 0, 1300, 850), fill=(0, 0, 0))
        draw.rectangle((0, 820, 250, img_height), fill=(0, 0, 0))
        draw.rectangle((0, 1260, img_width, img_height), fill=(0, 0, 0))
        filter_img = img.convert('L')
        filter_img.save(edited_path)

def handler(event, context):
    # 保存するデータのカラム
    columns = ["name", "difficulty","score", "combo", "perfect", "great", "good", "bad", "miss"]
    allSekaiScore_df = pd.DataFrame(columns=columns)

    for record in event['Records']:
        bucket = record['s3']['bucket']['name']
        key = unquote_plus(record['s3']['object']['key'])

        print("start recognize" + key)
        tmpkey = key.replace('/', '')
        download_path = '/tmp/{}{}'.format(uuid.uuid4(), tmpkey)
        edited_path = '/tmp/edited-{}'.format(tmpkey)
        s3.download_file(bucket, key, download_path) # バケットから画像をダウンロード
        edit_image(download_path, edited_path) # 画像編集

        with open(edited_path, "rb") as f:
            content = f.read()
        client = vision.ImageAnnotatorClient()
        image = vision.Image(content=content)
        print("start recognize" + key)
        # CloudVisionAPIで文字認識
        response = client.document_text_detection(
            image=image,
            image_context={'language_hints': ['ja']}
        )

        # 認識結果を表示
        print(response.full_text_annotation.text)
        words = response.full_text_annotation.text.replace(" ", "").split("\n")
        print(len(words))
        print(words)

        # ここらへんは画像処理によって変わる
        if len(words) == 16:
            name, difficulty, score, _, combo = words[:5]
            score = re.sub("\\D", "", score[:8]) # 数字以外を取り除く
            combo = re.sub("\\D", "", combo) # 数字以外を取り除く
            perfect, great, good, bad, miss = words[10:15]
            print("name: " + name)
            print("difficulty: " + difficulty)
            print("score: " + score)
            print("combo: " + combo)
            print("perfect: " + perfect)
            print("great: " + great)
            print("good: " + good)
            print("bad: " + bad)
            print("miss: " + miss)

            perfect, great, good, bad, miss = int(perfect), int(great), int(good), int(bad), int(miss)
            score, combo = int(score), int(combo)
            sekaiscore_df = pd.DataFrame([[name, difficulty, score, combo, perfect, great, good, bad, miss]], columns=columns)
            allSekaiScore_df = allSekaiScore_df.append(sekaiscore_df)

            # DynamoDBにデータを保存
            TABLE_NAME = os.environ["SCORE_TABLE_NAME"]
            score_data_table = dynamodb.Table(TABLE_NAME)
            score_data_table.put_item(
                Item={
                    'id': str(uuid.uuid4()),
                    'name': name,
                    'difficulty': difficulty,
                    'score': score,
                    'combo': combo,
                    'perfect': perfect,
                    'great': great,
                    'good': good,
                    'bad': bad,
                    'miss': miss
                }
            )
            print("dynamodb put")

            # 画像を削除
            s3.delete_object(
                Bucket=bucket,
                Key=key
            )

        if response.error.message:
            raise Exception(
                '{}\nFor more info on error messages, check: '
                'https://cloud.google.com/apis/design/errors'.format(
                    response.error.message))

    allSekaiScore_df = allSekaiScore_df.reset_index()
    allSekaiScore_df = allSekaiScore_df[columns]

    dt = datetime.datetime.now()
    csv_key = "csv/{0:%Y-%m-%d-%H-%M-%S}.csv".format(dt)
    score_data_bucket = os.environ["SCORE_BUCKET_NAME"]

    # csvデータの保存
    s3.put_object(
        Bucket=score_data_bucket,
        Body=allSekaiScore_df.to_csv(index=False).encode(),
        Key=csv_key,
    )
    print("save csv")


    return allSekaiScore_df.to_csv(index=False).encode("utf-8")
画像編集関連
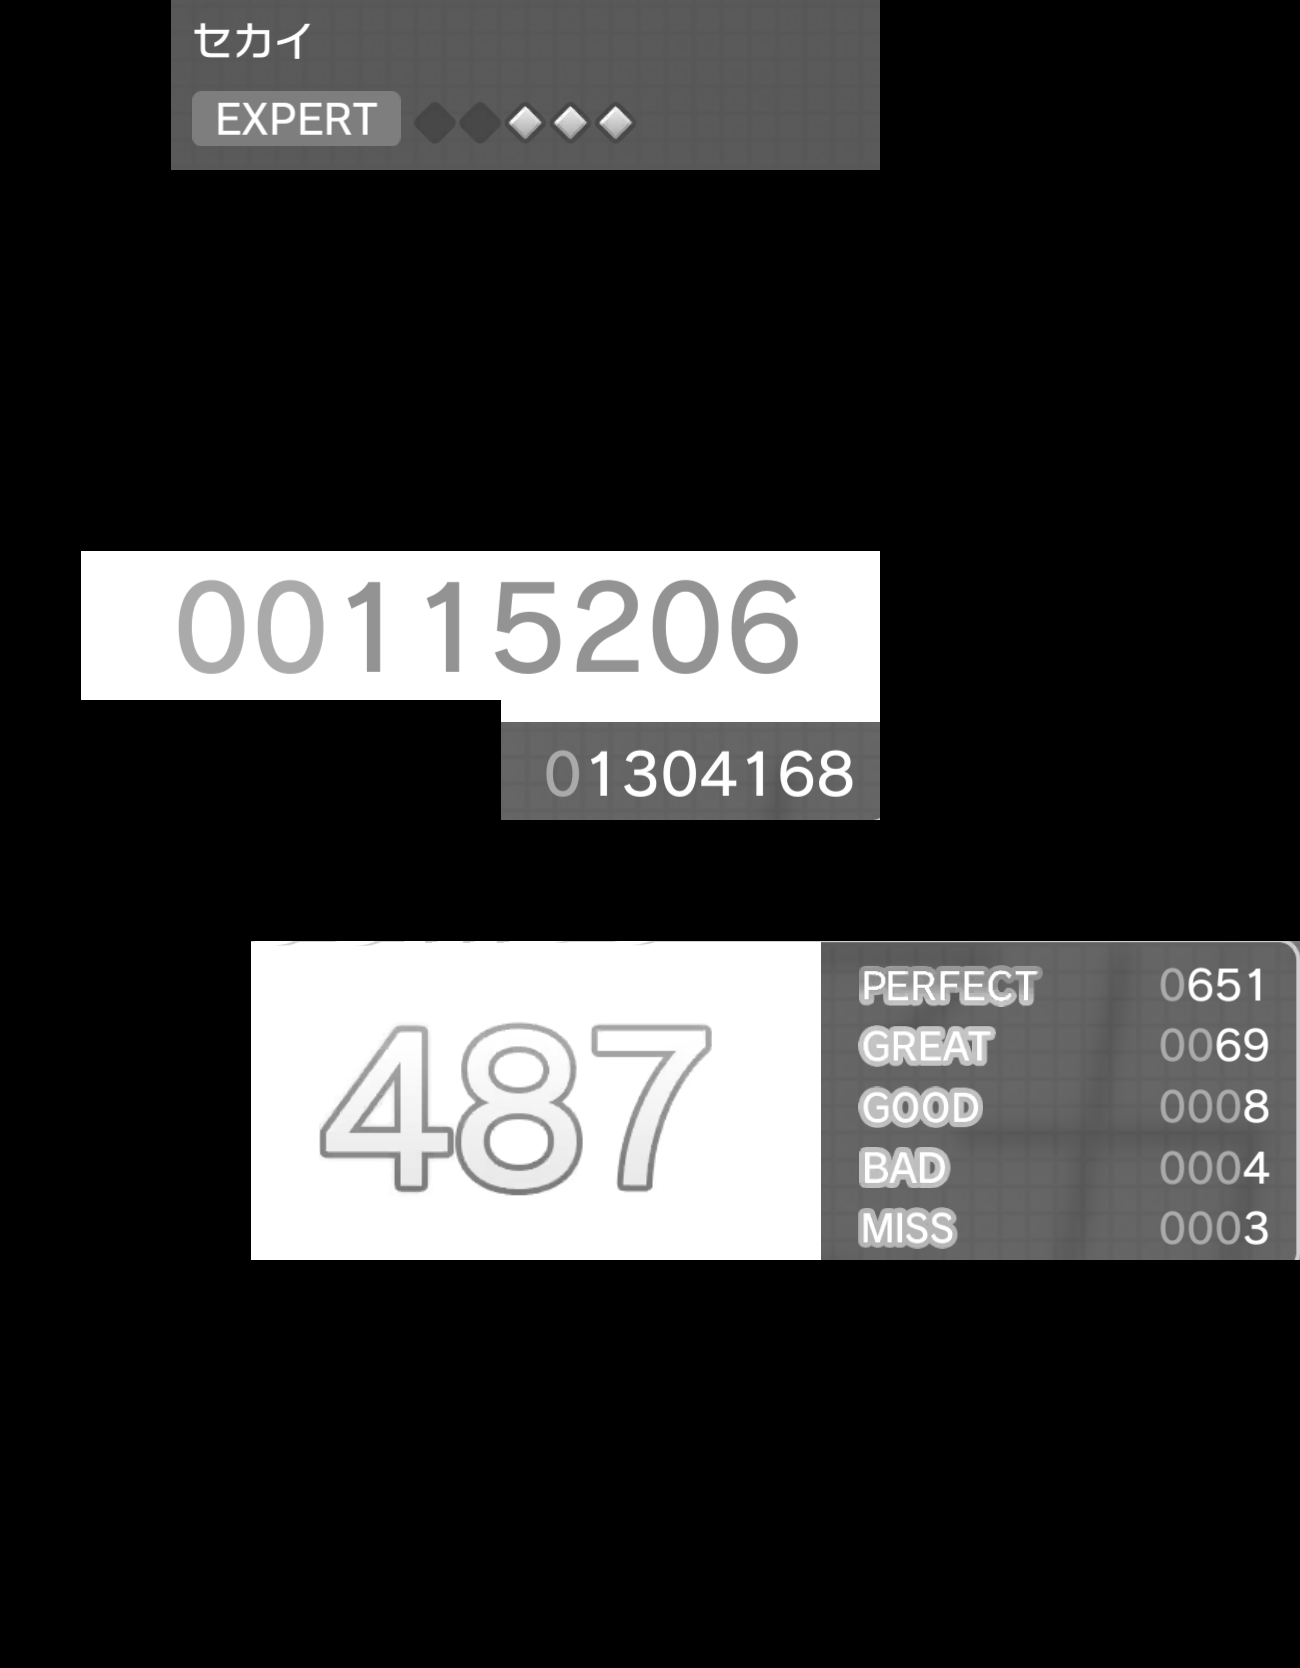
このまま画像認識を行うと曲や背景などによって結果が変わってしまうので、なるべく同じような形の結果になるように画像を編集します。
この編集ではiPadPro10.5インチで撮影したものを利用しています。他の端末や画像サイズが違う場合は変わるので気をつけてください。
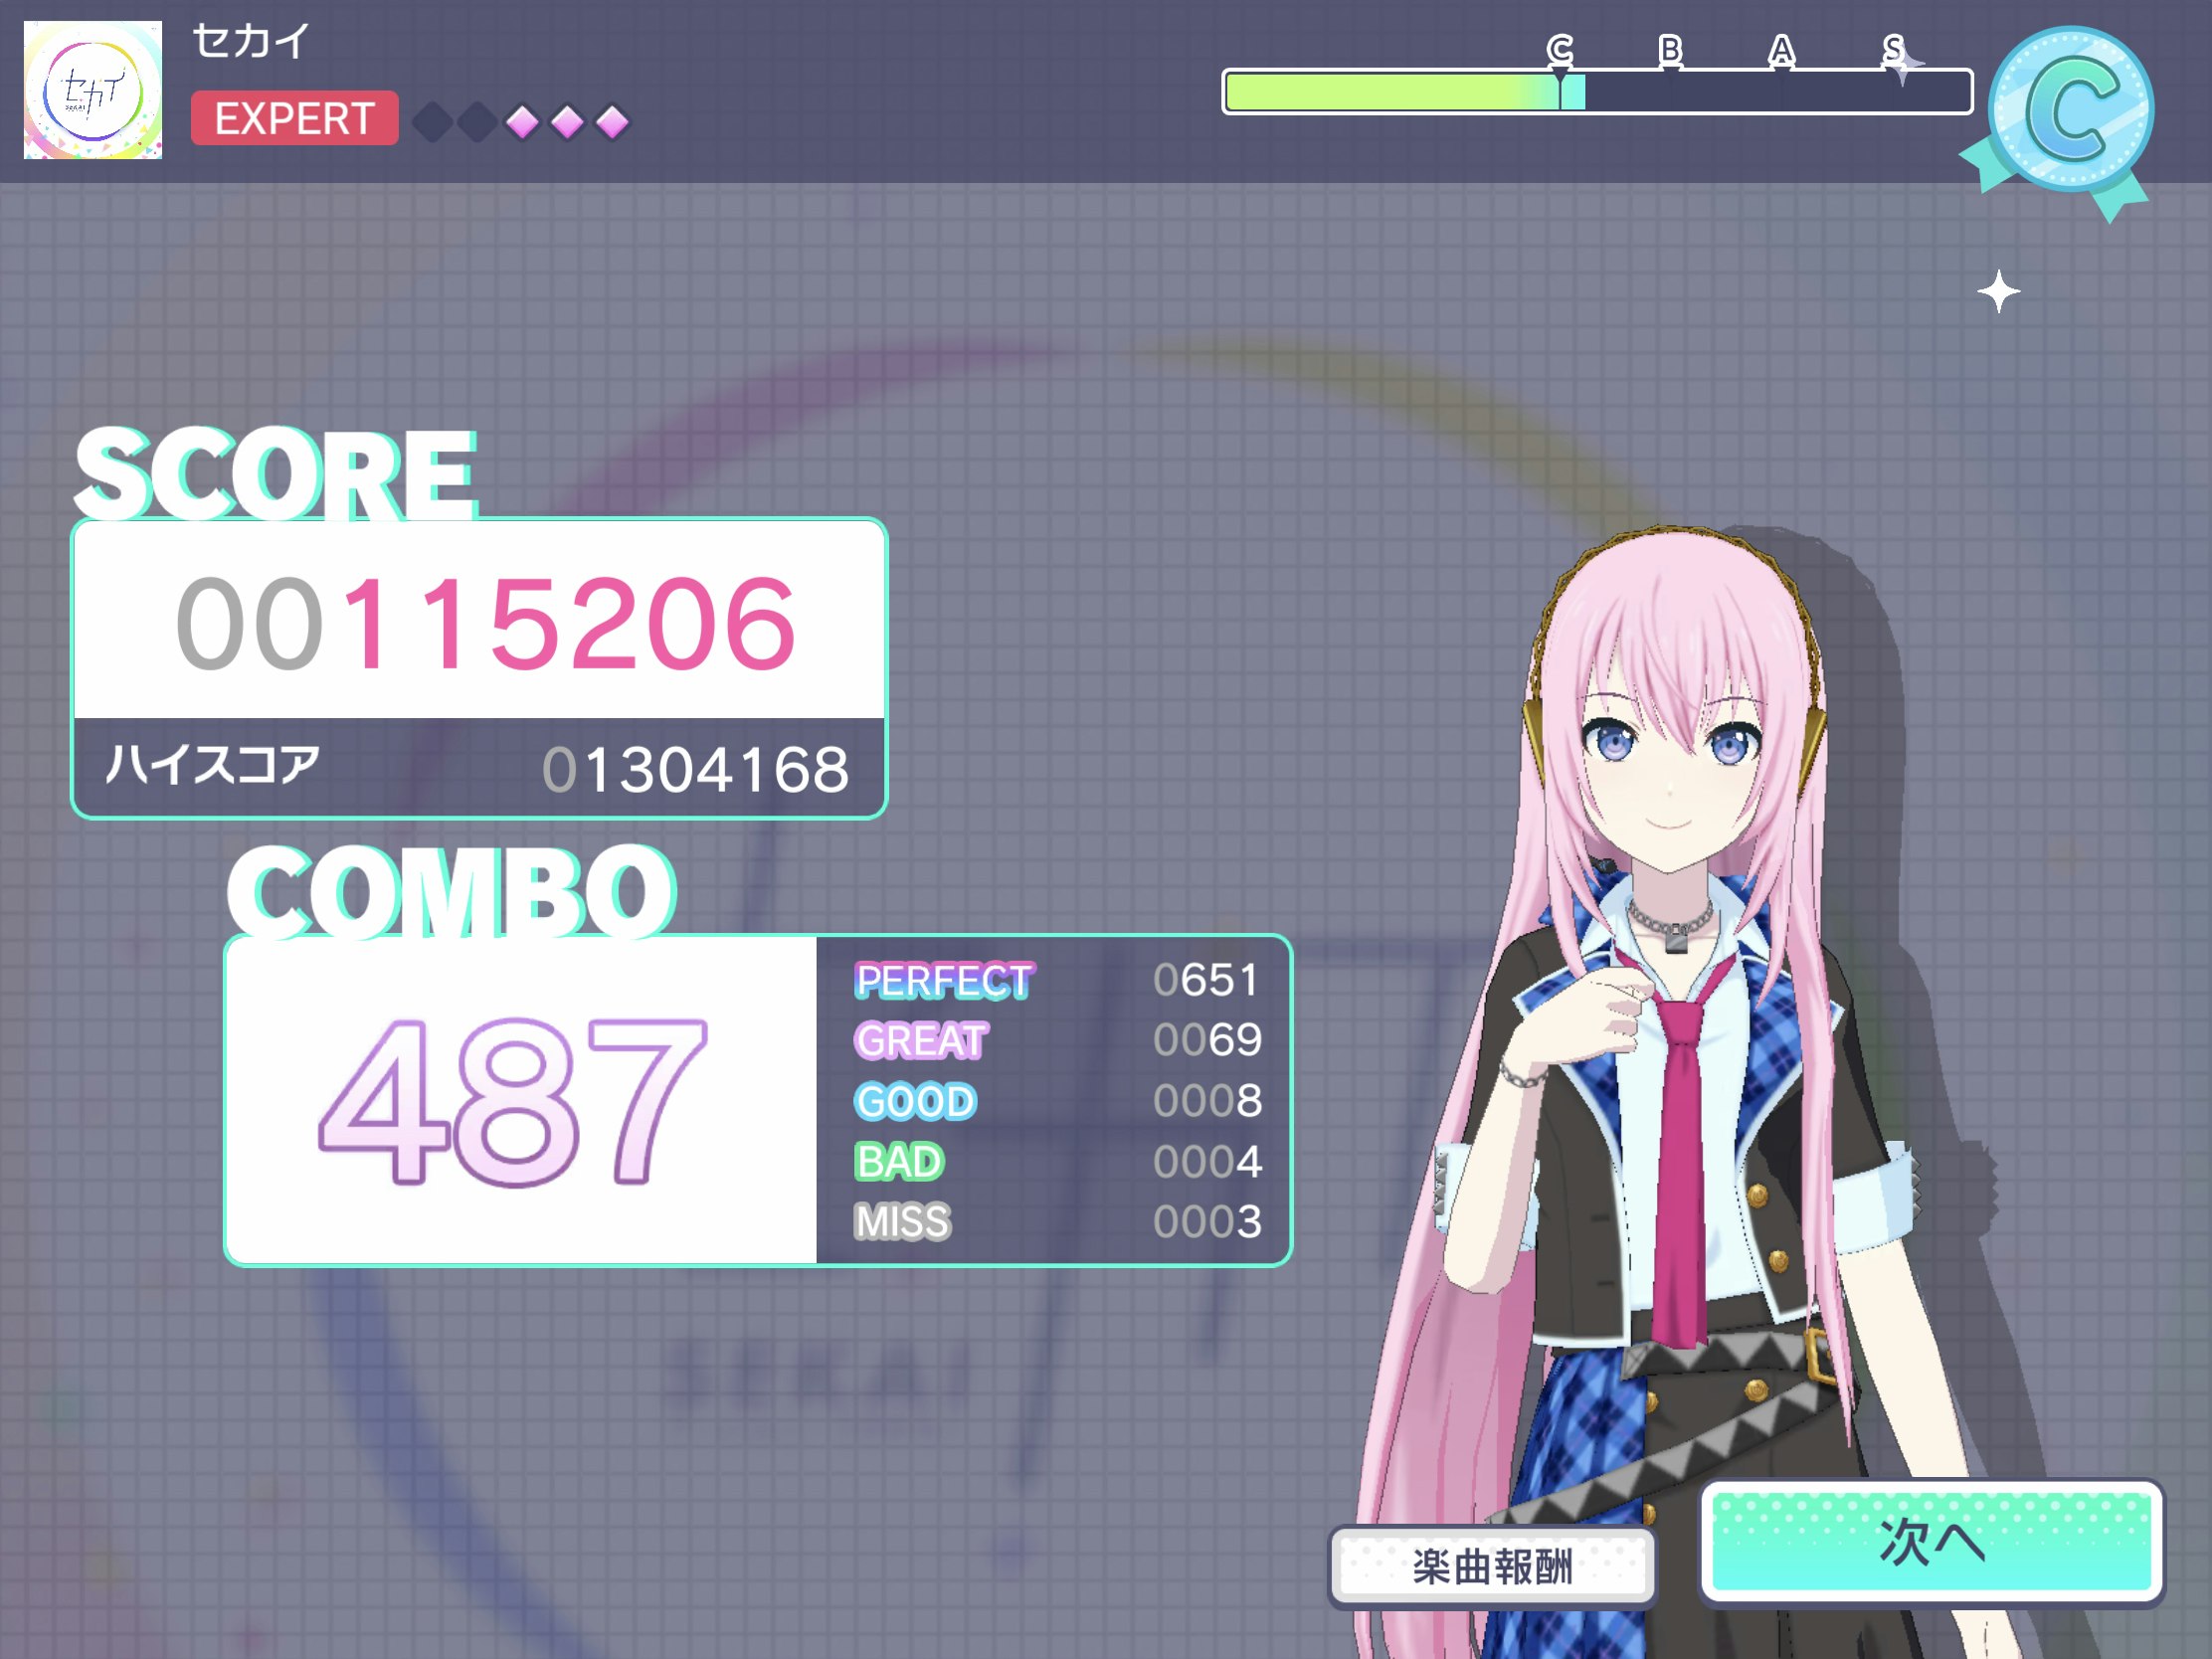
元画像
編集後の画像
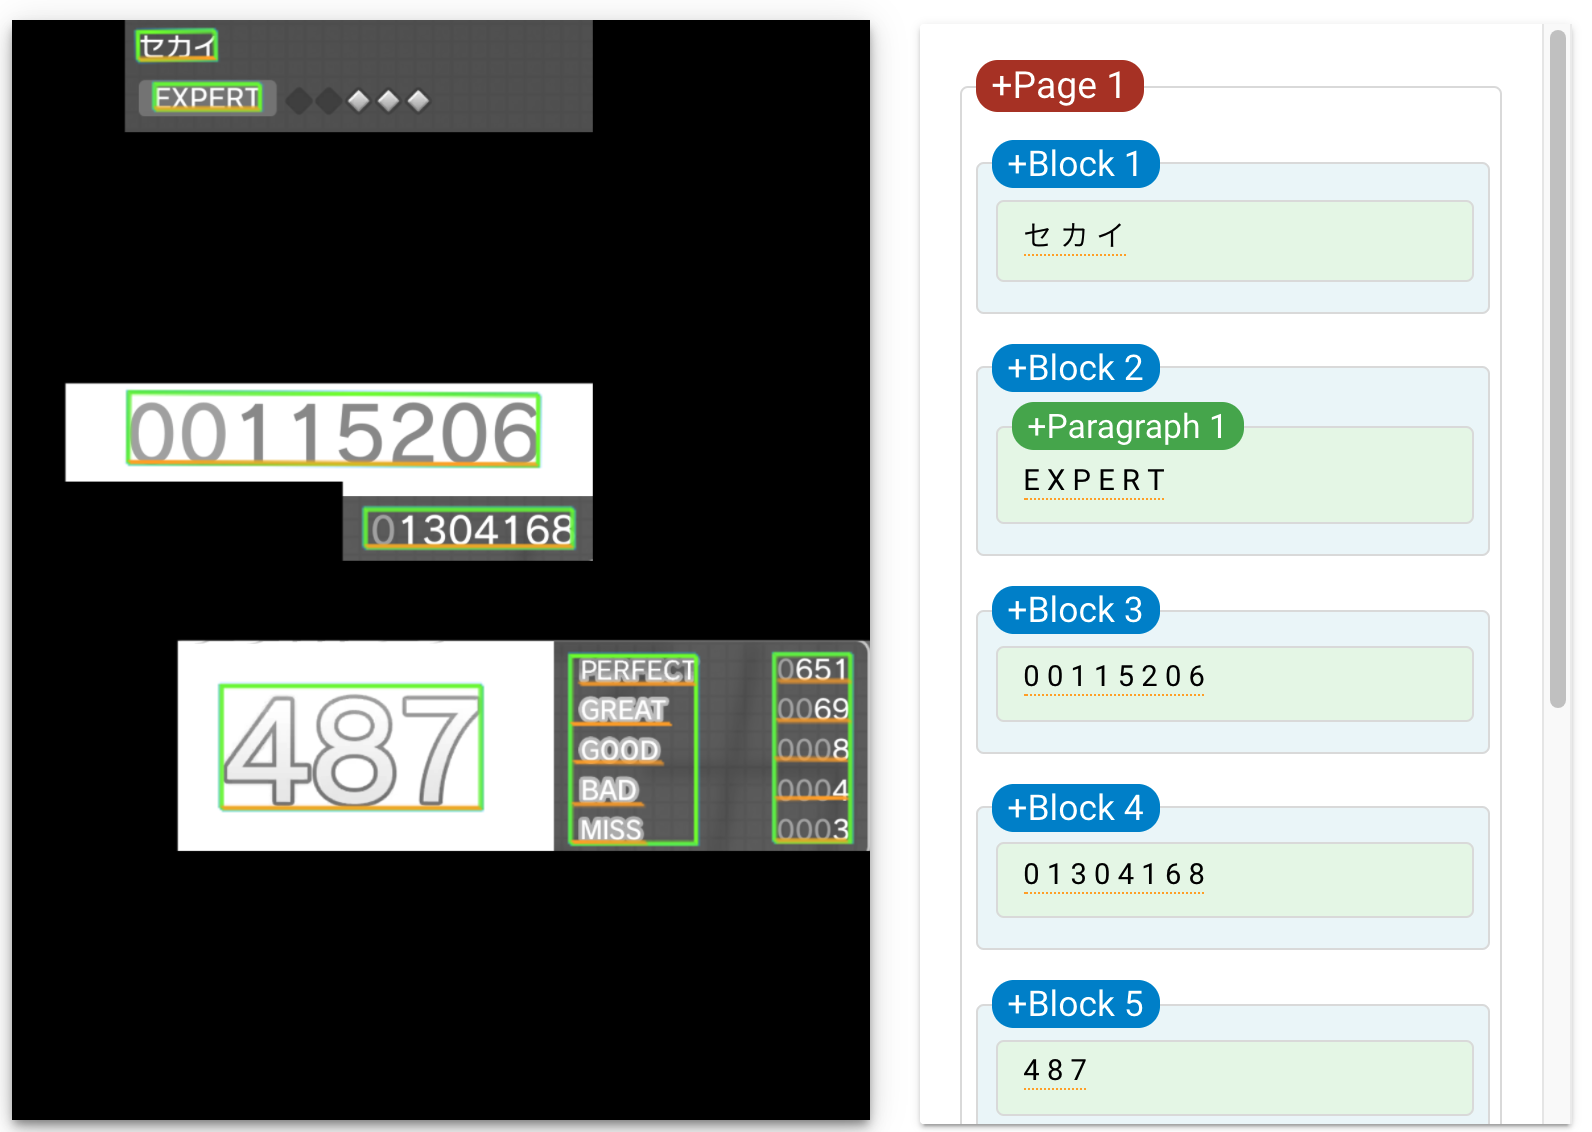
認識の結果
デプロイするよ
$ cdk deploy
動作確認
S3バケットに画像をアップロードします。
無事に動作していればS3にはcsvファイルが、DynamoDBテーブルを見ると記録が保存されています。また、画像をアップロードしたバケットは空になっています。
おわりに
必要がなければ、以下のコマンドで今回作成した環境を消しましょう。
cdk destroy