はじめに
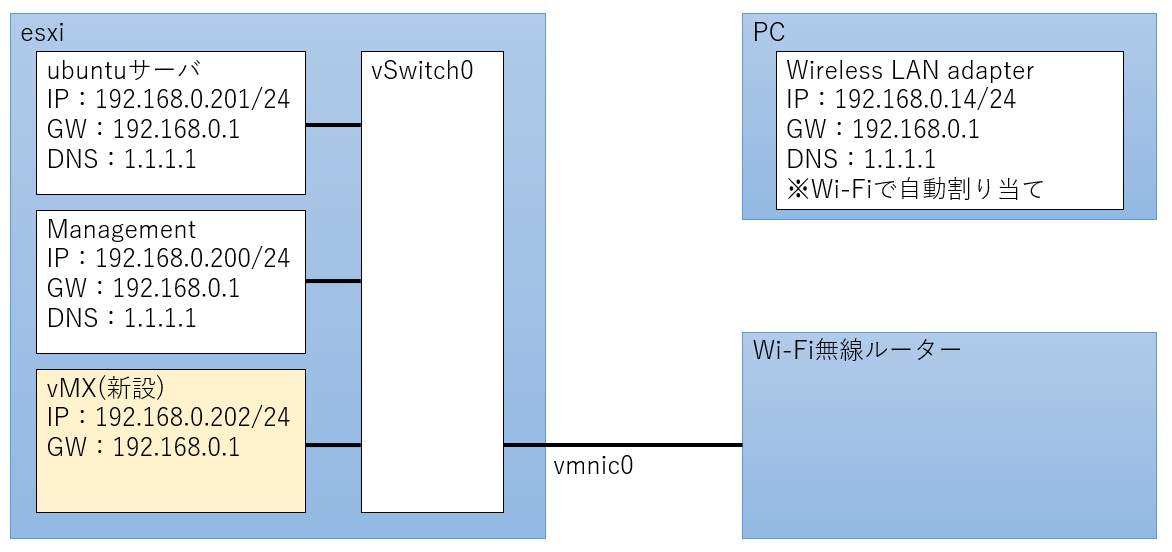
前回、ubuntuサーバがDNSで名前解決出来るようになったので、今回は以下の図のような構成を作ります。
やりたいこととしては、
1. vMXの構築(下図の薄赤)
2. ubuntuサーバにからvMXにSSH接続する
3. ubuntuサーバにAnsibleをインストールする
4. Ansibleの実行に必要なファイルを作成する
5. Ansibleを実行して、vMXのshowコマンドを取得する
なお、ubuntuのバージョンは18.04.3です。
1. VMXの構築
構築では以下のサイトを参考にさせて頂きました。
VMware ESXiでJuniper vMXを動かす
学習用環境として vMX を ESXi で構築してみる!!
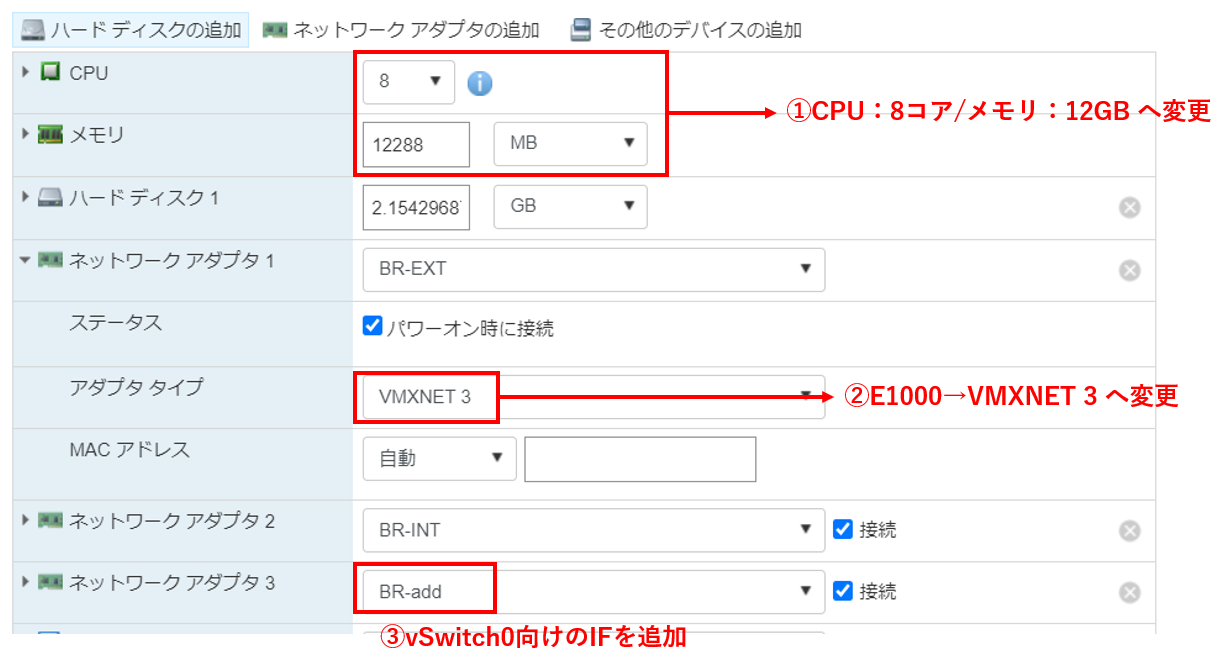
Minimum Hardware and Software Requirements
VFPCは最低限必要なリソースを満たさないとVCPから認識されなくなるので、以下の様に設定します。
①CPU:8コア/メモリ:12GB へ変更
②アダプタタイプを全てVMXNET3へ変更
③ネットワークアダプタの追加
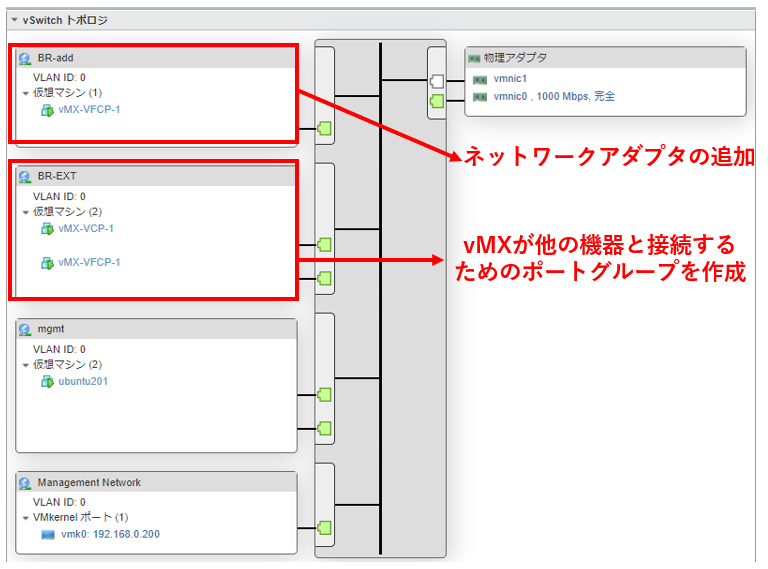
構築完了後の構成図は以下になります
2. ubuntuサーバにからvMXにSSH接続する
vMXで以下のような設定を入れます。設定の内容としては
(1)SSHを有効化して、Ansible実行用のユーザを作成
(2)管理インタフェースfxp0にアドレス(192.168.0.202/24)を割り当てる
(3)DHCPの設定の無効化
※fxp0でDHCPが有効になっていたので、「delete interface fxp0」で設定を削除
set system root-authentication plain-text-password
set system services ssh
set system login user ansible class super-user
set system login user ansible authentication plain-text-password
deactivate system processes dhcp-service
delete interface fxp0    # DHCP関連の設定を削除
set interfaces fxp0 unit 0 family inet address 192.168.0.202/24
vMXに設定出来たら、ubuntuサーバにログインしてSSH接続できるか確認しましょう!
まずは、pingで疎通確認をして、その後にSSHでログインしてみます。
SSHさえ出来てしまえば、Ansibleの環境構築もあと一息です!
test@ubuntu201:~/ansible$
test@ubuntu201:~/ansible$ ping 192.168.0.202           # pingを実行
PING 192.168.0.202 (192.168.0.202) 56(84) bytes of data.
64 bytes from 192.168.0.202: icmp_seq=1 ttl=64 time=0.061 ms
64 bytes from 192.168.0.202: icmp_seq=2 ttl=64 time=0.108 ms
64 bytes from 192.168.0.202: icmp_seq=3 ttl=64 time=0.083 ms

--- 192.168.0.202 ping statistics ---
3 packets transmitted, 3 received, 0% packet loss, time 2055ms
rtt min/avg/max/mdev = 0.061/0.084/0.108/0.019 ms
test@ubuntu201:~/ansible$
test@ubuntu201:~/ansible$ ssh ansible@192.168.0.202    # SSHログインを実行
~中略~
--- JUNOS 18.2R1.9 Kernel 64-bit  JNPR-11.0-20180614.6c3f819_buil    # ログイン完了
ansible>
3. ubuntuサーバにAnsibleをインストールする
まずはubuntuサーバにAnsibleをインストールします。ubuntuサーバで以下のコマンドを入力しました。
sudo apt update
sudo apt-get install software-properties-common  # aptだと上手くいかなかった
sudo apt-add-repository ppa:ansible/ansible
sudo apt update
sudo apt install ansible
インストールしたら、Ansibleがインストールされているか確認しましょう。
test@ubuntu201:~/ansible$ ansible --version
ansible 2.9.13
  config file = /home/test/ansible/ansible.cfg
  configured module search path = [u'/home/test/.ansible/plugins/modules', u'/usr/share/ansible/plugins/modules']
  ansible python module location = /usr/lib/python2.7/dist-packages/ansible
  executable location = /usr/bin/ansible
  python version = 2.7.17 (default, Jul 20 2020, 15:37:01) [GCC 7.5.0]
test@ubuntu201:~/ansible$
4. Ansibleの実行に必要なファイルを作成する
ここから、Ansibleに必要な以下3つのファイルを作成しましょう。
(1)ansible.cfg:Ansibleの設定を記載
(2)インベントリ(hosts):操作対象ホストやホストごとに使用する変数などを記載したファイル
(3)playbook(get-int.yml):Ansibleが実行する内容(task)を記載
(1)ansible.cfg
[defaults]
host_key_checking = False
timeout = 60
remote_port = 22
(2)インベントリ(hosts)
python2はサポートが終了しているので、「ansible_python_interpreter=/usr/bin/python3」
と記載して、python3を使用するように設定しておきましょう。
[all:vars]
ansible_python_interpreter=/usr/bin/python3    # python3を使用

[junos]
junos_router_1 ansible_ssh_host=192.168.0.202

[junos:vars]
ansible_connection=network_cli
ansible_network_os=junos
ansible_user=ansible    # vMXにログインするユーザ
ansible_ssh_pass=password
(3)playbook(get-int.yml)
---
- name: show TEST
  hosts: junos
  gather_facts: no
  tasks:
    - name: get show
      junos_command:
        commands: show interfaces fxp0 terse
      register: results

    - name: debug
      debug:
        msg: "{{ results.stdout_lines }}"
まずは、playbookを使わずにpingモジュールでvMXにpingをうってみます。コマンドは、
ansible -m <モジュール名> -i <インベントリ> <対象ホスト>
です。対象ホストは1台しかありませんが、今回は全ホストとして「all」にしました。
test@ubuntu201:~/ansible$ ansible -m ping -i hosts all
junos_router_1 | SUCCESS => {
    "changed": false,
    "ping": "pong"
}
####5. Ansibleを実行して、vMXのshowコマンドを取得する
Ansibleでpingがうてることが分かったので。今度はplaybookも使ってみましょう。コマンドは、
ansible-playbook -i <インベントリ> <playbook>
です。
test@ubuntu201:~/ansible$ ansible-playbook -i hosts get-int.yml

PLAY [show TEST] *******************************************************************************************************

TASK [get show] ********************************************************************************************************
[WARNING]: arguments wait_for, match, rpcs are not supported when using transport=cli
ok: [junos_router_1]

TASK [debug] ***********************************************************************************************************
ok: [junos_router_1] => {
    "msg": [
        [
            "Interface               Admin Link Proto    Local                 Remote",
            "fxp0                    up    up",
            "fxp0.0                  up    up   inet     192.168.0.202/24"
        ]
    ]
}

PLAY RECAP *************************************************************************************************************
junos_router_1             : ok=2    changed=0    unreachable=0    failed=0    skipped=0    rescued=0    ignored=0
想定通り、vMXのinterfaceの状態を取得することが出来ました。
【注意】vMXで | (パイプ)が使えない
第1章でもあったように、vMXにコンソールで操作しようとするとキーボードの入力が想定通りでは
ありませんでした(パイプが入力できない)。コンソール画面の右上から、キーボードレイアウトを日本語にしても
改善されなかったので、teratermからSSHログインして操作するようにしました。
関連記事
【VMware ESXi】自宅にAnsible実行環境を作りたい~第1章:ubuntuサーバのDNS解決まで~
【VMware ESXi】自宅にAnsible実行環境を作りたい~第3章:AnsibleによるvMXの設定変更&syslogとの連携~