はじめに
前回の記事で自宅にAnsible環境を作りましたが、AWS上に作れば
・どこからでも接続出来る
・他の人に環境に入ってきてもらうことが出来る
・環境をシェアできる
というメリットがあるので、今回はAWS上にAnsible実行環境を構築します。
<注意>
(1)以下手順でvMXを構築する際に有料のインスタンス(m4.xlarge)を使用します。
→使った分だけお金がかかるので使用後は停止 or 終了するように徹底しましょう。(一時的に使うだけなら1000円/月いかないはず)
(2)定期的に請求金額を確認して、想定以上にかかった場合はインスタンスを削除しましょう。
(3)セキュリティグループの設定は用途に応じて変更してください。
1.VMXの作成
まずは、vMXから作成しましょう。EC2の画面から、以下の手順を行います。
(1)「インスタンス」を選択
(2)「インスタンスの起動」を選択

Amazon マシンイメージ (AMI)の画面では、以下の手順を行います。
(1)検索欄に「vmx」と入力
(2)「AWS Marketplace」を選択
(3)「vMX Virtual Router (BYOL)」を選択

この後は、確認画面で「continue」を押した後以下の様に設定してください。
今回はAnsibleでの動作確認をするだけなので、以下のような最低限の設定だけで問題ありません。
インスタンスタイプ: m4.xlarge(有料)
タグ:test_ansible_vmx(任意)
※セキュリティグループは後で設定します
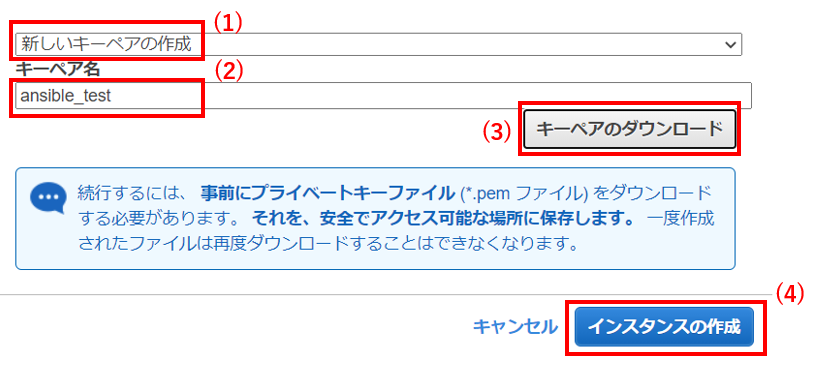
設定が終わったら最後の確認画面で「起動」を押すと、キーペアの画面になるので以下の手順を実施します。
(1)「新しいキーペアの作成」を選択
(2)キーペア名「ansible_test」を選択
(3)「キーペアのダウンロード」を選択(キーファイルは失くさないこと!!)
(4)「インスタンスの作成」を選択

インスタンスの作成が始まったら起動に時間がかかるので、その間にPublic IPとPrivate IPを確認しましょう。
今回は以下であると仮定します。
Public IP:1.1.1.1
Private IP:172.31.0.1/16
2.Ansibleサーバの作成
次に、Ansibleサーバを作成しましょう。
vMXと同様に、「インスタンスの起動」から無料利用枠の「Amazon Linux 2」を選択します。
これも以下の様に最低限の設定で問題ありません。
インスタンスタイプ: t2.micro(無料)
タグ:test_ansible_svr(任意)
セキュリティグループ:「ソース」欄でマイIPを選択すると自動で自分のPublic IPが割り振られます。

最後の画面で「起動」を選択すると、キーペアの画面になるのでvMXの時に作成したキーペアを選択しましょう。
インスタンスの作成が始まったら起動に時間がかかるので、その間にPublic IPとPrivate IPを確認しましょう。
今回は以下であると仮定します。
Public IP:2.2.2.2
Private IP:172.31.0.2/16
3.vMXの設定
TeraTermなどからvMXにログインしましょう。
ホスト:1.1.1.1(vMXのPublic IP)
ポート:22
ユーザ名:jnpr
パスワード:なし
秘密鍵:キーペア作成の際にダウンロードしたファイル(ansible_test.pem)
ログイン出来たら以下の設定を入れましょう。
set system root-authentication plain-text-password
set system services ssh                                          # sshを許可
set system login user ansible class super-user                   # Ansible用のユーザを作成
set system login user ansible authentication plain-text-password
4.Ansibleのインストール
TeraTermなどからAnsibleサーバにログインしましょう。
ホスト:2.2.2.2(AnsibleサーバのPublic IP)
ポート:22
ユーザ名:ec2-user
パスワード:なし
秘密鍵:キーペア作成の際にダウンロードしたファイル(ansible_test.pem)
ログインしたらまずはvMXにSSH出来るか確認しましょう。
ssh ansible@172.31.0.1 # vMXのPrivate address
SSH出来たら、以下の様に__vMXのセキュリティグループのインバウンドルール__で
vMXとAnsibleサーバのPrivate Network(172.31.0.0/16)のみを許可しておきましょう。
設定した後は、再度SSHログイン出来ることを確認してください。

今回は、Ansibleをpython3で動かすことを想定しているのでPython3をインストールします。
こうなると、python2とpython3が共存してしまうので、Ansibleをpip3コマンドでインストールします。
Ansibleのバージョン10以上は少しクセが強いので、バージョン2.9.7をインストールしました。
sudo yum install python3
sudo pip3 install ansible==2.9.7
sudo pip3 install paramiko
インストールしたらバージョンを確認しましょう。
pip3でインストールしたので、python version = 3.7.9 であることが確認できます。
※pipでインストールするとpython2がデフォルトになります
[ec2-user@ip-<ip-addr> ~]$ ansible --version
ansible 2.9.7
  config file = None
  configured module search path = ['/home/ec2-user/.ansible/plugins/modules', '/usr/share/ansible/plugins/modules']
  ansible python module location = /usr/local/lib/python3.7/site-packages/ansible
  executable location = /usr/local/bin/ansible
  python version = 3.7.9 (default, Aug 27 2020, 21:59:41) [GCC 7.3.1 20180712 (Red Hat 7.3.1-9)]
5.Ansibleの設定
この章は、過去の記事の流用になります。
Ansibleに必要な以下3つのファイルを作成しましょう。
(1)ansible.cfg:Ansibleの設定を記載
(2)インベントリ(hosts):操作対象ホストやホストごとに使用する変数などを記載したファイル
(3)playbook(get-int.yml):Ansibleが実行する内容(task)を記載
(1)ansible.cfg
[defaults]
host_key_checking = False
timeout = 60
remote_port = 22
(2)インベントリ(hosts)
pip3でAnsibleをインストールしており、デフォルトがpython3で動作するようになっているので
ansible_python_interpreter の記載は不要です。
[junos]
junos_router_1 ansible_ssh_host=172.31.0.1

[junos:vars]
ansible_connection=network_cli
ansible_network_os=junos
ansible_user=ansible
ansible_ssh_pass=password
(3)playbook(get-int.yml)
---
- name: show TEST
  hosts: junos
  gather_facts: no
  tasks:
    - name: get show
      junos_command:
        commands: show interfaces fxp0 terse
      register: results

    - name: debug
      debug:
        msg: "{{ results.stdout_lines }}"
6.実行結果
想定通りshow コマンドの結果が取得出来ました。
[ec2-user@ip-<ip-addr> ansible]$ ansible-playbook -i hosts get-int.yml

PLAY [show TEST] ****************************************************************************************************************************************************************************

TASK [get show] *****************************************************************************************************************************************************************************
[WARNING]: arguments wait_for, match, rpcs are not supported when using transport=cli
[WARNING]: Platform linux on host junos_router_1 is using the discovered Python interpreter at /usr/bin/python, but future installation of another Python interpreter could change this. See
https://docs.ansible.com/ansible/2.9/reference_appendices/interpreter_discovery.html for more information.
ok: [junos_router_1]

TASK [debug] ********************************************************************************************************************************************************************************
ok: [junos_router_1] => {
    "msg": [
        [
            "Interface               Admin Link Proto    Local                 Remote",
            "fxp0                    up    up",
            "fxp0.0                  up    up   inet     <ip-addr>"
        ]
    ]
}

PLAY RECAP **********************************************************************************************************************************************************************************
junos_router_1             : ok=2    changed=0    unreachable=0    failed=0    skipped=0    rescued=0    ignored=0