はじめに
参考にした記事の内容やリンクは文中に記載した。
当サイトに掲載している記事は個人の見解であり、所属する組織の公式見解ではない。
目的と背景
AAP on AWSをSubscribeしてAAPを利用している。備忘録として、インフラを構築した時に苦労した点をまとめておく。
Control PlaneとHop Nodes
Control PlaneとHop Nodesは、Managed ServiceとしてRed Hatから提供される。MarketplaceでSubscribeすると自動的に作成される。Control Planeには、AAPのGUIもしくはAPIでアクセスできる。
Execution Plane Nodeの作成
Playbookを実行するには、自分のVPC内にExecution Plane Nodeを最低1つ作る必要がある。Control PlaneからExecution Plane Nodeに指示を出し、Execution Plane Node経由で自分のVPC内のNodes上でPlaybookを実行する。アーキテクチャ図は以下のようなイメージになる。
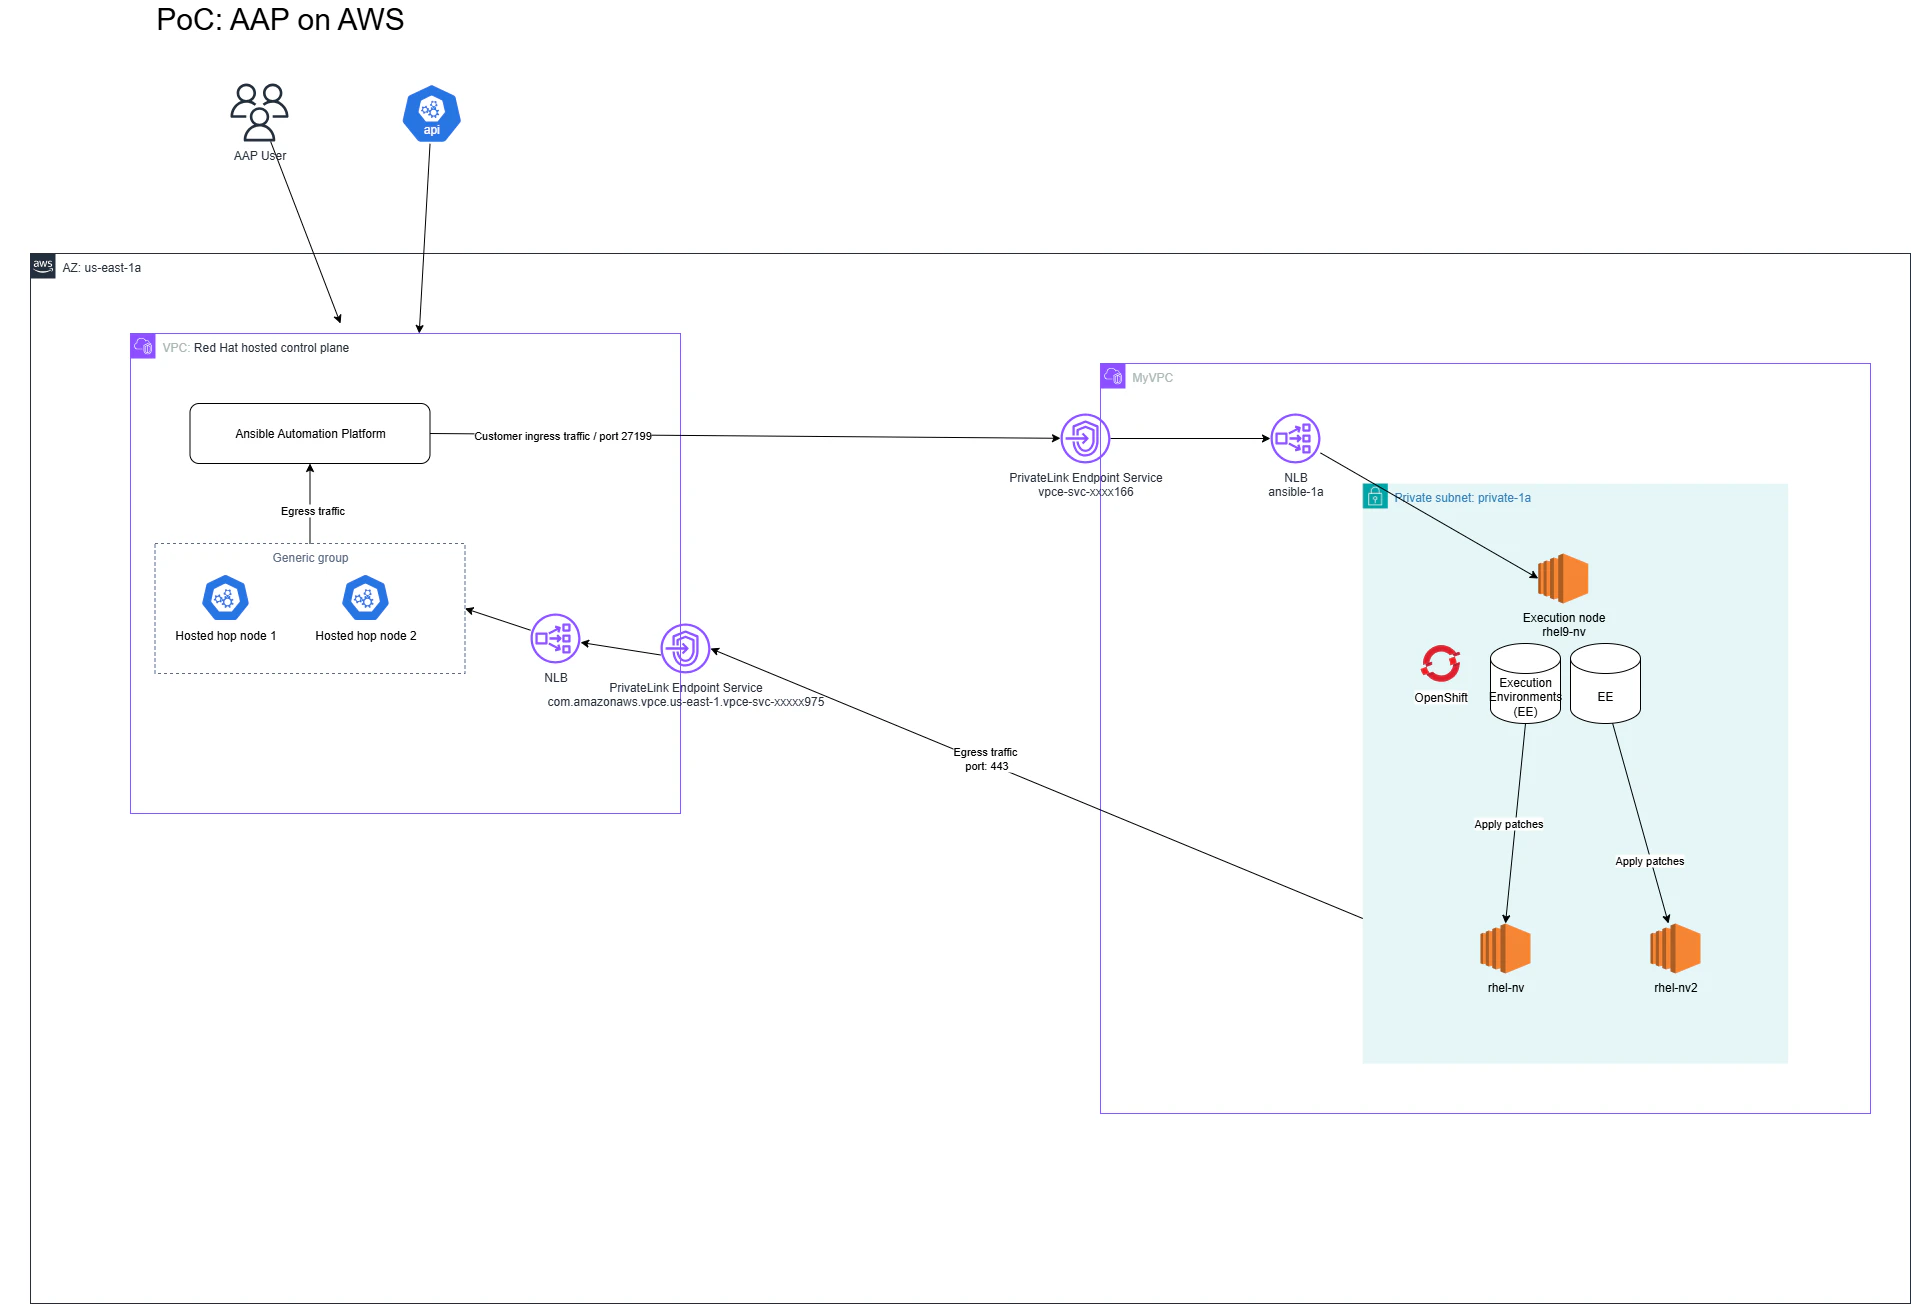
Control Plane NodesからHostsに対してPlaybooksを直接実行したかったが、それができないというRed Hat Supportからの回答だった。Control NodesからExecution Environmentsに対してPlaybooksを使用したジョブの実行指示を出すが、ジョブ実行はExecution Environments上で行われる。1つのExecution EnvironmentはOpenShiftの1つのPodである。そのPodをホストするためにExecution Plane Nodeが必要であると理解している。
私:I want to execute a playbook against a host from control nodes directly.
サポート:Since Control Nodes cannot execute playbooks(Jobs), you need at least one Execution Node to run Jobs.
MyVPCへのIngressを有効化する
Control PlaneからExecution Plane NodeへPlaybook実行を指示するために、Ingressの通信を有効化する必要がある。
Endpoint Serviceを作成する
Endpoint Serviceを新規作成しus-east-1aのAZに割り当て、NLBを作成してEndpoint Serviceで受け付けた通信をNLBに流す。NLBのTarget Group宛に通信が転送される。私はNLBをPrivate Subnetに割り当て、その中にあるNodesをTarget Group内に含めた。
執筆時点ではAAP on AWSがTokyo Regionで提供されていなかったので、North Virginiaに作成した。N.V.には6つのAZがあるが、私の場合Endpoint Serviceを1a,1b,1cのどれかに指定する必要があった。Control Planeが1aに作成されたことがその理由であると、Red HatのSupportに言われた。
作成したEndpoint ServiceにControl Planeからアクセスできるようにする
Red Hat Customer Support Ticketを作成し、Control Planeから作成したMyVPCのEndpoint Serviceへアクセスしてくれるように依頼する。以下の記事を参考にする。
Describe your problem:
Enable AWS PrivateLink connectivity from control plane to customer's network

Endpoint Service references are for the Endpoint Service created in the customer's VPC.

Endpoint Service name: vpce-svc-xxxx166
Endpoint Service AWS region: us-east-1
Endpoint Service ports or port ranges: 27199
AAP on AWSはManagedサービスなので、土日も含めて24時間以内に必ず返信が来る。サポートは手厚く、Web会議で画面を共有しながら進めること可能なので、どんどん利用することをお勧めする。
Customer SupportがControl Planeが配置されているAWSアカウントIDを教えてくれる。MyVPCに作成したEndpoint Serviceの"Allow principals"から、彼らのIDを許容する。
arn:aws:iam::<their 12 digits account ID>:root
Execution Plane Nodeを作成する
MyVPCのEndpoiint Serviceを作成したSubnet内にExecution Plane Nodeを作成する。私はRHEL9のEC2を採用した。
執筆時点では、COntainer-basedのAAPであればRHEL10上にInstallできたが、RPMーbasedバージョンはRHEL9までしかサポートしていなかった。そのためRHEL9を採用した。
以下の2.2の手順に沿って進めていけばよい。
私は最初RHEL10でやろうとして上手くいかなかった。以下のようにCustomer Staffから指示されたので、参考までに載せておく。
Currently, the Container-based Ansible Automation Platform can be installed on RHEL 10, but the RPM-based version cannot. For RPM-based installations, please use RHEL 9 for all AAP nodes.
Once RHEL 9 is set up, you can proceed with the following procedure.
[1]Setup the repository.
$ sudo subscription-manager register
$ sudo subscription-manager config --rhsm.manage_repos=1
$ sudo subscription-manager repos --enable=ansible-automation-platform-2.5-for-rhel-9-x86_64-rpms
2.2が成功したら、2.3を進める。
AAPのGUIからExecution Plane Node用のInstanceを作成し、手順に沿ってinstall_bundle.tar.gzファイルをダウンロードする。それをRHEL9で解凍しインストールを行う。
[ec2-user@ip-10-0-0-140 ssh]$ tar -xvzf 10.0.0.140_install_bundle.tar.gz
10.0.0.140_install_bundle/receptor/tls/ca/mesh-CA.crt
10.0.0.140_install_bundle/receptor/work_public_key.pem
10.0.0.140_install_bundle/receptor/tls/receptor.key
10.0.0.140_install_bundle/receptor/tls/receptor.crt
10.0.0.140_install_bundle/install_receptor.yml
10.0.0.140_install_bundle/inventory.yml
10.0.0.140_install_bundle/group_vars/all.yml
10.0.0.140_install_bundle/requirements.yml
解凍したInventory.ymlを編集する。ホスト名、ユーザー、SSHキーを指定する。
[ec2-user@ip-10-0-0-140 10.0.0.140_install_bundle]$ cat inventory.yml
---
all:
  hosts:
    remote-execution:
      ansible_host: 10.0.0.140
      ansible_user: ec2-user # user provided
      ansible_ssh_private_key_file: ~/ssh/rhel9-nv.pem
The system that is going to run the install bundle to setup the remote node and run ansible-playbook requires the ansible.receptor collection to be installed:
ansible-galaxy collection install ansible.receptor
If receptor_listener_port is defined, the machine also requires an available open port on which to establish inbound TCP connections, for example, 27199. Run the following command to open port 27199 for receptor communication (Make sure you have port 27199 open in your firewall):
sudo firewall-cmd --permanent --zone=public --add-port=27199/tcp
最後に以下のコマンドを実行する。
$ ansible-playbook -i inventory.yml install_receptor.yml
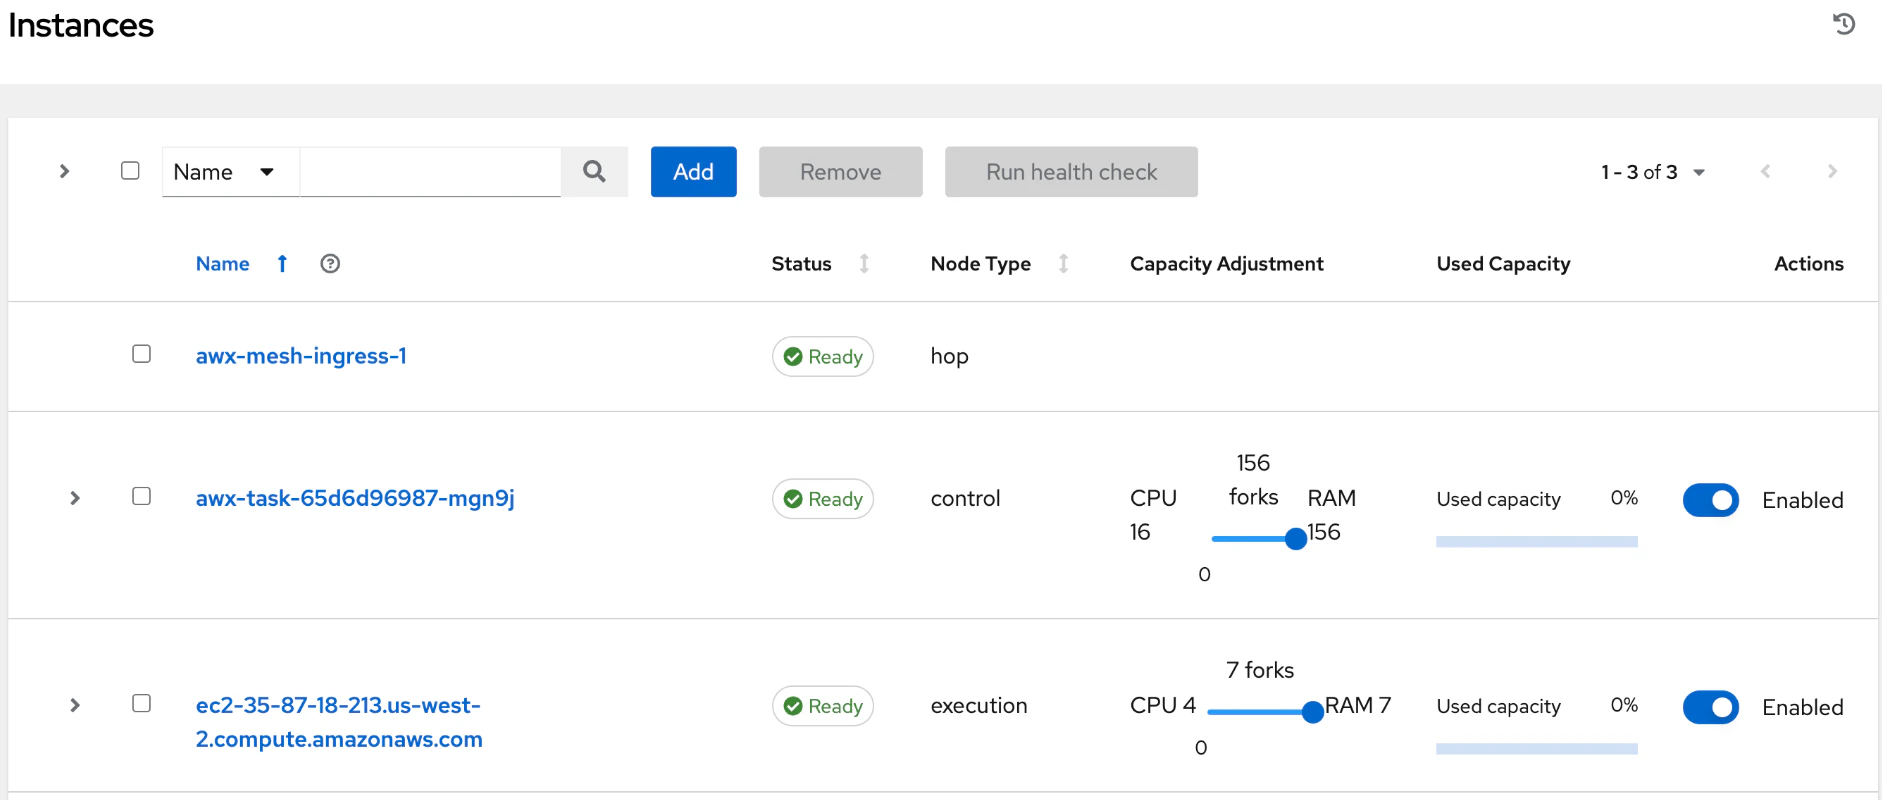
成功すると、AAP GUI上でExecution Plane NodeのInstanceのStatusがReadyになっていることが確認できる。
Execution Plane Node経由でControl PlaneからPlaybookをHostsに対して実行する
Execution Plane NodeとPlaybookを実行したいHosts間をSSHで繋げられるようにする。
1. ssh-keygen を使用してExecution Plane NodeにKeypairを作成する。
2. 作成したPublic KeyをHostsへコピーする。私の場合は ssh-copy-id commandがうまく動かなかったので、Hostsへログインして .ssh/authorized_keys を編集しその中にコピーした。
3. Credentialを新規作成する。Credential TypeはMachineを指定。Usernameは ec2-user, SSH Private KeyにPrivate Keyである id_rsa を設定した。
こちらの記事を参考にした。
Job Templateを実行すると、2つのHostsに対してPlaybookを実行できた!
Identity added: /runner/artifacts/123/ssh_key_data (ec2-user@ip-10-0-0-1.ec2.internal)
1

2
PLAY [Hello World Sample] ******************************************************
10:31:54
3

4
TASK [Gathering Facts] *********************************************************
10:31:54
5
ok: [10.0.0.2]
6
ok: [10.0.0.3]
7

8
TASK [Hello Message] ***********************************************************
10:31:56
9
ok: [10.0.0.2] => {
10
    "msg": "Hello World!"
11
}
12
ok: [10.0.0.3] => {
13
    "msg": "Hello World!"
14
}
15
16
PLAY RECAP *********************************************************************
17
10.0.0.2                 : ok=2    changed=0    unreachable=0    failed=0    skipped=0    rescued=0    ignored=0
18
10.0.0.3                 : ok=2    changed=0    unreachable=0    failed=0    skipped=0    rescued=0    ignored=0
MyVPCからのEgressを有効化する
MyVPCにあるNodesから、Control PlaneのAAPのAPIを実行できる。
MyVPCからControl PlaneのSubnetにあるEndpoint Serviceへアクセスできるようにする
Customer Support Caseを作成する。以下の記事を参考にする。
Describe your problem:
Enable AWS PrivateLink connectivity from customer's network to control plane

Customer AWS account ID: <enter here>
Endpoint AWS region(s): us-east-1
URL of your AAP deployment: com.amazonaws.vpce.us-east-1.vpce-svc-xxxx975
URL or your AAP deploymentは、Red Hat Hybrid ConsoleのAnsible Service on AWSメニューで確認できる。
AWS Management ConsoleでEndpointを作成する。SubnetはIngressと同じPrivate Subnetを指定した。以下の記事を参考に、Endpointが作成できる。
AWS Management ConsoleからAAPのEndpoint ServiceをVerifyする。成功すればEgress通信が有効になる。試しにGETをPOSTのコマンドを実行して疎通確認を行う。疎通確認をするには、API TOKENが必要になる。それはAAP GUIで、Access Management>Usersから作成した。
Job Templatesの一覧を取得する場合;
curl -X GET -H "Authorization: Bearer YOUR_TOKEN" https://<your-aap-instance>/api/controller/v2/job_templates/
特定のJob Templateを実行する場合;
curl -X POST -H "Authorization: Bearer YOUR_TOKEN" https://<your-aap-instance>/api/controller/v2/job_templates/<your job template id>/launch/
GETリクエストであれば、全てのAPIをブラウザから実行できる。ブラウザで
https://<your-app-instance>/api/controller/v2
にアクセスしたらドキュメントが表示される。例えばJOB TEMPLATESのAPIが見たい場合は、一覧からリンクをクリックする。
"job_templates": "/api/controller/v2/job_templates/",
ブラウザからJSONフォーマットでJOB TEMPLATESの一覧を取得することができるので、CLIを使う必要はない。AAPのGUIにあらかじめログインしておくことで、TOKENの入力が省略できる。詳細は以下の資料を参照。
AAP GUIの使い方
主なコンポーネントの役割とそれの使い方について今後まとめていく。