はじめに
前回Databricks extension for Visual Studio Code を試してみるにて、VSCode Extensionの設定やリモートクラスター実行を試してみました。今回はpytestをDatabricks Cluster上で実施してみたいと思います。
こちらのマニュアルを参考にしております。詳細はマニュアルをご覧ください。
https://docs.databricks.com/dev-tools/vscode-ext.html#run-tests-with-pytest
動画で確認したい方はこちらもご覧ください。
https://youtu.be/_QkcrYttVRs
ちなみに、リモートのDatabricksワークスペースにあるクラスタへの接続を必要としないローカルなコードに対してpytestを実行することもできます。例えば、ローカルメモリ内のPySpark DataFrameを受け入れて返す関数をテストするためにpytestを使用することができます。pytestを使い始めてローカルで実行するには、pytestのドキュメントのGet Startedを参照してください。
今回はローカルではなく、リモートのワークスペース上のクラスタへ接続し実行します。
Step1: tests fileを作成
実行するテストを含む、以下のコードを持つPythonファイルを追加します。この例では、このファイルの名前が spark_test.py で、Visual Studio Code プロジェクトのルートにあることを想定しています。このファイルには、クラスタのSparkSession(クラスタ上のSpark機能へのエントリポイント)をテストで利用できるようにするpytestフィクスチャが含まれています。このファイルには、テーブルの指定されたセルに指定された値が含まれているかどうかをチェックするテストが1つ含まれています。必要に応じて、このファイルに独自のテストを追加することができます。
from pyspark.sql import SparkSession
import pytest

@pytest.fixture
def spark() -> SparkSession:
  # Create a SparkSession (the entry point to Spark functionality) on
  # the cluster in the remote Databricks workspace. Unit tests do not
  # have access to this SparkSession by default.
  return SparkSession.builder.getOrCreate()

# Now add your unit tests.

# For example, here is a unit test that must be run on the
# cluster in the remote Databricks workspace.
# This example determines whether the specified cell in the
# specified table contains the specified value. For example,
# the third colum in the first row should contain the word "Ideal":
#
# +----+-------+-------+-------+---------+-------+-------+-------+------+-------+------+
# |_c0 | carat | cut   | color | clarity | depth | table | price | x    | y     | z    |
# +----+-------+-------+-------+---------+-------+-------+-------+------+-------+------+
# | 1  | 0.23  | Ideal | E     | SI2     | 61.5  | 55    | 326   | 3.95 | 3. 98 | 2.43 |
# +----+-------+-------+-------+---------+-------+-------+-------+------+-------+------+
# ...
#
def test_spark(spark):
  spark.sql('USE default')
  data = spark.sql('SELECT * FROM diamonds')
  assert data.collect()[0][2] == 'Ideal'
Step2: pytest runner の作成
Python ファイルに以下のコードを追加し、前のステップで作成したテストを実行するよう pytest に指示します。この例では、ファイル名が pytest_databricks.py で、Visual Studio Code プロジェクトのルートにあると仮定しています。
import pytest
import os
import sys

# Run all tests in the connected repository in the remote Databricks workspace.
# By default, pytest searches through all files with filenames ending with
# "_test.py" for tests. Within each of these files, pytest runs each function
# with a function name beginning with "test_".

# Get the path to the repository for this file in the workspace.
repo_root = os.path.dirname(os.path.realpath('__file__'))
# Switch to the repository's root directory.
os.chdir(repo_root)

# Skip writing .pyc files to the bytecode cache on the cluster.
sys.dont_write_bytecode = True

# Now run pytest from the repository's root directory, using the
# arguments that are supplied by your custom run configuration in
# your Visual Studio Code project. In this case, the custom run
# configuration JSON must contain these unique "program" and
# "args" objects:
#
# ...
# {
#   ...
#   "program": "${workspaceFolder}/path/to/this/file/in/workspace",
#   "args": ["/path/to/_test.py-files"]
# }
# ...
#
retcode = pytest.main(sys.argv[1:])
マニュアルにあるサンプルコードだと、'__file__' の部分のアポストロフィ(')が無く、エラーになってしまったので、上記のようにつけてください。
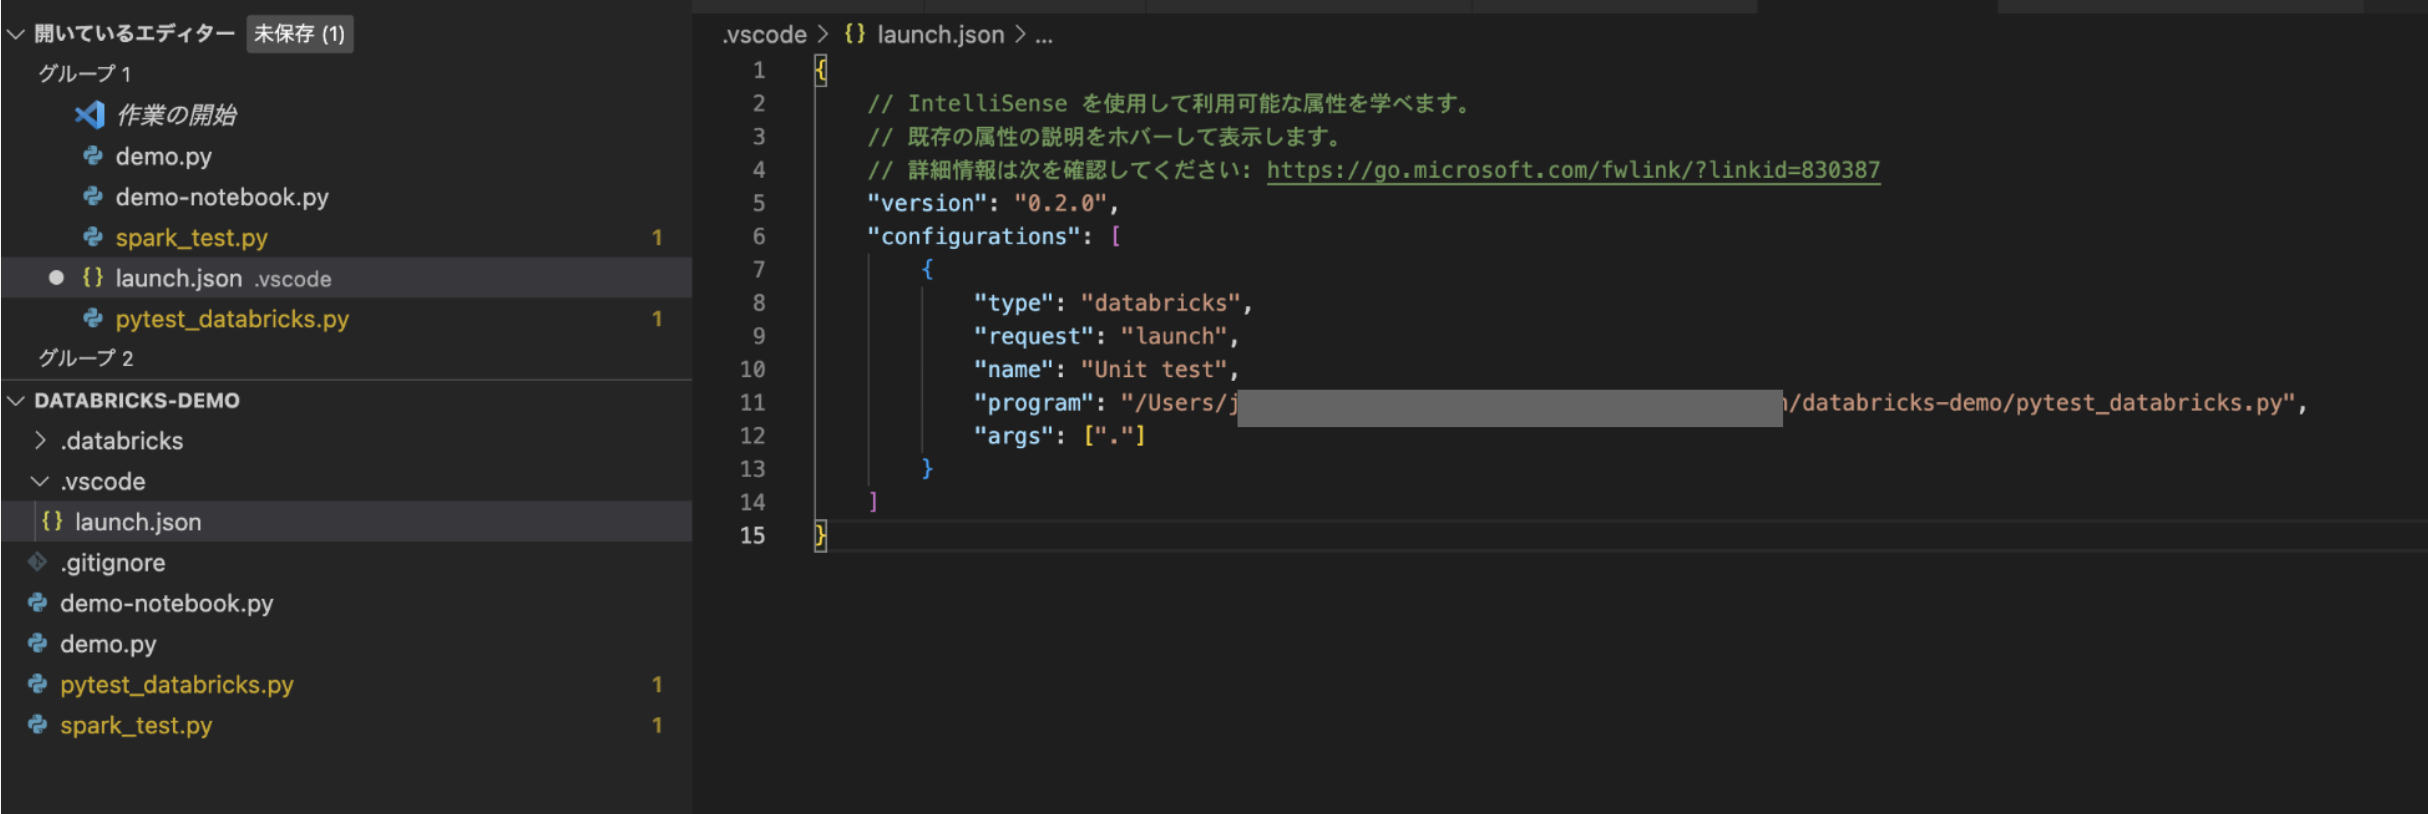
Step3: 実行設定ファイルの作成
pytestにテストの実行を指示するには、カスタムの実行設定を作成する必要があります。既存のDatabricksクラスタベースの実行設定を使用して、次のように独自のカスタム実行設定を作成します。
-
メインメニューで、実行(Run) > 構成の追加(Add configuration)をクリックします。

-
コマンドパレットで、[Databricks]を選択します。
-
Visual Studio Codeは、プロジェクトに.vscode/launch.jsonファイルを追加します(このファイルがまだ存在しない場合)。
-
スターターの実行構成を以下のように変更し、ファイルを保存します。
-
この実行構成の名前をRun on Databricksから、この構成に固有の表示名(この例ではUnit Tests (on Databricks))に変更します。
-
programを\${file}から、テストランナーを含むプロジェクトのパスに変更します(この例では${workspaceFolder}/pytest_databricks.py)
-
args を [] から、テストファイルを含むプロジェクトのパス、この例では ["."] に変更します。
-
Step4: pytestの実行
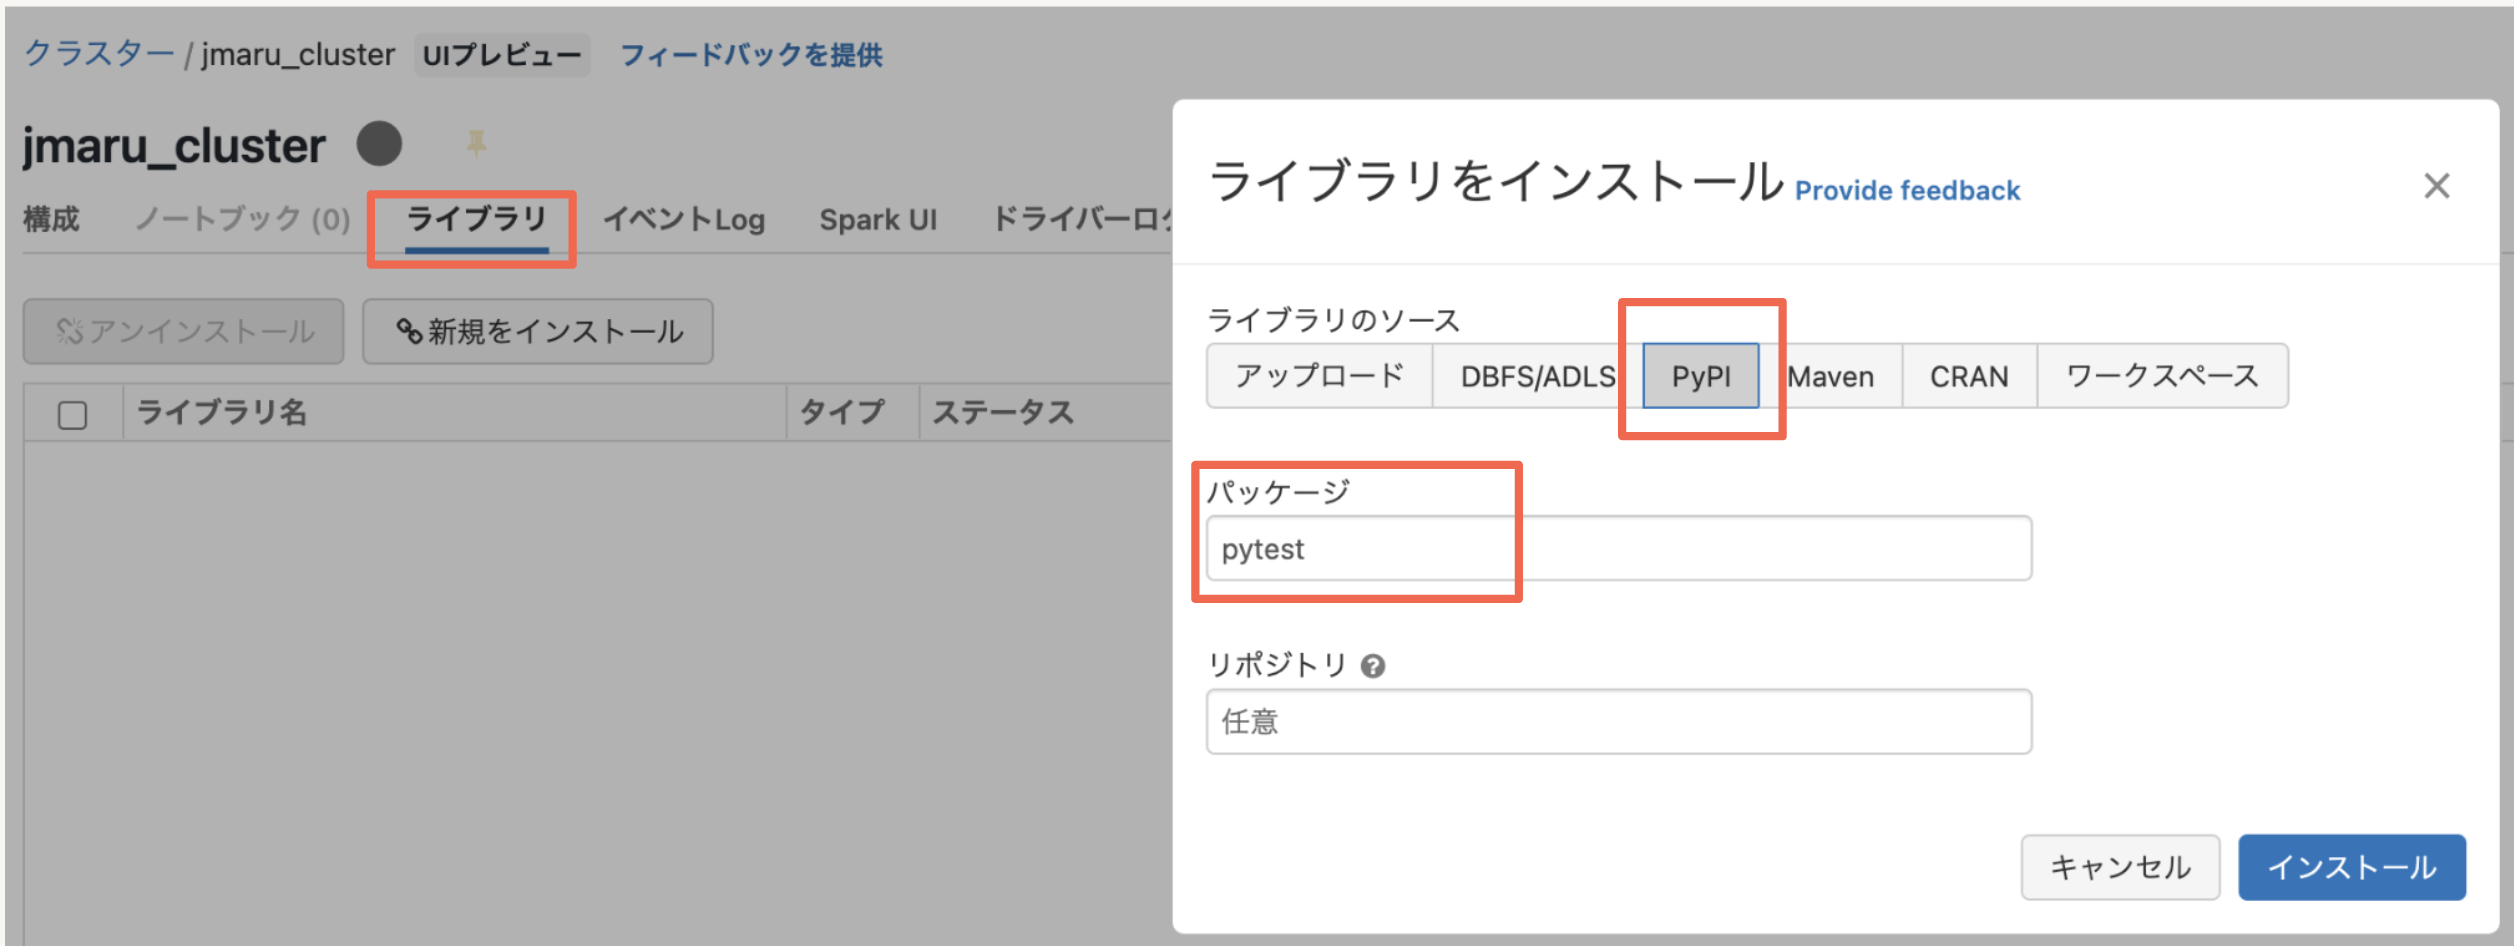
まず対象クラスタにpytestライブラリをインストールします。ワークスペースのクラスター画面にて以下のようにpytestをインストールします。(一度設定すれば、今後このクラスター上で利用可能になります)
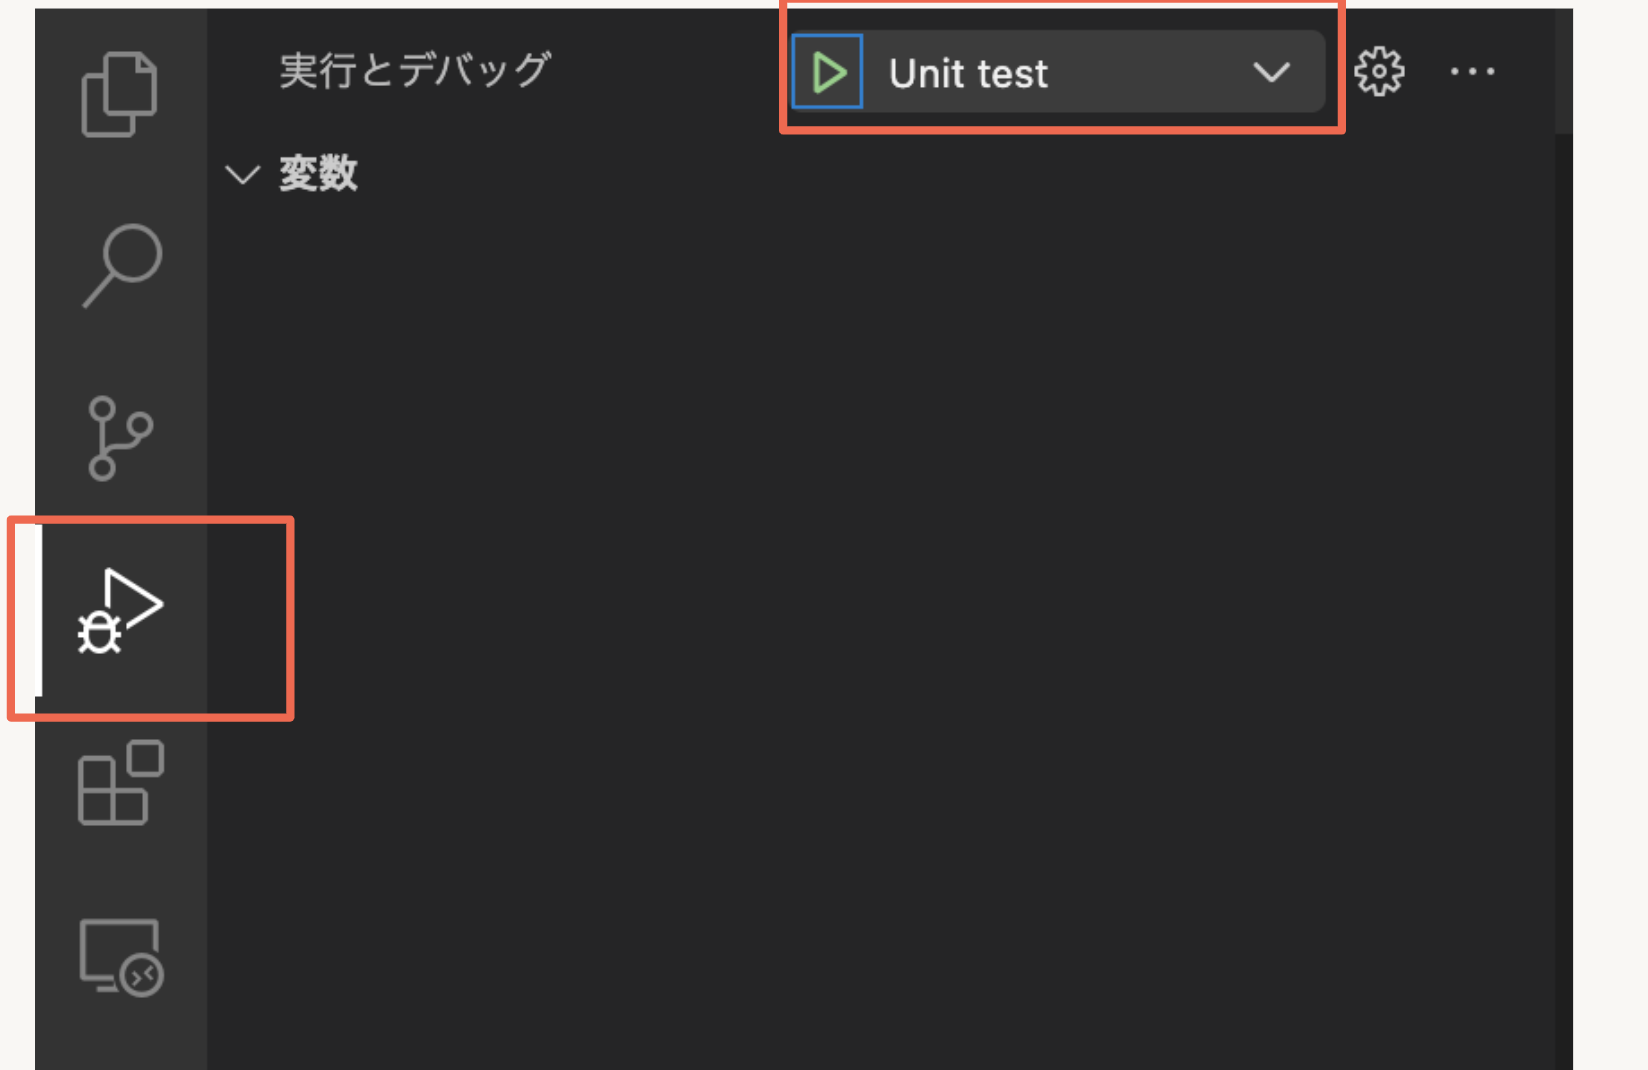
次にStep3で作成した実行ファイルを実行します。
VSCodeの左のペインから「実行とデバッグ」を開き、Step3で作成した名前(Unit test)を選択し実行します。
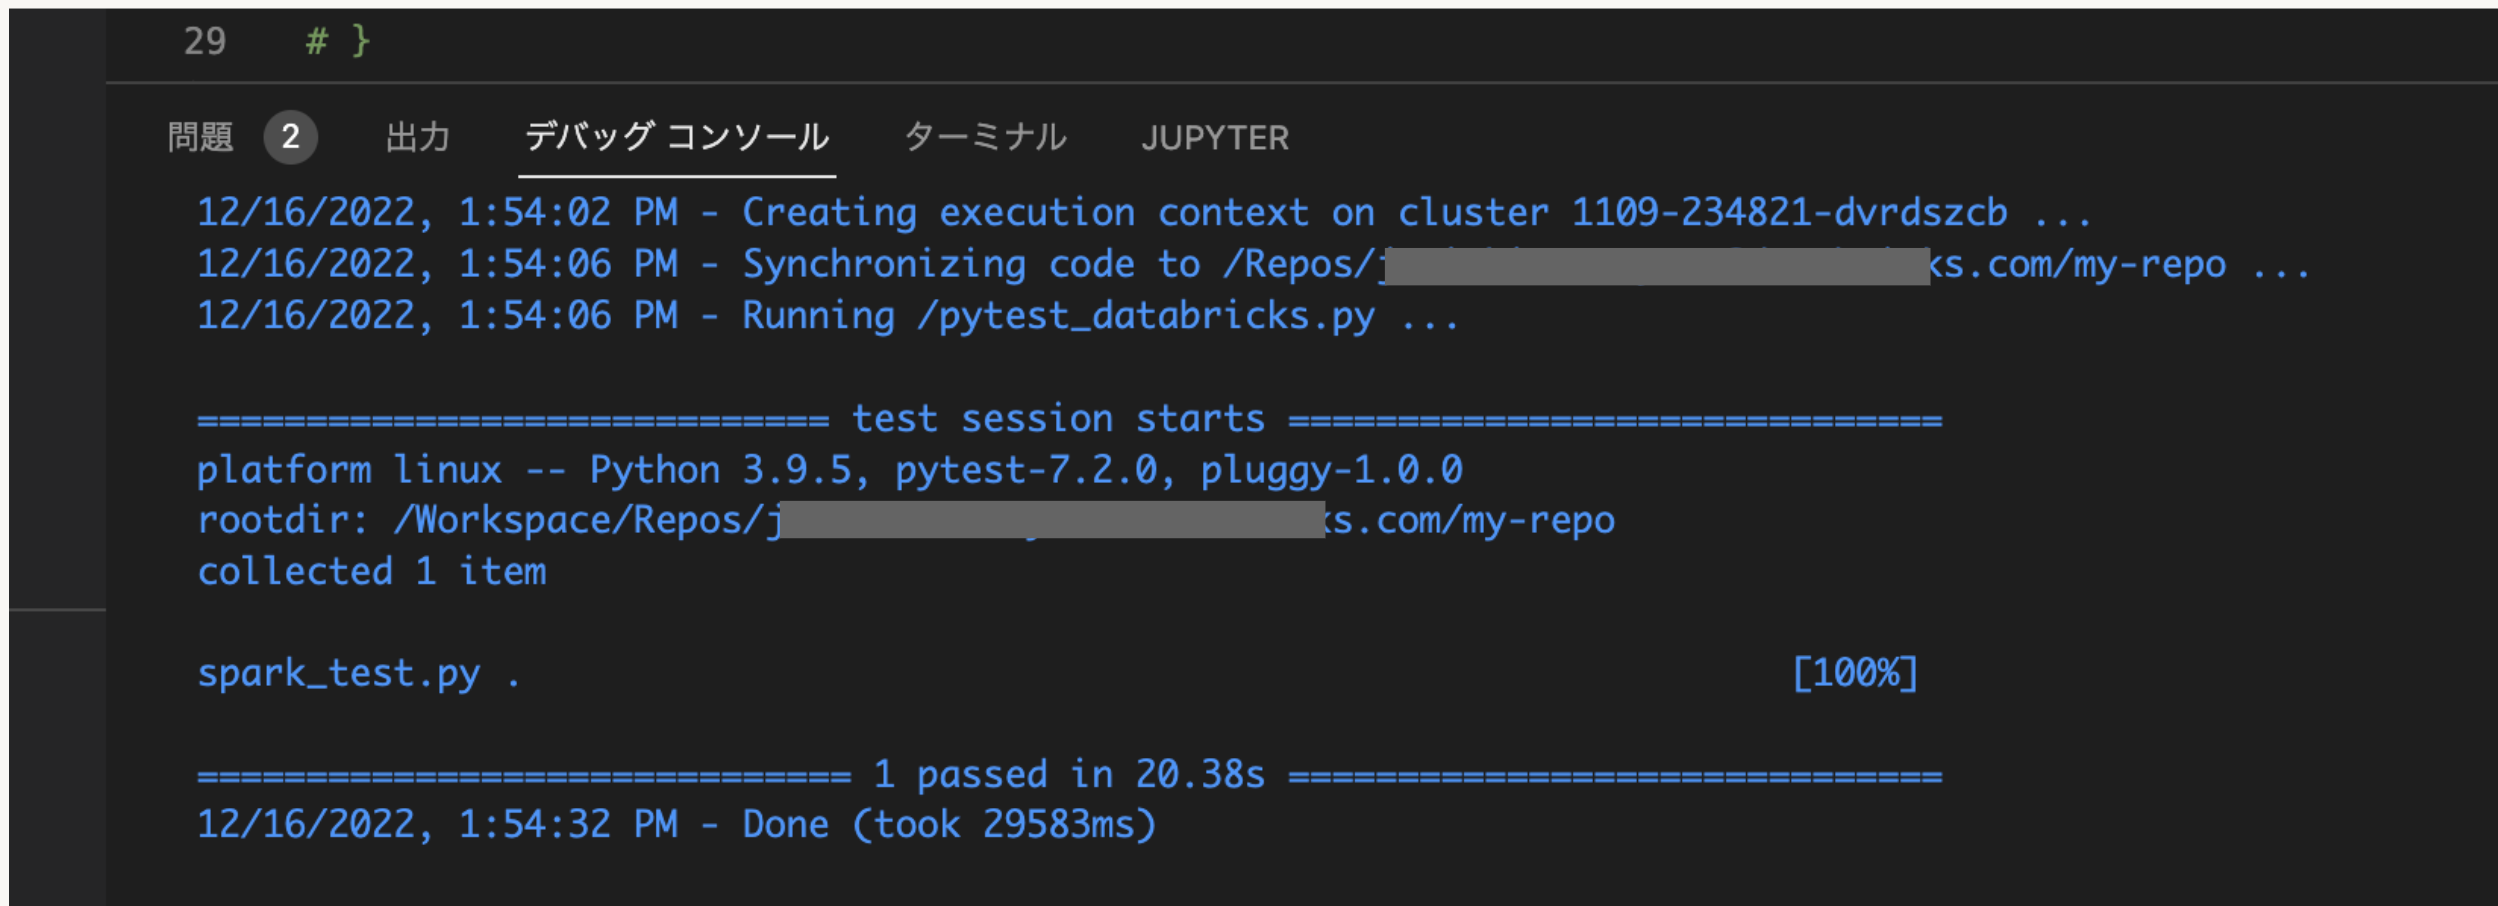
pytestの結果はDebug Consoleに表示されます(メインメニューのView > Debug Console)。例えば、この結果は spark_test.py ファイルに少なくとも1つのテストが見つかったことを示し、ドット(.)は1つのテストが見つかって合格したことを意味します。(失敗したテストはFが表示されます)。
最後に
VSCodeを使った開発でも、DatabricksのSpark Clusterと連携してテストが簡単に実施出来ることが確認出来ました。Databricksの活用パターンが増えていいですね。