はじめに
今までリアルタイム推論時にしか使えなかった Amazon SageMaker Model Monitor がバッチ推論に対応 したので、ちょっと試してみようと思います。
Amazon SageMaker Model Monitor とは
推論時の入力データや推論結果を監視して、モデルを学習した際に使用したデータと変化があるか(ドリフト)や推論精度の低下を検出する機能です。ビルトインで提供されている機能としては、Deequ というライブラリを使って学習データの統計量をベースラインとして算出して、モデルデプロイ後の推論時の入力データに対しても同様に統計量を算出してベースラインと比較します。
サンプルコードを見る
こちらの GitHub リポジトリ にサンプルコードが公開されています。データ監視とモデル監視のサンプルがありますが、今回は こちらのオンデマンドのデータ監視のサンプルノートブック を見ていこうと思います。オンデマンドの他に、データの監視をスケジュール実行するサンプルノートブック があります。
ベースラインの作成
ベースラインとは、今後データドリフトが発生したかを検知する際に基準として使用する統計量です。このサンプルノートブックではモデルの学習をせず、学習済みモデル model/xgb-churn-prediction-model.tar.gz を使用します。その学習済みモデルの学習時に使用したデータ test_data/training-dataset-with-header.csv を使ってベースラインを作成します。
ベースラインを作成しているのは以下の部分です。ベースライン作成ジョブは Amazon SageMaker Processing Job として実行されます。その際に使用するインスタンスタイプやインスタンス数などを DefaultModelMonitor で設定し、ベースライン作成に使用するデータの情報や作成結果の保存パスなどをパラメタで指定して suggest_baseline を実行することでベースライン作成ジョブが開始します。
my_default_monitor = DefaultModelMonitor(
    role=role,
    instance_count=1,
    instance_type="ml.m5.xlarge",
    volume_size_in_gb=20,
    max_runtime_in_seconds=3600,
)

my_default_monitor.suggest_baseline(
    baseline_dataset=baseline_data_uri + "/training-dataset-with-header.csv",
    dataset_format=DatasetFormat.csv(header=True),
    output_s3_uri=baseline_results_uri,
    wait=True,
    logs=False,
)
ベースライン作成ジョブが完了すると、指定した S3 パスに constraints.json と statistics.json というファイルが作成されます。
| ファイル名 | 内容 |
|---|---|
| constraints.json | 各特徴量のデータ型(Integral, Fractional, String, Unknown)、非null値の割合、監視設定値が記載されている。ベースラインの constraints.json の監視設定値を直接変更することで監視に使用する閾値などのパラメタを調整することができる。詳細は こちらのドキュメント 参照。 |
| statistics.json | 各特徴量の統計量(最大値、最小値、中央値、分散、など)が記載されている。詳細は こちらのドキュメント 参照。 |
バッチ推論と入力データのキャプチャの設定
オンデマンドでデータ監視をするには、Amazon SageMaker Pipelines の MonitorBatchTransformStep を使う必要があるようです。
以下の流れで SageMaker Pipelines のセットアップをします。
まずはバッチ変換ジョブで使用する Model の作成です。
image_uri = retrieve("xgboost", boto3.Session().region_name, "0.90-1")

model = Model(
    image_uri=image_uri,
    model_data=model_url,
    role=role,
    sagemaker_session=pipeline_session,
)

create_model_step = ModelStep(
    name="CreateXGBoostModelStep",
    step_args=model.create(),
)
次に、バッチ変換ジョブの設定をします。
transformer = Transformer(
    model_name=create_model_step.properties.ModelName,
    instance_count=1,
    instance_type="ml.m5.xlarge",
    accept="text/csv",
    assemble_with="Line",
    output_path=transform_output_path,
    sagemaker_session=pipeline_session,
)

transform_input_param = ParameterString(
    name="transform_input",
    default_value=f"s3://{bucket}/{prefix}/transform_input/validation3",
)

transform_arg = transformer.transform(
    transform_input_param,
    content_type="text/csv",
    split_type="Line",
    # exclude the ground truth (first column) from the validation set
    # when doing inference.
    input_filter="$[1:]",
)
その後、CheckJobConfig でデータ品質チェックの設定をし、MonitorBatchTransformStep を使って SageMaker Pipelines のバッチ推論&データチェック Step を作成します。
job_config = CheckJobConfig(role=role)
data_quality_config = DataQualityCheckConfig(
    baseline_dataset=transform_input_param,
    dataset_format=DatasetFormat.csv(header=False),
    output_s3_uri=s3_report_path,
)

from sagemaker.workflow.monitor_batch_transform_step import MonitorBatchTransformStep

transform_and_monitor_step = MonitorBatchTransformStep(
    name="MonitorCustomerChurnDataQuality",
    transform_step_args=transform_arg,
    monitor_configuration=data_quality_config,
    check_job_configuration=job_config,
    # since this is for data quality monitoring,
    # you could choose to run the monitoring job before the batch inference.
    monitor_before_transform=True,
    # if violation is detected in the monitoring, you can skip it and continue running batch transform
    fail_on_violation=False,
    supplied_baseline_statistics=statistics_path,
    supplied_baseline_constraints=constraints_path,
)
その後は、以下のように SageMaker Pipelines の Step をつなげて実行します。
from sagemaker.workflow.pipeline import Pipeline

pipeline = Pipeline(
    name="MonitorDataQualityBatchTransformPipeline",
    parameters=[transform_input_param],
    steps=[create_model_step, transform_and_monitor_step],
)
pipeline.upsert(role_arn=role)
execution = pipeline.start()
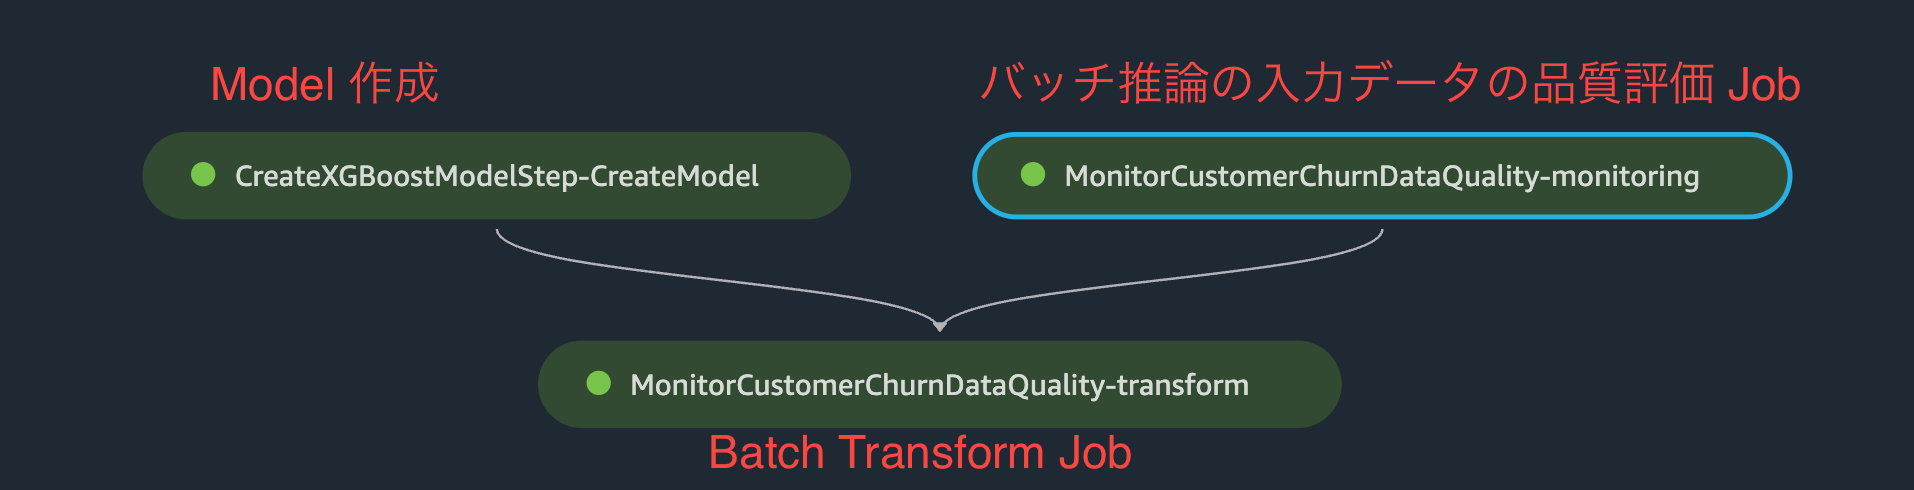
上記手順で以下のような Graph が作成されます。作成した Step は ModelStep と MonitorBatchTransformStep のふたつですが、ノードは合計 3つ作成されています。Model 作成と、バッチ推論の入力データの品質評価 Job が完了してから、Batch Transform Job が実行されます。
データ品質評価結果を見てみる
SageMaker Pipelines の実行が終わったら、出力されたレポートを確認してみます。
データ品質評価結果の取得
以下のコードで、データ品質評価 Step の情報を取得し、さらにデータ評価結果レポートファイル(constraint_violations.json)の内容を取得します。
from sagemaker.model_monitor import MonitoringExecution

monitoring_step = [step for step in execution.list_steps() if "QualityCheck" in step["Metadata"]][0]

monitoring = MonitoringExecution.from_processing_arn(
    sagemaker_session=pipeline_session,
    processing_job_arn=monitoring_step["Metadata"]["QualityCheck"]["CheckJobArn"],
)
violation = monitoring.constraint_violations(file_name="constraint_violations.json")
データ品質評価結果の可視化
以下のコードでデータ評価で検出された異常の一覧を確認することができます。デフォルトのモニタリング設定値だと violation が検出されなかったため、ベースラインの constraints.json の一番下の方にある comparison_threshold の値を 0.1 から 0.0001 にしてから SageMaker Pipelines を実行しました。
pd.set_option("display.max_colwidth", -1)

constraints_df = pd.io.json.json_normalize(violation.body_dict["violations"])
constraints_df.head(10)
使用した constraints.json のモニタリング設定値の部分は以下のような感じです。
  "monitoring_config": {
    "evaluate_constraints": "Enabled",
    "emit_metrics": "Enabled",
    "datatype_check_threshold": 1.0,
    "domain_content_threshold": 1.0,
    "distribution_constraints": {
      "perform_comparison": "Enabled",
      "comparison_threshold": 0.0001,
      "comparison_method": "Robust"
    }
  }
Ece Mins という特徴量のデータ型とデータドリフトに問題が発生しているようです。

どれくらいベースラインからの差が生じたのかを確認するために、さらに詳しく結果を見ていきます。以下のコードで、
バッチ推論の入力データとベースラインの統計量データをそれぞれ取得します。
from sagemaker.s3 import S3Downloader
execution_statistics = monitoring.statistics(file_name="statistics.json").body_dict
baseline_statistics = (
    json.loads(S3Downloader.read_file(statistics_path))
    if statistics_path is not None
    else None
)
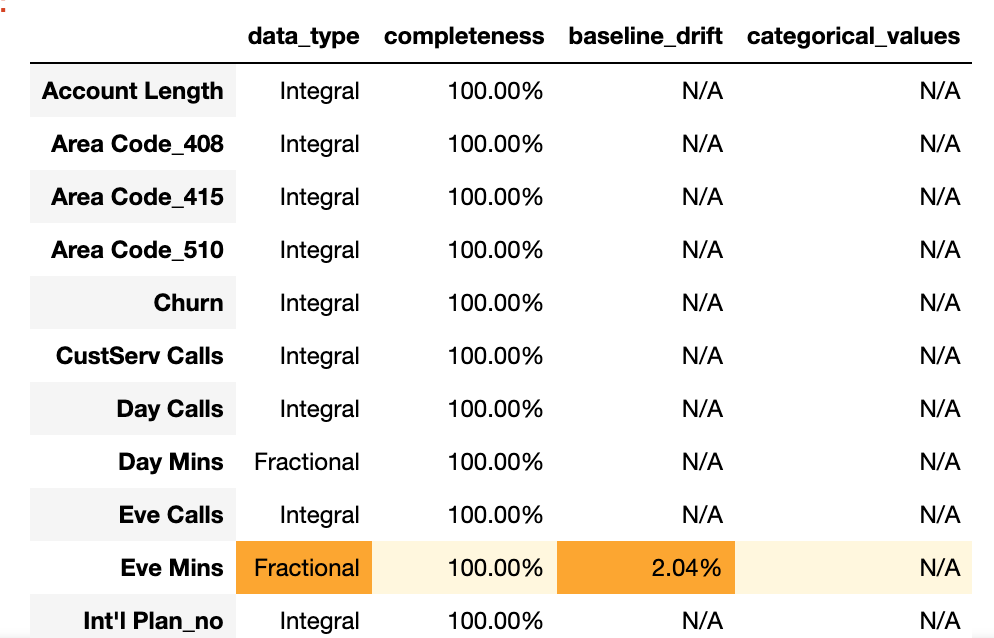
取得した統計量を使ってデータ評価結果を可視化します。
!wget https://raw.githubusercontent.com/awslabs/amazon-sagemaker-examples/main/sagemaker_model_monitor/visualization/utils.py

import utils as mu

mu.show_violation_df(
    baseline_statistics=baseline_statistics,
    latest_statistics=execution_statistics,
    violations=violation.body_dict["violations"],
)
Eve Mins に関して、データ型の不一致とドリフトが検出されたようです。
おわりに
バッチ変換ジョブに対応した SageMaker Model Monitor を試してみました。テーブルデータであれば、簡単にデータのドリフトや型の不一致を検出することができました。サンプルノートブックの Pipeline をカスタマイズして、vaiolation が検出されたら SNS にメッセージを送信したり、最新のデータを使ってモデルの再学習を実行したりできそうです。MonitorBatchTransformStep を使わず、QualityCheckStep を単体で実行して、violation が検出されたらモデルの再学習を挟んでから TransformStep でバッチ推論、という流れにしても良いかもしれません。