ルールとは
JUnit4.7で追加された、JUnitの拡張フレームワーク。
JUnitでは、フィクスチャのセットアップの共通処理を抽出するための様々な仕組みがあるが、
ルールはより容易に、そして柔軟に共通処理を抽出することができる仕組みである。
特徴としては以下のようなものが挙げられる。
- 共通処理を独立したクラスとして定義できる
- テスト実行時のメタデータにアクセスできる
上記の特徴から、ルールは再利用しやすく、宣言的に記述でき、
テスト実行時の拡張を容易に行うことができる仕組みであると言える。
ルールの実装
ルールのお約束(ややこしい)
- org.junit.rules.TestRuleインターフェースの実装クラスであること
- org.junit.Ruleアノテーションもしくはorg.junit.ClassRuleを付与した
publicなフィールドとして定義すること - フィールドの宣言と同時にインスタンスの作成
もしくはコンストラクタによるインスタンスの生成をすること
ルールの仕組み
RuleアノテーションとClassRuleアノテーションでは、ルールが適用されるタイミングが異なる。
Ruleアノテーションはテストメソッドの実行ごと(Beforeアノテーションと同じ)に適用され、
ClassRuleアノテーションはテストクラスごと(BeforeClassアノテーションと同じ)に適用される。
複数のルールの宣言
ルールは、一つのテストクラスに複数定義することができる。
ただし、RuleChain(後述)を使用しない場合、その実行順序は制御できずランダムとなる。
ルールの実装例
public class RuleExampleTest {
    @Rule
    public Timeout timeout = new TimeOut(100);
    @ClassRule
    public TestName testName = new TestName();

    @Test
    public void 実行に時間がかかることのあるテスト() throws Exception {
        doLongTask();
    }
}
JUnitが提供しているルール
TemporaryFolder:テンポラリフォルダの作成と解放を行う
補足:テンポラリフォルダとは、一時的に必要なファイルを格納しておくフォルダのこと。
通例、ファイルシステムを扱うテストの実行時はテスト毎に
前処理でフォルダを作成、後処理で削除するといった操作を行い、テストの独立性を保つ。
org.junit.rules.TemporaryFolderクラスをルールとして定義すると、ルールが実行される度に
フォルダの作成、削除が行われるため、これらの処理を実装する必要がなくなる。
public class TemporaryFolderExampleTest {
    @Rule
    public TemporaryFolder tmpFolder = new TemporaryFolder();

    @Test
    public void mkFilesによって2つのファイルが作成される() throws Exception {
        File folder = tmpFolder.getRoot();
        TemporaryFolderExample.mkDefaultFiles(folder);
        String[] actualFiles = folder.list();
        Arrays.sort(actualFiles);
        assertThat(actualFiles.length, is(2));
        assertThat(actualFiles[0], is("UnitTest"));
        assertThat(actualFiles[1], is("readme.txt"));
    }
}
public class TemporaryFolderExample {

	public static void mkDefaultFiles(File folder) {
		String rootPath = folder.getPath();
		File file = new File(rootPath + "/UnitTest");
		File file2 = new File(rootPath + "/readme.txt");
		try {
			file.createNewFile();
			file2.createNewFile();
		} catch (IOException e) {
			e.printStackTrace();
		}

	}

}
補足:TemporaryFolderの拡張
拡張前のTemporaryFolderクラスはJavaのシステムプロパティ"java.io.tmpdir"に設定された
フォルダ直下のリソースの準備と解放しか行わないが、サブクラスを作成することで処理を拡張することができる。
TemporaryFolderはorg.junit.rules.ExternalResourceのサブクラスなので、
beforeメソッド、afterメソッドをオーバーライドしている。
それぞれ、テストの実行前、実行後に呼び出されるのでその時に行う処理を拡張できる。
以下は実行前にテンポラリフォルダ直下にサブクラスを作成し、
実行後に作成したフォルダ名をコンソール出力するよう拡張した例。
public class SubTemporaryFolder extends TemporaryFolder {

	// サブフォルダ
	public File srcFolder;
	public File testFolder;

	@Override
	protected void before() throws Throwable {
		// TemporaryFolderのbeforeメソッド(必須)
		super.before();
		srcFolder = newFolder("src");
		testFolder = newFolder("test");
	}

	@Override
	protected void after() {
		// TemporaryFolderのafterメソッド(必須)
		super.after();
		System.out.println(srcFolder.getName());
		System.out.println(testFolder.getName());
	}
}
public class SubTemporaryFolderExampleTest {
	   @Rule
	    public SubTemporaryFolder tmpFolder = new SubTemporaryFolder();

	    @Test
	    public void mkFilesによって2つのファイルが作成される() throws Exception {
	        File folder = tmpFolder.getRoot();
	        File srcFolder = tmpFolder.srcFolder;
	        File testFolder = tmpFolder.testFolder;
	        assertThat(folder.list().length, is(2));
	        assertThat(srcFolder.list().length, is(0));
	        assertThat(testFolder.list().length, is(0));
	    }
}
ExternalResource:外部リソースを扱う際の基底クラス
org.junit.rules.ExternalResourceクラスは
「テスト実行前のリソースの準備」と「テスト実行後のリソースの解放」を行うルール。
ExternalResourceクラスは抽象クラスであるため、使用する際はサブクラスを実装する。
例の中ではサブクラスをテストクラスのネストクラスとして定義したが、
これを独立したクラスとして定義した場合は複数テストクラスからの利用が可能になる。
public class ExternalResourceExampleTest() {

	@Rule
	public ServerResource resource = new ServerResource();

	static class ServerResource extends ExternalResource {
		ServerSocket server;

		@Override
		protected void before() throws Throwable {
			server = new ServerSocket(8080);
			server.accept();
		}

		@Override
		protected void after() {
			try {
				server.close();
			} catch (IOException e) {
				e.printStackTrace();
			}
		}
	}
	@Test
	public void test() {
		fail("Not yet implemented");
	}
}
Verifier:テスト後の事後条件を検証する
org.junit.rules.Verifierクラスは、テストの事後条件を検証するルールである。
ExternalResourceクラスと同様、抽象クラスなのでサブクラスを作成し、
verifyメソッドをオーバーライドして使用する。
テストの事後条件の検証はAfterアノテーションやAfterClassアノテーションを付与した
後処理メソッドで行うことも可能なので、検証内容がより複雑、複数クラスで横断的に行いたい
という場合にVerifierクラスを使用するよう使い分けると便利。
※複数クラスで横断的に使用する場合にはネストクラスではなく独立したクラスとして実装。
実行順序は以下の通り。
Beforeアノテーション → Testアノテーション → Afterアノテーション → verifyメソッド
public class VerifierExampleTest {
    // 使い捨ての無名クラスとして実装
    @Rule
    public Verifier verifier = new Verifier() {
        protected void verify() throws Throwable {
            assertThat("value should be 0.", sut.value, is(0));
        }
    };
    VerifierExample sut;

    @Before
    public void setUp() throws Exception {
        sut = new VerifierExample();
    }

    @After
    public void tearDown() throws Exception {
        // do nothing.
    }

    @Test
    public void clearメソッドで計算結果を初期化し0にする() throws Exception {
        sut.set(0);
        sut.add(140);
        sut.minus(5);
        assertThat(sut.getValue(), is(135));
        sut.clear();
    }
}
public class VerifierExample {

	protected Integer value;

	public void set(int i) {
		value = i;
	}

	public void add(int i) {
		value += i;
	}

	public void minus(int i) {
		value -= i;
	}

	public Integer getValue() {
		return value;
	}

	public void clear() {
		value = 0;
	}
}
ErrorCollector:テスト時の例外の扱いをカスタマイズする
通常、JUnitにおいてのテストメソッドの処理はエラーが発生した時点で終了する。
しかし、org.junit.rules.ErrorCollectorクラスを使用するとテストを最後まで実行した後、
まとめてエラーに関する情報を出力する。
public class ItemInfoTest {

	@Rule
	public ErrorCollector errCollector = new ErrorCollector();

	@Test
	public void ルール適用時の検証() throws Exception {
		ItemInfo itemInfo = new ItemInfo();
		errCollector.checkThat(itemInfo, is(nullValue())); /* エラー発生箇所 */
		errCollector.checkThat(itemInfo.getId(), is(""));
		errCollector.checkThat(itemInfo.getName(), is(not(""))); /* エラー発生箇所 */
		errCollector.checkThat(itemInfo.getStockNum(), is(0));
	}

	@Test
	public void 通常時の検証() throws Exception {
		ItemInfo itemInfo = new ItemInfo();
		assertThat(itemInfo, is(nullValue())); /* エラー発生箇所 */
		assertThat(itemInfo.getId(), is(""));
		assertThat(itemInfo.getName(), is(not(""))); /* エラー発生箇所 */
		assertThat(itemInfo.getStockNum(), is(0));
	}

}
public class ItemInfo {

	private String id;

	private String name;

	private int stockNum;

	public ItemInfo() {
		this.id = "";
		this.name = "";
		this.stockNum = 0;
	}

/* 以下、各メンバーのGetter、Setterメソッド */

}
〜ルール適用時の検証〜

Expected: is null
     but: was <com.example.junit.rules.errcollect.ItemInfo@506c589e>

java.lang.AssertionError:
Expected: is not ""
     but: was ""

〜通常時の検証〜

Expected: is null
     but: was <com.example.junit.rules.errcollect.ItemInfo@1698c449>
ExpectedException:例外を詳細に検証する
org.junit.rules.ExpectedExceptionクラスは送出された例外の検証を
シンプルに行うための仕組みを提供するルールである。
実装方法の比較のため、ルール未使用の場合と使用した場合を以下に比較する。
public class ExpectExceptionExampleTest {

	@Rule
	public ExpectedException exException = ExpectedException.none();

	@Test
	public void 例外メッセージをルールを使って検証する() throws Exception {
		exException.expect(ArithmeticException.class);
		exException.expectMessage(containsString("by zero"));
		int result = 1 / 0;
		System.out.println(result);
	}

	@Test
	public void 例外メッセージを標準的な方法で検証する() throws Exception {
		try {
			int result = 1 / 0;
			System.out.println(result);
			// 例外が発生しない場合を検出する
			fail("例外が発生しない");
		} catch (ArithmeticException e) {
			assertThat(e.getMessage(), is(containsString("by zero")));
		}
	}
}
Timeout:タイムアウトを制御する
読んで字のごとくタイムアウトまでの時間を設定できるルール。
タイムアウトの設定はTestアノテーションのtimeout属性に値を渡すことでも設定できるが、
テストクラス内の全テストメソッドに共通で設定する場合には
Timeoutクラスを使用することで記述を1箇所にまとめることができる。
public class TimeoutExampleTest {
	@Rule
	public Timeout timeout = new Timeout(1000);

	@Test
	public void sleep1() throws InterruptedException {
		while(true) {
		}
	}

	@Test
	public void sleep2() throws InterruptedException {
		while(true) {
		}
	}
}
TestWatcher:テスト実行時の記録を行う
org.junit.rules.TestWatcherクラスは、ログと合わせて使用することで
テストの実行状態を監視する(追う)ことができるルールである。
TestWatcherは抽象クラスなので、サブクラスでメソッドをオーバーライドして使用する。
テスト成功時と失敗時のTestWatcherの実行順序は以下の通り。
【成功時】
starting → succeeded → finished
【失敗時】
starting → failed → finished
public class TestWatcherExampleTest {

	@Rule
	public TestWatcher testWatcher = new TestWatcher() {

		@Override
		protected void starting(Description desc) {
                    Logger.getAnonymousLogger()
                        .info("start: " + desc.getMethodName());
		}

		@Override
		protected void succeeded(Description desc) {
                    Logger.getAnonymousLogger()
                        .info("succeeded: " + desc.getMethodName());
		}

		@Override
		protected void failed(Throwable e, Description desc) {
                    Logger.getAnonymousLogger()
                        .log(Level.WARNING, "failed: " + desc.getMethodName(), e);
		}

		@Override
		protected void finished(Description desc) {
			Logger.getAnonymousLogger()
                    .info("finished: " + desc.getMethodName());
		}
	};

	@Test
	public void 成功するテスト() throws Exception {
	}

	@Test
	public void 失敗するテスト() throws Exception {
		fail("NG");
	}
}
4 23, 2020 7:11:08 午後 com.example.junit.rules.testwatcher.TestWatcherExampleTest$1 starting
情報: start: 失敗するテスト
4 23, 2020 7:11:08 午後 com.example.junit.rules.testwatcher.TestWatcherExampleTest$1 failed
警告: failed: 失敗するテスト
java.lang.AssertionError: NG
	at org.junit.Assert.fail(Assert.java:88)
	at com.example.junit.rules.testwatcher.TestWatcherExampleTest.失敗するテスト(TestWatcherExampleTest.java:45)
	at sun.reflect.NativeMethodAccessorImpl.invoke0(Native Method)
	at sun.reflect.NativeMethodAccessorImpl.invoke(NativeMethodAccessorImpl.java:62)
	at sun.reflect.DelegatingMethodAccessorImpl.invoke(DelegatingMethodAccessorImpl.java:43)
	at java.lang.reflect.Method.invoke(Method.java:498)
	at org.junit.runners.model.FrameworkMethod$1.runReflectiveCall(FrameworkMethod.java:47)
	at org.junit.internal.runners.model.ReflectiveCallable.run(ReflectiveCallable.java:12)
	at org.junit.runners.model.FrameworkMethod.invokeExplosively(FrameworkMethod.java:44)
	at org.junit.internal.runners.statements.InvokeMethod.evaluate(InvokeMethod.java:17)
	at org.junit.rules.TestWatcher$1.evaluate(TestWatcher.java:55)
	at org.junit.rules.RunRules.evaluate(RunRules.java:20)
	at org.junit.runners.ParentRunner.runLeaf(ParentRunner.java:271)
	at org.junit.runners.BlockJUnit4ClassRunner.runChild(BlockJUnit4ClassRunner.java:70)
	at org.junit.runners.BlockJUnit4ClassRunner.runChild(BlockJUnit4ClassRunner.java:50)
	at org.junit.runners.ParentRunner$3.run(ParentRunner.java:238)
	at org.junit.runners.ParentRunner$1.schedule(ParentRunner.java:63)
	at org.junit.runners.ParentRunner.runChildren(ParentRunner.java:236)
	at org.junit.runners.ParentRunner.access$000(ParentRunner.java:53)
	at org.junit.runners.ParentRunner$2.evaluate(ParentRunner.java:229)
	at org.junit.runners.ParentRunner.run(ParentRunner.java:309)
	at org.eclipse.jdt.internal.junit4.runner.JUnit4TestReference.run(JUnit4TestReference.java:50)
	at org.eclipse.jdt.internal.junit.runner.TestExecution.run(TestExecution.java:38)
	at org.eclipse.jdt.internal.junit.runner.RemoteTestRunner.runTests(RemoteTestRunner.java:459)
	at org.eclipse.jdt.internal.junit.runner.RemoteTestRunner.runTests(RemoteTestRunner.java:675)
	at org.eclipse.jdt.internal.junit.runner.RemoteTestRunner.run(RemoteTestRunner.java:382)
	at org.eclipse.jdt.internal.junit.runner.RemoteTestRunner.main(RemoteTestRunner.java:192)

4 23, 2020 7:11:08 午後 com.example.junit.rules.testwatcher.TestWatcherExampleTest$1 finished
情報: finished: 失敗するテスト
4 23, 2020 7:11:08 午後 com.example.junit.rules.testwatcher.TestWatcherExampleTest$1 starting
情報: start: 成功するテスト
4 23, 2020 7:11:08 午後 com.example.junit.rules.testwatcher.TestWatcherExampleTest$1 succeeded
情報: succeeded: 成功するテスト
4 23, 2020 7:11:08 午後 com.example.junit.rules.testwatcher.TestWatcherExampleTest$1 finished
情報: finished: 成功するテスト
TestName:実行中のテストメソッド名を参照する
org.junit.rules.TestNameクラスは、
テストメソッド内で実行中のメソッド名を取得するためのルール。
テストメソッド内でメソッド名を取得できることで、メソッド名と外部リソースの
ファイル名を紐づけて取得するなど様々な利用方法がある。
public class TestNameExampleTest {
    @Rule
    public TestName testName = new TestName();

    @Test
    public void テストメソッド名() throws Exception {
        fail(testName.getMethodName() + " is unimplements yet.");
    }
}
カスタムルールの作成
カスタムルールの作成には、
- すでに実装されている抽象クラスのサブクラスを作成する(ExternalResourceクラスなど)
- TestRuleインターフェースを実装したクラスを作成する
の2通りの方法がある。
TestRuleインターフェース
org.junit.rules.TestRuleインターフェースには、次のメソッドが定義されている。
Statement apply(Statement base, Description description);
Statementオブジェクト
org.junit.runners.model.Statementクラスは、テストの実行を制御するクラスである。
Statement.evaluateメソッドが呼び出されると、テストが実行される。
applyメソッドに引数として渡されるStatementオブジェクトは、evaluateメソッドにおいて
以下の順序でテストが実行されるようセットアップされている。
- テストクラスのインスタンスの生成
- Beforeアノテーションの付与されたメソッドの実行(事前処理)
- テストメソッドの実行
- Afterアノテーションの付与されたメソッドの実行(事後処理)
Descriptionオブジェクト
org.junit.runner.Descriptionクラスは、テストケースのメタ情報を保持するクラスである。
テストクラス、テストメソッドの名称や付与されたアノテーションといった情報を取得できる。
実装の雛形
ルールの一般的な実装は、引数のStatementオブジェクトの
プロキシオブジェクト(代理オブジェクト)を作成して戻り値として返却する。
public abstract class カスタムルール名 implements TestRule {

	@Override
	public Statement apply(Statement base, Description description) {
		return new Statement() {
			@Override
			public void evaluate() throws Throwable {
				// 事前、事後処理として独自の事前処理を呼んだり、
				customedBySubClazz();
				// テストのメタ情報を取得して条件分岐したり、
				if (description.getMethodName().equals("該当テストメソッド名")) {
					// 判定結果によってオリジナルのevaluateメソッドを実行したり、しなかったりする
					base.evaluate();
				} else {
					fail("テストメソッドが違います");
				}

			}
		};
	}
	// サブクラス定義時に独自の処理を実装するための抽象メソッド
	protected abstract void customedBySubClazz() throws Throwable;
}
事前条件をチェックするカスタムルール
テストの事前条件のチェックを行うカスタムルールを作成する。
Beforeアノテーションの付与されたメソッドによる事前条件のチェックとの違いとしては、
よりテストクラスから独立した形で拡張機能が提供できる。メタ情報にアクセスしやすい。
といったものがある。
実装はVerifierクラスの実装を参考にする。
public abstract class PreProcess implements TestRule {

	@Override
	public Statement apply(Statement base, Description description) {
		return new Statement() {
			@Override
			public void evaluate() throws Throwable {
				// 独自の事前処理
				verify();
				// オリジナルのevaluateメソッド
				base.evaluate();
			}
		};
	}

	// サブクラス定義時に独自の事前処理を実装する
	protected abstract void verify() throws Throwable;
}
public class PreProcessExampleTest {

	@Rule
	public PreProcess preProcess = new PreProcess() {
		@Override
		protected void verify() throws Throwable {
			LocalDate now = LocalDate.now();
			LocalDate limitDate = LocalDate.of(2015, 4, 1);
			if (now.isAfter(limitDate)) {
				throw new AssertionError();
			}
		}
	};

	@Test
	public void 実行されないテスト() {
		assertThat(1, is(1));
	}
}
OSに依存したテストを行うカスタムルール
OSに依存したテストを行うカスタムルールを作成する。
プロキシオブジェクトのevaluateにおいて、実行環境のOSを判定し、
想定のOS(独自実装のRunOnアノテーションで指定したOS)と一致する場合のみ、
オリジナルのevaluateメソッドを呼び出す。
テストを実行するOSを設定する独自アノテーションの作成
アノテーションの作成で使用しているメタ情報に関するアノテーションの詳細は、
TECHSCOREで掲載されている記事を参照。
ざっくりと説明すると、
@Retention(RetentionPolicy.RUNTIME) → JUnitテスト実行時も参照できる
@Target({ElementType.METHOD}) → メソッドに付与するアノテーションですよ
という感じ。
@Retention(RetentionPolicy.RUNTIME)
@Target({ElementType.METHOD})
public @interface RunOn {
	public enum OS {
		WINDOWS, MAC, LINUX
	}
	public OS value();
}
カスタムルールの実装
カスタムルールでは、RunOnアノテーションから取得したOSと
Javaのシステムプロパティから取得した実行環境のOSが一致するかを判定し、
一致した場合はオリジナルのevaluateメソッドを呼び出し、
一致しない場合は何も行わないという処理を実装する。
public class OSDepend implements TestRule {

	@Override
	public Statement apply(Statement base, Description desc) {
		return new Statement() {
			@Override
			public void evaluate() throws Throwable {
				// Descriptionからメソッドに付与されたアノテーションを取得
				RunOn env = desc.getAnnotation(RunOn.class);
				// アノテーションで指定したOSと実行環境のOSが一致するかを判定
				if (env == null || canEvaluate(env.value())) {
					base.evaluate();
				} else {
					// don't evaluate
				}
			}

			private boolean canEvaluate(OS os) {
				/* システムプロパティから実行環境のOSを取得し、
				    RunOnアノテーションで指定したOSと一致する場合にtrueを返却する*/
				String osName = System.getProperty("os.name");
				if (osName == null) {
					return false;
				}
				if (os == OS.WINDOWS && osName.startsWith("Windows")) {
					return true;
				}
				if (os == OS.MAC && osName.startsWith("Mac OS X")) {
					return true;
				}
				if (os == OS.LINUX && osName.startsWith("Linux")) {
					return true;
				}
				return false;
			}
		};
	}
}
OSに依存したテストを行うテストクラス
以下のテストクラスを実行すると、テストは2つ実施されるが、
コンソール出力があるのはMacだけ(筆者の環境がMacのため)なので
Windows環境のテストケースは実行されていないことがわかる。
public class OSDependExampleTest {
	@Rule
	public OSDepend osDepend = new OSDepend();

	@Test
	// OSを判定するためのEnumを定義したアノテーション
	@RunOn(OS.WINDOWS)
	public void Windows環境でのみ実行するテスト() {
		System.out.println("test: onlyWindows");
		assertThat(File.separator, is("¥¥"));
	}

	@Test
	@RunOn(OS.MAC)
	public void Mac環境でのみ実行するテスト() {
		System.out.println("test: onlyMac");
		assertThat(File.separator, is("/"));
	}
}
↓ JUnitの実行結果
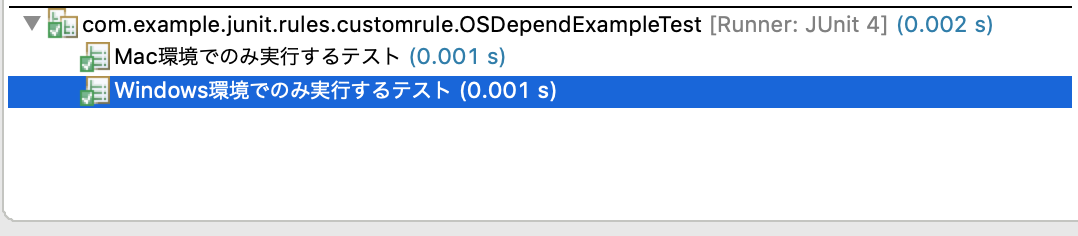
test: onlyMac
RuleChainによるルールの実行順序の制御
ルールを利用して外部リソースを制御する際、実行順序の指定が必要なケースがある。
例えば、APサーバとDBサーバを連携するテストケースがあった場合、
実行順序はDBサーバの起動 → APサーバの起動でなければならない。
こういった場合は、org.junit.rules.RuleChainクラスを利用して、
ルールの実行を連鎖させる形で実行順序を制御することができる。
(Chain of Responsibilityパターン:デザインパターンの一種)
RuleChainの実装例
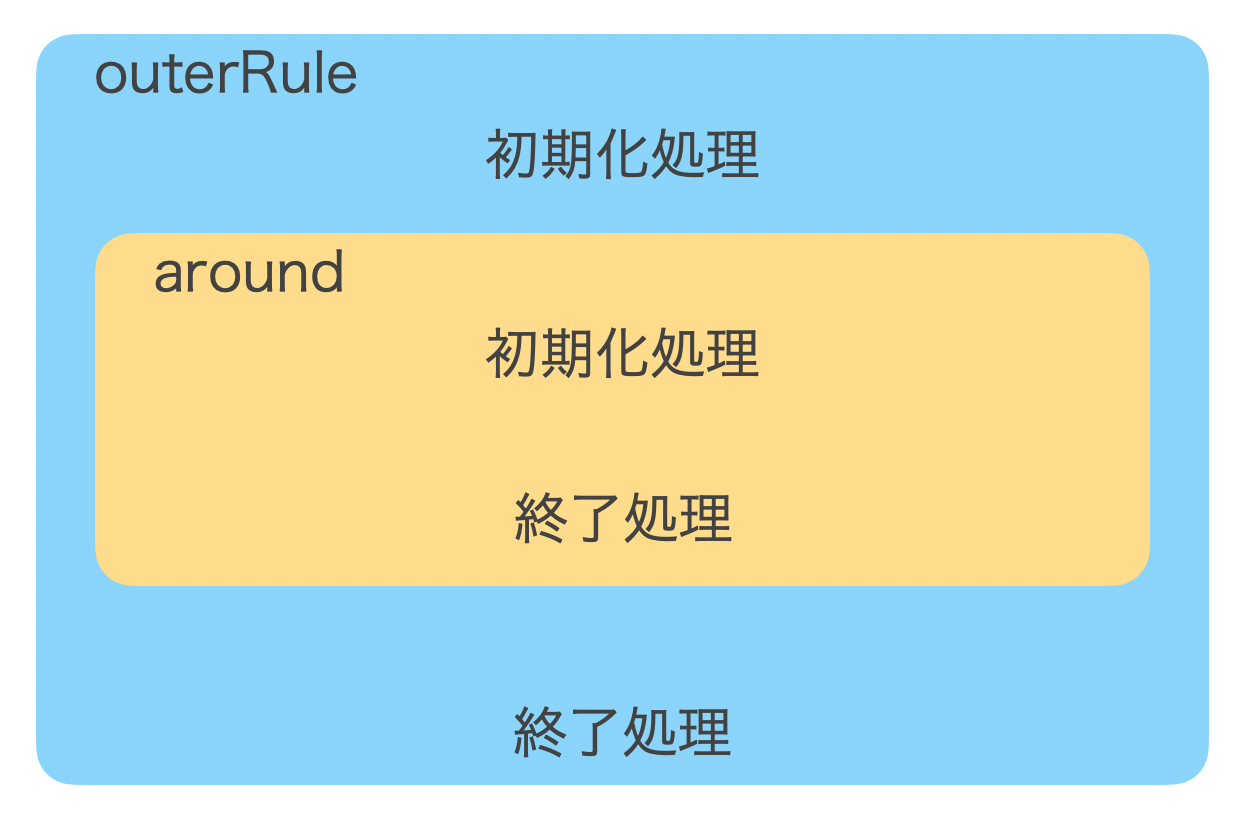
RuleChainクラスには以下のメソッドが実装されている。
static RuleChain outerRule(TestRule outerRule)
先に初期化し、後に終了処理を行うルールを指定する
RuleChain around(TestRule enclosedRule)
後に初期化し、先に終了処理を行うルールを指定する
文字だとスッと入ってこなかったので図解。
public class RuleChainExampleTest {
    @Rule
    public RuleChain ruleChain = RuleChain
                                    .outerRule(new PreRule())
                                    .around(new PostRule());

    @Test
    public void テスト() throws Exception {
    }
}

class PreRule extends ExternalResource {
    @Override
    protected void before() throws Throwable {
        System.out.println("1 start: PreRule");
    }

    @Override
    protected void after()  {
        System.out.println("4 finish: PreRule");
    }
}

class PostRule extends ExternalResource {
    @Override
    protected void before() throws Throwable {
        System.out.println("2 start: PostRule");
    }

    @Override
    protected void after()  {
        System.out.println("3 finish: PostRule");
    }
}
1 start: PreRule
2 start: PostRule
3 finish: PostRule
4 finish: PreRule
ClassRuleによるRuleChainの適用
サーバの起動、停止は重たい処理なので、テストケースが増えるとスローテスト問題が生じる。
よって、起動と終了時に特別な制御が必要ないのであればClassRuleアノテーションを使用し、
テストクラスごとにサーバの起動、停止を行うようにするなどリソースの節約が可能である。
参考文献
この記事は以下の情報を参考にして執筆しました。