はじめに
Apple は TN3187: Migrating to the UIKit scene-based life cycle にて、従来の app-based life cycle から scene-based life cycle (UIScene ライフサイクル) への移行を案内しています。
こちらの対応は Unity 製アプリも例外ではなく、Apple 公式および Unity Discussions からは、この対応について「iOS 26 の次のメジャーリリース以降、最新の SDK でビルドする際にはサポートしていることが必須であり、未対応の場合にはアプリが起動しなくなる」と注意喚起されています。
In the next major release following iOS 26, UIScene lifecycle will be required when building with the latest SDK; otherwise, your app won’t launch. While supporting multiple scenes is encouraged, only adoption of scene life-cycle is required.
これらを踏まえ、本記事では Unity プロジェクト向けの具体的な対応手順について解説していきます。
(本記事では主に iOS と表記しますが、Unity / Apple の告知としては iOS / iPadOS / tvOS / visionOS も対象に含まれます)
検証環境
- Unity
- Unity 6000.0.67f1
- Unity 6000.0.75f1
- Xcode 26.5
UIScene ライフサイクルとは
従来までは、アプリ全体のライフサイクルやウィンドウ管理を UIApplicationDelegate で扱う実装が一般的でした。1
しかし、iOS 13 からはマルチウィンドウが導入され2、それに伴いアプリ全体のライフサイクルと個々のウィンドウ (Scene) のライフサイクルを分けて扱う scene-based life cycle という仕組みが追加されました。
この場合には UIApplicationDelegate がアプリ全体のライフサイクルを管理し、UISceneDelegate (UIWindowSceneDelegate) がウィンドウ単位のライフサイクルを管理します。
詳細についての解説は割愛しますが、以下の記事などが参考になります。
対応手順
対応手順は大きく分けて 2 つあります。
- Unity を対応バージョンにアップデートする
- アップデートできない場合での手動対応
もしプロジェクト側でアップデートが検討可能であれば、まずは対応済みバージョン以降へ上げるのが最も確実な対応となります。
しかし、運用上の都合などで、すぐに Unity 本体をアップデートできないケースもあります。
その場合には、手動で変更差分を適用することで対応することも可能なので、順に解説していきます。
ちなみに UIScene がサポートされる最小の OS バージョンは iOS 13 以降となります。
これに応じて Unity 側も iOS 13 が最小要件となっています。
Unity を対応バージョンにアップデートする
こちらは Discussions でもアナウンスされているとおり、2022.3.72f1, 6000.0.68f1 などいくつかのバージョンから UIScene ライフサイクルサポートが適用されています。
しかし、記事執筆時点で Discussions のトップに記載されているバージョンは対応こそされているものの、UIApplicationSceneManifest を Info.plist に追加すると、アプリ実行中に Application.deepLinkActivated が呼び出されないという不具合が報告されています。
そのため、上記の件が気がかりな場合には、不具合修正が入った以下のバージョン以降にアップデートするのが安全かもしれません。
(Issue の Fixed in に記載されているバージョンの転載になります)
| Unity | version |
|---|---|
| Unity 6.6 | 6000.6.0a1 |
| Unity 6.5 | 6000.5.0a9 |
| Unity 6.4 | 6000.4.0b12 |
| Unity 6.3 LTS | 6000.3.12f1 |
| Unity 6.0 LTS | 6000.0.71f1 |
| Unity 2022 xLTS | 2022.3.75f1 |
ただし Discussions / Issue Tracker のコメント欄では、上記の修正バージョン以降でも Universal Links では再現するという報告があります。
そのため Deep Link を利用しているプロジェクトでは、Custom URL Scheme と Universal Links を分けて、実際に利用している起動経路で Application.deepLinkActivated や Application.absoluteURL の挙動を確認するのが安全です。
アップデートできない場合での手動対応
前述したとおり、運用上の都合などで、すぐに Unity 本体をアップデートできないケースもあります。
その場合は、iOS ビルドで出力される Xcode プロジェクトに対して手動で変更を加えることでも対応可能です。
ここからは未対応バージョンである 6000.0.67f1 をベースに、対応バージョンである 6000.0.75f1 との差分を比較しつつ、変更が必要な箇所について解説していきます。
これから紹介する手順は iOS ビルドで出力される Xcode プロジェクトに対するパッチとなるため、独自に関連コードを改修している場合には変更が競合する可能性があります。
また、手動でのパッチ適用は Unity 公式のサポート対象外となる旨も Discussions にてアナウンスされているため、適用するうえではこれらの注意事項を踏まえたうえでご検討ください。
主に変更するファイルは以下の 6 ファイルです (既存 4 ファイルの変更 + 新規 2 ファイルの追加)。
| 種別 | ファイル |
|---|---|
| 変更 | Info.plist |
| 変更 | Classes/UnityAppController.h |
| 変更 | Classes/UnityAppController.mm |
| 変更 | Classes/Unity/DisplayManager.mm |
| 新規 | Classes/UI/UnityScene.h |
| 新規 | Classes/UI/UnityScene.mm |
1. Info.plist に UIApplicationSceneManifest を追加
まず、シーンをサポートするために Info.plist に対して UIApplicationSceneManifest を追加します。
UISceneDelegateClassName には、次のステップで解説する UnityScene を指定します。
また、UIApplicationSupportsMultipleScenes には false を設定することでシングルウィンドウにしています。
<key>UIApplicationSceneManifest</key>
<dict>
	<key>UIApplicationSupportsMultipleScenes</key>
	<false/>
	<key>UISceneConfigurations</key>
	<dict>
		<key>UIWindowSceneSessionRoleApplication</key>
		<array>
			<dict>
				<key>UISceneConfigurationName</key>
				<string>Default Configuration</string>
				<key>UISceneDelegateClassName</key>
				<string>UnityScene</string>
			</dict>
		</array>
	</dict>
</dict>
Xcode で開いた際に以下のようになっていれば問題ありません。
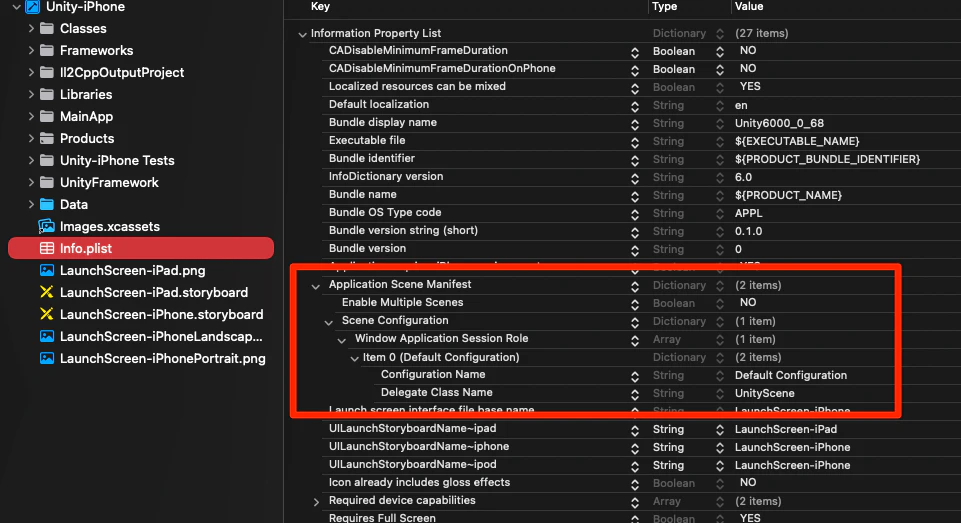
Unity が iOS ビルドで出力する Xcode プロジェクトには Info.plist が 2 つ存在します。
今回変更するのは Xcode プロジェクト直下にあるものです。
- (Xcode プロジェクト)/Info.plist
- (Xcode プロジェクト)/UnityFramework/Info.plist ※こちらではない
2. UnityScene.mm と UnityScene.h を追加
次に、前のステップで指定した UnityScene クラスを Xcode プロジェクトに追加します。
(ファイルを配置するだけではなく、UnityFramework ターゲット に追加する必要があります)
こちらは UIWindowSceneDelegate を実装したクラスであり、シーンのライフサイクルイベントを受け取る役割を持ちます。
#import <UIKit/UIKit.h>

@interface UnityScene : UIResponder <UIWindowSceneDelegate>

@end
コード全体は以下をクリックしてご覧ください。5
コード全体はこちら (クリックで展開)
#import <UIKit/UIKit.h>

@interface UnityScene : UIResponder <UIWindowSceneDelegate>

@end
#import "UnityScene.h"
#import "UnityViewControllerBase.h"
#include "UnityAppController.h"
#include "Unity/UnityInterface.h"
#import "PluginBase/AppDelegateListener.h"

@implementation UnityScene {
    UIOpenURLContext *_pendingURLContext;
    NSUserActivity *_pendingUserActivity;
}

- (void)sceneDidBecomeActive:(UIScene *)scene {
    ::printf("-> sceneDidBecomeActive()\n");
    auto appController = GetAppController();
    if ([appController respondsToSelector:@selector(applicationDidBecomeActive:)])
    {
        [appController applicationDidBecomeActive:UIApplication.sharedApplication];
    }
}

- (void)sceneWillResignActive:(UIScene *)scene {
    ::printf("-> sceneWillResignActive()\n");
    auto appController = GetAppController();
    if ([appController respondsToSelector:@selector(applicationWillResignActive:)])
    {
        [appController applicationWillResignActive:UIApplication.sharedApplication];
    }
}

- (void)sceneWillEnterForeground:(UIScene *)scene {
    ::printf("-> sceneWillEnterForeground()\n");
    auto appController = GetAppController();
    UIWindowScene *windowScene = (UIWindowScene *)scene;
    [appController initUnityWithScene: windowScene];

    if (_pendingURLContext != nil)
        [self applyURL: _pendingURLContext.URL sourceApplication: _pendingURLContext.options.sourceApplication annotation: _pendingURLContext.options.annotation];
    else if (_pendingUserActivity != nil)
        [self applyURL: _pendingUserActivity.webpageURL sourceApplication: nil annotation: nil];

    _pendingURLContext = nil;
    _pendingUserActivity = nil;

    if ([appController respondsToSelector:@selector(applicationWillEnterForeground:)])
    {
        [appController applicationWillEnterForeground:UIApplication.sharedApplication];
    }
}

- (void)sceneDidEnterBackground:(UIScene *)scene {
    ::printf("-> sceneDidEnterBackground()\n");
    auto appController = GetAppController();
    if ([appController respondsToSelector:@selector(applicationDidEnterBackground:)])
    {
        [appController applicationDidEnterBackground:UIApplication.sharedApplication];
    }
}

- (void)scene:(UIScene *)scene openURLContexts:(NSSet<UIOpenURLContext *> *)URLContexts {
    UIOpenURLContext *ctx = [self firstValidContextFromContexts: URLContexts];
    if (ctx != nil)
        [self applyURL: ctx.URL sourceApplication: ctx.options.sourceApplication annotation: ctx.options.annotation];
}

- (void)scene:(UIScene *)scene willConnectToSession:(UISceneSession *)session options:(UISceneConnectionOptions *)connectionOptions {
    _pendingURLContext = [self firstValidContextFromContexts: connectionOptions.URLContexts];
    _pendingUserActivity = [self firstBrowsingActivityFromActivities: connectionOptions.userActivities];

    // Set the URL immediately so Application.absoluteURL is available during first-scene Awake().
    // Requires minimal engine init first (UnitySetAbsoluteURL accesses PlayerSettings).
    // The kUnityOnOpenURL notification is deferred to sceneWillEnterForeground (after full init) for listeners/plugins.
    NSURL *url = [self pendingURL];
    if (url != nil)
    {
        [GetAppController() initUnityApplicationNoGraphics];
        UnitySetAbsoluteURL(url.absoluteString.UTF8String);
    }
}

- (void)scene:(UIScene *)scene continueUserActivity:(NSUserActivity *)userActivity {
    if (userActivity != nil)
        [self applyURL: userActivity.webpageURL sourceApplication: nil annotation: nil];
}

- (UIOpenURLContext *)firstValidContextFromContexts:(NSSet<UIOpenURLContext *> *)contexts {
    for (UIOpenURLContext *ctx in contexts)
    {
        if (ctx.URL != nil && ctx.URL.absoluteString != nil)
            return ctx;
    }
    return nil;
}

- (NSURL *)pendingURL {
    if (_pendingURLContext != nil)
        return _pendingURLContext.URL;
    if (_pendingUserActivity != nil)
        return _pendingUserActivity.webpageURL;
    return nil;
}

- (NSUserActivity *)firstBrowsingActivityFromActivities:(NSSet<NSUserActivity *> *)activities {
    for (NSUserActivity *activity in activities)
    {
        if ([activity.activityType isEqualToString: NSUserActivityTypeBrowsingWeb] && activity.webpageURL != nil && activity.webpageURL.absoluteString != nil)
            return activity;
    }
    return nil;
}

- (void)applyURL:(NSURL *)url sourceApplication:(NSString *)sourceApplication annotation:(id)annotation {
    if (url == nil || url.absoluteString == nil)
        return;

    UnitySetAbsoluteURL(url.absoluteString.UTF8String);

    NSMutableDictionary<NSString*, id>* notifData = [NSMutableDictionary dictionaryWithCapacity: 3];
    notifData[@"url"] = url;
    if (sourceApplication != nil)
        notifData[@"sourceApplication"] = sourceApplication;
    if (annotation != nil)
        notifData[@"annotation"] = annotation;

    AppController_SendNotificationWithArg(kUnityOnOpenURL, notifData);
}
@end
3. UnityAppController.h の変更
UnityAppController.h には UIWindowScene を初期化するためのメソッドを追加します。
 // this one is called at the very end of didFinishLaunchingWithOptions:
 // after views have been created but before initing engine itself
 // override it to register plugins, tweak UI etc
 - (void)preStartUnity;

+- (void)initUnityApplicationNoGraphics;
+
 // this one is called at at the very end of didFinishLaunchingWithOptions:
 // it will start showing unity view and rendering unity content
-- (void)startUnity:(UIApplication*)application;
+- (void)initUnityWithScene:(UIWindowScene*)scene;

+// this one is called at at the very end of didFinishLaunchingWithOptions:
+// it will start showing unity view and rendering unity content
+- (void)startUnity;
+
 // override it if you want to have custom logic for the decision to use CAMetalDisplayLink or not
 // in any case, CAMetalDisplayLink will be used only if actually supported by the device
 // this will be called once on startup, before any rendering but after initializing unity
 - (BOOL)shouldUseMetalDisplayLink;
4. UnityAppController.mm の変更
UnityAppController.h の変更に合わせて、実装側にも変更を加えていきます。
まず、startUnity はパラメータがなくなるので、それに合わせて以下のように変更します。
-- (void)startUnity:(UIApplication*)application
+- (void)startUnity
 {
     NSAssert(self.engineLoadState < kUnityEngineLoadStateAppReady, @"[UnityAppController startUnity:] called after Unity has been initialized");

     UnityInitApplicationGraphics();
     // (中略)
initUnityWithApplication: 相当の処理は initUnityWithScene: に置き換わっているため、以下のように変更します。
-- (void)initUnityWithApplication:(UIApplication*)application
+- (void)initUnityWithScene:(UIWindowScene*)scene
 {
     if (self.engineLoadState >= kUnityEngineLoadStateCoreInitialized)
         return;
     // basic unity init
     [self initUnityApplicationNoGraphics];
     // initUnityApplicationNoGraphics progresses the state & does initialization if necessary
     // so the next state bump has to be after it to not skip the init part
     [self advanceEngineLoadState: kUnityEngineLoadStateCoreInitialized];

     // we want to initialize DisplayManager first, since unity view might need it on creation
     [DisplayManager Initialize];

-#if !PLATFORM_VISIONOS
     // init main window
-    _window = [[UIWindow alloc] initWithWindowScene: [self pickStartupWindowScene: application.connectedScenes]];
-#else
-    _window = [[UIWindow alloc] init];
-#endif
+    if (scene == nil)
+        _window = [[UIWindow alloc] init];
+    else
+        _window = [[UIWindow alloc] initWithWindowScene: scene];

     // init unity view
     [self selectRenderingAPI];
     [UnityRenderingView InitializeForAPI: self.renderingAPI];
     _unityView = [self createUnityView];

     // connect main display with window and unity view
     _mainDisplay = [DisplayManager Instance].mainDisplay;
     [_mainDisplay createWithWindow: _window andView: _unityView];

     // create UI hierarchy, and proceed with unity graphics init
     [self createUI];
     [self preStartUnity];

     // if you wont use keyboard you may comment it out at save some memory
     [KeyboardDelegate Initialize];

 #if UNITY_DEVELOPER_BUILD && !PLATFORM_VISIONOS
     // Causes a black screen after splash screen, but would deadlock if waiting for manged debugger otherwise
-    // also causes issues on visionOS, but we don't have wait for debugger dialog there
-    [self performSelector: @selector(startUnity:) withObject: application afterDelay: 0];
+    [self performSelector: @selector(startUnity) withObject: nil afterDelay: 0];
 #else
-    [self startUnity: application];
+    [self startUnity];
 #endif
 }
従来までは application:didFinishLaunchingWithOptions: にて initUnityWithApplication: の呼び出しが行われていましたが、scene-based への移行後はこのタイミングでは Unity の初期化を行わないため、以下のように変更を加えます。
主な初期化経路は、前述した UnityScene の sceneWillEnterForeground: から initUnityWithScene: を呼び出す流れになります。
 - (BOOL)application:(UIApplication*)application didFinishLaunchingWithOptions:(NSDictionary*)launchOptions
 {
     ::printf("-> applicationDidFinishLaunching()\n");

     // make sure orientation notifications are sent
 #if !PLATFORM_TVOS && !PLATFORM_VISIONOS
     if ([UIDevice currentDevice].generatesDeviceOrientationNotifications == NO)
         [[UIDevice currentDevice] beginGeneratingDeviceOrientationNotifications];
 #endif

-    // if application is in background, don't initialize Unity
-    // this happens if app uses location fence, notifications with content/actions, ...
-    // initUnityWithApplication: initializes rendering, possibly loads scene and calls Start(), none meant for background
-    if (UIApplication.sharedApplication.applicationState == UIApplicationStateBackground)
-        return YES;
-
-    [self initUnityWithApplication: application];
     return YES;
 }
applicationDidBecomeActive: は UnityScene の sceneDidBecomeActive: より呼び出されます。
通常は sceneWillEnterForeground: の時点で初期化済みになりますが、未初期化のまま applicationDidBecomeActive: に到達した場合でも initUnityWithScene: を呼び出せるように変更されています。
 - (void)applicationDidBecomeActive:(UIApplication*)application
 {
     ::printf("-> applicationDidBecomeActive()\n");

     [self removeSnapshotViewController];

     if (self.engineLoadState >= kUnityEngineLoadStateAppReady)
     {
         if (UnityIsPaused() && _wasPausedExternal == false)
         {
             UnityWillResume();
             UnityPause(0);
         }
         if (_wasPausedExternal)
         {
             if (UnityIsFullScreenPlaying())
                 TryResumeFullScreenVideo();
         }
         // need to do this with delay because FMOD restarts audio in AVAudioSessionInterruptionNotification handler
         [self performSelector: @selector(updateUnityAudioOutput) withObject: nil afterDelay: 0.1];
         UnitySetPlayerFocus(1);
     }
     else
     {
-        [self initUnityWithApplication: application];
+        UIWindowScene *scene = [self pickStartupWindowScene:application.connectedScenes];
+        [self initUnityWithScene: scene];
     }

     _didResignActive = false;
 }
5. DisplayManager.mm の改修
DisplayManager.mm では非推奨の UIWindow.screen を UIWindow.windowScene に置き換えます。
ここでは UIScreen に対応する UIWindowScene を connectedScenes から探す sceneForScreen: を新設し、それを利用します。
+#if !PLATFORM_VISIONOS
+- (UIWindowScene*) sceneForScreen:(UIScreen*)screen {
+    for (UIScene* scene in UIApplication.sharedApplication.connectedScenes) {
+        if ([scene isKindOfClass:[UIWindowScene class]]) {
+            UIWindowScene* windowScene = (UIWindowScene *)scene;
+            if (windowScene.screen == screen) {
+                return windowScene;
+            }
+        }
+    }
+    return nil;
+}
+#endif
+
 - (void)createView:(BOOL)useForRendering showRightAway:(BOOL)showRightAway;
 {
 #if !PLATFORM_VISIONOS
     NSAssert(_screen != [UIScreen mainScreen], @"DisplayConnection for mainScreen should be created with createWithWindow:andView:");
 #endif
     if (_view == nil)
     {
 #if !PLATFORM_VISIONOS
         UIWindow* window = [[UIWindow alloc] initWithFrame: _screen.bounds];
-
-    #pragma clang diagnostic push
-    #pragma clang diagnostic ignored "-Wdeprecated-declarations"
-        // [UIWindow setScreen:] is deprecated in favor of [UIWindow setWindowScene:], but we are not yet scenes based
-        // this API works perfectly fine for now, so we use it until we rewrite/modernize trampoline to be Scene-based
-        window.screen = _screen;
-    #pragma clang diagnostic pop
+        UIWindowScene* scene = [self sceneForScreen: _screen];
+        window.windowScene = scene;

         UIView* view = [(useForRendering ? [UnityRenderingView alloc] : [UIView alloc]) initWithFrame: _screen.bounds];
         view.contentScaleFactor = UnityScreenScaleFactor(_screen);
 #else
         UIWindow* window = [[UIWindow alloc] init];
         UIView* view = [(useForRendering ? [UnityRenderingView alloc] : [UIView alloc]) init];
 #endif

         [self createWithWindow: window andView: view];

         if (showRightAway)
         {
             [window addSubview: view];
             window.hidden = NO;
         }
     }
 }

 - (void)shouldShowWindow:(BOOL)show
 {
-    _window.hidden = show ? NO : YES;
+    if (_window.hidden != show)
+        return;

+    _window.hidden = !show;
+
 #if !PLATFORM_VISIONOS
-#pragma clang diagnostic push
-#pragma clang diagnostic ignored "-Wdeprecated-declarations"
-    // [UIWindow setScreen:] is deprecated in favor of [UIWindow setWindowScene:], but we are not yet scenes based
-    // this API works perfectly fine for now, so we use it until we rewrite/modernize trampoline to be Scene-based
-    _window.screen = show ? _screen : nil;
-#pragma clang diagnostic pop
+    _window.windowScene = show ? [self sceneForScreen: _screen] : nil;
 #endif
 }
対応済みか確認するには
Apple 公式からもアナウンスされているとおり、未対応の場合には以下のログが出力されます。
前述の対応が完了したら、動作確認に加えてログが出力されていないかチェックしてください。
(iOS 18.4、iPadOS 18.4、Mac Catalyst 18.4、tvOS 18.4、visionOS 2.4 以降)
This process does not adopt UIScene lifecycle. This will become an assert in a future version.(iOS 26、iPadOS 26、Mac Catalyst 26、tvOS 26、visionOS 26)
UIScenelifecycle will soon be required. Failure to adopt will result in an assert in the future.

おわりに
対応手順としては以上となります。
「アップデートできない場合での手動対応」に記載した内容を実際に手元で試したところ、未対応時に出るログが解消されていることが確認できました。
そのときの検証端末および OS バージョンは以下で確認しています。
- iPhone 15 Pro Max (iOS 26.5)
- iPhone 11 Pro Max (iOS 18.7.8)
ただ、現時点だとまだ最小プロジェクト (Unity のテンプレートにある Universal 3D) でしか確認できていないうえに、詳細なテストケース (DeepLink からの起動など) もそこまで深く試せていません。もし今後検証していく中で、その他共有できる知見などが出てきたら随時更新していければと思います。
あとは運用面においても、この変更を手動で反映し続けるのは現実的ではないので、バージョン間の差分など比較しつつ、必要な変更だけを適用する Editor 拡張を AI に作らせるなどしたら便利かなとも考えています。
参考リンク
Apple
Unity
- [INFO][APPLE] Update your editor to receive UIScene lifecycle support
- [iOS] Application.deepLinkActivated does not get invoked while app is running when UIApplicationSceneManifest is added in Info.plist
参考記事
- LINE iOSアプリへのscene-basedライフサイクルの導入
- iOS 27 / Xcode 27 の破壊的変更に備えて今から準備すべきこと
- 【iOS】AppDelegateからSceneDelegateへ シングルウィンドウアプリ向けのライフサイクル変更対応
-
UIScene ライフサイクル対応前の Unity アプリもこちらに該当します。 ↩
-
詳しくは後述しますが、対応版の Unity ではマルチウィンドウの設定は OFF になっています。 ↩
-
iOS ビルドで出力される Xcode プロジェクトのソースコード (テンプレート) は、Unity のインストールディレクトリ以下にある
PlaybackEngines/iOSSupport/Trampolineから取得可能です。また、iOS ビルドで得た Xcode プロジェクトからそのまま取得することもできます。 ↩ -
イメージ的には PostProcessBuildAttribute を用いて関連ソースのみ追加・上書きを行う感じです。 ↩
-
余談ですが、
UnityScene.mmの実装は、前述したApplication.deepLinkActivatedが呼び出されない不具合の修正前と後で実装が大きく異なります。修正前のコードは比較的シンプルですが、修正後はApplication.deepLinkActivatedを呼び出すための対応が入っているためか、さまざまな変更が適用されています。 ↩