概要
Confluet の公式トレーニングコースであるApache Kafka® for Python Developersにおけるハンズオンを Databricks で実行する手順を紹介します。

引用元:Introduction to Python for Kafka
対象のハンズオンは下記です。
- Hands On: Setup the Exercise Environment for Confluent Cloud and Python
- Hands On: Use the Python Producer Class
- Hands on: Use the Python Consumer Class
- Hands On: Use the Python Producer Class with Schemas
- Hands On: Use the Python Consumer Class with Schemas
- Hands On: Use the Python AdminClient Class
手順
Hands On: Setup the Exercise Environment for Confluent Cloud and Python
Sign up for Confluent Cloud
Confluent の無償トライアルに申し込みます。Google アカウントでもうしこんだところ、すぐにアカウントが払い出されました。

引用元:無料版の Confluent をお試しください:あらゆるクラウドでお使いいただけるマネージド型 Kafka です | JP
Login to the Confluent Cloud Console
Confluent 上で learn-kafka-python という environment を作成します。

Enable Streams Governance
environment 作成時に、Stream Governance packageの設定をAdvancedに設定する必要があるようです。
Essentialsで作成してしまった場合には、 environment のページにて右側にあるStream Governance packageのUpgrade nowにてadvanced governance controlsを有効にします。


Create a Cluster in the learn-kafka-python Environment
kafka-pythonという名称の cluster を作成します。

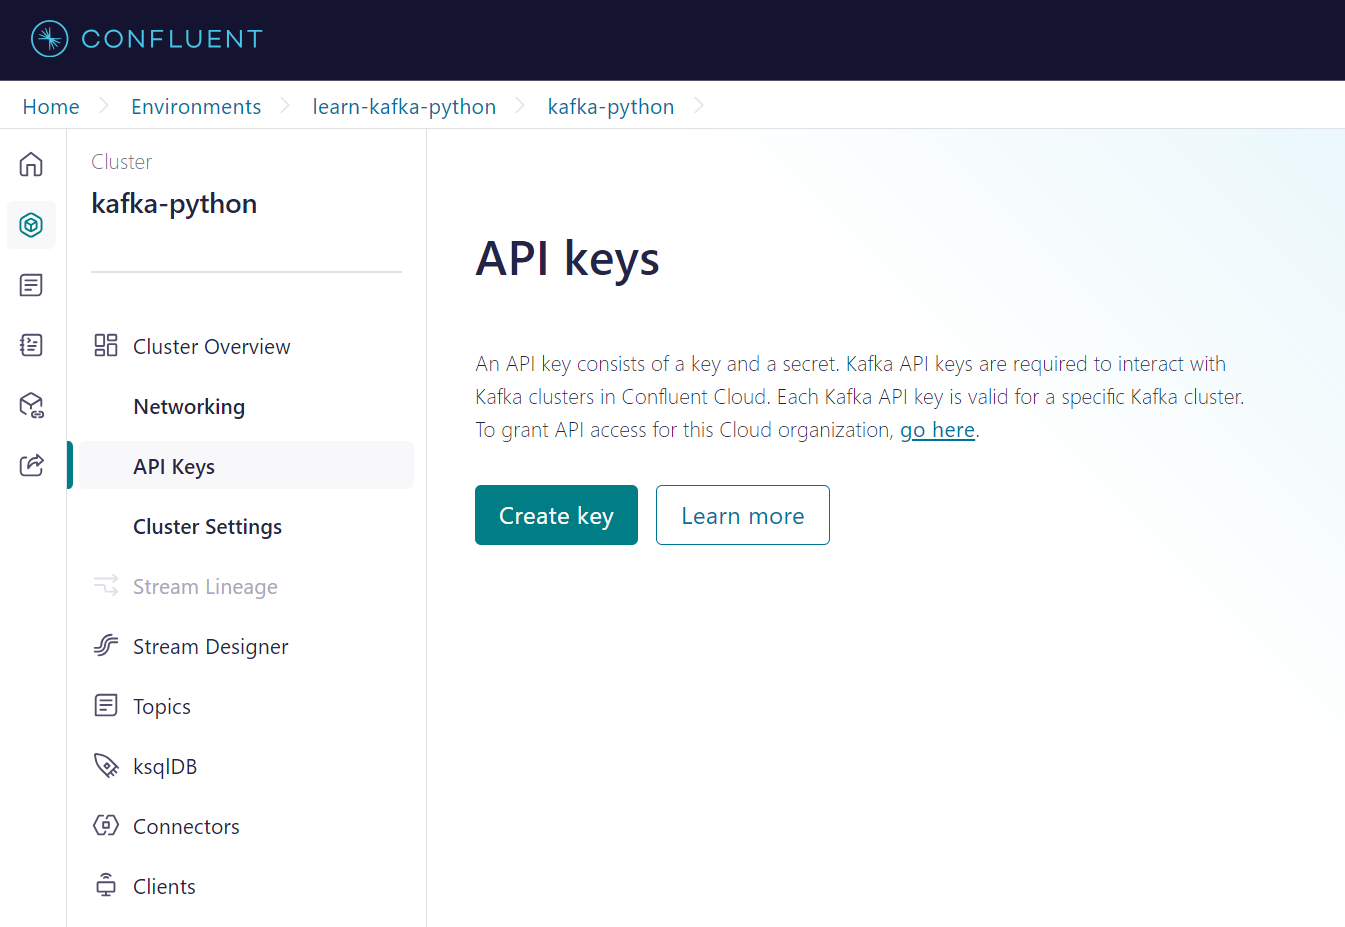
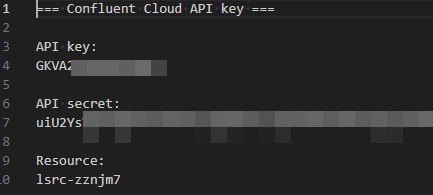
Create and Download Python Client Configuration Properties
Confluent のサイトでは client から API を取得する手順となっておりますが、 API Keys を取得するための手順であるためAPI Keysからキーの生成をしました。Download and continueを選択するとBoostrap serverの値も取得できるため便利です。


Create Python Dictionary
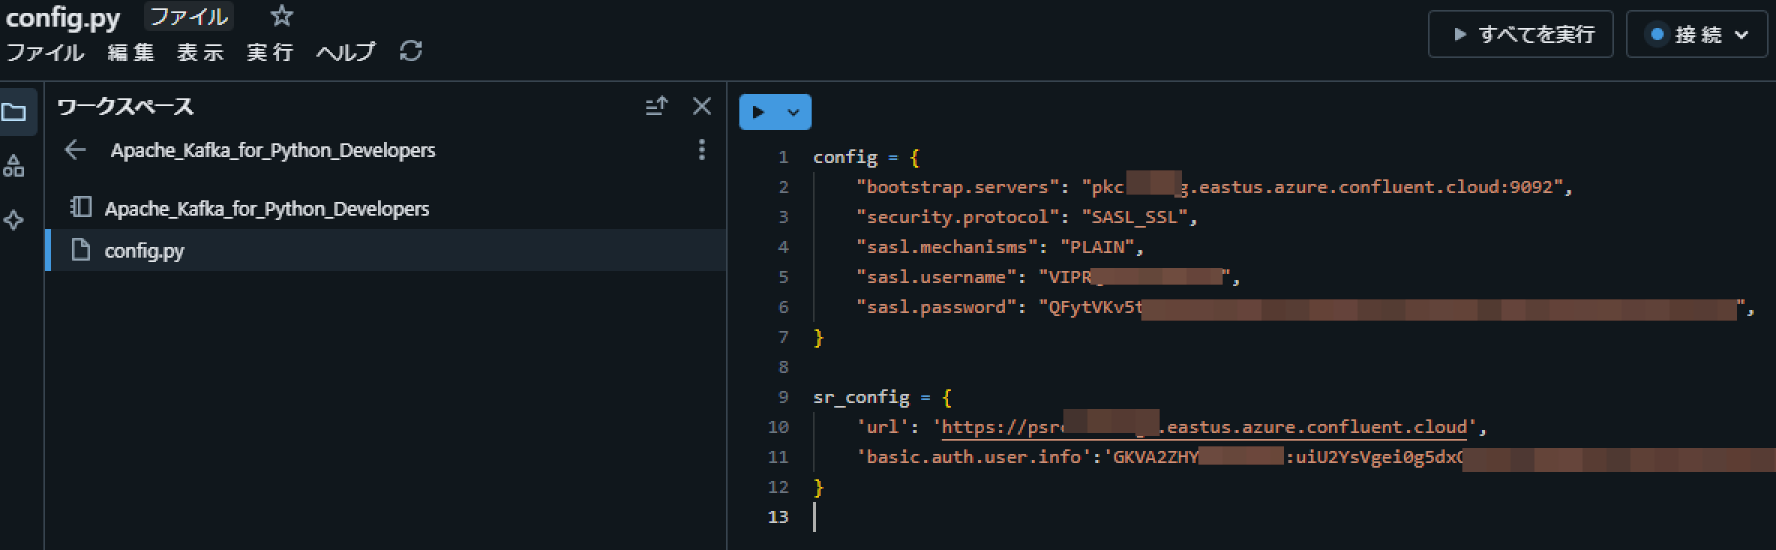
Databricks 上にノートブックと同じディレクトリ上にconfig.pyというファイル名で下記のコードを記述します。認証情報については前の手順で取得した値をセットします。
config = {
    "bootstrap.servers": "<bootstrap-server-endpoint>",
    "security.protocol": "SASL_SSL",
    "sasl.mechanisms": "PLAIN",
    "sasl.username": "<CLUSTER_API_KEY>",
    "sasl.password": "<CLUSTER_API_SECRET>",
}

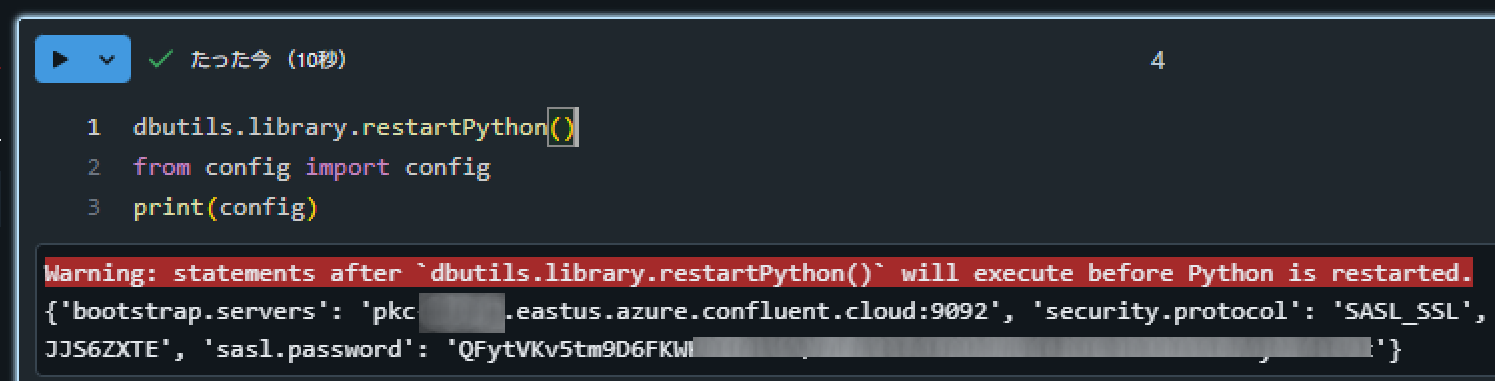
Databricks のノートブック上で下記のコードを実行して想定通りの値が表示されることを確認します。
dbutils.library.restartPython()
from config import config
print(config)
Install Python 3.X and Related Prerequisites on Local Machine
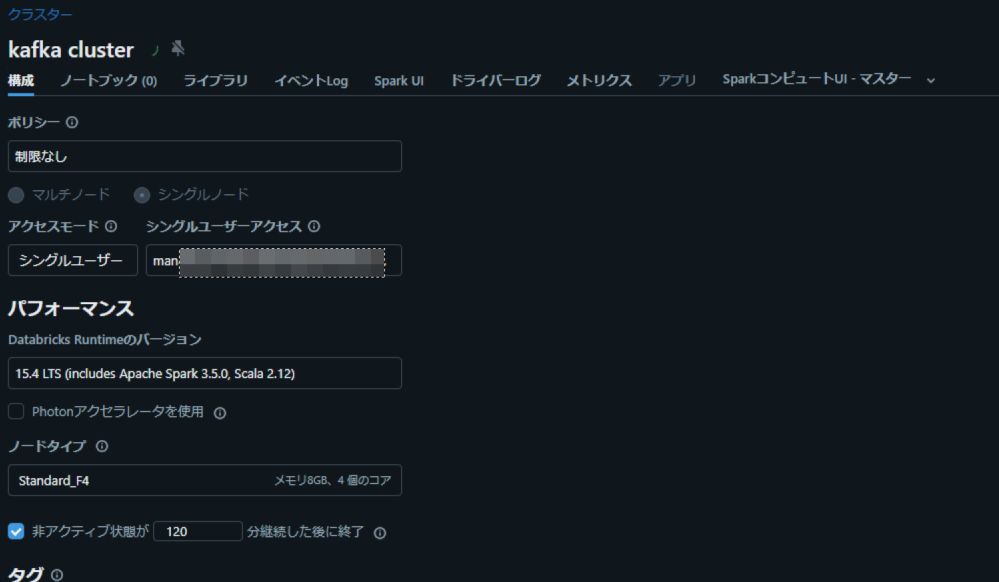
Databricks 上でシングルノードのクラスターを作成します。
Create a New Virtual Environment with virtualenv
本手順は省略します。
Install Confluent Kafka
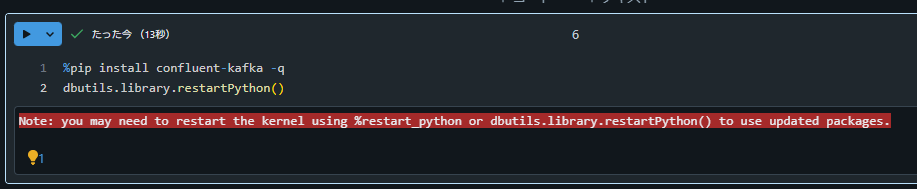
Databricks ノートブック上で下記のコードを実行します。
%pip install confluent-kafka -q
dbutils.library.restartPython()
Hands On: Use the Python Producer Class
Create Topics

Project Setup
Databricks 利用時には不要な手順であるため省略。
Add Required Imports
Databricks のノートブック上で下記コードを実行します。
from confluent_kafka import Producer
from config import config

Create callback function
Databricks のノートブック上で下記コードを実行します。
def callback(err, event):
    if err:
        print(f'Produce to topic {event.topic()} failed for event: {event.key()}')
    else:
        val = event.value().decode('utf8')
        print(f'{val} sent to partition {event.partition()}.')

Create function to produce to hello_topic
Databricks のノートブック上で下記コードを実行します。
def say_hello(producer, key):
    value = f'Hello {key}!'
    producer.produce('hello_topic', value, key, on_delivery=callback)

Add Main Block
Databricks のノートブック上で下記コードを記述します。
if __name__ == '__main__':
    producer = Producer(config)
    keys = ['Amy', 'Brenda', 'Cindy', 'Derrick', 'Elaine', 'Fred']
    [say_hello(producer, key) for key in keys]
    producer.flush()

Run the Program
Databricks 上で前の手順を実行します。実行後に Confluent 上でデータが書きこまれたことを確認します。


Hands on: Use the Python Consumer Class
Use Consumer to Read Events from Kafka
特に手順なし。
Topics
特に手順なし。
Project Setup
Databricks 利用時には不要な手順であるため省略。
Add Required Imports
from confluent_kafka import Consumer, KafkaException
from config import config

Create function to update configuration
def set_consumer_configs():
    config['group.id'] = 'hello_group'
    config['auto.offset.reset'] = 'earliest'
    config['enable.auto.commit'] = False

Create callback function for partition assignment
def assignment_callback(consumer, partitions):
    for p in partitions:
        print(f'Assigned to {p.topic}, partition {p.partition}')

Add Main Block
if __name__ == '__main__':
    set_consumer_configs()
    consumer = Consumer(config)
    consumer.subscribe(['hello_topic'], on_assign=assignment_callback)
    try:
        while True:
            event = consumer.poll(1.0)
            if event is None:
                continue
            if event.error():
                raise KafkaException(event.error())
            else:
                val = event.value().decode('utf8')
                partition = event.partition()
                print(f'Received: {val} from partition {partition}    ')
                # consumer.commit(event)
    except KeyboardInterrupt:
        print('Canceled by user.')
    finally:
        consumer.close()

Run the Consumer
前の手順で記述したコードを実行します。処理が継続実行されるため、セルの実行をとめることを忘れないようでしてください。

Produce New Events
省略します。本手順を実施したい場合には、Hands On: Use the Python Producer ClassとHands on: Use the Python Consumer Classを異なるノートブックで実装してください。下記のコードはノートブックスコープでのライブラリインストールであるため、2つのノートブックの先頭に記述するようにしてください。
%pip install confluent-kafka -q
dbutils.library.restartPython()
Observe Consumer Group Rebalance Behavior
省略します。本手順を実施したい場合には、前の手順に記述した内容を実施してください。
Hands On: Use the Python Producer Class with Schemas
Prerequisites
Confluent 上でtemp_readingsという topic を作成します。

Confluent にて environment の画面に右下にあるStream Governance APIのAdd keyを選択して、 Schema Registry API の認証情報を取得します。


Databricks のノートブック上で下記のコードを実行します。
%pip install jsonschema -q
%pip install requests -q
dbutils.library.restartPython()

前の手順で作成したconfig.pyというファイルに、 Schema Registry API に対する認証情報を追記します。
sr_config = {
    'url': '<schema.registry.url>',
    'basic.auth.user.info':'<SR_API_KEY>:<SR_API_SECRET>'
}
Project Setup
Databricks 利用時には不要な手順であるため省略。
Add Required Imports
from confluent_kafka import Producer
from confluent_kafka.serialization import SerializationContext, MessageField
from confluent_kafka.schema_registry import SchemaRegistryClient
from confluent_kafka.schema_registry.json_schema import JSONSerializer
from config import config, sr_config
import time

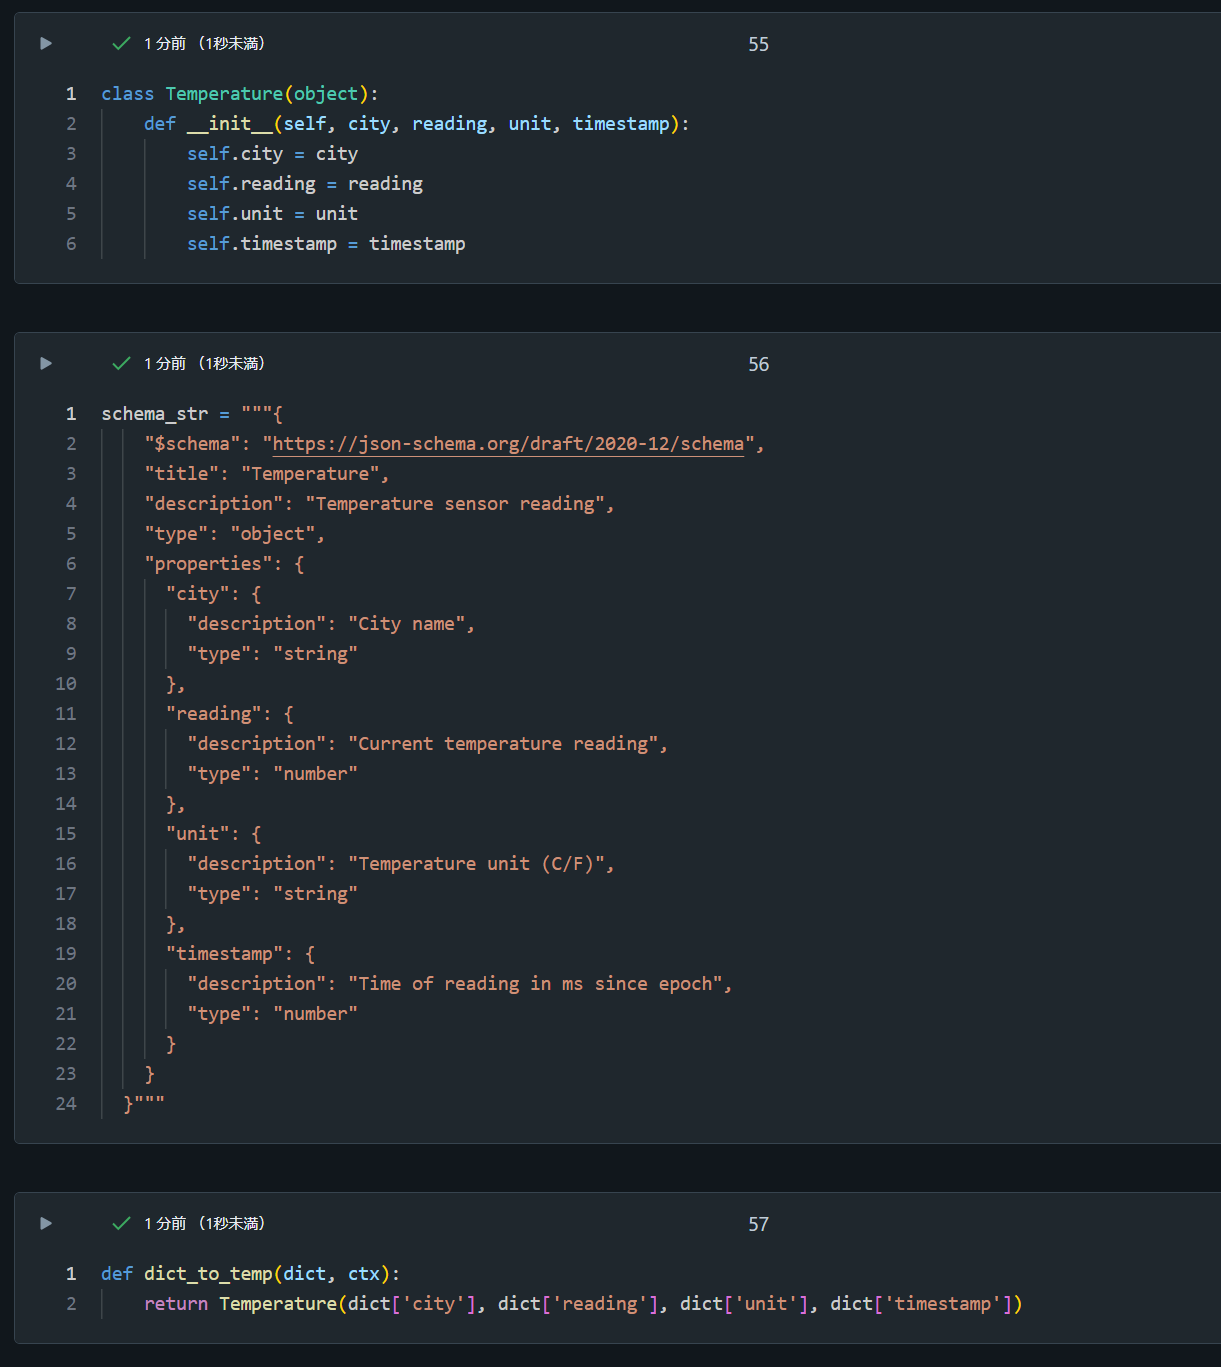
Define our class and schema
Databricks のノートブック上で下記のコードを実行します。
class Temperature(object):
    def __init__(self, city, reading, unit, timestamp):
        self.city = city
        self.reading = reading
        self.unit = unit
        self.timestamp = timestamp

schema_str = """{
  "$schema": "https://json-schema.org/draft/2020-12/schema",
  "title": "Temperature",
  "description": "Temperature sensor reading",
  "type": "object",
  "properties": {
    "city": {
      "description": "City name",
      "type": "string"
    },
    "reading": {
      "description": "Current temperature reading",
      "type": "number"
    },
    "unit": {
      "description": "Temperature unit (C/F)",
      "type": "string"
    },
    "timestamp": {
      "description": "Time of reading in ms since epoch",
      "type": "number"
    }
  }
}"""

def temp_to_dict(temp, ctx):
    return {"city":temp.city,
            "reading":temp.reading,
            "unit":temp.unit,
            "timestamp":temp.timestamp}

Create some test data
Databricks のノートブック上で下記のコードを実行します。
data = [Temperature('London', 12, 'C', round(time.time()*1000)),
        Temperature('Chicago', 63, 'F', round(time.time()*1000)),
        Temperature('Berlin', 14, 'C', round(time.time()*1000)),
        Temperature('Madrid', 18, 'C', round(time.time()*1000)),
        Temperature('Phoenix', 78, 'F', round(time.time()*1000))]

Create a producer callback function
Databricks のノートブック上で下記のコードを実行します。
def delivery_report(err, event):
    if err is not None:
        print(f'Delivery failed on reading for {event.key().decode("utf8")}: {err}')
    else:
        print(f'Temp reading for {event.key().decode("utf8")} produced to {event.topic()}')

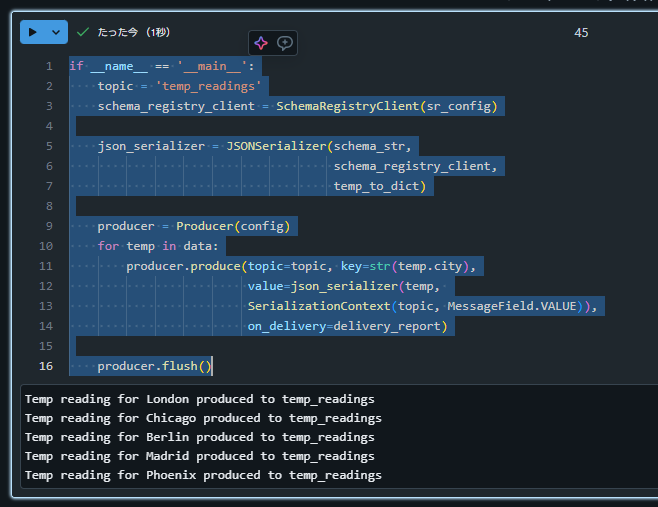
Add Main Block
Databricks のノートブック上で下記のコードを記述します。
if __name__ == '__main__':
    topic = 'temp_readings'
    schema_registry_client = SchemaRegistryClient(sr_config)

    json_serializer = JSONSerializer(schema_str,
                                     schema_registry_client,
                                     temp_to_dict)

    producer = Producer(config)
    for temp in data:
        producer.produce(topic=topic, key=str(temp.city),
                         value=json_serializer(temp,
                         SerializationContext(topic, MessageField.VALUE)),
                         on_delivery=delivery_report)

    producer.flush()

Execute the program
前の手順のコードを実行後、 Confluent 上でデータが書きこまれたことを確認します。

Hands On: Use the Python Consumer Class with Schemas
Project Setup
Databricks 利用時には不要な手順であるため省略。
Add Required Imports
Databricks のノートブック上で下記のコードを実行します。
from confluent_kafka import Consumer
from confluent_kafka.serialization import SerializationContext, MessageField
from confluent_kafka.schema_registry.json_schema import JSONDeserializer
from config import config

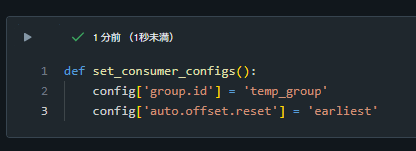
Add consumer specific configuration properties
Databricks のノートブック上で下記のコードを実行します。
def set_consumer_configs():
    config['group.id'] = 'temp_group'
    config['auto.offset.reset'] = 'earliest'
Define our class and schema
Databricks のノートブック上で下記のコードを実行します。
class Temperature(object):
    def __init__(self, city, reading, unit, timestamp):
        self.city = city
        self.reading = reading
        self.unit = unit
        self.timestamp = timestamp

schema_str = """{
    "$schema": "https://json-schema.org/draft/2020-12/schema",
    "title": "Temperature",
    "description": "Temperature sensor reading",
    "type": "object",
    "properties": {
      "city": {
        "description": "City name",
        "type": "string"
      },
      "reading": {
        "description": "Current temperature reading",
        "type": "number"
      },
      "unit": {
        "description": "Temperature unit (C/F)",
        "type": "string"
      },
      "timestamp": {
        "description": "Time of reading in ms since epoch",
        "type": "number"
      }
    }
  }"""

def dict_to_temp(dict, ctx):
    return Temperature(dict['city'], dict['reading'], dict['unit'], dict['timestamp'])
Add Main Block
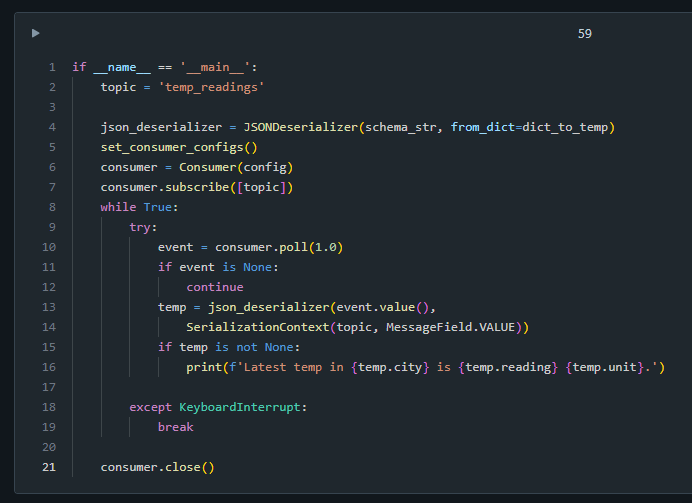
Databricks のノートブック上で下記のコードを記述します。
if __name__ == '__main__':
    topic = 'temp_readings'

    json_deserializer = JSONDeserializer(schema_str, from_dict=dict_to_temp)
    set_consumer_configs()
    consumer = Consumer(config)
    consumer.subscribe([topic])
    while True:
        try:
            event = consumer.poll(1.0)
            if event is None:
                continue
            temp = json_deserializer(event.value(),
                SerializationContext(topic, MessageField.VALUE))
            if temp is not None:
                print(f'Latest temp in {temp.city} is {temp.reading} {temp.unit}.')

        except KeyboardInterrupt:
            break

    consumer.close()
Execute the program
前の手順で記述したコードを実行します。処理が継続実行されるため、セルの実行をとめることを忘れないようでしてください。

Hands On: Use the Python AdminClient Class
Use AdminClient to Create a Topic and Alter its Configuration
Databricks のノートブック上で下記のコードを実行します。
from confluent_kafka.admin import (AdminClient, NewTopic,
                                   ConfigResource)
from config import config

Project Setup
Databricks 利用時には不要な手順であるため省略。
Add Required Imports
Databricks のノートブック上で下記のコードを実行します。
# return True if topic exists and False if not
def topic_exists(admin, topic):
    metadata = admin.list_topics()
    for t in iter(metadata.topics.values()):
        if t.topic == topic:
            return True
    return False

Check if Kafka Topic Exists
Databricks のノートブック上で下記のコードを実行します。
# return True if topic exists and False if not
def topic_exists(admin, topic):
    metadata = admin.list_topics()
    for t in iter(metadata.topics.values()):
        if t.topic == topic:
            return True
    return False

Create a New Kafka Topic
Databricks のノートブック上で下記のコードを実行します。
# create new topic and return results dictionary
def create_topic(admin, topic):
    new_topic = NewTopic(topic, num_partitions=6, replication_factor=3)
    result_dict = admin.create_topics([new_topic])
    for topic, future in result_dict.items():
        try:
            future.result()  # The result itself is None
            print("Topic {} created".format(topic))
        except Exception as e:
            print("Failed to create topic {}: {}".format(topic, e))

Describe the New Kafka Topic
Databricks のノートブック上で下記のコードを実行します。
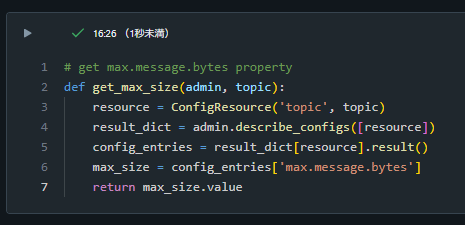
# get max.message.bytes property
def get_max_size(admin, topic):
    resource = ConfigResource('topic', topic)
    result_dict = admin.describe_configs([resource])
    config_entries = result_dict[resource].result()
    max_size = config_entries['max.message.bytes']
    return max_size.value
Set a Kafka Topic Configuration Property Value
Databricks のノートブック上で下記のコードを実行します。
# set max.message.bytes for topic
def set_max_size(admin, topic, max_k):
    config_dict = {'max.message.bytes': str(max_k*1024)}
    resource = ConfigResource('topic', topic, config_dict)
    result_dict = admin.alter_configs([resource])
    result_dict[resource].result()

Add Main Block
Databricks のノートブック上で下記のコードを記述します。
if __name__ == '__main__':

    # Create Admin client
    admin = AdminClient(config)
    topic_name = 'my_topic'
    max_msg_k = 50

    # Create topic if it doesn't exist
    if not topic_exists(admin, topic_name):
        create_topic(admin, topic_name)

    # Check max.message.bytes config and set if needed
    current_max = get_max_size(admin, topic_name)
    if current_max != str(max_msg_k * 1024):
        print(f'Topic, {topic_name} max.message.bytes is {current_max}.')
        set_max_size(admin, topic_name, max_msg_k)

    # Verify config was set
    new_max = get_max_size(admin, topic_name)
    print(f'Now max.message.bytes for topic {topic_name} is {new_max}')
Test admin.py
前の手順で記述したコードを実行します。私の環境ではエラーとなってしまいました。
KafkaException: KafkaError{code=UNKNOWN_TOPIC_OR_PART,val=3,str="Broker: Unknown topic or partition"}

topic 作成後に1秒待機することで正常終了しました。
if __name__ == '__main__':

    # Create Admin client
    admin = AdminClient(config)
    topic_name = 'my_topic'
    max_msg_k = 50

    # Create topic if it doesn't exist
    if not topic_exists(admin, topic_name):
        create_topic(admin, topic_name)

    # TOPIC が作成されるまで1秒待機
    time.sleep(1)

    # Check max.message.bytes config and set if needed
    current_max = get_max_size(admin, topic_name)
    if current_max != str(max_msg_k * 1024):
        print(f'Topic, {topic_name} max.message.bytes is {current_max}.')
        set_max_size(admin, topic_name, max_msg_k)

    # Verify config was set
    new_max = get_max_size(admin, topic_name)
    print(f'Now max.message.bytes for topic {topic_name} is {new_max}')

Exercise Environment Teardown
本記事で作成したlearn-kafka-python environment を削除します。
