この記事は、Magic Leap Advent Calendar 2020 の11日目の記事です
ArUcoマーカーとは
ARマーカーの一種で、OpenCVの一部として提供されているものです。
その主な利点は、検出が堅牢で迅速であることです。
ArUcoマーカーの一例

OpenCV の ArUco Marker のページ
MagicLeap の ArUco Tracking のページ
MagicLeapではImageTrackingもありますが、それとは同時に使えない別のトラッキングシステムとしてArUcoが存在していて、一度に最大16個のマーカーを認識することができます。
ImageTrackingは、UnityのMagic Leap SDKに含まれていてそのままUnityプロジェクト内で使用することができますが、ArUco TrackingはMagicLeapネイティブではサポートされているものの UnityのSDKには含まれていないため使うとなったらネイティブプラグインを書く必要があります。
MagicLeapネイティブプラグインを作る
ここでは Visual Studio 2017 を使ってネイティブプラグインを作る方法を書いていきます。
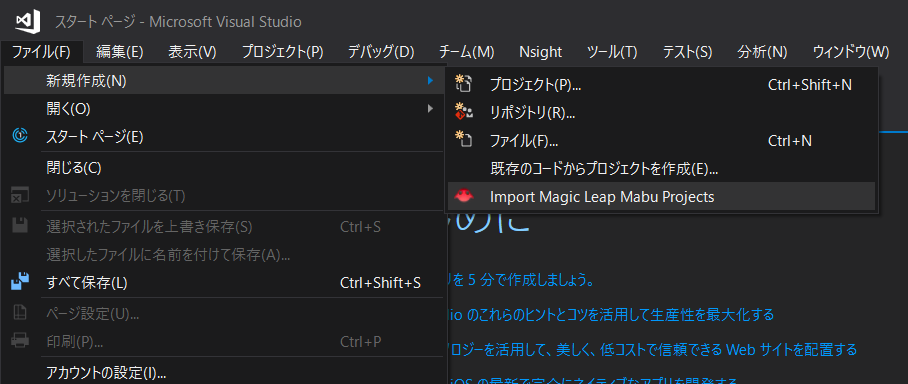
まずは MagicLeap社が提供している拡張機能「Magic Leap Extension for Visual Studio 2017」をインストールします。
新規作成のところに「Import Magic Leap Mabu Projects」が出てくるのでそこからプロジェクトを作成します。このとき使用する MagicLeap SDK の指定もします。
以下がArUcoマーカーのプラグインのコードすべてです。
# include <string.h>
# include <ml_perception.h>
# include <ml_aruco_tracking.h>

# define TRACK_DATA_LENGTH 9

extern "C"
{
	static MLHandle handle;
	static MLArucoTrackerResultArray resultArray;
	static float data[TRACK_DATA_LENGTH];

	void TrackerCreate(float markerLength, int *resultCode)
	{
		MLArucoTrackerSettings settings;
		MLArucoTrackerSettingsInit(&settings);
		settings.dictionary = MLArucoDictionaryName::MLArucoDictionaryName_DICT_4X4_50;
		settings.marker_length = markerLength;
		settings.enable_marker_tracking = true;
		MLResult result = MLArucoTrackerCreate(&settings, &handle);
		*resultCode = (int)result;
	}

	void TrackerDestroy()
	{
		MLArucoTrackerDestroy(handle);
	}

	void TrackerGetResult(float** arrayPtr, int *size)
	{
		MLArucoTrackerGetResult(handle, &resultArray);
		data[0] = (float)resultArray.count;
		if (resultArray.count > 0)
		{
			MLSnapshot *snapshot = nullptr;
			MLPerceptionGetSnapshot(&snapshot);
			MLCoordinateFrameUID frame_uid = resultArray.detections[0]->coord_frame_marker;
			MLTransform transform = {};
			MLSnapshotGetTransform(snapshot, &frame_uid, &transform);
			data[1] = (float)resultArray.detections[0]->id;
			data[2] = transform.position.x;
			data[3] = transform.position.y;
			data[4] = transform.position.z;
			data[5] = transform.rotation.x;
			data[6] = transform.rotation.y;
			data[7] = transform.rotation.z;
			data[8] = transform.rotation.w;
		}
		float* retArr = (float*)malloc(sizeof(data));
		memcpy(retArr, data, sizeof(data));
		*arrayPtr = retArr;
		*size = sizeof(data) / sizeof(data[0]);
	}

	void TrackerReleaseResult()
	{
		MLArucoTrackerReleaseResult(&resultArray);
	}
}
要点のみ抜粋すると
こちらがトラッキングを開始する関数です。
void TrackerCreate(float markerLength, int *resultCode)
引数の markerLength は現実で用意するマーカーの1辺の長さ(単位はメートル)です。この値に正確な長さを与えることで3次元上の位置を知ることができます。
この関数の中で使われている以下の指定はArUcoマーカーの種類です。
MLArucoDictionaryName::MLArucoDictionaryName_DICT_4X4_50
4x4 はマーカー内のピクセル数、50 がIDの数に対応しています。
種類は以下のものが定義されているので用途によって使い分けるとよいでしょう。
typedef enum MLArucoDictionaryName {
 MLArucoDictionaryName_DICT_4X4_50 = 0,     /*! 4 by 4 pixel ArUco marker dictionary with 50 IDs */
 MLArucoDictionaryName_DICT_4X4_100,        /*! 4 by 4 pixel ArUco marker dictionary with 100 IDs */
 MLArucoDictionaryName_DICT_4X4_250,        /*! 4 by 4 pixel ArUco marker dictionary with 250 IDs */
 MLArucoDictionaryName_DICT_4X4_1000,       /*! 4 by 4 pixel ArUco marker dictionary with 1000 IDs */
 MLArucoDictionaryName_DICT_5X5_50,         /*! 5 by 5 pixel ArUco marker dictionary with 50 IDs */
 MLArucoDictionaryName_DICT_5X5_100,        /*! 5 by 5 pixel ArUco marker dictionary with 100 IDs */
 MLArucoDictionaryName_DICT_5X5_250,        /*! 5 by 5 pixel ArUco marker dictionary with 250 IDs */
 MLArucoDictionaryName_DICT_5X5_1000,       /*! 5 by 5 pixel ArUco marker dictionary with 1000 IDs */
 MLArucoDictionaryName_DICT_6X6_50,         /*! 6 by 6 pixel ArUco marker dictionary with 50 IDs */
 MLArucoDictionaryName_DICT_6X6_100,        /*! 6 by 6 pixel ArUco marker dictionary with 100 IDs */
 MLArucoDictionaryName_DICT_6X6_250,        /*! 6 by 6 pixel ArUco marker dictionary with 250 IDs */
 MLArucoDictionaryName_DICT_6X6_1000,       /*! 6 by 6 pixel ArUco marker dictionary with 1000 IDs */
 MLArucoDictionaryName_DICT_7X7_50,         /*! 7 by 7 pixel ArUco marker dictionary with 50 IDs */
 MLArucoDictionaryName_DICT_7X7_100,        /*! 7 by 7 pixel ArUco marker dictionary with 100 IDs */
 MLArucoDictionaryName_DICT_7X7_250,        /*! 7 by 7 pixel ArUco marker dictionary with 250 IDs */
 MLArucoDictionaryName_DICT_7X7_1000,       /*! 7 by 7 pixel ArUco marker dictionary with 1000 IDs */
 MLArucoDictionaryName_DICT_ARUCO_ORIGINAL, /*! 5 by 5 pixel ArUco marker dictionary with 1024 IDs */
} MLArucoDictionaryName;
以下の関数がトラッキングの結果を取得する関数です。
arrayPtr が取得データへのポインタ、sizeは取得データ長です。
void TrackerGetResult(float** arrayPtr, int *size)
ビルドする前に忘れてはならないのが .mabuファイルの書きかえです。
これはデフォルトで指定されているライブラリがビルドパッケージに含まれていないため、使えるものに変更する必要があるためです。(自分は当初これを書き換えないでビルドしたプラグインがMagicLeap実機で動かず詰まりました、なんで公式Extensionのデフォルト設定が動かないの![]() )
)
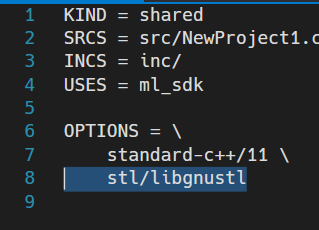
↑ がデフォルトの内容
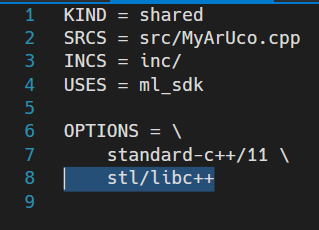
この stl/libgnustl の部分を stl/libc++ に変更します。
ソリューションプラットフォームを ML にしてビルド!
これでUnityプロジェクトで使う.soファイルが作られているはずです。
Unityでネイティブプラグインを使う
まずビルドした.soファイルをUnityプロジェクトのPluginsフォルダに入れ、そのプラグインのインスペクタでプラットフォームをLuminのみチェックにします。
これでコードからネイティブプラグインを使う準備ができました。
ネイティブプラグインの関数のインポート宣言します。
[DllImport("MyArUco", CallingConvention = CallingConvention.StdCall)]
public static extern void TrackerCreate(float marker_length, out int resultCode);

[DllImport("MyArUco", CallingConvention = CallingConvention.StdCall)]
public static extern void TrackerDestroy();

[DllImport("MyArUco", CallingConvention = CallingConvention.StdCall)]
public static extern void TrackerGetResult(out IntPtr arrayPtr, out int size);

[DllImport("MyArUco", CallingConvention = CallingConvention.StdCall)]
public static extern void TrackerReleaseResult();
トラッキングの開始
void Setup()
{
    TrackerCreate(MARKER_LENGTH, out int resultCode);
    var result = (MLResult.Code)resultCode;
    if (!MLResult.IsOK(result))
    {
        // Error
    }
}
トラッキングの結果の取得
void GetTrackerResult()
{
    IntPtr arrayPtr = IntPtr.Zero;
    TrackerGetResult(out arrayPtr, out int size);
    float[] array = new float[size];
    Marshal.Copy(arrayPtr, array, 0, size);

    resultArrayCount = (int)array[0];
    markerId = (int)array[1];
    pos = new Vector3(array[2], array[3], array[4]);
    rot = new Quaternion(array[5], array[6], array[7], array[8]);
}
このコードを使ってMagicLeap実機でマーカー認識してみるとこんなかんじ。
MagicLeapの動画キャプチャはTrackingと併用できないため、MagicLeapのグラスと目の間にカメラを挟み込んで無理やり撮影しています笑
検証するためにマーカーを用意するときは こちらのサイトでマーカー作成ができるようです。
使用環境
MagicLeap SDK v0.24.1
Unity 2019.3.9f1