はじめに
チュートリアルリンクにあるWatson Machine Learningのチュートリアルを試してみました。
(2018-01-30 サンプルアプリの記事追加)
(2018-02-09 サンプルアプリのコードを全面的に書き直し)
モデルの説明
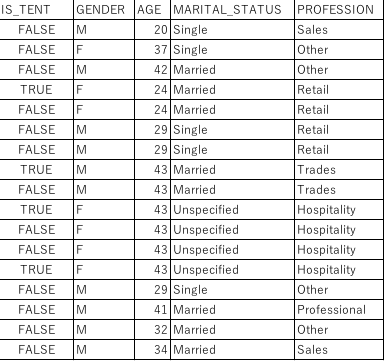
下の図のような、「テントを購入しているか」、「性別」、「年齢」、「既婚・未婚」、「職業」に関する約60000件のデータがあります。
このデータを元に、性別以降の4つの値からテント購入有無を予測するモデルを作ることを目標とします。
事前準備
まず、15分でできる! お手軽なAIクラウド環境 IBM DSXをセットアップするの手順に従って、IBM DSXのセットアップを行って下さい。
以下のガイドを実施するには、手順中オプションの扱いになっているWatson machine Learningとの連携まで必要です。
教師データの準備
機械学習モデルの学習に使う教師データを準備します。
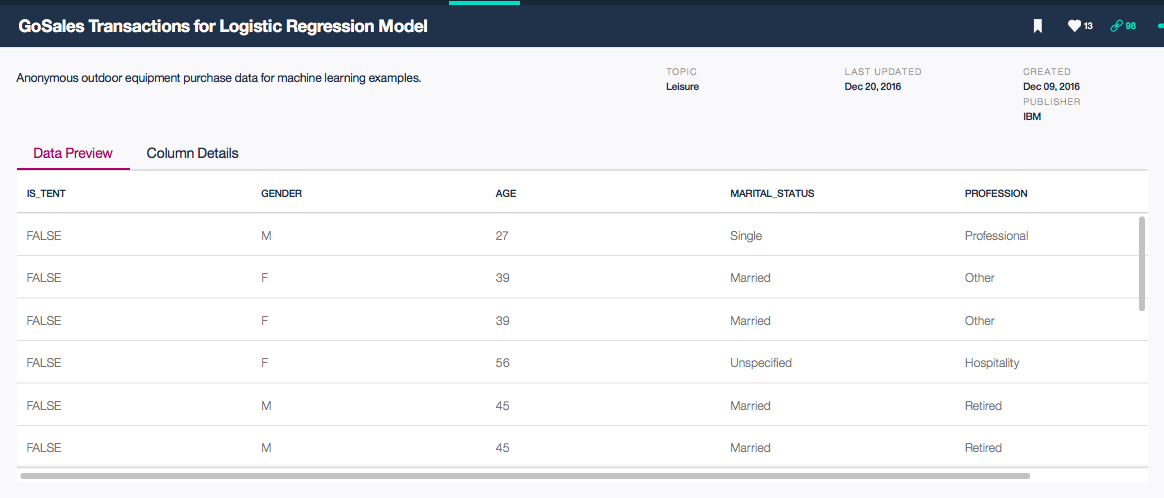
データはダウンロード元
にあります。下の図のようなデータがあることを確認した上で、ローカルにダウンロードします。
モデル作成と教師データのロード
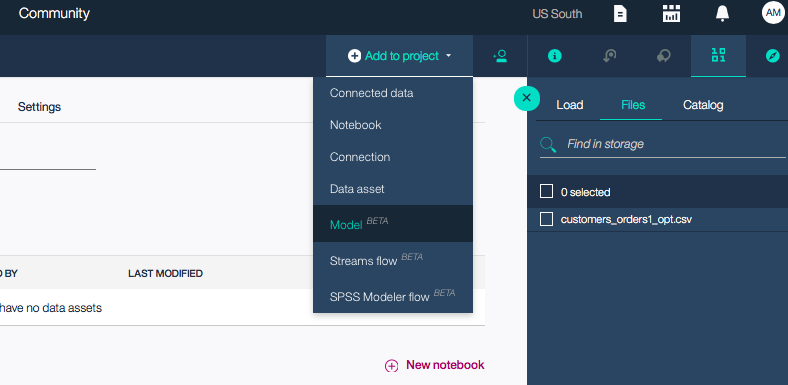
プロジェクト管理画面のメニューから「Add to project」->「Model」を選択します。
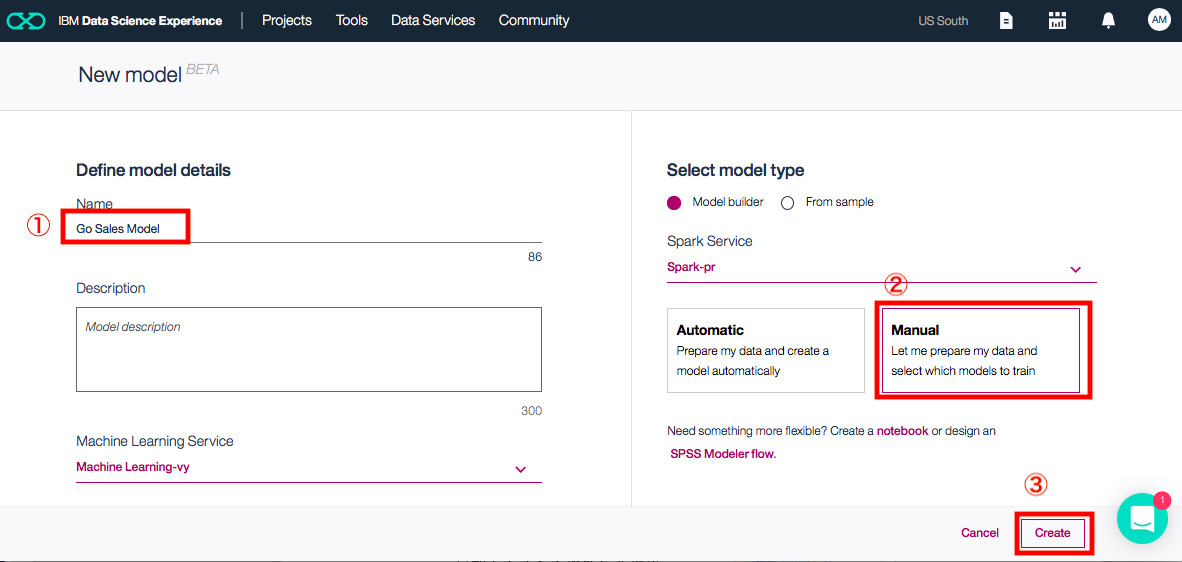
New Modelの画面になったら
- 名称を入力します。なんんでもいいのですが、例では"Go Sales Model"をしています。
- Model Typeは「Model Builder」を選択します。(デフォルトで選ばれているはずです)
- 方式はManualとします。
- 後はデフォルトのままで「Create」ボタンをクリックします。
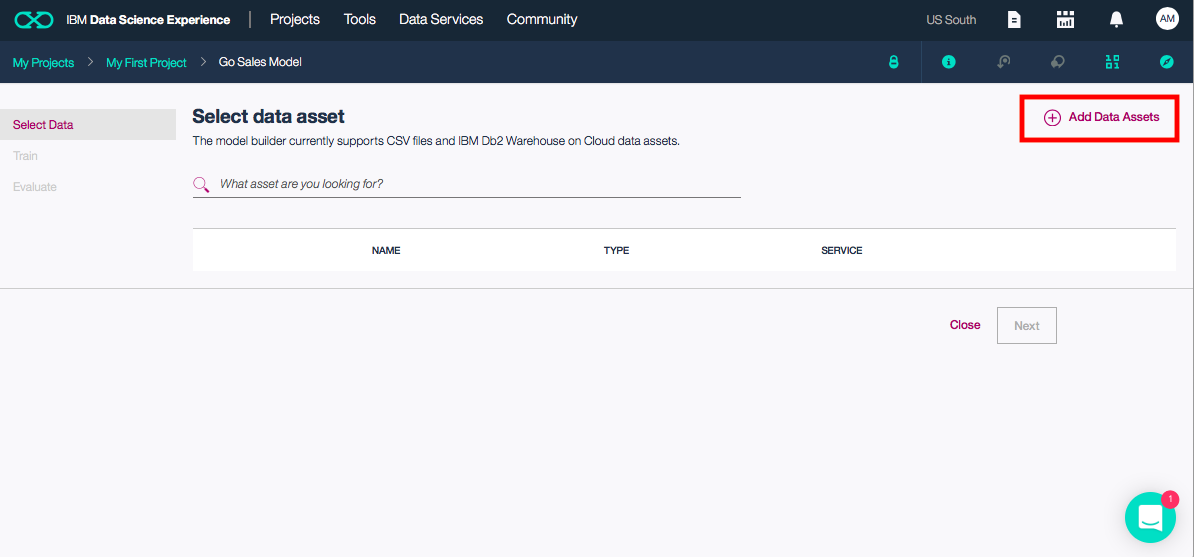
次のような画面になるので、「Add data Assets」をクリックします。
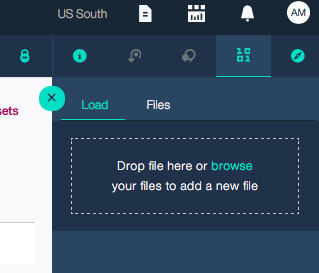
下のような画面が出てくるので、先ほどダウンロードしたCSVファイルを指定します。
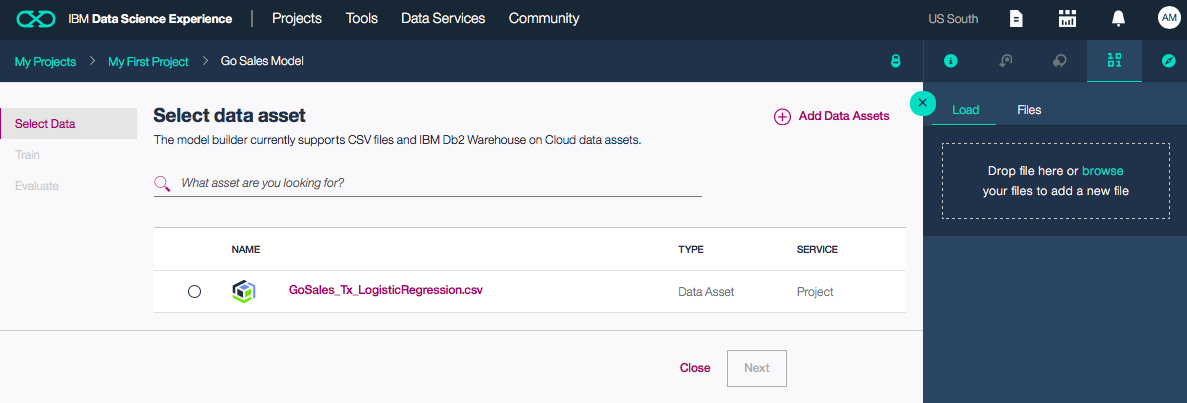
ファイルアップロードが完了したら、下の図にようになります。今、アップロードしたcsvファイルを選択し、アクティブになる「Next」ボタンをクリックします。
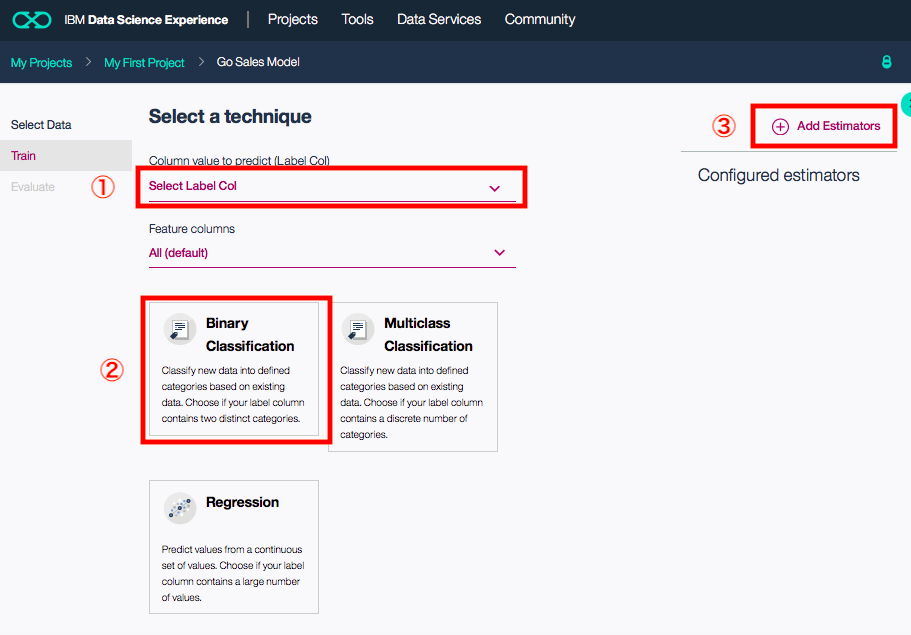
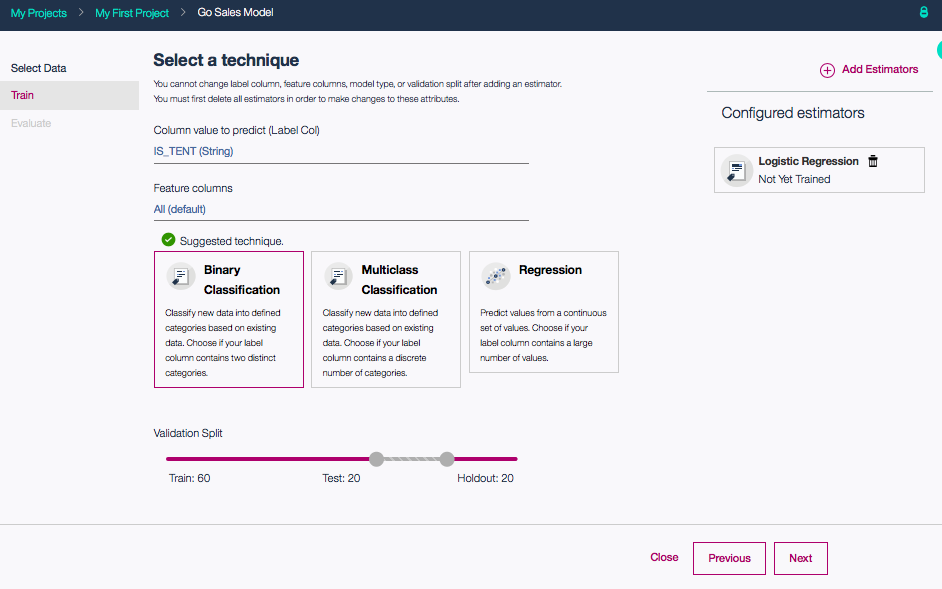
- 一番上の欄は、機械学習で使う教師データの選択です。テント購入有無を予測したいので、「IS_TENT」を選択します。
- どのようなタイプの学習かを指定します。Yes/Noの二値予測なので、「Binary Classifier」を選択します。
- モデル選択をするため、「Add Estimator」をクリックします。
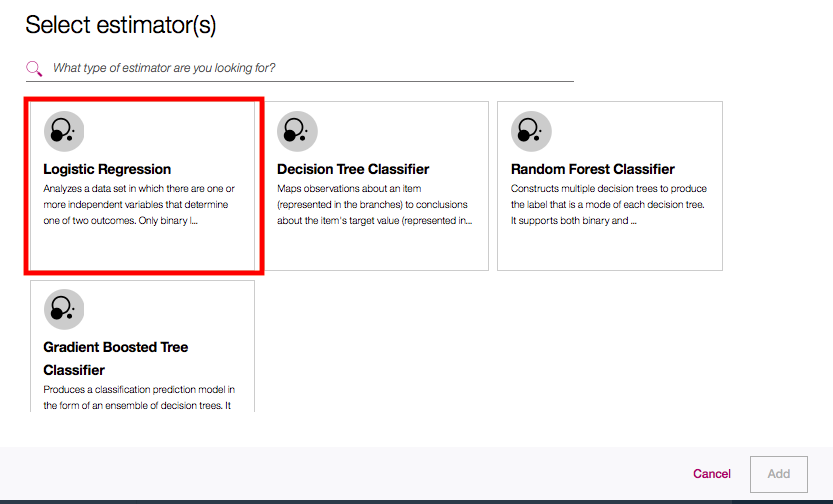
次のような候補モデルのリストの中から「Logistic Regression(ロジスティック回帰)」を選びます。
チュートリアルによると、ロジスティック回帰を選ぶ理由は以下の通りとのことです。
ロジスティック回帰を使用する理由
このチュートリアルでは、以下の理由でロジスティック回帰を使用します。
ロジスティック回帰を使用すると、順序、連続、または2分の2つの値を使用することができる複数の説明変数を使用することができます。
ロジスティック回帰では、予測の強さに対する定量化された値が得られ、他の要因に対する制御が可能になります。
この特定の分析の場合、受信側オペレーター特性(ROC)は、優れたパフォーマンス結果を生成します。
モデル選択が終わると、下の画面に戻ります。この画面で、「Next」ボタンをクリックします。
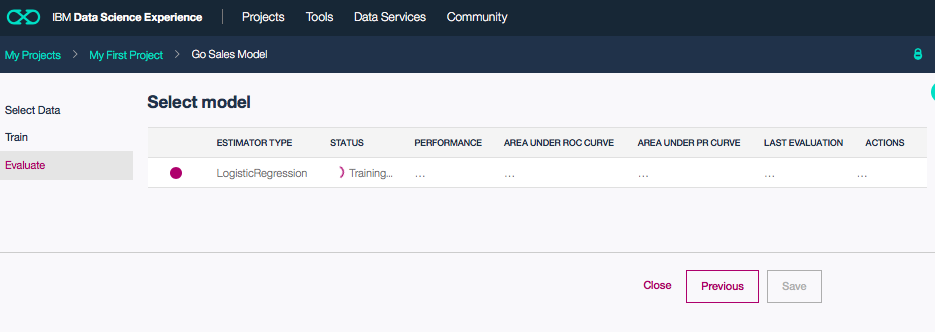
「Next」ボタンを押すと、下のように自動的に機械学習が始まります。
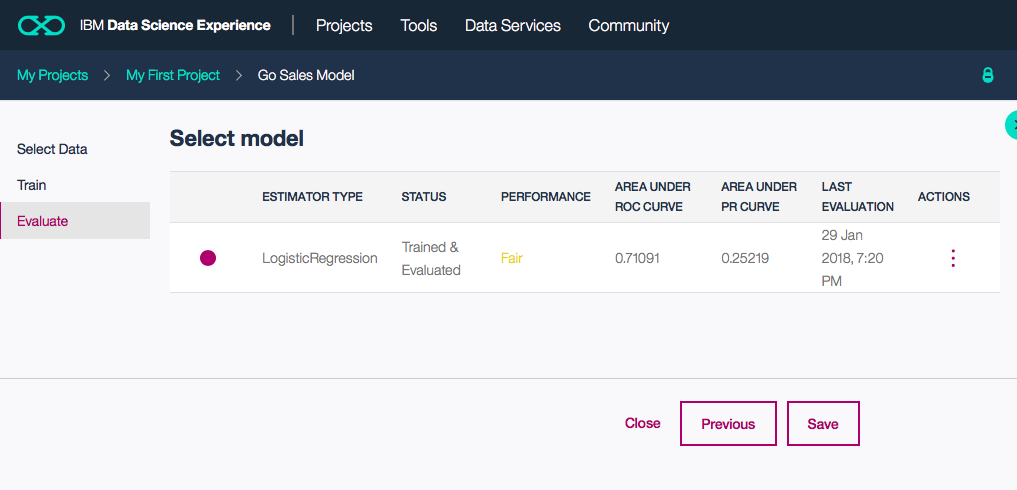
学習が終わると、画面は下の図のようになり、テストデータによる評価結果の数字が示されます。この数字でモデルとして問題ない場合は、「Save」ボタンをクリックします。
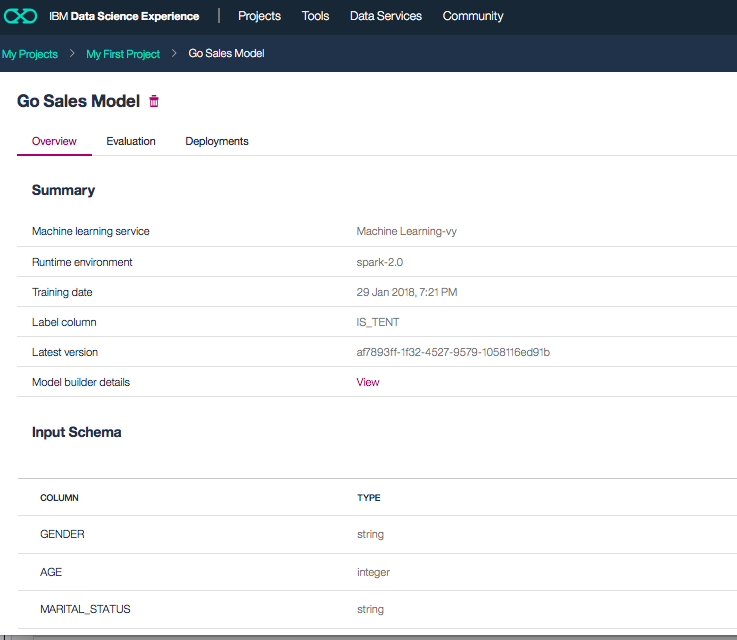
学習が終わると、下の図のように、学習結果のサマリーが表示されます。
モデルのデプロイ
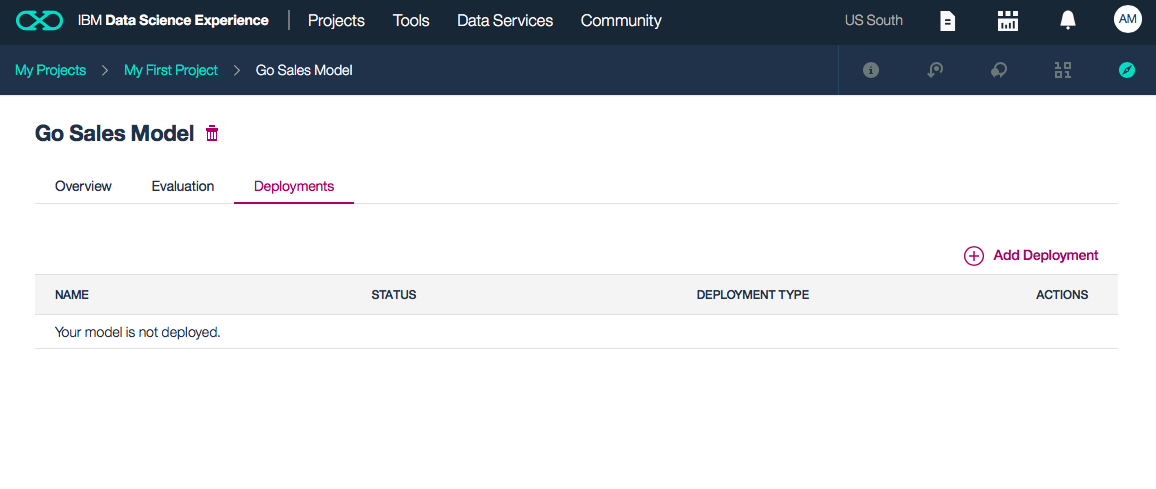
引き続き、作った学習モデルのデプロイを行います。このため、「Deployments」タブを選択し、「Add Deployment」のリンクをクリックします。
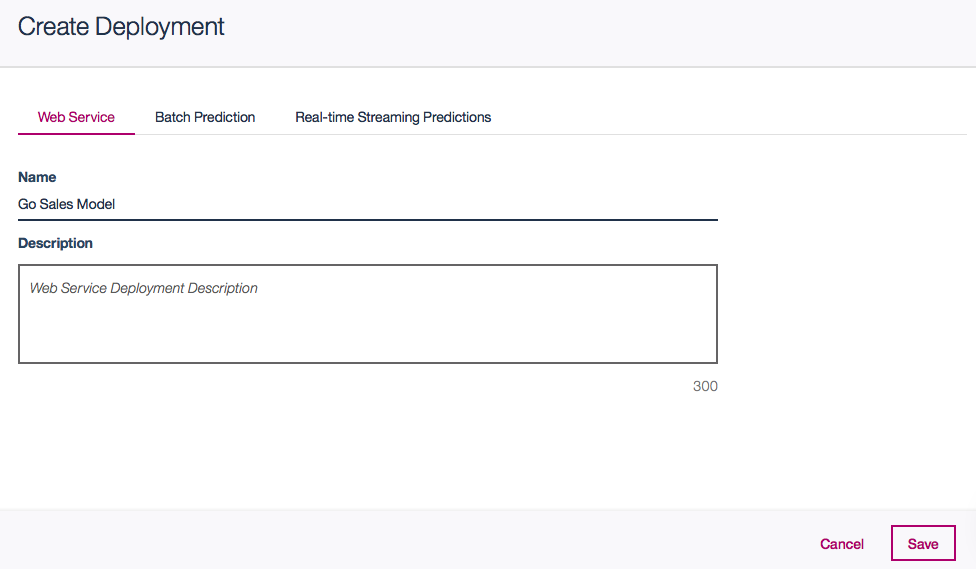
「Create Deployment」の画面になったら、一番左の「Web Service」のタブを選択し、適当な名前(例では"Go Sales Model"としています)を入力して、「Save」ボタンをクリックします。
備考:実はこのあたりはチュートリアルと微妙に違っているのですが、他にやり方がないし、その後のテストもうまくいっているので、これでよしとしています。。
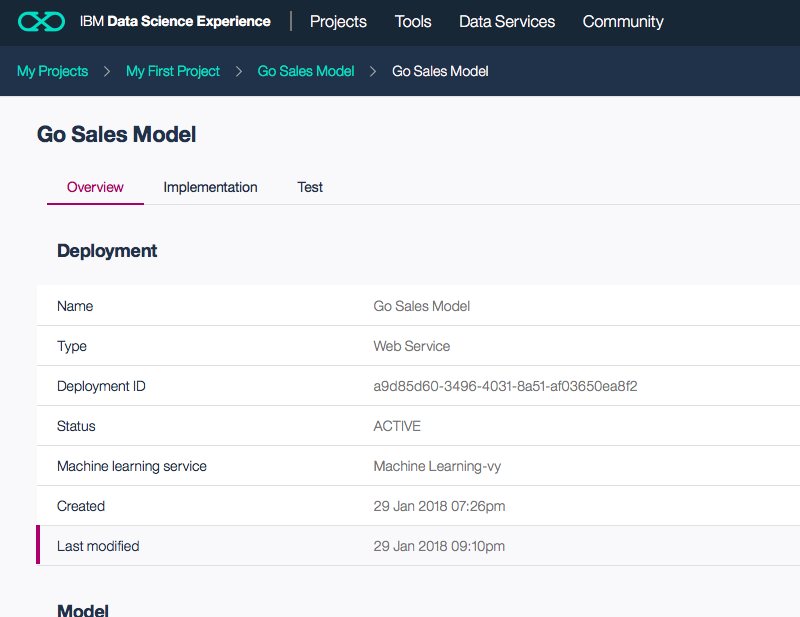
デプロイが完了すると、下の図のような画面になりますので、今作った「Go Sales Model」を選択します。
テスト
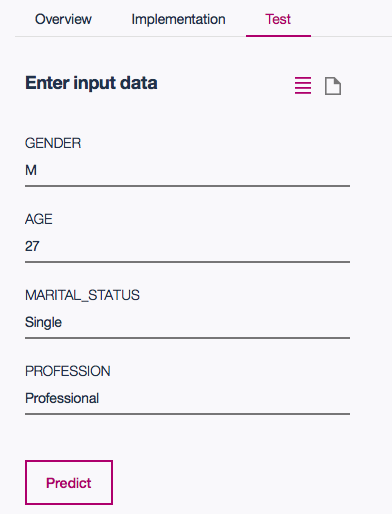
下のような画面になるので、「Test」のタブをクリックします。
すると、下のようなテスト用UI画面がでてきます。
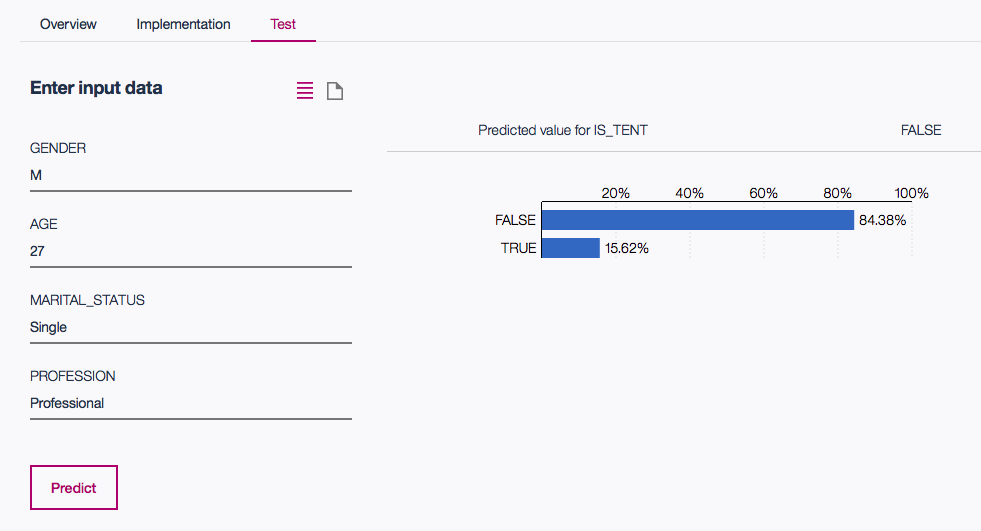
「Predict」ボタンを押すと、下の図のように、このパラメータの値の時の機械学習モデルの予測結果が表示されます。
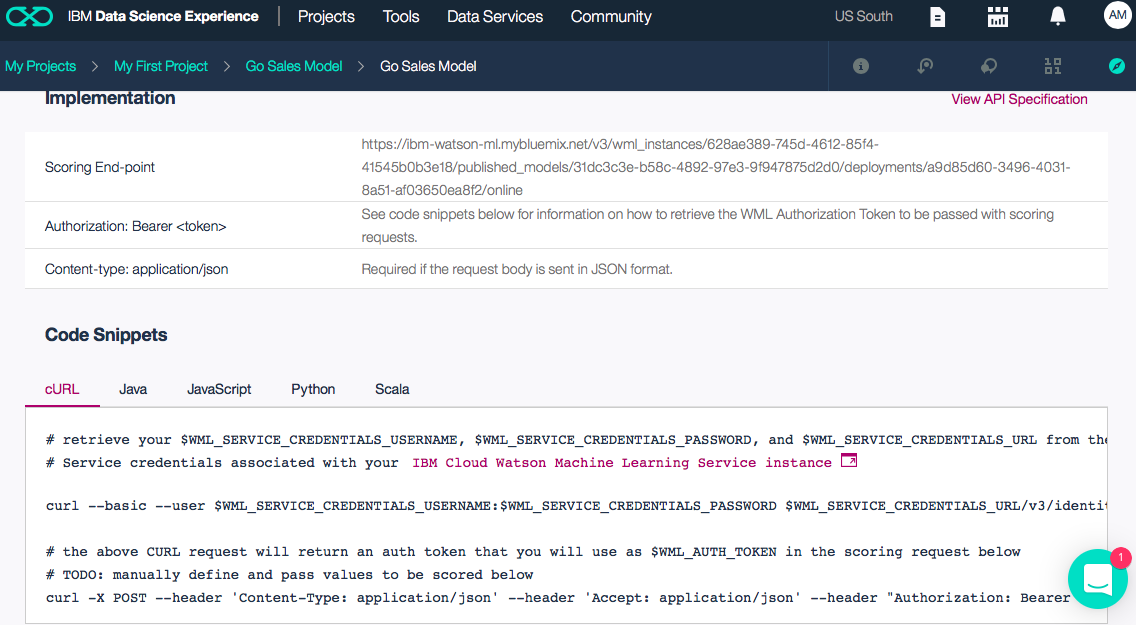
真ん中の「Implementation」タブをクリックすると、プログラムから機械学習モデルを呼ぶ場合の呼出し方がわかります。
この解説を元にcURLコマンドで実際に呼出しを行ってみました。
まず、最初のcURLコマンドで実行用トークンの取得を行います。
WML_SERVICE_CREDENTIALS_USERNAME=xxxxxxxx-xxxx-xxxx-xxxx-xxxxxxxxxxxx
WML_SERVICE_CREDENTIALS_PASSWORD=xxxxxxxx-xxxx-xxxx-xxxx-xxxxxxxxxxxx
WML_SERVICE_CREDENTIALS_URL=https://ibm-watson-ml.mybluemix.net
curl --basic --user $WML_SERVICE_CREDENTIALS_USERNAME:$WML_SERVICE_CREDENTIALS_PASSWORD $WML_SERVICE_CREDENTIALS_URL/v3/identity/token
次のcURLコマンドで、実際のサービス呼出しを行います。
WML_AUTH_TOKEN=xxxxxxxxxxxxxxxxxxxxxxxxxxxxxxxxxxxxx #実際にはもっと長いです
curl -X POST --header 'Content-Type: application/json' \
--header 'Accept: application/json' \
--header "Authorization: Bearer  $WML_AUTH_TOKEN" \
-d '{"fields": ["GENDER", "AGE", "MARITAL_STATUS", "PROFESSION"],"values":[["M",27,"Single","Professional"], ["F",27,"Single","Other"]]}' \
https://ibm-watson-ml.mybluemix.net/v3/wml_instances/xxxxxxxx-xxxx-xxxx-xxxx-xxxxxxxxxxxx/\
published_models/xxxxxxxx-xxxx-xxxx-xxxxxxxxxxxx/deployments/\
xxxxxxxx-xxxx-xxxx-xxxx-xxxxxxxxxxxx/online
次のような結果が返ってくれば、モデルはWEBサービスとして正常に動いています。
(jqコマンドで結果を整形した後)
{
  "fields": [
    "GENDER",
    "AGE",
    "MARITAL_STATUS",
    "PROFESSION",
    "features",
    "rawPrediction",
    "probability",
    "prediction",
    "nodeADP_class",
    "nodeADP_classes"
  ],
  "values": [
    [
      "M",
      27,
      "Single",
      "Professional",
      [
        12,
        [
          0,
          1,
          3,
          5
        ],
        [
          2.0013397229244108,
          2.676576635173241,
          2.035259009198972,
          2.811714998809647
        ]
      ],
      [
        1.6869098284322752,
        -1.6869098284322752
      ],
      [
        0.8438173398391515,
        0.15618266016084842
      ],
      0,
      "FALSE",
      [
        "FALSE",
        "TRUE"
      ]
    ],
    [
      "F",
      27,
      "Single",
      "Other",
      [
        12,
        [
          1,
          3,
          4
        ],
        [
          2.676576635173241,
          2.035259009198972,
          2.036568161847183
        ]
      ],
      [
        2.3403570096072084,
        -2.3403570096072084
      ],
      [
        0.9121646930845702,
        0.08783530691542982
      ],
      0,
      "FALSE",
      [
        "FALSE",
        "TRUE"
      ]
    ]
  ]
}
サンプルアプリの実装 (2018-02-09修正)
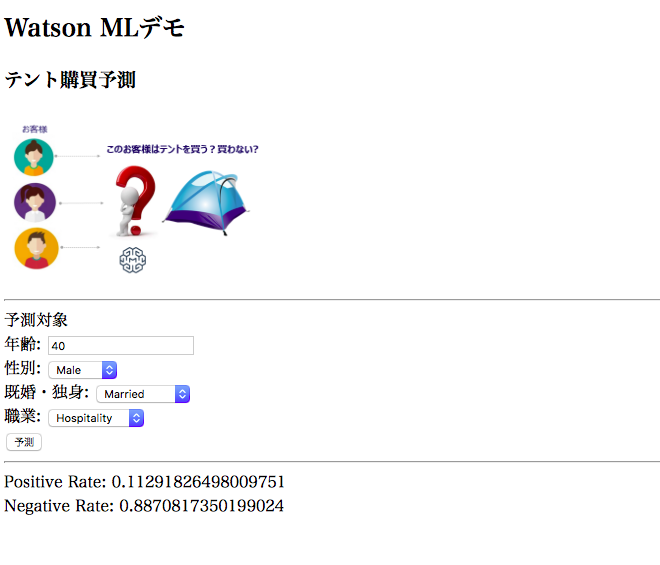
上で作った機械学習モデルを呼び出すサンプルアプリを作ってみました。
上と同じようにImplementationタブの「JavaScript」の欄を雛形にコードを実装する形になります。
下記に画面とソースコードを連携しておきます。
(2018-02-09 元のコードはコールバックの処理が不十分だったので、全面的に書き直しました。)
主要な3つのファイルに関しては、ソースコードそのものの載せておきます。
それぞれのソースの役割についてはWatson APIを使ったNode.jsアプリの標準実装パターンを参考にして下さい。
'use strict';

const btoa = require('btoa');
const async = require('async');
const request = require('request');
const express = require('express');
const app = express();

var credentials_url;
var credentials_username;
var credentials_password;
var wml_endpoint_url;

// 静的HTMLパスの指定
app.use(express.static(__dirname + '/public'));

// 構成情報の取得
const fs = require('fs');
if (fs.existsSync('local.env')) {
  console.log('構成情報をlocal.envから取得します');
  require('dotenv').config({ path: 'local.env' });
  credentials_url = process.env.WML_SERVICE_CREDENTIALS_URL;
  credentials_username = process.env.WML_SERVICE_CREDENTIALS_USERNAME;
  credentials_password = process.env.WML_SERVICE_CREDENTIALS_PASSWORD;
} else {
  console.log('構成情報を環境変数から取得します');
  var env = JSON.parse(process.env.VCAP_SERVICES);
  var vcap = env['pm-20'];
  credentials_url = vcap[0].credentials.url;
  credentials_username = vcap[0].credentials.username;
  credentials_password = vcap[0].credentials.password;
}

wml_endpoint_url = process.env.WML_ENDPOINT_URL;

// ML呼出し
app.get("/predict", function(req, res, next){
    console.log("started predict");
    async.waterfall([
        // step 1 token取得
        function (callback) {
            const tokenHeader = "Basic " + btoa((credentials_username + ":" + credentials_password));
            const tokenUrl = credentials_url + "/v3/identity/token";

            var headers = {
                Authorization: tokenHeader,
                'Content-Type': "application/json;charset=UTF-8"
            }
            var options = {
                url: tokenUrl,
                method: 'GET',
                headers: headers
            }
            // リクエスト実行
            console.log("before get token");
            request(options, function (error, response, body) {
                if ( error ) {
                    console.log('error');
                    console.log(error);
                    callback(1, '1st error');
                } else {
                    console.log('get token normal end');
                    const wmlToken = "Bearer " + JSON.parse(body).token;
                    callback(null, wmlToken);
                }
            })
        },
        // step 2 予測値取得
        function (arg, callback) {
            const wmlToken = arg;
            var payload = req.query;
            payload.values[0][1] = Number(payload.values[0][1]);

            var headers = {
                Authorization: wmlToken,
                Accept: "application/json",
                'Content-Type': "application/json;charset=UTF-8"
            }
            var options = {
                url: wml_endpoint_url,
                method: 'POST',
                headers: headers,
                json: payload
            }
            console.log("before predict");
            request(options, function (error, response, body) {
                if ( error ) {
                    console.log('2nd error');
                    console.log(error);
                    callbak(1, '2nd error');
                } else {
                    console.log('2nd normal end');
                    var retValue = body.values[0][6];
                    callback(null, retValue);
                }
            })
        },
    ], function (err, results) {
        if (err) {
            console.log("Error")
            console.log(err);
        } else {
            console.log("Normal End!");
            console.log(results);
            res.send(results);
        }
    });
});

// VCAP_APP_PORTが設定されている場合はこのポートでlistenする (Bluemixのお作法)
var port = process.env.VCAP_APP_PORT || 6011;
app.listen(port, function() {
  // eslint-disable-next-line
  console.log('Server running on port: %d', port);
});
<!doctype html>
<html lang="ja">
<head>
<meta charset="UTF-8">
<title>Watson ML Sample</title>

<style type="text/css">
text { font-size: 12px; font-weight: bold; fill: black; }
a { font-size: 12px;}
.axis path,
.axis line{ fill: none; stroke: black; }
.tick text{ font-size: 10px; fill: black; }
.line{ fill: none; stroke-width: 2px; }
div.tooltip { position: absolute; text-align: center; width: 60px; height: 28px;
    padding: 2px; font: 10px sans-serif; background: lightsteelblue;
    border: 0px; border-radius: 8px; pointer-events: none; }
</style>


<script src="js/jquery-3.2.1.min.js"></script>
<script src="ml-sample.js"></script>
</head>

<body>

<h2>Watson MLデモ</h2>
<h3>テント購買予測</h3>
<img src='picture.png' width='270' height='170'>
<hr>
予測対象<br>
年齢:
<input text id="age" value='40'>
<br>
性別:
<select id="gender">
    <option>Male</option>
    <option>Famale</option>
</select>
<br>
既婚・独身:
<select id="marital_status">
    <option>Married</option>
    <option>Single</option>
    <option>Unspecified</option>
</select>
<br>
職業:
<select id="profession">
    <option>Executive</option>
    <option>Hospitality</option>
    <option>Professional</option>
    <option>Retail</option>
    <option>Retired</option>
    <option>Sales</option>
    <option>Student</option>
    <option>Trades</option>
    <option>Other</option>
</select>
<br>
<input type="submit" id="predict" value="予測">
<hr>
Positive Rate: <label id=pos_rate></label>
<br>
Negative Rate: <label id=neg_rate></label>

<script>
$(function(){
    $('#predict').click(call_predict)
});
</script>

</body>
</html>
function call_ml_predict( data, success, error ) {
// API呼出し
    $.ajax({
        type: "GET",
        url:  "/predict",
        data: data,
        success: success,
        error: error
        });
}

function predict_callback(msg) {
    $('#pos_rate').text(msg[1]);
    $('#neg_rate').text(msg[0]);
    console.log(msg);
}


function call_predict() {
    console.log('in predict');
    var params = [
            $('#gender').val(),
            Number($('#age').val()),
            $('#marital_status').val(),
            $('#profession').val()
    ];
    console.log(params);
    var data = {
        fields: ["GENDER", "AGE", "MARITAL_STATUS", "PROFESSION"],
        values: [params]
    };
    console.log(data);
    call_ml_predict( data,
            predict_callback,
            function(XMLHttpRequest,textStatus,errorThrown){alert('error');} );
}
