2
0

Delete article

Deleted articles cannot be recovered.

Draft of this article would be also deleted.

Are you sure you want to delete this article?

More than 3 years have passed since last update.

【Watson Studioメモ】Watson Studioで追加ユーザーの招待をする

Last updated at Posted at 2019-04-03

はじめに

Watson Studioでユーザー追加の手順を知りたいとの問い合わせがあったので、その手順を記載します。
ユーザー登録は、インスタンスでなくプロジェクト単位で行います。Watson Studio固有の話としてここで追加するユーザーは、IBM Cloud側のWatson Studioインスタンスに対するアクセス権は不要です。
以下の手順の前提は、招待先のユーザーがIBM Cloudにアカウント登録済みであることです。もしこれもまだの場合は、IBM Cloudからも招待メールが届き、ユーザーは2段階のアクティベーションをかける必要があります。

(2020-04-25 手順修正)

手順1

step1.png

プロジェクト管理の画面で、右から2つめの「Acccess Control」のタブをクリックします。
続いて「Add Collaborators」のボタンをクリックして下さい。

手順2

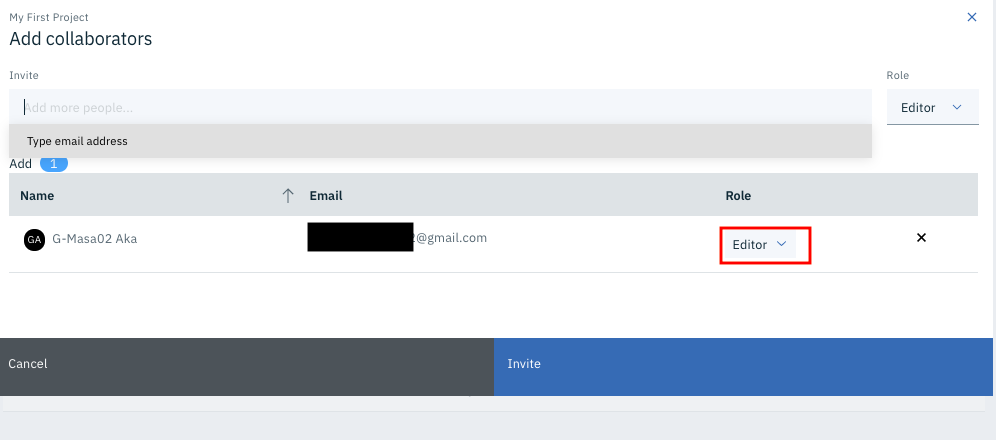
スクリーンショット 2020-04-25 13.02.51.png

画面上部のテキストボックスに招待したい人のメールアドレスを入力してエンターキーを押します。

手順3

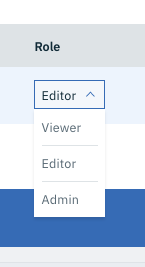
スクリーンショット 2020-04-25 13.04.10.png

上の画面になるので、必要であれば、RoleをAdminなどに変更します。Editorのままでいい場合は、特に変更の必要はありません。

スクリーンショット 2020-04-25 13.05.13.png

手順4

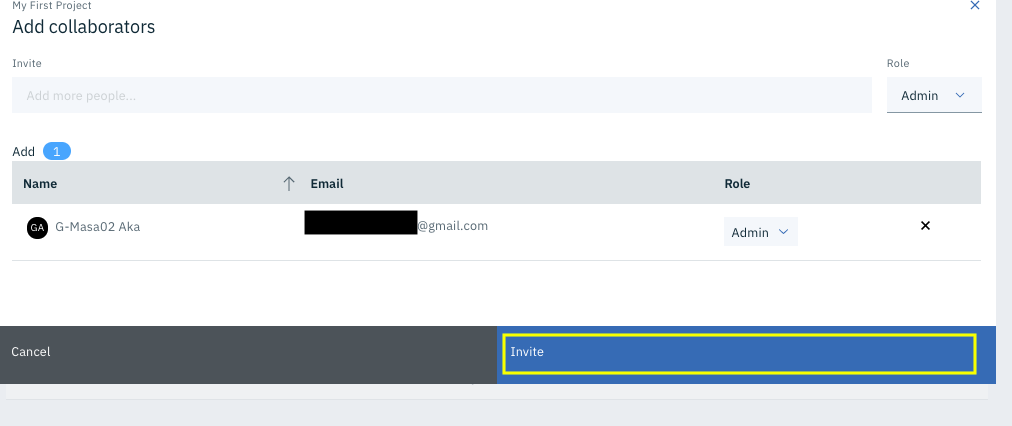
スクリーンショット 2020-04-25 13.05.23.png

画面右下の「Invite」ボタンをクリックします。
これで、追加ユーザーの招待は完了です。

備考

招待先のユーザーがIBM idにも未登録な場合、対応手順がやや複雑になります。具体的な手順は別記事【Watson Studioメモ】IBM idの登録がないユーザーがWatson Studioの招待を受けた場合の対応手順に記載しましたので、こちらを参照して下さい。

2
0
0

Register as a new user and use Qiita more conveniently

  1. You get articles that match your needs
  2. You can efficiently read back useful information
  3. You can use dark theme
What you can do with signing up
2
0

Delete article

Deleted articles cannot be recovered.

Draft of this article would be also deleted.

Are you sure you want to delete this article?