はじめに
Pythonで機械学習を行う場合、CSVで取得した業務データを機械学習にかけるためOne Hot Vectorに変換するというのは、非常に当たり前に行うことと思います。
ところが意外とネットにサンプルが出ていなかったので、自分で調べた結果を備忘録としてあげておきます。
前提
Watson StudioのJutyper Notebook上で動作検証しています。
Watson StudioはIBM Cloudで動作するJupyter Notebook環境でもあります。(他にもいろいろなことが可能です)
関心のある方は10分でできるPython機械学習環境! Watson Studioセットアップガイドでお試し下さい。
利用データ
ダウンロードに公開されているデータを利用します。
Jupyter Notebook
以下で紹介するコードはJupyter Notebookとしてgithubからダウンロード可能です。
実施手順
対象データをDataFrameに
以下のコマンドで、対象データをデータフレームにロードします。
# 分析対象CSVのダウンロード
!wget https://github.com/MattyMc/is-a-tent/raw/master/GoSales_Tx_LogisticRegression.csv

# 分析対象データをDataFrameにロード
import pandas as pd
import numpy as np

df = pd.read_csv('GoSales_Tx_LogisticRegression.csv', header=0)
df.head()
結果は以下のようになるはずです。
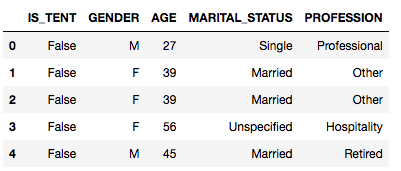
IS_TENTが教師データ、GENDER、NARITAL_STATUS、PROFESSIONが、入力データのうちOne Hot化を行いたい項目となります。これらの項目を以下のコードで変換します。
まず、試しに項目PROFESSIONに対して変換をかけます。
個別項目のOne Hot化
# One Hot化
from sklearn import preprocessing
from sklearn.preprocessing import OneHotEncoder

profession = df['PROFESSION'].values
profession_enc = preprocessing.LabelEncoder().fit_transform(profession).reshape(-1,1)
profession_enc2 = OneHotEncoder().fit_transform(profession_enc).toarray()

# 結果の確認をします
print(profession_enc[:5])
print(profession_enc2[:5])
以下のような結果になるはずです。
[[3]
 [2]
 [2]
 [1]
 [5]]
[[ 0.  0.  0.  1.  0.  0.  0.  0.  0.]
 [ 0.  0.  1.  0.  0.  0.  0.  0.  0.]
 [ 0.  0.  1.  0.  0.  0.  0.  0.  0.]
 [ 0.  1.  0.  0.  0.  0.  0.  0.  0.]
 [ 0.  0.  0.  0.  0.  1.  0.  0.  0.]]
profession_enc2の段階でちゃんとOne Hot化されていることがわかりました。
他の2項目も同様の処理を行います。
marital_status = df['MARITAL_STATUS'].values
marital_status_enc = preprocessing.LabelEncoder().fit_transform(marital_status).reshape(-1,1)
marital_status_enc2 = OneHotEncoder().fit_transform(marital_status_enc).toarray()

gender = df['GENDER'].values
gender_enc = preprocessing.LabelEncoder().fit_transform(gender).reshape(-1,1)
gender_enc2 = OneHotEncoder().fit_transform(gender_enc).toarray()
整数データの標準化
項目AGEに関しては元々は整数値ですが、機械学習入力用に浮動小数点に変換後、標準化を行って[0, 1]の範囲に値が収まるようにします。
# AGEに関しては、浮動小数点に変換後、標準化します
from sklearn.preprocessing import MinMaxScaler
age = df['AGE'].values.reshape(-1, 1).astype(np.float32)
age_std = MinMaxScaler().fit_transform(age)

# 結果確認
print(age_std[:5])
print文の結果は次のようなるはずです。
[[ 0.19230768]
 [ 0.4230769 ]
 [ 0.4230769 ]
 [ 0.75      ]
 [ 0.53846157]]
入力用行列の作成
今までの結果をすべて連結して機械学習の入力用データを作成します。
x = np.hstack([gender_enc2, age_std, marital_status_enc2, profession_enc2])
# 結果確認
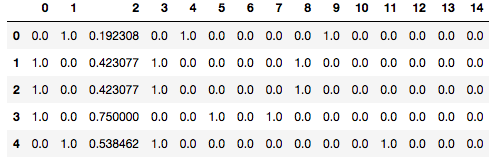
pd.DataFrame(x).head()
結果は次のようになるはずです。
教師データ作成
最後に教師データ用の配列を作成します。
# 教師データの作成
is_tent = df['IS_TENT'].values
y = preprocessing.LabelEncoder().fit_transform(is_tent).ravel()

# 結果確認
print(y[:5])
y.shape
以下のような結果が表示されればOKです。
[0 0 0 0 0]
(60252,)
機械学習実施
以上で、機械学習にかけるための準備は完了しました。
以下は、あくまで参考としての機械学習実施コードサンプルです。
# 以下はおまけです
from sklearn import svm
from sklearn.model_selection import train_test_split

# 訓練データと検証データ取得
x_train, x_test, y_train, y_test = train_test_split(x, y, test_size=0.2)

# モデル作成
from sklearn.linear_model import LogisticRegression
lr = LogisticRegression(C=1.0)

# 学習
lr.fit(x_train, y_train)

# 検証データで予測
y_pred = lr.predict(x_test)
lr.score(x_test, y_test)