はじめに
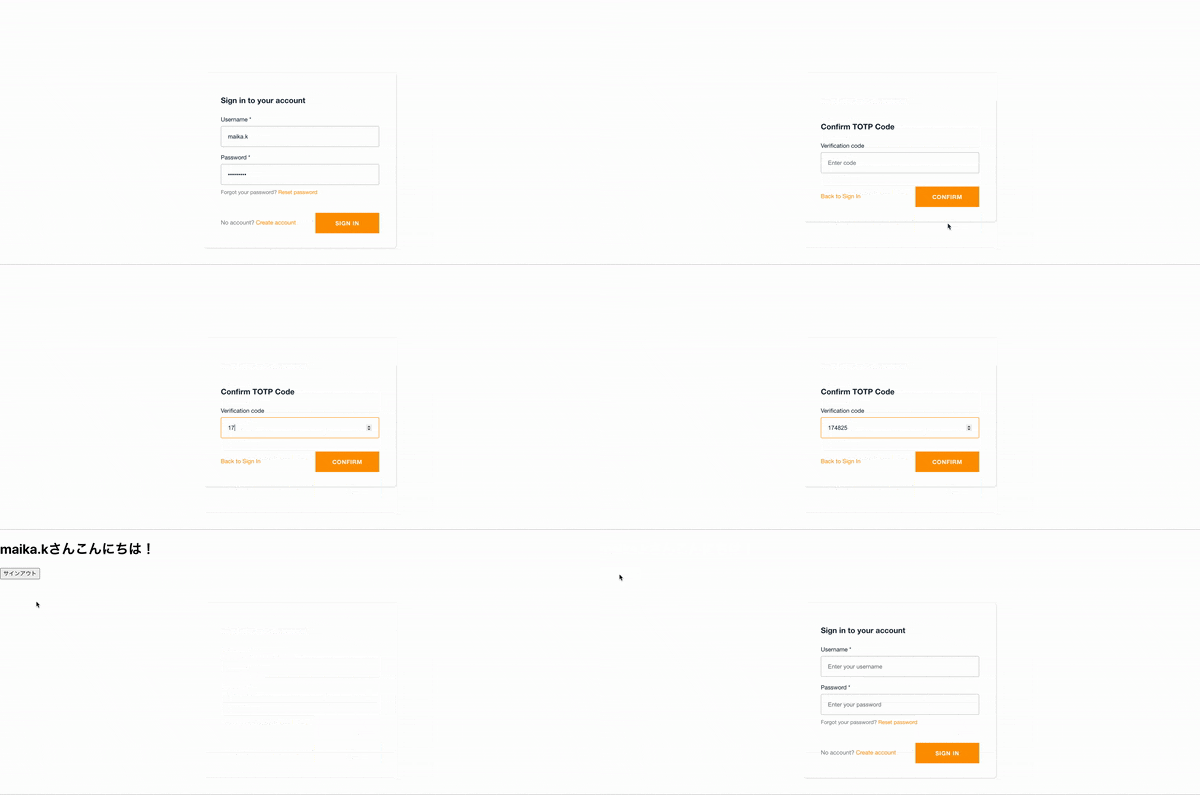
Reactで作成したWebアプリケーションのユーザー認証部分をCognito + Amplifyフレームワークで構築してみました。「【React】ユーザー認証をCognito + Amplifyで構築してみた」の構築準備編と構築完成編を経て、現状下記のようなサインインページのWebアプリケーションが出来上がっています。
ただ、このWebアプリケーションは管理者が事前にユーザーを登録し、登録されているユーザーのみが使用できるようにしたいので、今回はサインインページにあるサインアップボタンを非表示にしたいと思います。
既存のソースコード
※↓クリックするとソースコードが見れます。
既存のソースコード
import React, {useEffect} from "react";
import Amplify, {Auth} from 'aws-amplify';
import awsconfig from './aws-exports';
import {withAuthenticator} from "@aws-amplify/ui-react";

Amplify.configure(awsconfig);

function App() {
    const [currentUserName, setCurrentUserName] = React.useState("");
    useEffect(() => {
        const init = async() => {
            const currentUser = await Auth.currentAuthenticatedUser();
            setCurrentUserName(currentUser.username);
        }
        init()
    }, []);

    const signOut = async() => {
        try {
            await Auth.signOut();
        } catch (error) {
            console.log('error signing out: ', error);
        }
        document.location.reload();
    }

    return (
        <div>
            <h1>{currentUserName}さんこんにちは!</h1>
            <button onClick={signOut}>サインアウト</button>
        </div>
    );
}

export default withAuthenticator(App);
既存のものは、withAuthenticatorコンポーネントでラップすることでサインイン画面等を表示していました。ただ、withAuthenticatorだとサインアップボタンを非表示にする方法を見つけられず、<AmplifyAuthenticator>というUIコンポーネントを使う方法だと簡単にサインアップボタンを非表示にできそうだったので、<AmplifyAuthenticator>を使うことにしました。
やってみる
公式ドキュメントを参考に実装していきます。
サインアップボタンを削除する
まず、サインインページにあるサインアップボタンを非表示にするために、UIコンポーネント<AmplifySignIn/>内にhideSignUp={true}を挿入します。これでサインアップボタンを非表示にすることができます。
<AmplifyAuthenticator >
    <AmplifySignIn slot="sign-in" hideSignUp={true} />
</AmplifyAuthenticator>
この他にもさまざまなプロパティが用意されています。デフォルトのユーザー認証にはユーザー名が使われています。例えば、ユーザー認証にメールアドレスを使いたいとなれば、<AmplifySignIn/>内にusernameAlias="email"を指定するだけで簡単に変更することができます。
ログイン判定
既存のソースではwithAuthenticatorコンポーネントでラップしていたので、ログインしているかどうかを特に気にしていませんでしたが、<AmplifyAuthenticator>を使うことで、ログインしている人としていない人で表示するコンポーネントを分ける必要があります。
ここで分けないと、Uncaught (in promise) not authenticatedというエラーが出て、ログイン後にユーザー情報が取得できません。
return authState === AuthState.SignedIn && user ? (
    <TopPage />
) : (
    <AmplifyAuthenticator >
        <AmplifySignIn slot="sign-in" hideSignUp={true} />
    </AmplifyAuthenticator>
);
ステータスがSignedInになっているか、ユーザー情報が取得できているかを確認することで、ログイン済みかどうかを判定しています。
MFAを使っている場合、一段階目のユーザー名とパスワードでの認証後には、userにユーザー情報が入ってしまうので、authStateも確認する必要があります。逆のパターンは見つけることができず・・、authStateだけで判定している方も見かけましたが、今回は公式に沿って、ステータスとユーザー情報の有無で判定するようにしています。
完成したソースコード
上記を踏まえて完成したソースコードです。
既存のものでは、ラップしていただけなので、トップページも同じコンポーネントにまとめていましたが、今回は分けることにしました。TopPage.jsの内容はほとんど既存App.jsのものと同じです。
import React, {useEffect} from "react";
import Amplify from 'aws-amplify';
import awsconfig from './aws-exports';
import {AmplifyAuthenticator, AmplifySignIn} from "@aws-amplify/ui-react";
import {AuthState, onAuthUIStateChange} from "@aws-amplify/ui-components";
import TopPage from "./TopPage";

Amplify.configure(awsconfig);

function App() {
    const [authState, setAuthState] = React.useState();
    const [user, setUser] = React.useState();

    useEffect(() => {
        onAuthUIStateChange((nextAuthState, authData) => {
            setAuthState(nextAuthState);
            setUser(authData);
        });
    }, []);

    return authState === AuthState.SignedIn && user ? (
        <TopPage />
    ) : (
        <AmplifyAuthenticator >
            <AmplifySignIn slot="sign-in" hideSignUp={true} />
        </AmplifyAuthenticator>
    );
}

export default App;
import React, {useEffect} from "react";
import Amplify, {Auth} from 'aws-amplify';
import awsconfig from './aws-exports';

Amplify.configure(awsconfig);

function TopPage() {
    const [currentUserName, setCurrentUserName] = React.useState("");
    useEffect(() => {
        const init = async() => {
            const currentUser = await Auth.currentAuthenticatedUser();
            setCurrentUserName(currentUser.username);
        }
        init()
    }, []);

    const signOut = async() => {
        try {
            await Auth.signOut();
        } catch (error) {
            console.log('error signing out: ', error);
        }
        document.location.reload();
    }

    return (
        <div>
            <h1>{currentUserName}さんこんにちは!</h1>
            <button onClick={signOut}>サインアウト</button>
        </div>
    );
}

export default TopPage;
完成画面
サインアップボタンを非表示にすることができました!
サインアップボタンが非表示になっただけで、画面の動き等は冒頭の完成画面と同じです。
おわりに
サインインページのカスタマイズも完成です!
実はこの実装をしたのが半年以上前で、そもそもこの情報がなかったのか、あったのにうまく調べきることができなかったのかは分かりませんでした。2日調べてサインアップボタンが消せなかったので、当時はUIコンポーネントの文言を日本語化する要領で無理やり消しました(笑)
今回この記事を書くにあたり、再度調べてみると、すごくあっさり見つけることができ、しかも実装も簡単で、こんなに簡単にできるんかーいという気持ちです。でも、今回正解の実装方法を知ることができたので、いい機会になりました。


