概要
WEBアプリの開発未経験者が無謀にも対話型LINE BOTを自作するまでの試行錯誤の記録。
本記事ではWEBサーバのセットアップから始まり、BOTのデプロイ、外部サービスを活用した対話機能の実装までを時系列にまとめる。
この記事をトレースすれば誰でもBOTが作成できるはず。
インスピを受けたもの
最初のモチベーションとなったものはこれ↓
LINE BOTでりんな風の自分専用女子高生BOTを作ってみた (Python & Heroku)
その他、基本的にはQiitaにUPされている作例で学習した。
(出典は覚えている範囲でリンクを貼っています。)
採用したサービス
趣味で作るものだから家計に負担をかけないためにコストミニマムであることは重要である。
| Service | 用途 | 備考 | 維持コスト |
|---|---|---|---|
| さくらVPS | CentOS 6 | IaaSとして安価に導入可能 | 698円/月 |
| LINE@ | Messaging API | なし | |
| Google Domains | 任意のドメイン取得 | 1700円/年 | |
| Let's Encrypt | 中間CA局 | 無料プラン | なし |
| Userlocal | AIチャットボット | 無料プラン | なし |
BOTサーバ構成要素
| Software | 分類 | 備考 |
|---|---|---|
| NGiNX | WEBフロントサーバ | LINE@との窓口 |
| Gunicorn | WEBアプリケーションサーバ | |
| Django | WEBアプリフレームワーク | BOT本体 |
システム構成
基本動作はとてもシンプル。LINEアプリからメッセージを発信すると、その内容を外部の対話APIまで中継し、応答メッセージを受信して再びLINEに返す。これだけだと単なるメッセージ中継BOTに過ぎないが、メッセージの内容に応じて処理をアドオンするなり自在にカスタマイズできるようになるので汎用性が高い。
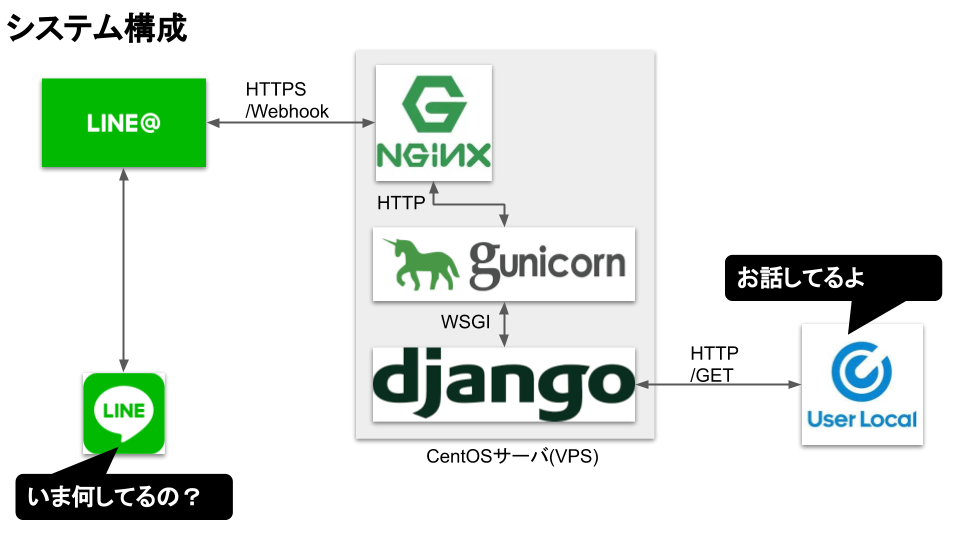
フロントとアプリケーションを分離するメリットは、SSLのオフロードによる負荷軽減であったり、NGiNXをリバースプロキシとすることによる機能追加など拡張性が見込めるといったことが挙げられる。
0.事前準備
最低限の準備は事前に終わらせておく。解説記事は検索すれば山ほど出てくるので割愛。
- さくらVPSの契約、サーバログイン
- LINE Developersのアカウント作成、プロバイダー作成、チャネル作成
- UserLocalのアカウント作成
1.Python環境構築
さくらVPSへのログインからスタート
$ cat /etc/redhat-release
CentOS release 6.10 (Final)
$ sudo yum install -y https://centos6.iuscommunity.org/ius-release.rpm
まずは手始めにpythonのインストール。
$ sudo yum install -y python36*
$ sudo ln -s /usr/bin/python3.6 /usr/bin/python3
$ sudo ln -s /usr/bin/pip3.6 /usr/bin/pip3
$ sudo pip3 install --upgrade pip
CentOS(7系含む)ではパッケージ管理のYumコマンドがデフォルトインストールのPython2.xで動いているのでデフォルトインストールされているpythonのパスを変えてしまうようなエイリアス設定はしない方が良い
〈参考〉CentOS6にPython3入れる
〈参考〉PythonでLine botを作ってみた
$ sudo pip3 install flask
$ sudo pip3 install line-bot-sdk
2.ドメイン取得
ドメインはGoogle Domainsで取得することとした。
ネームサーバも併せてGoogle Domainsでレコード登録。
手順は記載するほどでもないので割愛する。というか驚くほど簡単だったため書くことがない・・・。
3.NGiNX導入
WEBフロントサーバとしてNGiNXを利用する。ここでは時系列に沿って説明するため詳しくは後述するが、最終的にはSSLオフロードおよびリバースプロキシの役割を担うこととなる。
$ sudo yum install -y nginx
$ sudo vi /etc/selinux/config
$ sudo iptables -L
Chain INPUT (policy DROP)
target     prot opt source               destination
ACCEPT     all  --  anywhere             anywhere
ACCEPT     icmp --  anywhere             anywhere            icmp any limit: avg 1/sec burst 4
ACCEPT     tcp  --  anywhere             anywhere            state RELATED,ESTABLISHED
SERVICES   tcp  --  anywhere             anywhere            state NEW
ACCEPT     udp  --  anywhere             anywhere            udp spt:domain
ACCEPT     udp  --  anywhere             anywhere            udp spt:ntp dpt:ntp

Chain FORWARD (policy DROP)
target     prot opt source               destination

Chain OUTPUT (policy ACCEPT)
target     prot opt source               destination

Chain SERVICES (1 references)
target     prot opt source               destination
ACCEPT     tcp  --  anywhere             anywhere            tcp dpt:http ★追加
ACCEPT     tcp  --  anywhere             anywhere            tcp dpt:https ★追加
ACCEPT     tcp  --  anywhere             anywhere            tcp dpt:domain
ACCEPT     udp  --  anywhere             anywhere            udp dpt:domain
ACCEPT     tcp  --  anywhere             anywhere            tcp dpt:ftp
ACCEPT     tcp  --  anywhere             anywhere            tcp dpt:wap-wsp
nginx 操作コマンド(CentOS7)
開始: systemctl start nginx
終了: systemctl stop nginx
再起動:systemctl restart nginx
設定の再読み込み:systemctl reload nginx
状態確認:systemctl status nginx.service -l
覚えておくと便利。
→CentOS6ならserviceコマンドに読み替えること!
$ sudo chkconfig nginx on
$ chkconfig --list
$ sudo service nginx start
4.サーバ証明書発行
NGiNXのHTTPS化を目論む。理由としては自己防衛の意味合いもあるが、ここではLINE Messaging APIがHTTPに対応していないため必須事項なのである。
今回は認証局として中間CA局であるLet's Encryptを利用する。
$ sudo su -
# yum install -y epel-release
# curl https://dl.eff.org/certbot-auto -o /usr/bin/certbot-auto
# chmod a+x /usr/bin/certbot-auto
# certbot-auto --os-packages-only --non-interactive
certbot-auto certonly --non-interactive --agree-tos --webroot -w /usr/share/nginx/html -d mydomain.com --email mymail@example.com
オプション解説
--non-interactive
--agree-tos
--webrootwebrootモードで動作
-wwebrootのディレクトリを指定する。この中にファイルを書き込むためhttp(80)でアクセス可能にしておく必要がある
-dドメイン
# ls /etc/letsencrypt/live/mydomain.com/
README  cert.pem  chain.pem  fullchain.pem  privkey.pe
〈参考〉CentOSにLet's EncryptのSSL証明書を導入する
〈参考〉[サーバー] Let's EncryptとNginxで、https対応を行う
証明書の更新
certbot-auto renew --webroot -w /usr/share/nginx/html --post-hook "service nginx reload"
--post-hook証明書の更新が行われた場合にのみ、1度だけ実行される。更新が行われなかった場合は実行されない。通常はWebサーバの再読み込み処理を記述する。
Let's Encryptの証明書は3ヶ月で有効期限が切れるので、これをcronで定期的に実行させるとよい。
crontab -e
50 3 * * * root certbot-auto renew --webroot -w /usr/share/nginx/html --post-hook "service nginx reload" > /dev/null 2>&1
5.NGiNXのSSL化
ssl.confファイルを編集
#
# HTTPS server configuration
#

server {
    listen       443 ssl http2 default_server;
#    listen       [::]:443 ssl;
#    server_name  _;
#    root         /usr/share/nginx/html;

    ssl_certificate /etc/letsencrypt/live/mydomain.com/fullchain.pem;
    ssl_certificate_key /etc/letsencrypt/live/mydomain.com/privkey.pem;
#    ssl_session_cache shared:SSL:1m;
#    ssl_session_timeout  10m;
#    ssl_ciphers HIGH:!aNULL:!MD5;
#    ssl_prefer_server_ciphers on;

    # Load configuration files for the default server block.
    include /etc/nginx/default.d/*.conf;

    location / {
    }

    error_page 404 /404.html;
        location = /40x.html {
    }

    error_page 500 502 503 504 /50x.html;
        location = /50x.html {
    }
}
# service nginx restart
ブラウザからhttps接続してみてレスポンスが得られれば無事に疎通完了。
中間まとめ1
ここまで
・ドメイン取得、証明書発行
・WEBフロントサーバとしてNGiNXをインストール
・クライアントからのhttps接続を確立
が完了した。
続いて、WEBアプリケーションサーバの構築を進めていく。
6.postgresqlをインストール
Djangoのデータベースとして PostgreSQLを利用する。
# yum -y install postgresql-server
# service postgresql initdb
# service postgresql start
$ sudo -u postgres psql
postgres=# create database myDB;
postgres-# create user mysqluser with password 'mysql'; #ユーザとパスワード作成
postgres-# alter role mysqluser set client_encoding to 'utf8'; #文字コード設定
postgres-# alter role mysqluser set default_transaction_isolation to 'read committed'; #実行された結果だけを見に行く
postgres-# alter role mysqluser set timezone to 'UTC+9'; #タイムゾーンを設定
postgres-# grant all privileges on database myDB to mysqluser; #ユーザがデータベースを参照できるよう権限付与
postgres=# \q #終了
$ sudo ps aux | grep post
postgres 26941 0.1 1.2 220940 6124 ? S 10:40 0:00 /usr/bin/postmaster -p 5432 -D /var/lib/pgsql/data
postgres 26945 0.0 0.2 183952 1328 ? Ss 10:40 0:00 postgres: logger process
postgres 26947 0.0 0.4 220940 2112 ? Ss 10:40 0:00 postgres: writer process
postgres 26948 0.0 0.2 220940 1504 ? Ss 10:40 0:00 postgres: wal writer process
postgres 26949 0.0 0.3 221080 1832 ? Ss 10:40 0:00 postgres: autovacuum launcher process
postgres 26950 0.0 0.3 183948 1524 ? Ss 10:40 0:00 postgres: stats collector process
7.virtualenvのインストール
virtualenv = pythonの仮想環境を構築してくれるツール。
例えば、python2とpython3は普通の開発環境だと共存できない。そういった場合にvirtualenvを活用するらしい。
$ sudo pip install virtualenv
$ which python3
/usr/bin/python3
$ virtualenv -p /usr/bin/python3 botenv

Running virtualenv with interpreter /usr/bin/python3
Using base prefix '/usr'
New python executable in /home/my/botenv/bin/python3
Also creating executable in /home/my/botenv/bin/python
Installing setuptools, pip, wheel...
done.
$ ls botenv/bin/
 #ずらずらとファイルが配置されている
$ source /home/my/botenv/bin/activate
(botenv) []$
django と gunicorn と postgresql に接続するためのモジュールをインポートする(仮想環境内で)
(botenv) []$ pip install django gunicorn psycopg2
(botenv) []$ pip install django-toolbelt
(botenv) [ ~]$ python3
Python 3.4.8 (default, Apr 9 2018, 11:43:18)
[GCC 4.4.7 20120313 (Red Hat 4.4.7-18)] on linux
Type "help", "copyright", "credits" or "license" for more information.
>>> import django
>>> django.get_version()
'2.0.10'
>>> exit()
(botenv) [ ~]$ deactivate
〈参考〉Djangoで投稿アプリを作ってみる①(プロジェクト作成、http / https 通信許可)
〈参考〉はじめての Django アプリ作成、その 1
(チュートリアル) Djangoの使い方
BOTの開発に入る前に、Djangoの練習としてテストプロジェクトの作成やWEBアプリとして公開する手順などを試してみる。
(botenv) []$ cd /home/my/botenv/

# gccインストール
(botenv) [botenv]$ sudo yum install -y gcc

# treeインストール
(botenv) [botenv]$ sudo wget ftp://mama.indstate.edu/linux/tree/tree-1.6.0.tgz
(botenv) [botenv]$ sudo tar zxvf tree-1.6.0.tgz
(botenv) [botenv]$ cd tree-1.6.0
(botenv) [tree-1.6.0]$ sudo make
(botenv) [tree-1.6.0]$ sudo make install
(botenv) [tree-1.6.0]$ cd ..
# Djangoプロジェクトを作成(project001)
(botenv) [botenv]$ django-admin startproject project001
(botenv) [botenv]$ tree project001/
project001
├── manage.py
└── project001
    ├── __init__.py
    ├── settings.py
    ├── urls.py
    └── wsgi.py

1 directory, 5 files

# Djangoサーバ起動
(botenv) [botenv]$ cd project001
(botenv) [project001]$ python3 manage.py runserver

# このままでは8000番ポートがコネクトできないためfirewallを設定追加
(botenv) [project001]$ sudo iptables -I SERVICES -p tcp --dport 8000 -j ACCEPT

# 結果確認(nオプションでポート番号で表示される)
(botenv) [project001]$ sudo iptables -L -n
まだ外部からDjangoサーバにアクセスできない。
setting.pyにallowホストを記述する必要がある。
ALLOWED_HOSTS = ['サーバのIPアドレス','mydomain.com'] #自身のホストを許可する
# 全てのIP(0.0.0.0)からの8000番ポートへのアクセスを受け付ける
(botenv) [project001]$ python3 manage.py runserver 0.0.0.0:8000
これでブラウザからhttp:<IPアドレス>:8000でアクセスしてロケットの絵が表示されれば無事成功。
しかしまだhttpsでのアクセスは拒否される。どうやらデフォルトのDjangoサーバではhttpsがサポートされていないらしい。
そこでhttps対応のDjangoサーバであるdjango-sslserverをインストールする。
(botenv) [project001]$ pip install django-sslserver
あわせてsettings.pyも★の行を追記する。
INSTALLED_APPS = [
'django.contrib.admin',
'django.contrib.auth',
'django.contrib.contenttypes',
'django.contrib.sessions',
'django.contrib.messages',
'django.contrib.staticfiles',
'sslserver', ★
]
SECURE_PROXY_SSL_HEADER = ('HTTP_X_FORWARDED_PROTO', 'https') ★
SECURE_SSL_REDIRECT = True ★
SESSION_COOKIE_SECURE = True ★
CSRF_COOKIE_SECURE = True ★
さらにローカルユーザへサーバ証明書アクセス権を付与。
$ sudo chmod 755 /etc/letsencrypt/live/
$ sudo chmod 755 /etc/letsencrypt/archive/
$ sudo chmod 644 /etc/letsencrypt/archive/mydomain.com/privkey1.pem
(秘密鍵までreadableにするのはあんまり望ましくない?)
最終的に実行コマンドは以下の通りとなる
(botenv) [project001]$ python3 manage.py runsslserver 0.0.0.0:8000 --certificate /etc/letsencrypt/live/mydomain.com/fullchain.pem --key /etc/letsencrypt/live/mydomain.com/privkey.pem
実行コマンドの書式
python3 manage.py runsslserver 0.0.0.0:8000 サーバ証明書 秘密鍵
以上でブラウザからhttps://<URL>:8000でアクセスできれば成功。
NGiNXとgunicornとDjangoの連携
DjangoをWEBサービスとして提供するためにはWEBサーバとの連携が必要となる。
★NGiNX (グローバルIP or URL:443)
nginxがインターネットからの接続を受け付けるWEBフロントとなり
SSLの終端および静的コンテンツの提供を行うとともに、
gunicornへのリバースプロキシとして動作する。
gunicornの負荷軽減を目的としてHTTP接続を用いる。
★Gunicorn (127.0.0.1:8000)
gunicornはPythonアプリを動作させるWebアプリケーションサーバ。
=別名WSGI(Web Server Gateway Interface)サーバ。
単体でも動作するがnginxなど他のWebサーバとも連携できる。
★Django
WEBアプリケーションを実装するために用意されたpython用のモダンフレームワーク
連携イメージは下記の通り。
クライアント <--(HTTPS)--> `nginx` <--(HTTP)--> `gunicorn` <--(WSGI)--> Django
〈参考〉Django best practice (nginx)
〈参考〉CentOS7 Nginx+GunicornでDjangoを動かす
まずはNGiNXの設定
server {
  listen 80;
  server_name サーバのIPアドレス;

  location /static {
    alias /usr/share/nginx/html/static;
  }

  location /media {
    alias /usr/share/nginx/html/media;
  }

  location / {
    proxy_pass http://127.0.0.1:8000;
    proxy_set_header X-Forwarded-For $proxy_add_x_forwarded_for;
    proxy_set_header Host $http_host;
    proxy_redirect off;
    proxy_set_header X-Forwarded-Proto $scheme;
  }
}

server {
  listen 443 ssl;
  server_name mydomain.com;

  ssl on;
  ssl_certificate /etc/letsencrypt/live/mydomain.com/fullchain.pem;
  ssl_certificate_key /etc/letsencrypt/live/mydomain.com/privkey.pem;

  location /static {
    alias /usr/share/nginx/html/static;
  }

  location /media {
    alias /usr/share/nginx/html/media;
  }

  location / {
    proxy_pass http://127.0.0.1:8000;
    proxy_set_header X-Forwarded-For $proxy_add_x_forwarded_for;
    proxy_set_header Host $http_host;
    proxy_redirect off;
    proxy_set_header X-Forwarded-Proto $scheme;
  }
}
(botenv) [conf.d]$ sudo nginx -t
nginx: the configuration file /etc/nginx/nginx.conf syntax is ok
nginx: configuration file /etc/nginx/nginx.conf test is successful
Gunicorn設定
(botenv) [project001]$ pip install gunicorn
INSTALLED_APPS = [
'gunicorn', ★
]
先ほどDjangoのSSLサーバ化を行った場合は'sslserver'を指定したが、
Gunicorn&NGiNXとの連携を行う場合においては、NGiNXがSSLを終端する(NGiNXとGunicornの間はHTTPで接続される)ため、DjangoのSSLサーバ化は必要なくなる。
GunicornからDjangoを起動
(botenv) [project001]$ gunicorn --bind 127.0.0.1:8000 project001.wsgi:application
(botenv) [project001]$ gunicorn --daemon --bind 127.0.0.1:8000 project001.wsgi:application

# 終了するときはプロセスを探してkill
(botenv) [project001]$ sudo lsof -i:8000
COMMAND PID USER FD TYPE DEVICE SIZE/OFF NODE NAME
gunicorn 29072 my 6u IPv4 2604917 0t0 TCP localhost:irdmi (LISTEN)
gunicorn 29075 my 6u IPv4 2604917 0t0 TCP localhost:irdmi (LISTEN)
(botenv) [project001]$ sudo kill -9 29072
(botenv) [project001]$ sudo kill -9 29075
以上でチュートリアル終了。
8.BOTアプリケーション開発
いよいよBOT本体の開発に入っていく。
チュートリアルで確認した通り、NGiNXとGunicornとDjangoの連携を用いることとする。
# Djangoプロジェクト(プロジェクト名:line_bot)作成
(botenv) [botenv]$ django-admin startproject line_bot
(botenv) [botenv]$ cd line_bot

# ファイル配置確認
(botenv) [line_bot]$ tree
.
├── db.sqlite3
├── line_bot
│   ├── __init__.py
│   ├── __pycache__
│   │   ├── __init__.cpython-34.pyc
│   │   ├── settings.cpython-34.pyc
│   │   ├── urls.cpython-34.pyc
│   │   └── wsgi.cpython-34.pyc
│   ├── settings.py
│   ├── urls.py
│   └── wsgi.py
└── manage.py

# Allowホスト設定,Gunicorn連携設定
(botenv) [line_bot]$ vim line_bot/settings.py
ALLOWED_HOSTS = ['サーバのIPアドレス','mydomain.com'] #自身のホストを許可
INSTALLED_APPS = ['gunicorn'] #追記

# botアプリケーション(アプリ名:bot)作成
(botenv) [line_bot]$ python3 manage.py startapp bot
 # botディレクトリが作成され、必要なファイルが配置される。

# ファイル配置確認
(botenv) [line_bot]$ tree
.
├── bot
│   ├── __init__.py
│   ├── admin.py
│   ├── apps.py
│   ├── migrations
│   │   └── __init__.py
│   ├── models.py
│   ├── tests.py
│   └── views.py
├── db.sqlite3
├── line_bot
│   ├── __init__.py
│   ├── __pycache__
│   │   ├── __init__.cpython-34.pyc
│   │   ├── settings.cpython-34.pyc
│   │   ├── urls.cpython-34.pyc
│   │   └── wsgi.cpython-34.pyc
│   ├── settings.py
│   ├── urls.py
│   └── wsgi.py
└── manage.py
8-2.テスト用関数の準備
簡易な応答関数を用意しておくことで、動作確認の際に何かと重宝する。
今回はbot/views.pyにindexおよびcallbackを配置する。
indexは単純な文字列を返す関数
callbackはPOSTされた文字列を返す関数
bot/views.pyまでのルーティングはline_bot/urls.pyおよびbot/urls.pyにて記述する。
イメージとしては
line_bot/urls.py → bot/urls.py → bot/views.py
という参照の流れ。
# from django.contrib import admin ★コメントアウト
from django.urls import path
from django.conf.urls import url,include ★追記

urlpatterns = [
#    path('admin/', admin.site.urls), ★コメントアウト
    path('bot/',include('bot.urls')), ★追記
]
ついでにadminは当面使う予定がないのでコメントアウトしておく。
from django.conf.urls import url
from . import views

urlpatterns = [
  url('^$', views.index, name="index"),
  url('callback', views.callback),
]
from django.shortcuts import render
from django.views.decorators.csrf import csrf_exempt ##注釈1

# Create your views here.
from django.http import HttpResponse
import json
import requests

REPLY_ENDPOINT = 'https://api.line.me/v2/bot/message/reply'
ACCESS_TOKEN = '' #アクセストークンはLINE Developers管理画面にて確認する
HEADER = {
    "Content-Type": "application/json",
    "Authorization": "Bearer " + ACCESS_TOKEN
}

def reply_text(reply_token, text):
    reply = "You said "+text+" that's all."
    payload = {
      "replyToken":reply_token,
      "messages":[
        {
          "type":"text",
          "text": reply
        }
      ]
    }
    requests.post(REPLY_ENDPOINT, headers=HEADER, data=json.dumps(payload))
    return reply

@csrf_exempt  ##注釈1
def callback(request):
    reply = ""
    request_json = json.loads(request.body.decode('utf-8'))

    for e in request_json['events']:
      reply_token = e['replyToken']
      message_type = e['message']['type']

      if message_type == 'text':
        text = e['message']['text']
        reply += reply_text(reply_token, text)
    return HttpResponse(reply)

def index(request):
    return HttpResponse("This is bot api.")
注釈1:CSRF検証の回避
CSRF(クロスサイトリクエストフォージェリ)対策としてDjangoにおいては
settings.pyの
'django.middleware.csrf.CsrfViewMiddleware',
で検証が有効になっている。
Djangoでは、デフォルトで POST/PUT/DELETE のメソッドが禁止されており、GET のみ許可されている。このままではPOSTが使えないため、必要に応じてCSRF検証をスキップする必要がある。
- 案1.setting.pyにて上記設定をコメントアウト(全てのCSRF検証を無効化)
- 案2.@csrf_exemptで例外扱いとする(関数単位にCSRF検証を無効化)
- 案3.Django REST Frameworkを利用する(恒久対策)
老番ほど安全性は高くなるが、案3については別途学習コストが必要だったので今回は案2で対処した。今後余力があれば挑戦したい。
# requestモジュールのインストール
(botenv) [line_bot]$ pip3 install requests
準備ができたところでBOTを起動してみる。以下のような出力が得られれば無事に待ち受け状態となる。
(botenv) [line_bot]$ gunicorn --bind 127.0.0.1:8000 line_bot.wsgi:application
[2019-10-29 12:01:23 +0900] [19196] [INFO] Starting gunicorn 19.9.0
[2019-10-29 12:01:23 +0900] [19196] [INFO] Listening at: http://127.0.0.1:8000 (19196)
[2019-10-29 12:01:23 +0900] [19196] [INFO] Using worker: sync
[2019-10-29 12:01:23 +0900] [19199] [INFO] Booting worker with pid: 19199
動作確認①
https://mydomain.com/bot/にブラウザアクセス
下記メッセージが表示されればOK

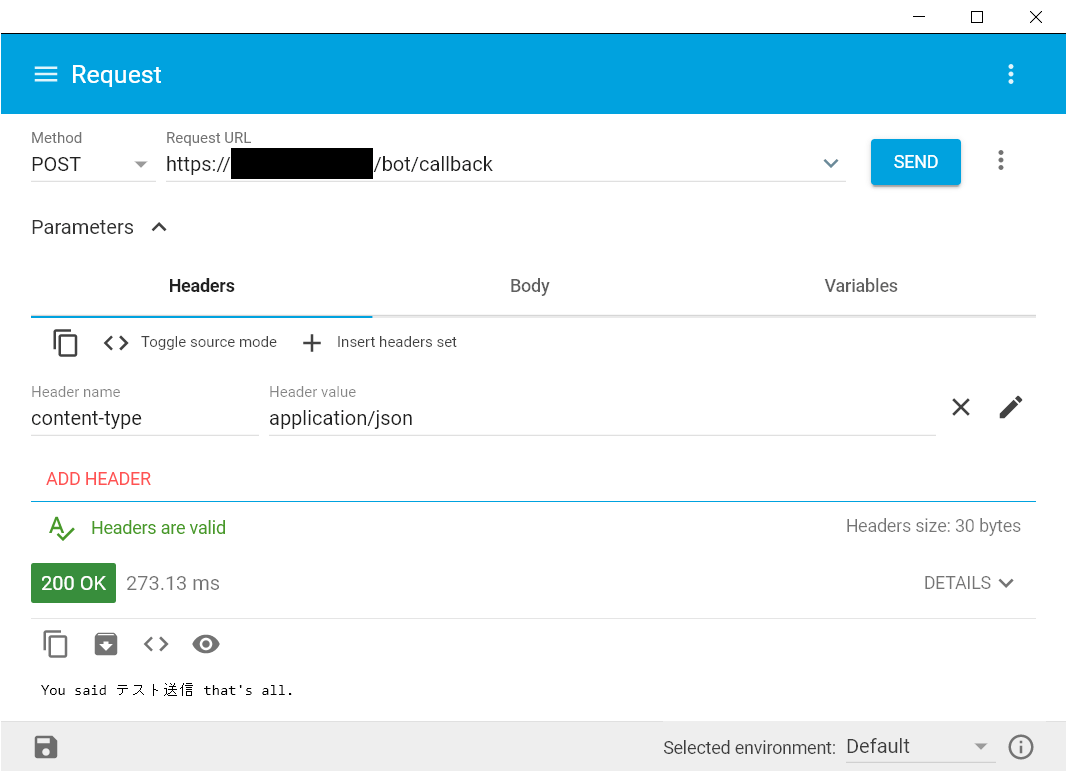
動作確認②
https://mydomain.com/bot/callbackに自作jsonをPOST
chromeの拡張機能であるAdvanced REST clientを使用して手動でPOSTする。設定例は下記の通り。
- Method : POST
- Request URL : https://mydomain.com/bot/callback
- Header name : content-type
- Header value : application/json
- Body :
{
"events": [
{
"replyToken": "000000",
"message": {
"type": "text",
"text": "テスト送信"
}
}
]
}
SENDボタンを押下し、レスポンスが正しく得られたらOK
動作確認③
LINE Developers管理コンソールからWebhook URLに
https://mydomain.com/bot/callbackを設定、接続確認ボタンを押下し成功すればOK

どうやら問題なさそうである。
中間まとめ2
前項までで以下の構築が完了した。
- NGiNXをフロントサーバとしたSSLオフロードおよびGunicornへのリバースプロキシ化。
- Djangoフレームワークを利用した簡単なreplyを返すBOTアプリを設置。
続けてloggingの準備をして、終わったらいよいよ実際にLINE BOTアプリの開発を始める。
8-3.Logging設定
慣れている人にとっては完全に余談でしかないと思うので省略しても問題ない。
筆者はPythonのド素人なので、小まめにログを出すことが生産性に直結するためしっかり準備しておく。。
なおloggingの学習だけで5日くらい要した。奥が深すぎて気が遠くなりそう。
参考にしたサイトは忘れてしまったので申し訳ないが、出来上がったコードはほぼコピペに近く、新規性は無いのだが、いちおう備忘録として掲載しておく。
(botenv) [bot]$mkdir utils
# -*- coding: utf-8 -*-
from django.http import HttpResponse
from django.views.decorators.csrf import csrf_exempt

import json
import logging
import requests

@csrf_exempt
def outputLog_line_request(request): # type=byte code
    if request.method == 'POST':
        linelogger = logging.getLogger('lineBotLogging')
        # byte を string型へデコード
        linelogger.debug(json.loads(request.body.decode('utf-8')))
    return '処理完了'

def outputLog_line_response(response): # type=json
    linelogger = logging.getLogger('lineBotLogging')
    linelogger.debug(response)
    return '処理完了'

def outputLog_ulocal_request(request): # type=json
    linelogger = logging.getLogger('ulocalBotLogging')
    linelogger.debug(request)
    return '処理完了'

def outputLog_ulocal_response(response): # type=byte code
    linelogger = logging.getLogger('ulocalBotLogging')
    # byte を string型へデコード
    linelogger.debug(response.json())
    return '処理完了'
(botenv) [bot]$mkdir log
import logging.config
import os

logging.config.dictConfig({
    'version': 1,
    'formatters': {
        'botFormat': {
            'format': '%(asctime)s %(name)-12s %(message)s'
        },
        'customFormat': {
            'format': '%(asctime)s %(name)-12s %(levelname)-8s %(message)s'
        },
    },
    'handlers': {
        'rootHandler': {
            'class': 'logging.FileHandler',
            'formatter': 'customFormat',
            'encoding': 'utf8',
            'level': logging.DEBUG,
            'filename': os.path.dirname(os.path.abspath(__file__)) + '/debug.txt'
        },
        'lineBotHandler': {
            'class': 'logging.FileHandler',
            'formatter': 'botFormat',
            'encoding': 'utf8',
            'level': logging.DEBUG,
            'filename': os.path.dirname(os.path.abspath(__file__)) + '/linelogger.txt'
        },
        'ulocalBotHandler': {
            'class': 'logging.FileHandler',
            'formatter': 'botFormat',
            'encoding': 'utf8',
            'level': logging.DEBUG,
            'filename': os.path.dirname(os.path.abspath(__file__)) + '/ulocallogger.txt'
        },
        'customFileHandler': {
            'class': 'logging.FileHandler',
            'formatter': 'customFormat',
            'encoding': 'utf8',
            'level': logging.DEBUG,
            'filename': os.path.dirname(os.path.abspath(__file__)) + '/debug.txt'
        }
    },
    'root': {
        'handlers': ['rootHandler'],
        'level': logging.DEBUG
    },
    'loggers': {
        'lineBotLogging': {
            'handlers': ['lineBotHandler'],
            'level': logging.DEBUG,
            'propagate': 0
        },
        'ulocalBotLogging': {
            'handlers': ['ulocalBotHandler'],
            'level': logging.DEBUG,
            'propagate': 0
        },
        'commonLogging': {
            'handlers': ['customFileHandler'],
            'level': logging.DEBUG,
            'propagate': 0
        },
    }
})
8-4.LINE BOT(対話BOT)作成
LINEからメッセージを受け取り、本文をUserLocalの対話APIに中継し、
応答を受け取ると、再びLINEへ中継するというリレーアプリを作る。
ポイントとしてはLINEからのWebhookはJSON、UserLocalへの投稿はGET、LINEへの応答はJSONのPOSTという具合である。
LINEから遅れらてくるJSONフォーマットは下記に示す通り
{
  'destination': ,
  'events': [{
    'type': 'message',
    'timestamp': 1572579298365,
    'source': {
      'type': 'user',
      'userId': ユーザ固有
    },
    'replyToken': '13a9ed827c4341d1b1e118c682fd6840',
    'message': {
     'type': 'text',
     'id': '10840574616013',
     'text': '何してるの?'
    }
  }]
}
第三者からのアクセスを防ぎたければuserIdでユーザを識別するようホワイトリストを作ればよい。
重要なのはreplyTokenでこれは受信の毎に変わるが、LINE側のコンテクストを維持するために応答メッセージに含める必要がある。
出来上がったコードは以下の通り。
(デバッグが不要であればloggingは全て無視して問題ない。)
# -*- Coding: utf-8 -*-

from django.views.decorators.csrf import csrf_exempt
from django.http import HttpResponse
from django.shortcuts import render
from datetime import datetime
from time import sleep
import requests
import json
import base64
import logging
import os
import random
import log.logconfig
from utils import tools

logger = logging.getLogger('commonLogging')

LINE_ENDPOINT = 'https://api.line.me/v2/bot/message/reply'
LINE_ACCESS_TOKEN = '' #Line developer管理画面で確認
LINE_ALLOW_USER='' #Line developer管理画面で確認

ULOCAL_ENDPOINT = 'https://chatbot-api.userlocal.jp/api/chat'
ULOCAL_API_KEY = '' #Userlocal登録時に確認

@csrf_exempt
def line_handler(request):

    #exception
    if not request.method == 'POST':
      return HttpResponse(status=200)

    logger.debug('line_handler message incoming') #logging
    out_log = tools.outputLog_line_request(request) #logging
    request_json = json.loads(request.body.decode('utf-8'))

    for event in request_json['events']:
      reply_token = event['replyToken']
      message_type = event['message']['type']
      user_id = event['source']['userId']

      #whitelist
      if not user_id == LINE_ALLOW_USER:
        logger.warning('invalid userID:' + user_id) #logging
        return HttpResponse(status=200)

      #action
      if message_type == 'text':
        #ulocal chat
        response_text(reply_token,ulocal_chatting(event))

    return HttpResponse(status=200)

def response_text(reply_token,text):
    payload = {
      "replyToken": reply_token,
      "messages":[
        {
          "type": 'text',
          "text": text
        }
      ]
    }
    line_post(payload)

def line_post(payload):
    url = LINE_ENDPOINT
    header = {
      "Content-Type": "application/json",
      "Authorization": "Bearer " + LINE_ACCESS_TOKEN
    }
    requests.post(url, headers=header, data=json.dumps(payload))
    out_log = tools.outputLog_line_response(payload) #logging
    logger.debug('line_handler message -->reply') #logging

def ulocal_chatting(event):
    url = ULOCAL_ENDPOINT
    payload={
      'key'    : ULOCAL_API_KEY,
      'message': event['message']['text']
    }

    out_log = tools.outputLog_ulocal_request(payload) #logging
    logger.debug('ulocal_chatting send request') #logging
    ulocal_res = requests.get(url,payload)
    logger.debug('ulocal_chatting -->recv response') #logging
    out_log = tools.outputLog_ulocal_response(ulocal_res) #logging

    data = ulocal_res.json()
    response = data['result']
    return response
続いてルーティングの追加
from django.conf.urls import url
from . import views,chatbot ★

urlpatterns = [
  url('^$', views.index, name="index"),
  url('callback', views.callback),
  url('chatbot', chatbot.line_handler), ★
]
以上で完成
(botenv) [line_bot]$ gunicorn --bind 127.0.0.1:8000 line_bot.wsgi:application
LINE Developers管理コンソールにてWebhook URLを
https://mydomain.com/bot/chatbotに変更して接続確認し成功することを確認。
LINEアプリからメッセージを投下してみると、問題なく応答が得られるだろう。
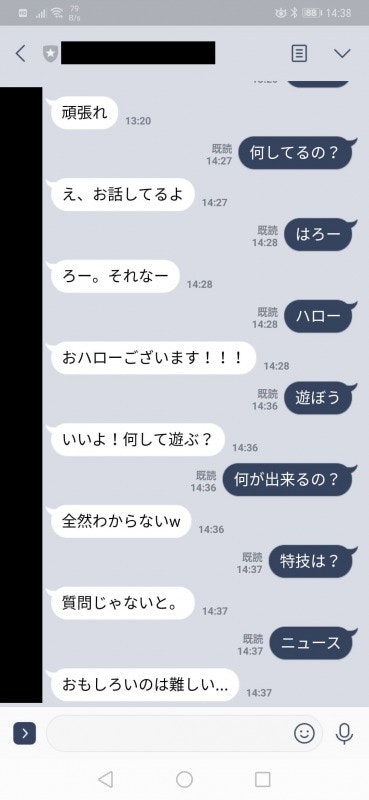
実用性はさておき、これで最低限の機能を有する対話型BOTが完成した。
初回投稿はここまで。