Ubuntu MAAS/Juju 2.0 で OpenStack Mitaka 構築 (その1) の続きの覚え書き.
1. OpenStack CLI 操作コマンドの導入
MAAS を動かしている controller ノード上で OpenStack を操作できるよう,CLI 操作ツールを導入する.
$ sudo apt install python-novaclient python-keystoneclient python-glanceclient python-neutronclient
前回の記事の3.2節でダウンロードした openstack-base の Juju-charm に同封された環境設定ファイルを使う.
$ source novarc
$ keystone catalog
2. Glance への OS イメージの追加
Ubuntu trusty (14.04) および xenial (16.04) のイメージを OpenStack に取り込む.
$ mkdir ~/images
$ wget -O ~/images/trusty-server-cloudimg-amd64-disk1.img \
	http://cloud-images.ubuntu.com/trusty/current/trusty-server-cloudimg-amd64-disk1.img
$ wget -O ~/images/xenial-server-cloudimg-amd64-disk1.img \
	http://cloud-images.ubuntu.com/xenial/current/xenial-server-cloudimg-amd64-disk1.img
$ glance image-create --name="trusty" --visibility public --progress \
    --container-format=bare --disk-format=qcow2 \
    < ~/images/trusty-server-cloudimg-amd64-disk1.img
$ glance image-create --name="xenial" --visibility public --progress \
    --container-format=bare --disk-format=qcow2 \
    < ~/images/xenial-server-cloudimg-amd64-disk1.img
3. フレーバーの追加
デフォルトのフレーバーが作られなかったので手動で作成する.
$ nova flavor-create m1.tiny 1 512 1 1
$ nova flavor-create m1.small 2 2048 20 1
$ nova flavor-create m1.medium 3 4096 40 2
$ nova flavor-create m1.large 4 8192 80 4
$ nova flavor-create m1.xlarge 5 16384 160 8
4. インスタンスのコンソール有効化
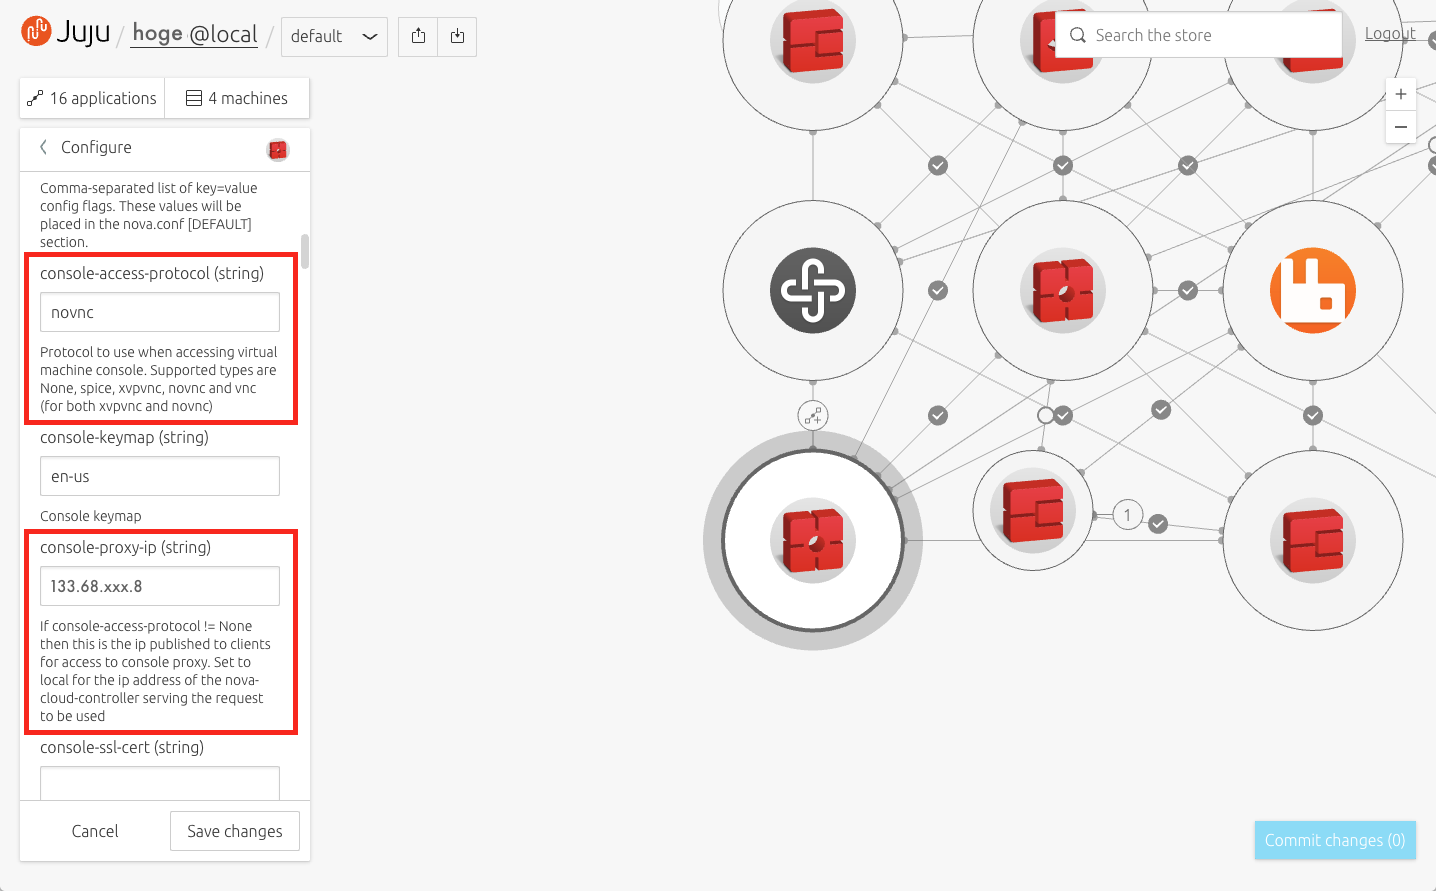
Juju GUI より nova-cloud-controller アプリケーションの設定を開き,赤枠で囲った箇所を以下のように設定する.
| 項目 | 設定値 |
|---|---|
| console-access-protocol | novnc |
| console-proxy-ip | (controller ノードの Public IP) |
その後, "Save changes" をして "Commit changes" を行う.
最後に iptables で controller ノードから nova-cloud-controller (10.1.0.15) へのポートフォワーディングを行う.
$ sudo iptables -t nat -A PREROUTING -p tcp -m tcp --dport 6080 -j DNAT --to-destination 10.1.0.15:6080
$ sudo iptables-save -c > iptables.rules && sudo mv iptables.rules /etc/iptables.rules
以後 OpenStack 上で作成された nova インスタンスは vnc アクセスが可能となる.
5. ネットワークの作成
前回の記事の3.2節でダウンロードした openstack-base の Juju-charm に同封されたスクリプトファイルを使う.
外部ネットワーク ext_net (133.68.xxx.0/24) と admin プロジェクトで用いる内部ネットワーク admin_net (10.5.5.0/24) を作成する.
$ ./neutron-ext-net -g 133.68.xxx.1 -c 133.68.xxx.0/24 -f 133.68.xxx.2:133.68.xxx.254 ext_net
$ ./neutron-tenant-net -t admin -r provider-router admin_net 10.5.5.0/24
これで一通りの構築作業は完了.
参考文献
・openstack base | Juju
・nova cloud controller | Juju
・gnuoy: OpenStack Guest Console Access with Juju
