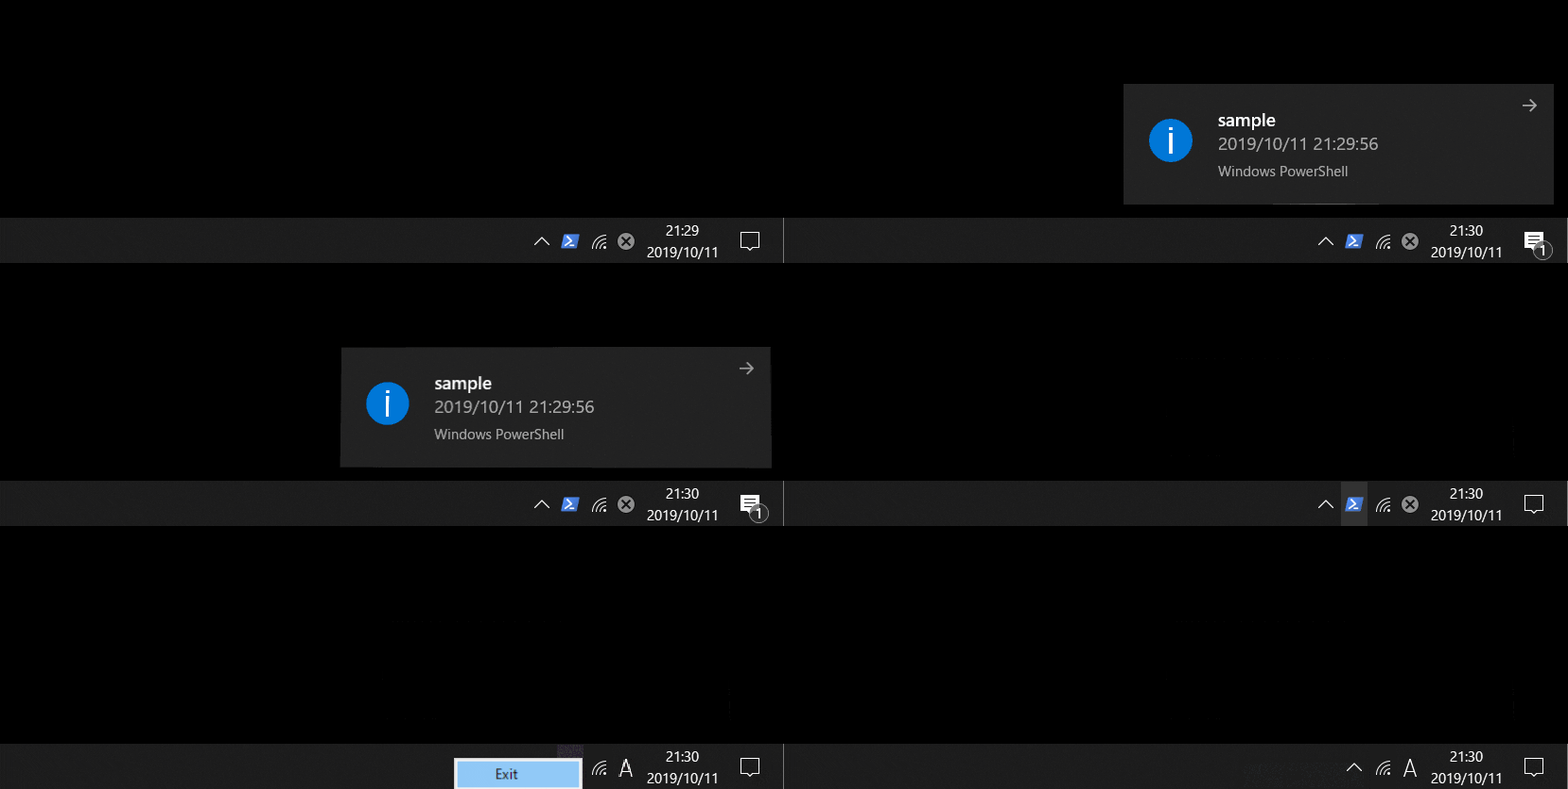
PowerShellでタスクトレイに常駐して定期的にスクレイピングするスクリプトを作りました。
スクレイピングしている先がアレなので、ソースは公開しませんが、部品やノウハウをまとめておきます。
常駐アプリのテンプレート
定期的にスクレイピングする場合、
linuxならcronで実行するようなスクリプトにしますが、
Windowsなら、タスクトレイに常駐するようにしたいですよね。
以下の処理を行うためのテンプレート
・タスクトレイに常駐
・多重起動制限
・右クリックでメニュー
・メニューから終了
・タイマーで定期的に実行
・ツールチップでメッセージ表示
・バルーンでメッセージ表示
・左クリックで処理を行う
Add-Type -AssemblyName System.Windows.Forms

# 定数定義
$TIMER_INTERVAL = 10 * 1000 # timer_function実行間隔(ミリ秒)
$MUTEX_NAME = "Global\mutex" # 多重起動チェック用

function timer_function($notify){
  # ここに定期実行する処理を実装

  $datetime = (Get-Date).ToString("yyyy/MM/dd HH:mm:ss")
  Write-Host "timer_function "  $datetime

  # ツールチップに登録
  $notify.Text = $datetime

  # バルーンで表示
  $notify.BalloonTipIcon = 'Info'
  $notify.BalloonTipText = $datetime
  $notify.BalloonTipTitle = 'sample'
  $notify.ShowBalloonTip(1000)
}

function main(){
  $mutex = New-Object System.Threading.Mutex($false, $MUTEX_NAME)
  # 多重起動チェック
  if ($mutex.WaitOne(0, $false)){
    # タスクバー非表示
    $windowcode = '[DllImport("user32.dll")] public static extern bool ShowWindowAsync(IntPtr hWnd, int nCmdShow);'
    $asyncwindow = Add-Type -MemberDefinition $windowcode -name Win32ShowWindowAsync -namespace Win32Functions -PassThru
    $null = $asyncwindow::ShowWindowAsync((Get-Process -PID $pid).MainWindowHandle, 0)

    $application_context = New-Object System.Windows.Forms.ApplicationContext
    $timer = New-Object Windows.Forms.Timer
    $path = Get-Process -id $pid | Select-Object -ExpandProperty Path # icon用
    $icon = [System.Drawing.Icon]::ExtractAssociatedIcon($path)

    # タスクトレイアイコン
    $notify_icon = New-Object System.Windows.Forms.NotifyIcon
    $notify_icon.Icon = $icon
    $notify_icon.Visible = $true

    # アイコンクリック時のイベント
    $notify_icon.add_Click({
      if ($_.Button -eq [Windows.Forms.MouseButtons]::Left) {
        # タイマーで実装されているイベントを即時実行する
        $timer.Stop()
        $timer.Interval = 1
        $timer.Start()
      }
    })

    # メニュー
    $menu_item_exit = New-Object System.Windows.Forms.MenuItem
    $menu_item_exit.Text = "Exit"
    $notify_icon.ContextMenu = New-Object System.Windows.Forms.ContextMenu
    $notify_icon.contextMenu.MenuItems.AddRange($menu_item_exit)

    # Exitメニュークリック時のイベント
    $menu_item_exit.add_Click({
      $application_context.ExitThread()
    })

    # タイマーイベント.
    $timer.Enabled = $true
    $timer.Add_Tick({
      $timer.Stop()

      timer_function($notify_icon)

      # インターバルを再設定してタイマー再開
      $timer.Interval = $TIMER_INTERVAL
      $timer.Start()
    })

    $timer.Interval = 1
    $timer.Start()

    [void][System.Windows.Forms.Application]::Run($application_context)

    $timer.Stop()
    $notify_icon.Visible = $false
    $mutex.ReleaseMutex()
  }
  $mutex.Close()
}

main
2018/12/26 修正
Stop-ProcessではなくExitThreadで終了するように修正しました。
VS Codeでデバッグしやすくなると思います。
黒窓を出さない起動
PowerShellは便利ですがポリシーの指定が必要なので、ユーザーに配布する場合に障害が多いと感じます。
batファイルでポリシー指定する方法をネットでよく見ますが、黒窓がでるのが嫌なのでvbsからの起動して黒窓を回避するのがよさそうです。
デメリットとしては標準出力したログが確認できないことでしょうか。
以下のようにvbsから起動すれば黒窓を表示させずに起動ができます。
Set ws = CreateObject("Wscript.Shell")

command ="powershell -NoProfile -ExecutionPolicy Unrestricted .\sample.ps1"

ws.run command, 0
ショートカットの作成、スタートアップへの登録
vbs以外で黒窓を表示させないps1起動方法としてショートカットがあります。
ショートカットの場合は、インストーラーなどで作成する必要がありますので、vbsほどは手軽な方式ではありません。
ですが、常駐するのであればスタートアップにショートカットを登録方法が一番楽なので、初回起動時にスタートアップにショートカット登録する仕組みを実装してみました。
#常駐せずにCronみたいにWindowsのスケジュール登録する方法もありますが、使いにくいですよね?
#アンインストール時にショートカット消すだけでいいのもメリットだと思います。
自分自身のスクリプトをスタートアップ登録します。
一度、起動してしまえば、次回からはOS起動時に常駐するようにできます。
# 自身のスクリプトファイル名を取得
$path_items = $PSCommandPath.Split("\")
$script_file = $path_items[$path_items.Length-1]

# ショートカットをスタートアップへ登録時に必要なパス情報
$current_path = Split-Path -Parent $MyInvocation.MyCommand.Path
$startup_path = $env:APPDATA + "\Microsoft\Windows\Start Menu\Programs\Startup\"
$shortcut_file = "sample.lnk"
$startup_shortcut_path = $startup_path + $shortcut_file

# ショートカットが無い場合に生成する
$is_shortcut = (Test-Path $startup_shortcut_path)
if(!$is_shortcut){
  $ws = New-Object -ComObject WScript.Shell
  $shortcut = $ws.CreateShortcut($startup_shortcut_path)
  $shortcut.TargetPath = "powershell.exe"
  $shortcut.WorkingDirectory = $current_path
  $shortcut.Arguments = "-NoProfile -ExecutionPolicy Unrestricted .\" + $script_file
  $shortcut.WindowStyle = 7 #最小化
  $shortcut.Save()
}
メッセージボックス
各種ボタン、アイコンを指定できるメッセージボックス表示を関数化しておきました。
常駐する場合は、最前面に表示するとうまく表示できました。
function show_message_box($message, $title, $button_type = "OK", $icon_type = "None", $default_button = "button1"){
  Add-Type -AssemblyName System.Windows.Forms

  # 最前面でメッセージ表示
  $form = New-Object System.Windows.Forms.form
  $form.TopMost = $true
  [System.Windows.Forms.MessageBox]::show($form, $message, $title,$button_type,$icon_type,$default_button)
}

#$button_type { "OKCancel","YESNO","OK" }
#$icon_type { "None","Info","Warn","Error","Question" }
#$default_button { "button1","button2" }

# OK - Info
show_message_box "ok message box " "title" "OK" "Info"

# YESNO - Question
$message_box_result = show_message_box "YES or NO message box?" "title" "YESNO" "Question" "button2"
if( $message_box_result -eq "YES"){
  Write-Host "YES button clicked"
}

#改行したい場合はダブルクォートでくくり `n で改行
show_message_box "abc`n123`nABC" "title" # 改行できる
show_message_box 'abc`n123`nABC' "title" # 改行できない
画面を表示する
xamlで画面を定義して表示することができます。
以下のようにすれば画面が表示できるが、xamlは詳しくないので入力チェックとかもっといい方法がありそうなのが課題。
Add-Type -AssemblyName System.Windows.Forms
Add-Type -AssemblyName PresentationFramework

function show_window(){
  [xml]$xaml = @'
  <Window xmlns="http://schemas.microsoft.com/winfx/2006/xaml/presentation"
    xmlns:x="http://schemas.microsoft.com/winfx/2006/xaml"
    Title="画面"
    Height="250" Width="300"
    ResizeMode="NoResize">
  <StackPanel>
    <Label Content="param:" />
    <TextBox Name="textInput" Text="" Margin="10,0,10,0" />
    <StackPanel Orientation="Horizontal" Margin="100,10,10,0">
      <Button Name="okButton" Content="OK" IsDefault="True" Width="80" Margin="0,0,0,0" />
      <Button Name="cancelButton" Content="Cancel" IsCancel="True" Width="80" Margin="10,0,0,0" />
    </StackPanel>
  </StackPanel>
  </Window>
'@
  $reader = (New-Object System.Xml.XmlNodeReader $xaml)
  $window = [Windows.Markup.XamlReader]::Load($reader)

  $text_input = $window.FindName("textInput")
  $ok_button = $window.FindName("okButton")

  # 実行ボタン押下時の処理
  $ok_button.add_Click.Invoke({
    # 入力チェックする場合はここに追加.
    if ($text_input.Text -eq ""){
      Write-Host "text_input is empty"
      return
    }

    $window.DialogResult = $true
    $window.Close()
  })
  # ウィンドウに初期値を設定したい場合はここに追加
  $text_input.Text = "test"

  # ウィンドウ表示.
  $ret_dialog = $window.ShowDialog()
  if($ret_dialog -eq $false){
    Write-Host "cancel clicked"
    return
  }

  # 入力値を取得.
  [string]$input_value = $text_input.Text
  Write-Host "input_value:${input_value}"

  $input_value
}

$result_show_window = show_window
if ($result_show_window -eq $null){
  Write-Host "result_show_window is null"
}

Write-Host "result_show_window:${result_show_window}"
http(s)からデータ取得
curlのように使えるInvoke-WebRequestを利用してhttp(s)の通信を行う。
ログインしてからデータを取得するような通信であれば、以下のようなパターン。
$url_login = "https://hoge.local/login"
$url_home = "https://hoge.local/home"

$uesr = "hoge"
$pass = "HOGE"
$request_body = "user=" + $uesr + "&pass=" + $pass

# ユーザーとパスワードをPOSTしてCookieをもらう
$web_response = Invoke-WebRequest -Uri $url_login -Method "POST" -ContentType "application/x-www-form-urlencoded" -Body $request_body -SessionVariable loginSession;
Write-Host $web_response.Content

# Cookieを渡してGETする
$web_response = Invoke-WebRequest -Uri $url_home -WebSession $loginSession;
Write-Host $web_response.Content
補足
通信の処理は、Wiresharkや、fidder2などをいれて通信解析し自分でコマンド作らなくても、Chromeの開発機能でpowershellから通信するコマンドを取得できます。
私の手順は
1.Chromeをシークレットモードにする
キャッシュやCookieが無い状況にする
2.F12キーで開発機能を表示して、[Preserve log]をONにする
3.Chromeからwebページを操作する
操作で発生したリクエストが画面表示される
4.再現したいリクエストを選択
5.右クリックで[Copy as PowerShell]
クリップボードにInvoke-WebRequestを利用したコマンドがコピーされる
6.ソースコードに張り付けて、パラメータを修正する
正規表現
htmlパースの機能もあるけど、javascript内の文字列を切り出したりするので、正規表現のほうが利用シーンが多いと思います。
$content_text = "<test>https://hoge.local</test><test>https://hogehoge.local<test>"

# urlを抜き出す正規表現
$regex = new-object -TypeName "System.Text.RegularExpressions.Regex" -ArgumentList "http(s)?://([\w-]+\.)+[\w-]+(/[\w- ./?%&=]*)?"
$regex_matches = $regex.Matches($content_text);
if($regex_matches.Count -ge 1){
  foreach ($regex_item in $regex_matches) {
    Write-Host $regex_item.Value
  }
}
xmlのパース
xmlのパースは簡単です。
$data_xml = "<?xml version=`"1.0`"?><test><items><item>aaa</item><item>bbb</item><item>ccc</item></items></test>"

$xml_doc = [XML]($data_xml)
$xml_navigator = $xml_doc.CreateNavigator()
$items = $xml_navigator.Select("/test/items/item")
Write-Host $items.Count
foreach ($item in $items) {
  Write-Host $item.Value
}
設定ファイルの書き込み/読み込み、暗号化/復号
設定ファイルはxml形式で実装するとシンプルになりました。
パスワードを保存する場合は暗号化しています。
ですが、スクリプトが実行できる環境であればすぐに復号されてしまうので、他の人と共有している環境での使用は控えたほうがよさそうです。
$config_file_path = "./sample_config.xml"
$uesr = "hoge"
$pass = "HOGE"

# SecureStringの文字列に変換
[string]$secure_password = ConvertFrom-SecureString -SecureString (ConvertTo-SecureString $pass -AsPlainText -Force)

# 設定ファイル生成
[xml]$xml_doc = New-Object system.Xml.XmlDocument
$xml_doc.LoadXml("<?xml version=`"1.0`" encoding=`"utf-8`"?><config><username></username><password></password></config>")
$xml_doc.config.username = $uesr
$xml_doc.config.password = $secure_password
$xml_doc.Save($config_file_path)

# 設定ファイル読み込み
$config_data = [xml](Get-Content $config_file_path)
Write-Host $config_data.config.username
Write-Host $config_data.config.password # 読み込んだ時点ではSecureStringの文字列になっている

# SecureStringを復号
try{
  $decrypt_password = [System.Runtime.InteropServices.Marshal]::PtrToStringAuto([System.Runtime.InteropServices.Marshal]::SecureStringToBSTR((ConvertTo-SecureString -String $config_data.config.password)))
  Write-Host $decrypt_password
}
Catch{
  Write-Host "password is invalid"
}
passwordを画面上のPasswordBoxから取得する場合はSecureStringが取得できるので
ConvertFrom-SecureString -SecureString (PasswordBox.SecurePassword)
で取得できます。
開発環境
PowerShellの開発はVisual Studio Codeに拡張機能を追加するのが使いやすいです。
インストーラー無し版も提供されているので管理者権限が無い環境でも動くのは助かります。
Portable版ではないから環境は汚れますが、自分のユーザーフォルダの下だけなので気にならないです。
ハマったこと
日本語を扱おうとすると文字コードによる問題がいくつか発生していました。
UTF8で保存したスクリプトだと正規表現がうまく動作しない場合があり、UTF8 with BOMだとうまく動作しています。
VS CodeでPS1ファイルを開く場合もUTF8だと文字化けするので、推奨文字コードがUTF8 with BOMなのかも?
UTF8 with BOMにしてからは日本語で問題発生していません。
私PowerShellだけど…シリーズ
私PowerShellだけど「送る」からファイルを受け取りたい(コンテキストメニュー登録もあるよ)
私powershellだけどタスクトレイの片隅でアイを叫ぶ
私PowerShellだけど子を持つ親になるのはいろいろ大変そう
私PowerShellだけどあなたにトーストを届けたい(プログレスバー付)
私Powershellだけど日付とサイズでログを切り替えたい(log4net)
私PowerShellだけどスクリプトだけでサービス登録したい
私PowerShellだけどスクリーンショットを撮影したい
私PowerShellだけどマウスカーソル付きのスクリーンショットを撮影したい
私PowerShellだけどスリープ抑制したい
