この記事はMackerel Advent Calendar 2015 18日目の記事であり、
ESP8266 Advent Calendar 2015 18目の記事でもあります。
ESP-WROOM-02って何?
一言で言えばWiFi(IEEE802.11b/g/n)に対応した電子工作向け無線LANモジュールです。IoT向けと謳われており、Arduinoなどのマイコンと連携しインターネット上につなげる事ができたりします。
ですが単体でもマイコンとしての機能を持っており、A/DコンバータやGPIOなどの入出力を搭載しているのでセンサなどを取り付けてサーバに送信することも可能です。
世間的にはESP8266と呼ばれており、それを国内で使えるように技適を取ってパッケージングしたものの一つがESP-WROOM-02です。Cerevoやスイッチサイエンス、秋月電子などで安価に売られています。
http://cerevo.shop-pro.jp/?pid=91608654
https://www.switch-science.com/catalog/2346/
http://akizukidenshi.com/catalog/g/gM-09607/
ですがモジュールのままだとブレッドボード上で実験がしにくいので私は以下のブレークアウト基板を使っています。
この記事のゴール
- ESP-WROOM-02に温湿度計(DHT11)をつなぎ、Mackerelへメトリクスとして送る
Step.1 Arduino化
ESP-WROOM-02は買ってきてつなげてみるとATコマンドを受け付けて他のマイコンから操作するようなプログラムが書き込まれています。
ですが、それを上書きしてArduino化します。
そのためにはそれぞれのピンをVCCに繋げたりGNDに繋げたりしないといけないのですが、以下の記事が詳しいです。
あと言うのを忘れてましたが、モジュール本体の他にUSB-シリアル変換モジュールが必要です。
例として以下のモジュールがあります。
あとコイツの3.3V電源だとちょっと心もとないので手持ちのArduino M0+の3V3電源から拝借しました。他の例では三端子レギュレータでUSBの5Vから3.3Vへ降圧するケースが多いようです。
また、Arduinoのプログラムを書き込むソフトウェアの準備も必要です。
以下の記事が詳しいです。
技適済み格安高性能Wi-FiモジュールESP8266をArduinoIDEを使ってIoT開発する為の環境準備を10分でやる方法
さてここまでくると適宜Lチカなどをやってみたくなります。
IO12にLEDと適当な抵抗を直接で繋いでGNDに落とします。
以下のプログラムを書き込んでみます。
void setup() {
  pinMode(12, OUTPUT);
}

void loop() {
  digitalWrite(12, HIGH);
  delay(1000);
  digitalWrite(12, LOW);
  delay(1000);
}
これで書き込みます。書き込むときは一旦電源を引っこ抜いて、IO0をGNDに接続し、またRSTと抵抗を介してVCCにつなげてから電源を入れます。
その後にArduino IDEからプログラムを書き込みます。
これで1秒毎にLEDがチカチカしたら成功です。
Step.2 WiFiアクセスポイントにつなぐ
以下のコードでWiFiアクセスポイントにつなげるようになります。
# include <ESP8266WiFi.h>
# include <ESP8266HTTPClient.h>

const char* ssid = "...";
const char* password = "...";

void setup() {
  pinMode(12, OUTPUT);

  Serial.begin(115200);
  delay(10);
  Serial.println("booted!");

  WiFi.begin(ssid, password);
  while (WiFi.status() != WL_CONNECTED) {
    delay(500);
    Serial.print(".");
  }
}

void loop() {
  if(WiFi.status() == WL_CONNECTED) {
    digitalWrite(12, HIGH);
  } else {
    digitalWrite(12, LOW);
    Serial.println("not connected");
  }
  delay(500);
}
WiFiのSSIDとパスワードは適宜入れ替えてください。また、シリアルコンソールでデバッグログを吐いているので、Arduino IDEのツール > シリアルモニタを開いて改行コードをCRおよびLFにし、ボーレートを115200bpsにすればログが見られます。
WiFiアクセスポイントに無事繋がるとLEDが光るようになりますのでお試しください。
Step3. HTTPリクエストを行う
最近esp8266/ArduinoにHTTPクライアントのライブラリが組み込まれたようですのでそれを使用してみます。
# include <ESP8266WiFi.h>
# include <ESP8266HTTPClient.h>

const char* ssid = "...";
const char* password = "...";

void setup() {
  pinMode(12, OUTPUT);

  Serial.begin(115200);
  delay(10);
  Serial.println("booted!");

  WiFi.begin(ssid, password);
  while (WiFi.status() != WL_CONNECTED) {
    delay(500);
    Serial.print(".");
  }
}

void requestURI() {
  HTTPClient http;
  http.begin("http://192.168.1.xx:5000/");
  int httpCode = http.GET();
  if(httpCode) {
      Serial.printf("[HTTP] GET... code: %d\n", httpCode);

      if(httpCode == 200) {
          String payload = http.getString();
          Serial.println(payload);
      }
  } else {
      Serial.printf("[HTTP] GET... failed, error: %d\n", httpCode);
  }

  http.end();
  delay(5000);
}

void loop() {
  if(WiFi.status() == WL_CONNECTED) {
    digitalWrite(12, HIGH);
    requestURI();
  } else {
    digitalWrite(12, LOW);
    Serial.println("not connected");
  }
  delay(500);
}
ローカルのPCで何かしらのサーバを立ち上げます。IPアドレスとポートは適宜読み替えてください。僕はPerlで以下のコマンドで立ち上げました。
$ plackup -e 'sub { return ["200", ["Content-Type", "text/plain"], ["OK"]] }'
そんな感じで以下の様なシリアルモニタを開くと以下の様な感じになると思います。
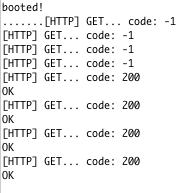
上の例では途中からサーバを立ち上げたので途中までエラーになっています。
Step4. 温度計の値を取る
今回用いるセンサは以下のものです。(自分の手持ちはGroveの温湿度計モジュールですが中身は一緒です)
http://akizukidenshi.com/catalog/g/gM-09876/
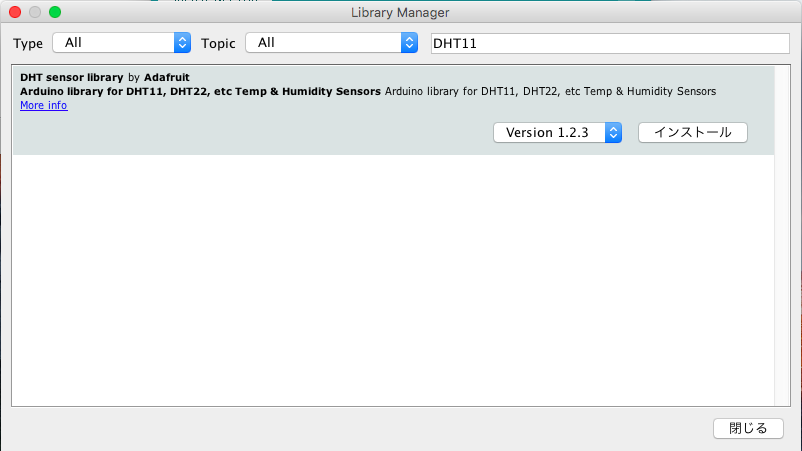
Arduino IDEにライブラリをインストールします。スケッチ > Include Library > Manage Libraries...から以下の様な画面でDHT11と検索しインストールします。
配線は電源はVCCとGNDにそのままつなぎ、SIGをIO4につなぎます。
そして以下のプログラムを書き込みます。
設定以外は https://github.com/adafruit/DHT-sensor-library/blob/master/examples/DHTtester/DHTtester.ino からのコピペです。
# include <DHT.h>

# define DHTTYPE DHT11
# define DHTPIN 4

DHT dht(DHTPIN, DHTTYPE);

void setup() {
  Serial.begin(115200);
  dht.begin();
  Serial.println("booted!");
}

void loop() {
  // Wait a few seconds between measurements.
  delay(2000);

  // Reading temperature or humidity takes about 250 milliseconds!
  // Sensor readings may also be up to 2 seconds 'old' (its a very slow sensor)
  float h = dht.readHumidity();
  // Read temperature as Celsius (the default)
  float t = dht.readTemperature();
  // Read temperature as Fahrenheit (isFahrenheit = true)
  float f = dht.readTemperature(true);

  // Check if any reads failed and exit early (to try again).
  if (isnan(h) || isnan(t) || isnan(f)) {
    Serial.println("Failed to read from DHT sensor!");
    return;
  }

  // Compute heat index in Fahrenheit (the default)
  float hif = dht.computeHeatIndex(f, h);
  // Compute heat index in Celsius (isFahreheit = false)
  float hic = dht.computeHeatIndex(t, h, false);

  Serial.print("Humidity: ");
  Serial.print(h);
  Serial.print(" %\t");
  Serial.print("Temperature: ");
  Serial.print(t);
  Serial.print(" *C ");
  Serial.print(f);
  Serial.print(" *F\t");
  Serial.print("Heat index: ");
  Serial.print(hic);
  Serial.print(" *C ");
  Serial.print(hif);
  Serial.println(" *F");
}
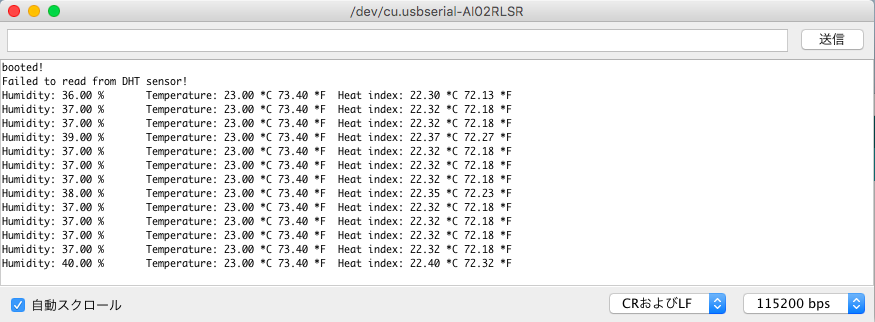
ちゃんと動いていそうな感じがします。
Step5. Mackerelにメトリクスを送信する
github.com/mackerelio/mkrを導入しホストを作成します。
$ go get github.com/mackerelio/mkr
$ export MACKEREL_APIKEY=...
$ mkr create --status maintenance -R Maker:esp esp-01
ここで与えられるホストIDを覚えておいてください。
メトリクスを送るAPIのドキュメントを見ながらコードを書いていきます。
APIで値が計測された日時を送らないといけないため、NTPで現在時刻を補正するコードを入れました(コピペ元)。なのでごちゃごちゃしちゃってますが以下の様な感じです。
# include <ESP8266WiFi.h>
# include <WiFiUdp.h>
# include <Time.h>
# include <TimeLib.h>
# include <DHT.h>
# include <ESP8266HTTPClient.h>

const char* ssid = "...";
const char* pass = "...";

unsigned int localPort = 2390;      // local port to listen for UDP packets

/* Don't hardwire the IP address or we won't get the benefits of the pool.
 *  Lookup the IP address for the host name instead */
//IPAddress timeServer(129, 6, 15, 28); // time.nist.gov NTP server
IPAddress timeServerIP; // time.nist.gov NTP server address
const char* ntpServerName = "time.nist.gov";

const int NTP_PACKET_SIZE = 48; // NTP time stamp is in the first 48 bytes of the message

byte packetBuffer[ NTP_PACKET_SIZE]; //buffer to hold incoming and outgoing packets

unsigned long sendNTPpacket(IPAddress& address);
time_t getNtpTime();
void sendMetric(float h, float t);

// A UDP instance to let us send and receive packets over UDP
WiFiUDP udp;

# define DHTTYPE DHT11
# define DHTPIN 4

DHT dht(DHTPIN, DHTTYPE);

# define MACKEREL_APIKEY "..."
# define MACKEREL_HOST_ID "..."

void setup()
{
  Serial.begin(115200);
  Serial.println();
  Serial.println();

  // We start by connecting to a WiFi network
  Serial.print("Connecting to ");
  Serial.println(ssid);
  WiFi.begin(ssid, pass);

  while (WiFi.status() != WL_CONNECTED) {
    delay(500);
    Serial.print(".");
  }
  Serial.println("");

  Serial.println("WiFi connected");
  Serial.println("IP address: ");
  Serial.println(WiFi.localIP());

  setSyncProvider(getNtpTime);
}

void loop() {
  float h = dht.readHumidity();
  float t = dht.readTemperature();

  // Check if any reads failed and exit early (to try again).
  if (isnan(h) || isnan(t)) {
    Serial.println("Failed to read from DHT sensor!");
    return;
  }

  Serial.printf("epoch:%d", now());
  Serial.print("\thumidity:"); Serial.print(h);
  Serial.print("\ttemperature:"); Serial.print(t);
  Serial.print("\n");
  sendMetric(h, t);
  delay(30000);
}

void sendMetric(float h, float t) {
  time_t epoch = now();
  HTTPClient http;
  http.begin("https://mackerel.io/api/v0/tsdb", "CA D8 2D AD 38 79 68 B1 92 DD BF A9 94 10 54 7C 75 1C E6 95");
  http.addHeader("X-Api-Key", MACKEREL_APIKEY);
  http.addHeader("Content-Type", "application/json");
  String payload = "[";
  String payloadHeader = String("{\"time\":" + String(epoch, DEC) + ",\"hostId\":\"" + MACKEREL_HOST_ID + "\",");
  char hs[16];
  dtostrf(h, 2, 2, hs);
  payload += String(payloadHeader + "\"name\":\"humidity\",\"value\":" + String(hs) + "},");
  char ts[16];
  dtostrf(t, 2, 2, ts);
  payload += String(payloadHeader + "\"name\":\"temperature\",\"value\":" + String(ts) + "}]");
  Serial.println(payload);
  int httpCode = http.POST(payload);
  if(httpCode) {
      Serial.printf("[HTTP] POST... code: %d\n", httpCode);

      if(httpCode == 200) {
          String payload = http.getString();
          Serial.println(payload);
      }
  } else {
      Serial.printf("[HTTP] POST... failed, error: %d\n", httpCode);
  }

  http.end();
}

time_t getNtpTime()
{
  udp.begin(localPort);
  //get a random server from the pool
  WiFi.hostByName(ntpServerName, timeServerIP);

  sendNTPpacket(timeServerIP); // send an NTP packet to a time server
  // wait to see if a reply is available
  delay(1000);

  int cb = udp.parsePacket();
  if (!cb) {
    return 0;
  }
  else {
    // We've received a packet, read the data from it
    udp.read(packetBuffer, NTP_PACKET_SIZE); // read the packet into the buffer

    //the timestamp starts at byte 40 of the received packet and is four bytes,
    // or two words, long. First, esxtract the two words:

    unsigned long highWord = word(packetBuffer[40], packetBuffer[41]);
    unsigned long lowWord = word(packetBuffer[42], packetBuffer[43]);
    // combine the four bytes (two words) into a long integer
    // this is NTP time (seconds since Jan 1 1900):
    unsigned long secsSince1900 = highWord << 16 | lowWord;

    // now convert NTP time into everyday time:
    // Unix time starts on Jan 1 1970. In seconds, that's 2208988800:
    const unsigned long seventyYears = 2208988800UL;
    // subtract seventy years:
    unsigned long epoch = secsSince1900 - seventyYears;
    // print Unix time:
    return epoch;
  }
}

// send an NTP request to the time server at the given address
unsigned long sendNTPpacket(IPAddress& address)
{
  Serial.println("sending NTP packet...");
  // set all bytes in the buffer to 0
  memset(packetBuffer, 0, NTP_PACKET_SIZE);
  // Initialize values needed to form NTP request
  // (see URL above for details on the packets)
  packetBuffer[0] = 0b11100011;   // LI, Version, Mode
  packetBuffer[1] = 0;     // Stratum, or type of clock
  packetBuffer[2] = 6;     // Polling Interval
  packetBuffer[3] = 0xEC;  // Peer Clock Precision
  // 8 bytes of zero for Root Delay & Root Dispersion
  packetBuffer[12]  = 49;
  packetBuffer[13]  = 0x4E;
  packetBuffer[14]  = 49;
  packetBuffer[15]  = 52;

  // all NTP fields have been given values, now
  // you can send a packet requesting a timestamp:
  udp.beginPacket(address, 123); //NTP requests are to port 123
  udp.write(packetBuffer, NTP_PACKET_SIZE);
  udp.endPacket();
}
Arduino初心者ゆえ雑な感じですが送れているようです。
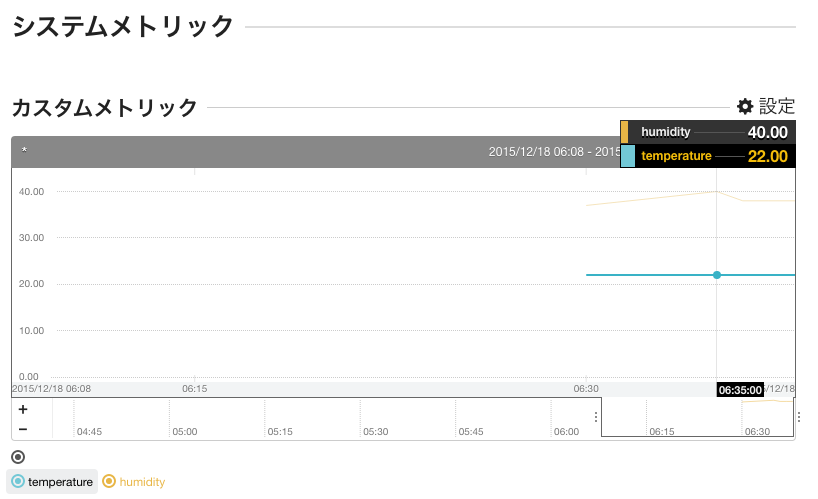
そんなこんなでMackerelでIoTってみる記事でした!
明日は @y_uuki さんです!