はじめに
タイトルの通り、簡易版instagramのアプリを作っていきます。
下記の工程に分けて記事を執筆していきますので、順を追って読んでいただけたらなと思います。
①アプリ作成〜ログイン機能の実装
②写真投稿機能の実装
③[ユーザーページの実装]
(https://qiita.com/maca12vel/items/c716702b02f977303011)
④[フォロー機能の実装]
(https://qiita.com/maca12vel/items/2760d33f3683fac91de5) ←イマココ
⑤投稿削除機能の実装
モデル作成
※以下、アプリケーションのディレクトリで
rails g model follow user:belongs_to target_user:belongs_to
マイグレーションファイルを修正します。
target_userのforeign_keyをfalseに。
class CreateFollows < ActiveRecord::Migration[6.0]
  def change
    create_table :follows do |t|
      t.belongs_to :user, null: false, foreign_key: true
      t.belongs_to :target_user, null: false, foreign_key: false

      t.timestamps
    end
  end
end
修正できたらrails db:migrateを実行します。
リレーションの設定
followモデルにリレーションを設定していきます。
target_userにclass_nameとforeign_keyを指定します。
class Follow < ApplicationRecord
  belongs_to :user
  belongs_to :target_user, class_name: 'User', foreign_key: 'target_user_id'
end
userモデルにもリレーションを設定していきます。
active_relationships
passive_relationships
を記述していきます。
class User < ApplicationRecord
  devise :database_authenticatable, :registerable,
         :recoverable, :rememberable, :validatable

  has_many :active_relationships, class_name: 'Follow', foreign_key: 'user_id'
  has_many :passive_relationships, class_name: 'Follow', foreign_key: 'target_user_id'
  has_many :followings, through: :active_relationships, source: :target_user
  has_many :followers, through: :passive_relationships, source: :user
  has_many :photos
end
これでリレーションは完成です。
followsコントローラ作成
rails g controller follows
ルーティングの設定も忘れずに行います。
Rails.application.routes.draw do
  root 'homes#index'

  devise_for :users

  resources :photos
  resources :users do
    resource :follow # ←ここ
  end
end
これでURLはuser/user_id/followという感じになると思います。
次に、followsコントローラを編集していきます。
class FollowsController < ApplicationController
  before_action :authenticate_user!

  def create
    current_user.active_relationships.create(target_user_id: params[:user_id])

    redirect_to [:user, {id: params[:user_id] }]
  end

  def destroy
    current_user.active_relationships.find_by(target_user_id: params[:user_id]).destroy

    redirect_to [:user, {id: params[:user_id] }]
  end
end
before_action :authenticate_user!とすることで、
ログインしているユーザーのみ「フォロー/フォロー解除」することができます。
createアクションでフォローの動きを設定します。
リダイレクト先は[:user, {id: params[:user_id] }]として、
userのuser_id、つまり ユーザーの詳細ページに遷移するよう設定しています。
destroyアクションでフォロー解除の動きを設定します。
createではなく、まずfind_byでフォロー中のレコードを取得します。
そして、destroyで取得してきたレコードを破壊します。
リダイレクト先は同じで大丈夫だと思います。
viewファイルにフォロー/フォロー解除リンクを作成
<h3><%= @user.email %></h3>

# ↓↓↓↓↓↓↓↓↓↓ ここから ↓↓↓↓↓↓↓↓↓↓
<% if current_user.active_relationships.exists?(target_user_id: @user.id) %>
  <%= link_to 'unfollow', [@user, :follow], method: :delete %>
<% else %>
  <%= link_to 'follow', [@user, :follow], method: :post %>
<% end %>
# ↑↑↑↑↑↑↑↑↑↑ ここまで ↑↑↑↑↑↑↑↑↑↑

<div>
  <%= link_to 'followings', [@user, :followings] %>
</div>
<div>
  <%= link_to 'followers', [@user, :followers] %>
</div>

<% @user.photos.each do |photo| %>
  <div>
    <p><%= photo.caption %></p>
    <%= image_tag photo.image %>
  </div>
<% end %>
条件分岐で、
current_userがユーザーを既にフォローしていた場合は
フォロー解除用のリンクを表示させます。→ method: delete
まだフォローしていない場合はフォロー用のリンクを表示させます。→ method: post
ここまでで一度ブラウザで確認してみます。
下記のようになっていれば成功です。
ユーザー詳細ページにとび、followを押すとフォロー完了。
そして、followがunfollowに変わります。
unfollowを押すとフォロー解除となり、followに戻ります。

ただ、この状態だとログインしていないユーザーが
URLに直接アクセスするとエラーが起きてしまいます。↓
これは条件分岐でcurrent_userとしているためです。
ですので、更に条件分岐を追加していきます。
先ほどの条件分岐を↓で挟みます。
<% if user_signed_in? && current_user != @user %>
<% end %>
<h3><%= @user.email %></h3>

<% if user_signed_in? && current_user != @user %> # ←ここ
  <% if current_user.active_relationships.exists?(target_user_id: @user.id) %>
    <%= link_to 'unfollow', [@user, :follow], method: :delete %>
  <% else %>
    <%= link_to 'follow', [@user, :follow], method: :post %>
  <% end %>
<% end %> # ←ここ

<div>
  <%= link_to 'followings', [@user, :followings] %>
</div>
<div>
  <%= link_to 'followers', [@user, :followers] %>
</div>

<% @user.photos.each do |photo| %>
  <div>
    <p><%= photo.caption %></p>
    <%= image_tag photo.image %>
  </div>
<% end %>
ユーザーがサインインしている
且
current_userがユーザー詳細ページのユーザーでないこと
という条件分岐を追記したことになります。
これで、サインインしていないと「フォロー/解除」のリンクが表示されないようになります。
また、自分の詳細ページに飛んだ時も表示されないようになります。
これでフォロー機能はほとんど完成ですが、
最後に、フォローされているユーザーの一覧を表示させたいと思います。
followings/followersコントローラの作成
rails g controller followings
rails g controller followers
ルーティングも忘れずに設定します。
Rails.application.routes.draw do
  root 'homes#index'

  devise_for :users

  resources :photos
  resources :users do
    resource :follow
    resources :followings # ←ここ
    resources :followers # ←ここ
  end
end
コントローラにもそれぞれ記述していきます。
class FollowingsController < ApplicationController
  def index
    @followings = User.find(params[:user_id]).followings
  end
end
class FollowersController < ApplicationController
  def index
    @followers = User.find(params[:user_id]).followers
  end
end
そしてviewを作成していきます。
それぞれlink_toでfollowing/followerのemailを表示して、
ユーザー詳細ページへのリンクを作成しています。
<% @followings.each do |following| %>
  <div>
    <%= link_to following.email, [following] %>
  </div>
<% end%>
<% @followers.each do |follower| %>
  <div>
    <%= link_to follower.email, [follower] %>
  </div>
<% end%>
pathの指定は
[following]→user_followings_path
[follower]→user_followers_path
でも良いのでわかりやすい方で。
最後にユーザー詳細ページにリンクを作成します。
<h3><%= @user.email %></h3>

<% if user_signed_in? && current_user != @user %>
  <% if current_user.active_relationships.exists?(target_user_id: @user.id) %>
    <%= link_to 'unfollow', [@user, :follow], method: :delete %>
  <% else %>
    <%= link_to 'follow', [@user, :follow], method: :post %>
  <% end %>
<% end %>

# ↓↓↓↓↓↓↓↓↓↓ ここから ↓↓↓↓↓↓↓↓↓↓
<div>
  <%= link_to 'followings', [@user, :followings] %>
</div>
<div>
  <%= link_to 'followers', [@user, :followers] %>
</div>
# ↑↑↑↑↑↑↑↑↑↑ ここまで ↑↑↑↑↑↑↑↑↑↑

<% @user.photos.each do |photo| %>
  <div>
    <p><%= photo.caption %></p>
    <%= image_tag photo.image %>
  </div>
<% end %>
表示させるページのpathは
@userのfollowings
@userのfollowers
となります。
これで動作を確認してみます。
以下のようになっていれば成功です。
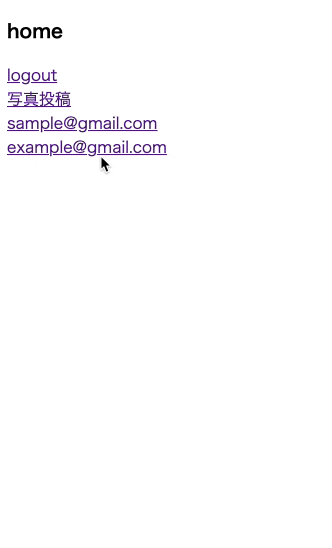
速くててわかりづらいんですが、sampleでログインしている状態から始まっています。
①sampleがexampleの詳細ページに飛びフォローする。
②sampleの詳細ページでfollowingsのリンクへ飛ぶと、今フォローしたexampleが確認できる。
③exampleの詳細ページでfollowersのリンクへ飛ぶと、sampleが確認できる。
以上です。お疲れ様でした。